



How to Create an Efficient Mudroom: A Step-by-Step Renovation Guide
A mudroom is one of the hardest-working spaces in a house when it is planned properly. It catches wet boots, backpacks, sports gear, coats, dog leashes, umbrellas, and everything else that usually gets dropped in the nearest hallway or kitchen corner. More importantly, it creates a controlled transition between outside and inside, which helps reduce mess, improve comfort, and support better day-to-day organization. If your current entry area always feels cluttered, drafty, or chaotic, a mudroom renovation can solve several problems at once.
Table Of Content
- Why an Efficient Mudroom Matters
- Step 1: Define What the Mudroom Needs to Do
- Questions to Answer Before You Renovate
- Step 2: Measure the Space and Build a Realistic Layout
- Step 3: Check Structural, Electrical, Ventilation, and Code Issues
- Step 4: Improve the Exterior Door and Air Sealing First
- Simple Entry Performance Upgrades That Matter
- Step 5: Choose Flooring and Wall Finishes That Can Take Abuse
- Step 6: Design Storage Around Real Household Use
- Storage Elements Worth Considering
- Step 7: Build or Install the Core Features
- Step 8: Add Lighting, Ventilation, and Everyday Utility
- Step 9: Finish With Organization Systems That Match Your Routine
- Common Mudroom Renovation Mistakes to Avoid
- Design Choices That Add Personality Without Hurting Function
- Budgeting for an Efficient Mudroom Renovation
- Final Thoughts: Build the Mudroom Around Daily Life
The biggest mistake people make is treating a mudroom as a decorating project instead of a performance and workflow project. Nice hooks and a new bench can help, but they are not the real foundation of an efficient mudroom. The room needs to support traffic flow, hold what your household actually uses, stand up to moisture and dirt, and work with the exterior door rather than against it. If you focus on function first, the finished space will look better because it will make sense.
This guide takes a practical, step-by-step approach to designing and renovating a mudroom that fits real family life. It covers how to evaluate the space, what to store, how to improve the exterior entry, what materials hold up best, and how to build in storage that earns its keep. It also covers energy and indoor air quality details that many homeowners overlook, even though they make a noticeable difference in comfort and cleanliness.
In colder Canadian and North American climates, the mudroom can act as a buffer zone that helps reduce drafts and limits how much wet air, cold air, dirt, and debris move into the main living space. U.S. Department of Energy guidance continues to stress that air sealing and weatherstripping are among the most cost-effective improvements for comfort and energy performance. A mudroom is the right place to take that advice seriously because the entry door is often one of the leakiest points in the house. A better mudroom is not just more attractive. It can also be more durable, healthier, and easier to live with every day.
Why an Efficient Mudroom Matters
People often think of a mudroom as a luxury feature found in larger custom homes, but that is a misconception. In practice, even a small mudroom or a smartly renovated entry nook can improve how the house functions. It gives you a proper landing zone, keeps wet and dirty items contained, and prevents daily clutter from spreading into the rest of the home. That matters whether you live in a suburban family house, a compact bungalow, or a narrow side-entry home.
There is also a health and cleanliness angle that deserves more attention. Recent NIH guidance points out that shoes can track dirt, pesticides, and other pollutants indoors. A shoe-off mudroom creates a natural place to stop that debris at the door rather than carry it across living-room rugs and kitchen floors. Families with young kids, pets, allergy concerns, or heavy outdoor activity usually notice the benefit quickly because cleaning becomes easier and the house stays cleaner longer.
Performance matters too. The Department of Energy notes that reducing air leakage can improve comfort, durability, indoor air quality, and heating and cooling efficiency. If your entry door leaks cold air in winter or hot humid air in summer, a mudroom renovation is a good time to correct it. Caulking and weatherstripping are simple air-sealing measures that can sometimes pay for themselves quickly, and the comfort difference near the door is often immediate.
A good mudroom should do three jobs well: create a landing zone, provide storage, and support cleanup. If one of those jobs is missing, the room usually ends up frustrating to use.
Step 1: Define What the Mudroom Needs to Do
Before you think about finishes, colors, or built-ins, get clear on how the space will be used. Walk through a normal week in your household and write down what comes in and out of that door. Include coats, shoes, lunch bags, backpacks, sports gear, umbrellas, purses, dog supplies, work boots, and seasonal items like snow pants or rain gear. The point is to design for reality, not for a magazine photo.
Next, look at traffic flow. Ask who uses the door most often and when the entry gets congested. A mudroom that serves one or two adults has different needs than one used by kids rushing to school, a dog coming in from the yard, and a parent carrying groceries at the same time. Think about how people move through the space, where they need to stop, and whether doors can swing open without hitting storage or blocking movement.
It helps to break the room into three practical zones. The first is the landing zone, where people first step in and set things down. The second is storage, where those items live when they are not in use. The third is cleanup, where you handle wet gear, muddy shoes, snow, pet mess, or anything else that should not go farther into the home. Every efficient mudroom has these three functions, even if they are packed into a small footprint.
If the space needs to act as a true air-lock between outdoors and indoors, take that seriously from the start. In colder climates this can make the adjacent rooms feel more comfortable and reduce the volume of outside air entering the house. It also means you should pay extra attention to the door assembly, flooring, moisture control, and any wall cavities you open during the renovation.
Questions to Answer Before You Renovate
- Which exterior door does the household actually use most often?
- How many people need daily storage here?
- Do you need room for pets, strollers, sports gear, or work equipment?
- Will laundry functions be combined with the mudroom?
- Does the entry feel drafty, damp, dark, or hard to clean now?
- Do you need seating for kids, older adults, or anyone with mobility concerns?
- Will any changes affect an egress route, stair landing, or door clearance?
Those answers shape every decision that follows. The best mudroom for your house is not the one with the most cabinetry. It is the one that solves the right problems in the right order.
Step 2: Measure the Space and Build a Realistic Layout
Once you know what the mudroom must do, measure everything carefully. Record wall lengths, ceiling height, window locations, baseboard heaters, floor vents, door swings, thresholds, and any obstacles like electrical panels or plumbing chases. If you are working with a tight footprint, even a few inches matter. Good mudroom layouts feel simple when finished, but they depend on accurate planning.
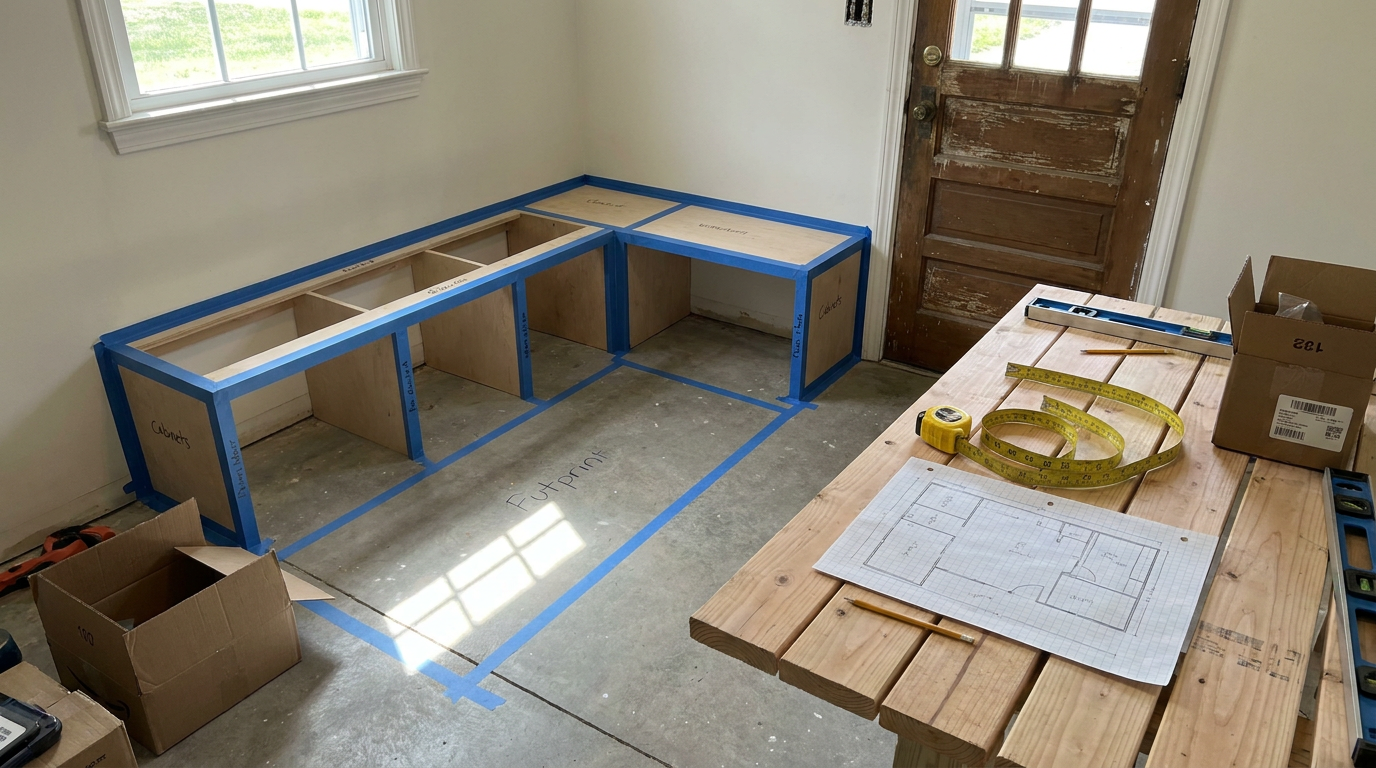
Use painter tape on the floor and walls to mock up the depth of benches, cabinets, and circulation paths. This is one of the easiest ways to catch layout problems before you buy or build anything. A bench that looks fine on paper may feel too deep once it narrows the walking path. A row of hooks may interfere with the door swing or make the space feel cramped when coats are hanging.
Most built-in benches run around 16 to 20 inches deep, while tall storage cabinets often need around 18 to 24 inches depending on what they hold. Open cubbies can be shallower for kids’ items, but heavy winter gear usually needs more room. Keep enough clear floor area so people can step in, shut the door, remove shoes, and move around without tripping over each other. In a hard-working mudroom, congestion is the enemy.
Also think vertically. A small mudroom becomes much more useful when the wall height is working for you. Upper cabinets, high shelves for seasonal bins, and double rows of hooks can add storage without eating floor space. Just make sure frequently used items stay within easy reach for the people who need them.
Step 3: Check Structural, Electrical, Ventilation, and Code Issues
Many mudroom renovations are straightforward, but not all of them are purely cosmetic. If you are moving walls, relocating the exterior door, adding windows, changing flooring heights, or tying the mudroom into a laundry area, check whether permits or professional input are needed. Local code rules matter, especially if the mudroom affects an exit route, stair clearance, landing dimensions, or accessibility. This is particularly relevant as code updates in Canada and elsewhere place more emphasis on accessibility and energy performance in alterations to existing buildings.
Electrical planning is often underestimated. Mudrooms benefit from good lighting because people use them in dim early mornings, wet weather, and winter evenings. You may want a ceiling light, under-cabinet or cubby lighting, one or two outlets for charging devices, and possibly a dedicated outlet for a boot dryer, vacuum, or pet grooming tools. If you are combining the mudroom with laundry, electrical needs become even more important.
Ventilation deserves a look too. A mudroom traps moisture by design, so if the space stays damp, smells musty, or lacks airflow, solve that during renovation. In some homes a simple upgrade like better air circulation, a transfer grille strategy, or nearby exhaust can help moisture dry out faster. The goal is to contain wet mess without turning the room into a damp pocket that wears out finishes and encourages mildew.
If the existing structure shows signs of water intrusion, soft subfloor, failing door trim, or cold-air leakage around the frame, stop and repair those issues before adding cabinetry. Built-ins installed over hidden moisture or air-leak problems only make later repairs more expensive.

Step 4: Improve the Exterior Door and Air Sealing First
If the mudroom connects directly to the outdoors, the exterior door deserves serious attention. This is one of the most practical upgrades in the whole project because it affects comfort, energy use, and moisture control. The Department of Energy recommends weatherstripping for movable components like doors and operable windows, and this is exactly the kind of spot where it pays off. A leaky door can make the whole entry feel unpleasant no matter how nice the storage looks around it.
Start by checking the door’s condition, fit, and operation. Close the door and look for light around the edges. Feel for drafts near the jambs, threshold, and bottom sweep. If the door rubs, sticks, or fails to latch tightly, correct the alignment before installing new weatherstripping. Door fit matters because seals should reduce infiltration without making the door hard to operate.
Replace worn weatherstripping around the jamb and install or adjust a door sweep if needed. Inspect the threshold and the area where the jamb meets the wall. If trim is being removed during renovation, this is also a good time to seal gaps between the rough opening and frame with appropriate materials. DOE guidance consistently frames caulking and weatherstripping as simple, cost-effective air-sealing upgrades, and this is one of the clearest opportunities to apply that advice.
If the door itself is in poor condition, replacement may be worth considering. An old warped door or a badly installed prehung unit can keep causing drafts and water issues no matter how much patchwork you do. When replacing a door, make sure flashing, sill details, and frame sealing are done correctly. Fancy hardware is optional. A tight, durable, well-installed door is not.
Simple Entry Performance Upgrades That Matter
- New compression weatherstripping on the jambs and head
- A properly fitted door sweep or bottom seal
- Sealing gaps at trim and casing when accessible
- Repairing damaged threshold or sill components
- Checking for water stains that suggest flashing problems
- Adjusting hinges and strike plate for a snug, smooth close
These upgrades may not be the visible part of the renovation, but they often provide some of the best value. The mudroom feels warmer, cleaner, and more controlled right away, which is the whole point of the space.
Step 5: Choose Flooring and Wall Finishes That Can Take Abuse
Mudrooms fail fast when finishes are chosen for looks alone. This room gets hit with water, grit, salt, mud, pet claws, and repeated cleaning. Flooring needs to handle that without swelling, staining, becoming slippery, or looking worn out after one season. In most homes, moisture-resistant and easy-to-clean materials are the right call.
Porcelain tile is a strong option because it is durable, highly water resistant, and available in textures that improve slip resistance. Luxury vinyl tile or plank can also work well if it is rated for wet areas and installed over a sound, level substrate. Sheet vinyl remains a practical choice in budget-conscious projects because it is easy to clean and handles moisture well when installed properly. Natural hardwood is usually a poor fit for a hard-working mudroom unless the space is very controlled and lightly used.
Pay attention to grout, transitions, and base details. Dark or medium-tone grout often hides dirt better than bright white. Baseboards should be durable and easy to wipe down, and in wet climates it can make sense to use more moisture-tolerant trim materials near the floor. If flooring height changes at the entry or connects to adjacent rooms, plan transitions carefully so they are safe and not prone to trapping water or debris.
For walls, washable paint in a durable finish is usually the practical choice. Where splash and abrasion are common, consider beadboard, paneling, tile wainscot, or another tough finish that protects the lower wall. The goal is not to make the room look rugged for its own sake. The goal is to choose materials that still look decent after years of boots, bags, and rushed weekday use.
Step 6: Design Storage Around Real Household Use
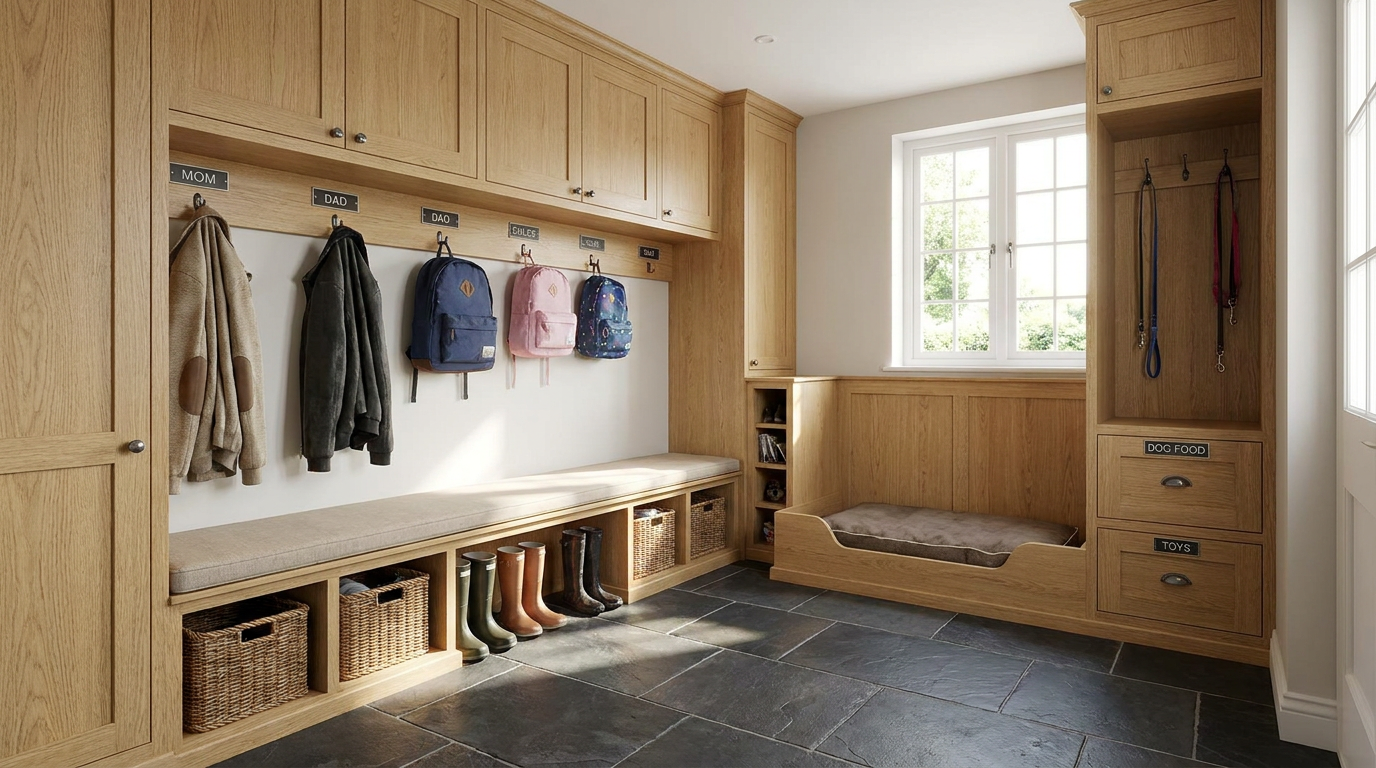
Storage is where many mudroom projects either become highly efficient or slowly turn into clutter traps. Start by assigning space to each person who uses the room regularly. A family of five usually needs more than one shared coat rail and a small basket for shoes. Individual cubbies, hooks, drawers, or locker-style sections make the room easier to keep organized because every item has a home.
Open storage works well for daily access, especially for backpacks, coats, and shoes that need to dry out. Closed storage is equally useful for reducing visual clutter and containing seasonal gear, cleaning products, pet supplies, or less attractive items. The best mudrooms usually combine both. They provide easy reach where speed matters and hidden storage where calm and order matter.
Bench seating is more than a style feature. It gives people a place to remove boots safely and comfortably, which makes the room more usable for children, older adults, and anyone juggling bags. A bench with storage below is one of the highest-value components you can add. Drawers, pull-out trays, or open shoe cubbies under the bench all work well depending on how tidy your household is and how much ventilation wet footwear needs.
If pets are part of the picture, plan for them directly. That may mean a drawer for leashes and towels, a tray area for food and water, or a small wash station if space allows. If the mudroom sits beside the laundry room, think about whether cleaning supplies, hampers, or drying racks can be integrated without interfering with the primary traffic path.
Storage Elements Worth Considering
- Individual cubbies for each family member
- Sturdy hooks mounted into blocking or studs
- A bench with drawer or cubby storage below
- Upper cabinets for seasonal overflow
- Closed tall cabinets for brooms, vacuum, or sports gear
- Boot trays or removable mats for wet footwear
- A dedicated drop spot for keys, mail, and wallets
When planning dimensions, avoid oversized storage that steals walking space. It is better to have slightly less cabinetry that works well than too much built-in volume that makes the room hard to use. Utility beats excess every time in a mudroom.
Step 7: Build or Install the Core Features
Once the layout is settled and the shell is ready, move on to the core components in a sensible order. If flooring runs under cabinets, complete that first unless the product and layout call for another sequence. Install wall blocking where hooks, bench supports, and upper cabinets will go. This matters more than many people realize because mudroom storage gets yanked on hard by heavy bags and wet winter gear.
If you are building custom units, keep joinery and materials straightforward. Plywood carcasses, solid face frames, and durable paint-grade finishes are often a practical choice. Built-ins do not need to be ornate. They need to resist wear, hold weight, and stay square. Factory-made cabinets can also work well if they are sized properly and secured well.
Install the bench at a comfortable height, usually around 17 to 19 inches depending on the design. Hooks should be mounted at heights that suit the users. In a family mudroom, a lower row for children and a higher row for adults can make the room function better. Shelving above the hooks is useful for baskets, hats, and off-season overflow, but leave enough breathing room so coats can hang freely.
If you want a more finished built-in look, extend cabinetry or trim intentionally to the walls and ceiling rather than leaving awkward gaps. Those gaps turn into dust shelves and visual clutter. A clean fit makes the room look better and makes cleaning easier, which is exactly the sort of practical improvement a mudroom should deliver.
Step 8: Add Lighting, Ventilation, and Everyday Utility
Lighting can make a mudroom feel either cramped and neglected or calm and easy to use. General overhead lighting is the starting point, but task lighting often improves the room more than people expect. A well-lit bench area makes it easier to put on shoes, sort bags, and see what is in cubbies. Good lighting also helps the space feel safer and more welcoming during dark mornings or late evenings.
Choose fixtures that are easy to clean and provide even light. Recessed lights, flush-mount fixtures, and under-shelf LED strips all work depending on the ceiling height and style of the room. If the space has no daylight, consider color temperature carefully. A harsh blue-white light can make a practical room feel sterile, while a balanced warm white often feels clearer and more comfortable.
Ventilation and drying support are worth including if your climate is wet or snowy. This does not have to mean a major mechanical system. It can mean making sure wet mats can dry, giving shoes airflow, avoiding storage designs that trap moisture, and ensuring the room does not stay cold and damp. If there is a nearby HVAC register, make sure the airflow is not blocked by cabinetry. A room that dries out properly will smell better and preserve materials longer.
Think through small utility details too. A charging shelf, outlet for a cordless vacuum, wall-mounted organizer for mail, or a basket station for gloves can all improve daily use. These are not decorative extras. They are the details that keep the room from becoming a pile-up zone again six months after the renovation is done.
Step 9: Finish With Organization Systems That Match Your Routine
A mudroom can be beautifully built and still fail if the organization system does not fit the household. The final step is to match the storage to real habits. If your kids never put hats on the top shelf, the hats will end up on the floor. If there is nowhere to drop grocery bags or nowhere to stash a dog towel, those items will migrate to the kitchen counter and hallway chair.
Use bins, baskets, labels, trays, and dividers where they actually reduce friction. One labeled bin for each person often works better than a deep shared shelf that becomes a jumble. Boot trays near the door keep water in one place. A small lidded container for sunscreen, bug spray, or pet waste bags may not sound exciting, but it keeps those items from floating around the house.
Seasonal rotation is also important. Mudrooms get overloaded when every coat and pair of shoes for the entire year lives there at once. Keep current-season items in the primary zone and store out-of-season gear elsewhere if possible. This one habit can make a modest mudroom feel twice as functional.
Closed storage has a special role here. While open cubbies are convenient, too much visible storage can make the room feel busy and cluttered even when it is technically organized. A mix of open and closed storage usually creates the best balance between speed, access, and visual calm.
Common Mudroom Renovation Mistakes to Avoid
The first common mistake is underestimating how much space coats and boots really take up. On paper, a row of hooks seems compact. In real life, winter gear is bulky, wet, and not very neat. Leave breathing room between hanging items and make sure there is enough floor area for shoes without turning the room into an obstacle course.
The second mistake is skipping entry performance upgrades. A mudroom with beautiful cabinetry and a drafty, leaking exterior door is only doing half the job. Weatherstripping, air sealing, and door adjustment are functional essentials, not cosmetic add-ons. The Department of Energy continues to emphasize how effective these measures are, and a mudroom is one of the best places to put that guidance to work.
The third mistake is relying entirely on open storage. Open shelves and hooks are useful, but they expose every item to view and can make the room feel messy quickly. Closed cabinets or drawers help contain visual clutter, dirty accessories, and off-season items. The room feels calmer and generally stays more manageable.
The fourth mistake is choosing finishes that cannot handle moisture. Soft wood flooring, delicate paint, and flimsy trim may look fine when installed but age poorly in a wet entry. Durable, washable, moisture-resistant materials save money and frustration over time. The fifth mistake is ignoring code and clearance issues, especially when altering door locations, stair-adjacent landings, or narrow entries.
Design Choices That Add Personality Without Hurting Function
Once the practical decisions are nailed down, this is where you can give the mudroom some character. Paint color, cabinet fronts, tile pattern, hardware, and wall treatment all shape the look of the room. The key is to make those choices after the storage, traffic, moisture, and door details are solved. Style should support the way the room works, not fight it.
Natural wood benches can warm up a room that uses durable tile and painted cabinetry. Patterned floor tile can add personality while still being practical if it hides dirt well. A beadboard or paneled wall can make a simple space feel more finished while protecting the wall from bumps and scuffs. These are good upgrades because they combine appearance with function.
If your home has a traditional style, locker-like millwork and classic hooks may fit naturally. In a more modern home, flat-panel cabinetry and simpler lines may be the better choice. Either way, the most successful mudrooms do not feel overdesigned. They feel intentional, durable, and easy to use. That is what gives them staying power.
Budgeting for an Efficient Mudroom Renovation
Costs vary widely depending on whether you are refreshing an existing entry, building custom storage, replacing the exterior door, or moving walls. The big practical cost drivers are cabinetry, flooring, electrical work, door replacement, finish materials, and any structural or moisture repairs uncovered during demolition. If the room is already enclosed and the layout stays the same, your budget can go much farther toward quality details that improve daily use.
Spend money first on the parts that are hard to change later. That means shell repairs, air sealing, flooring, door performance, lighting rough-in, and strong built-in support. Decorative accessories, fancy baskets, and premium hardware can wait if needed. Homeowners often regret overspending on appearance while cutting corners on function. In a mudroom, the hidden work usually matters more than the visible extras.
There can also be value in looking into current local energy-efficiency incentives or weatherization-related programs if your renovation includes air sealing or door upgrades. Requirements vary by region, but the broader trend in renovation is clear. Performance-aware improvements are getting more attention, and for good reason. Better sealing and better durability pay back in comfort and maintenance reduction even when the room itself is small.
Final Thoughts: Build the Mudroom Around Daily Life
An efficient mudroom is not about copying a showroom display. It is about building a practical transition space that works for the people in your house, in your climate, with your routines. When planned properly, it controls mess, protects the rest of the home, improves comfort near the entry, and makes everyday comings and goings feel less chaotic. That is a lot of value from one relatively small space.
Start with how the room needs to function. Then improve the shell, especially the exterior door and air sealing. Choose finishes that can take water and dirt, and build storage around the actual items your family uses every week. After that, add the personal design choices that make the room feel like part of your home.
If you keep the priorities in the right order, your mudroom will not just look finished on reveal day. It will still be working well years later, which is the real test of any renovation. Good construction is not only about what you can see. In a room like this, it is also about the details behind the walls, around the door, under the floor, and in the way the whole space supports daily life.


No Comment! Be the first one.