


How to Repair Scratches on Your Hardwood Floors: A Step by Step Guide
Hardwood floors carry a particular kind of grace. They warm a room without asking for attention, and they bring depth, grain, and natural character to interiors that aspire to feel both timeless and lived in. Yet even the most beautiful wood floor is vulnerable to the daily choreography of home life. Shoes, chair legs, pet claws, grit from outdoors, and hurried movement can leave behind scratches that interrupt the floor’s smooth finish and visual continuity.
Table Of Content
- Why scratch repair begins with understanding the finish
- Step 1: Assess the scratch with a careful eye
- Questions to ask before choosing a repair method
- Step 2: Clean the area properly before any repair
- Step 3: Repair light surface scratches and micro marring
- How to handle a minor surface scratch
- Step 4: Treat moderate scratches that cut through the finish
- Step 5: Know when recoating is the more elegant solution
- Signs your floor may benefit from recoating
- Step 6: Reserve sanding and refinishing for deeper or widespread damage
- When to call a professional
- Common mistakes that can make scratches worse
- How wood species and sheen affect the visibility of scratches
- How to prevent future scratches without compromising style
- A polished prevention routine
- Building a long term hardwood care routine
- Final thoughts: restore the floor, preserve the room
The good news is that not every scratch calls for dramatic intervention. In many cases, the most elegant solution is also the most restrained one. According to guidance from the National Wood Flooring Association, the first and most important step is determining whether the damage is limited to the finish coat or whether it has cut through the finish and torn the wood fibers beneath. That distinction shapes everything that follows, from a simple polish to a careful spot repair, a recoat, or in more serious cases, refinishing.
This article approaches scratch repair not simply as maintenance, but as preservation of design integrity. A hardwood floor is often one of the largest visual surfaces in a room, and when its sheen, tone, and texture are maintained, the entire interior feels more composed. Here, you will learn how to assess the damage, choose an appropriate repair method, restore a harmonious finish, and prevent future marks with a thoughtful floor care routine.
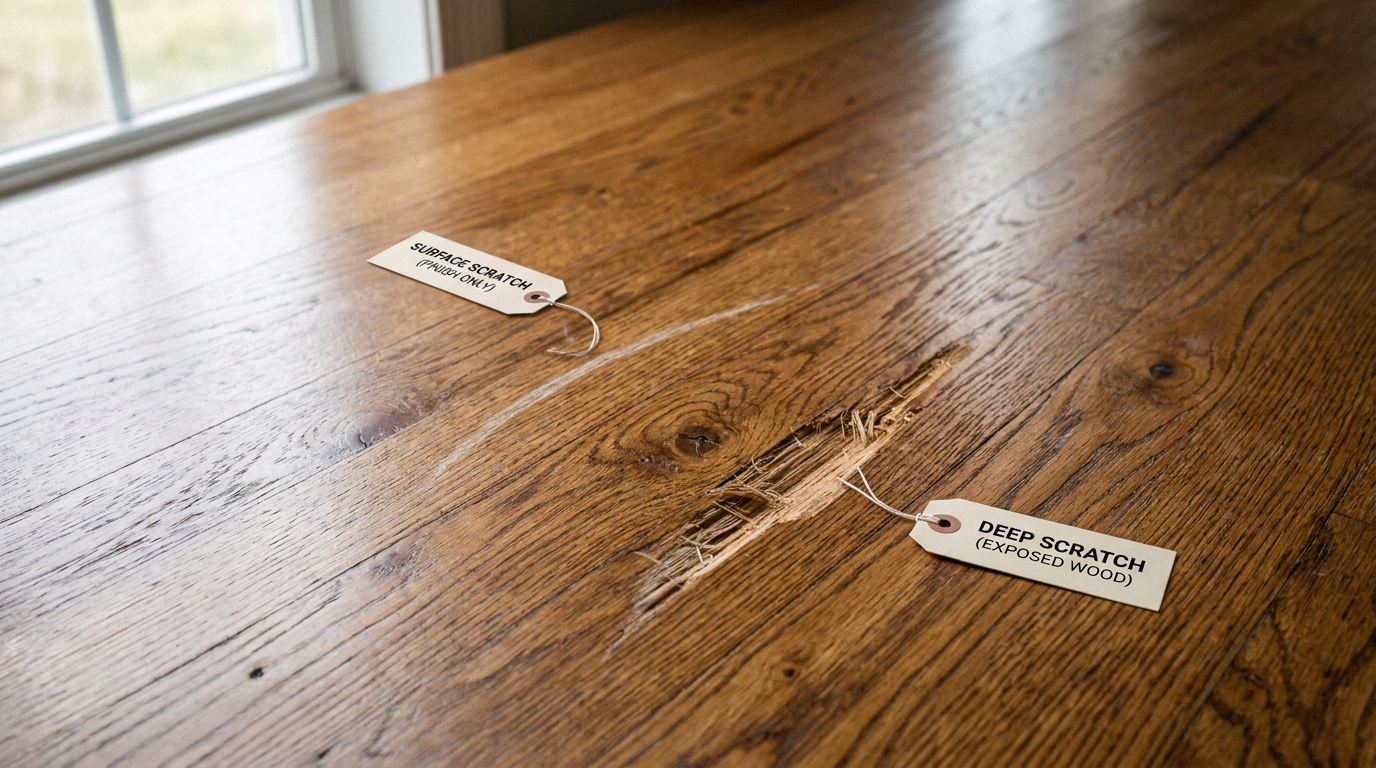
Why scratch repair begins with understanding the finish
Hardwood floors are not all protected in the same way, and that matters greatly when you begin a repair. Some floors have surface finishes such as polyurethane, urethane, or lacquer that sit on top of the wood and create a protective layer with a certain sheen. Others may have penetrating oil finishes that behave differently and often require a more specialized approach. Even among surface finishes, the floor’s gloss level, age, color variation, and wear pattern all affect how well a repair will blend.
A common misconception is that every visible mark in a hardwood floor means the wood itself has been damaged. In reality, many scratches exist only in the top finish layer. These are often called surface scratches or micro marring. They can catch the light and make the floor look worn, but they do not necessarily require sanding or aggressive treatment. Bona’s homeowner guidance notes that polishing can help improve smaller micro scratches and refresh the surface when the protective finish remains largely intact.
Deeper scratches are another matter entirely. When a scratch cuts through the finish and reaches the raw wood, it changes both the floor’s appearance and its vulnerability. Exposed wood can darken, absorb moisture, and fray visually at the edges. In these cases, a concealer or polish alone may not be enough, and a more targeted repair becomes necessary if you want the result to look refined rather than temporary.
Design minded floor care begins with restraint. The best repair is not always the most aggressive one, but the one that restores beauty while preserving as much original finish as possible.
Step 1: Assess the scratch with a careful eye
Before you reach for any product, pause to study the damage. Look at the scratch in natural daylight as well as under evening lighting, because light angle can reveal whether the mark is a shallow scuff in the finish or a more significant groove. Run a fingertip lightly across the area. If the mark feels barely perceptible and appears white or dull only from certain angles, it is likely in the finish. If your nail catches in it or the color appears noticeably lighter or raw, the scratch may extend into the wood.
It is also important to consider the direction of the scratch. Marks that follow the grain often blend more easily after repair, while cross grain scratches tend to be more conspicuous and may require more skill to disguise effectively. The National Wood Flooring Association notes that deeper gouges and cross grain damage are more serious than superficial surface marks, which is why a quick inspection can save you from choosing the wrong method.
Take in the broader condition of the floor as well. Is the scratch an isolated flaw in an otherwise healthy finish, or is it part of widespread dullness, finish wear, and loss of sheen? If the surrounding floor already looks tired, a tiny spot repair may make little visual difference, and a polish or recoat might be a more cohesive answer. Hardwood floors are most beautiful when they read as one continuous plane, so your repair strategy should suit not only the scratch itself but the room’s overall finish condition.
Questions to ask before choosing a repair method
- Is the scratch only in the finish, or does it expose bare wood?
- Is the damage isolated to one small area, or repeated across the room?
- Does the floor have a polyurethane, lacquered, or oil based finish?
- Can you match the floor’s color and sheen convincingly?
- Will a spot repair blend naturally, or will the surrounding floor still look worn?
Step 2: Clean the area properly before any repair
No repair should begin on a dusty or residue coated surface. Dirt can settle into a scratch and make it look deeper than it is, and leftover cleaning film can interfere with the way a concealer, polish, or touch up product bonds to the floor. Start by vacuuming or sweeping with a soft floor safe attachment, then clean the area with a hardwood floor cleaner formulated specifically for wood surfaces. Bona warns against using multi surface cleaners, oil soaps, steam cleaners, or harsh products that may damage the finish or leave behind residue.
This stage may seem modest, yet it is often where the floor begins to recover its elegance. A properly cleaned wood surface reflects light more evenly, and minor abrasions can appear less obvious once dust and dulling residue are removed. Use a microfiber cloth or mop rather than abrasive scrubbers, and allow the area to dry fully before moving on to any repair. Moisture trapped beneath a product can compromise both appearance and durability.
If the scratch still appears severe after cleaning, that gives you a more truthful picture of the work ahead. If it softens noticeably, you may be dealing with surface wear that responds well to a simple finish refresh. This is one reason floor care experts emphasize prompt attention. The sooner you clean and address damage, the easier it is to preserve the floor’s original beauty.
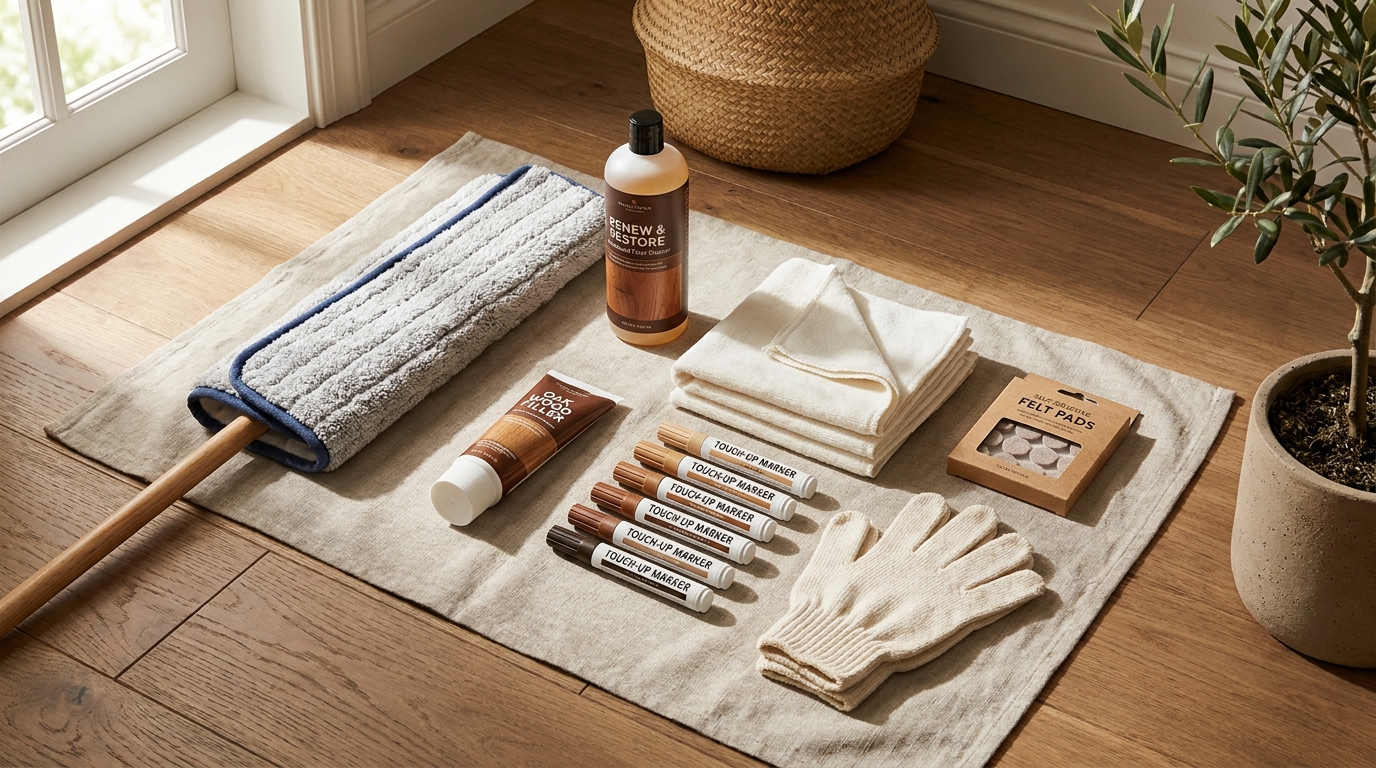
Step 3: Repair light surface scratches and micro marring
If your inspection shows that the scratch is confined to the finish, begin with the least invasive remedy. This is where hardwood floor polish, restorative products, and liquid concealers can be especially effective. The Home Depot recommends wood floor polish, liquid scratch concealers, wax in some product specific cases, and touch up kits for minor wear. The key is choosing a product intended for your floor type and using it sparingly, with full attention to manufacturer instructions.
For micro scratches spread across a small area, a floor specific polish can help fill fine marks, improve luster, and reduce the visibility of surface wear. Bona describes polishing as the least invasive method of refreshing the finish, and it can be a useful solution when the floor still has protective coating but has lost some visual smoothness. Apply the polish only to a thoroughly clean floor, and avoid layering random products over time, since buildup can cloud the finish rather than beautify it.
For an isolated light scratch, a liquid concealer or color matched touch up marker may be more precise. Test the product in an inconspicuous area first, because color variation in hardwood is subtle and complex. On a medium oak floor, for example, a touch up stain that is slightly too red or too dark can draw more attention than the original scratch. Blend carefully with a soft cloth, and step back to assess the repair from standing height rather than only from close range.
How to handle a minor surface scratch
- Clean the area with a hardwood specific cleaner and let it dry completely.
- Inspect under natural light to confirm the scratch is in the finish only.
- Choose a hardwood floor polish, scratch concealer, or touch up marker suited to the floor type.
- Test in a discreet area for color and sheen compatibility.
- Apply lightly and blend gently with a soft cloth.
- Allow the repair to cure as directed before walking on the area.
Minor scratch repair is often about restoring continuity rather than erasing every trace. A successful result allows the floor to read beautifully as a whole, even if a faint mark remains visible upon very close inspection. In a well designed room, continuity of tone and sheen matters more than chasing artificial perfection.
Step 4: Treat moderate scratches that cut through the finish
When the scratch penetrates the finish and reveals wood beneath, a little more artistry is required. This kind of damage cannot usually be resolved by polish alone because the issue is no longer just surface sheen. Now you are restoring both color and protection. Begin with a carefully matched wood floor touch up kit, repair marker, or stain pen designed for hardwood floors. The goal is to disguise the exposed wood while keeping the repaired area visually balanced with the surrounding planks.
After cleaning and drying the floor, apply the color sparingly into the scratch rather than across the full board. Wipe away any excess immediately, especially on lighter or satin finished floors where buildup can appear muddy. Some kits include a protective top layer or blending stick that helps replicate the floor’s final sheen. This is important because even a perfect color match can still look conspicuous if the gloss level differs from the rest of the surface.
If the scratch is slightly wider, a wood filler or wax repair product may be necessary before coloring. Choose one made for hardwood floors and for the scale of the damage. Overfilling creates a bump that catches the light awkwardly, while underfilling leaves a shadow line that keeps the scratch visible. Once filled and leveled according to the product directions, you can tone the area and seal it if appropriate.
Take your time during this process. Moderate scratch repair is less about speed than subtlety. Beautiful results come from thin layers, color patience, and a willingness to build the repair gradually. If the floor is part of a calm, elevated interior with consistent materials and carefully chosen finishes, a rushed repair will be immediately apparent. A careful one will disappear into the room’s quiet rhythm.
Step 5: Know when recoating is the more elegant solution
Sometimes a room has too many surface scratches for spot fixes to make sense. The finish may still be largely intact, but the overall effect is dull, lightly marred, and uneven in reflected light. In these cases, a recoat can be a particularly graceful solution. Bona notes that recoating can fill surface scratches and restore luster, making it a suitable middle ground between simple polishing and full refinishing.
A recoat adds a new layer of finish over the existing one after proper preparation, provided the original finish is compatible and not compromised by waxes or contaminants. Because it does not require sanding down to bare wood, it is far less invasive than a complete refinish. It also helps preserve the floor’s remaining service life, which matters because every full sanding removes material. The Home Depot notes that real hardwood can be lightly sanded and refinished multiple times, often up to about ten depending on wear and sanding thickness, but restraint is still wise.
For homeowners who value both practicality and aesthetics, recoating aligns beautifully with contemporary restoration trends. Low dust systems and durable waterborne finishes have made this process more appealing for busy households and refined interiors alike. If your floor’s color is still lovely and you simply want to restore depth, sheen, and a seamless look, recoating often offers exactly the level of renewal needed.
Signs your floor may benefit from recoating
- There are many light scratches across the room rather than one or two isolated marks.
- The finish looks dull or uneven, but the wood is not widely exposed.
- You want to restore sheen without changing the overall character of the floor.
- Spot repairs would be visually inconsistent across a larger surface.
- The floor is structurally sound, but its protective top layer is tired.
Step 6: Reserve sanding and refinishing for deeper or widespread damage
Refinishing is the most transformative option, and for that reason it should be chosen with intention rather than impulse. Bona describes refinishing as appropriate for moderate to severe damage, and the National Wood Flooring Association similarly emphasizes evaluating the severity of the wear before deciding between repair, recoating, or more extensive work. If scratches are deep, numerous, and accompanied by widespread finish failure, refinishing may be the only way to fully restore the floor.
A full refinish sands the floor down, removes the damaged finish, addresses visible imperfections, and applies a new topcoat system. It can make old floors look remarkably fresh, yet it also changes the visual story of the room more substantially than a spot repair or recoat. Depending on stain choice, sheen level, and finish chemistry, the floor may return looking brighter, more muted, warmer, cooler, or more contemporary than before. This is not inherently a drawback, but it should be part of the design conversation.
Because sanding removes some of the wood surface, it should not be undertaken unnecessarily. An elegant maintenance philosophy always seeks to preserve original material where possible. If the scratches are localized or mostly cosmetic, refinishing the whole room can be excessive. On the other hand, if every shaft of light reveals heavy scarring and bare patches, a careful professional refinish may be the truest route back to beauty.
Not every floor needs a dramatic reset. But when deep damage has disrupted both protection and appearance, a thoughtful refinish can return the room to its original composure.
When to call a professional
DIY repair is often well suited to small cosmetic scratches, especially when the finish is intact and the damage is limited. However, there are moments when professional assessment is the wiser path. The National Wood Flooring Association recommends evaluating floor damage carefully before choosing repair, replacement, or removal, ideally with the insight of a certified wood floor professional when the situation is uncertain.
Call a professional if the scratch is deep enough to expose raw wood over a noticeable length, if boards are splintered, if there is water staining, or if the finish is failing across large areas. You should also seek guidance if your floor has a specialty finish such as oil, aluminum oxide coating, or a factory prefinished system with a unique sheen that may be difficult to blend. A professional can determine whether a spot repair, isolation repair, recoat, or refinish will produce the most convincing result.
There is also a design advantage in asking for help at the right time. Professionals understand sheen matching, stain compatibility, edge blending, and how the floor will read under changing light. In a carefully composed home, these details matter immensely. The goal is not merely to fix damage, but to restore calm visual continuity.
Common mistakes that can make scratches worse
One of the most frequent mistakes is assuming that more force leads to a better result. Aggressive scrubbing, abrasive pads, and harsh cleaners can dull the finish further and create a broader patch of damage around the original scratch. Steam cleaning is another popular but problematic impulse. Bona explicitly warns against steam cleaners for hardwood, since excess moisture and heat can compromise both wood and finish over time.
Another mistake is using the wrong product category altogether. A generic furniture marker or a random stain pen may seem convenient, but color and finish matching on floors require more nuance. Floor surfaces are seen across wide expanses and under varied light conditions, so even subtle mismatches stand out. The same caution applies to polishes and restorers. Not every floor can accept every product, and incompatible buildup may interfere with future recoating.
It is equally important not to confuse polish with cure all repair. Polish can improve micro scratching and luster, but it will not erase a gouge that has torn through the finish into the wood fibers. When homeowners expect too much from the least invasive method, they often end up disappointed. The elegant approach is accurate diagnosis first, then measured action.
How wood species and sheen affect the visibility of scratches
Not all hardwood floors reveal damage in the same way. Softer species tend to dent and mark more easily, while harder species may resist wear better under daily traffic. The floor’s grain pattern also plays a role. A richly varied grain can conceal minor imperfections gracefully, while a more uniform board may show every line with greater clarity. If you are planning future flooring choices, understanding species hardness can help you align beauty with practical durability.
Sheen matters just as much. High gloss finishes reflect light sharply, which can make scratches, dust, and micro marring more visible. Satin and matte finishes tend to be more forgiving and often suit modern refined interiors beautifully because they let the wood’s character take precedence over glare. When repairing a scratch, matching the sheen is often as important as matching the color. A patch that is too shiny on a satin floor can attract the eye instantly.
This is why luxury design and maintenance are so deeply connected. The most successful interiors are not only well chosen in material but well sustained in finish. Understanding how your particular floor behaves allows you to care for it with more intelligence and less guesswork.
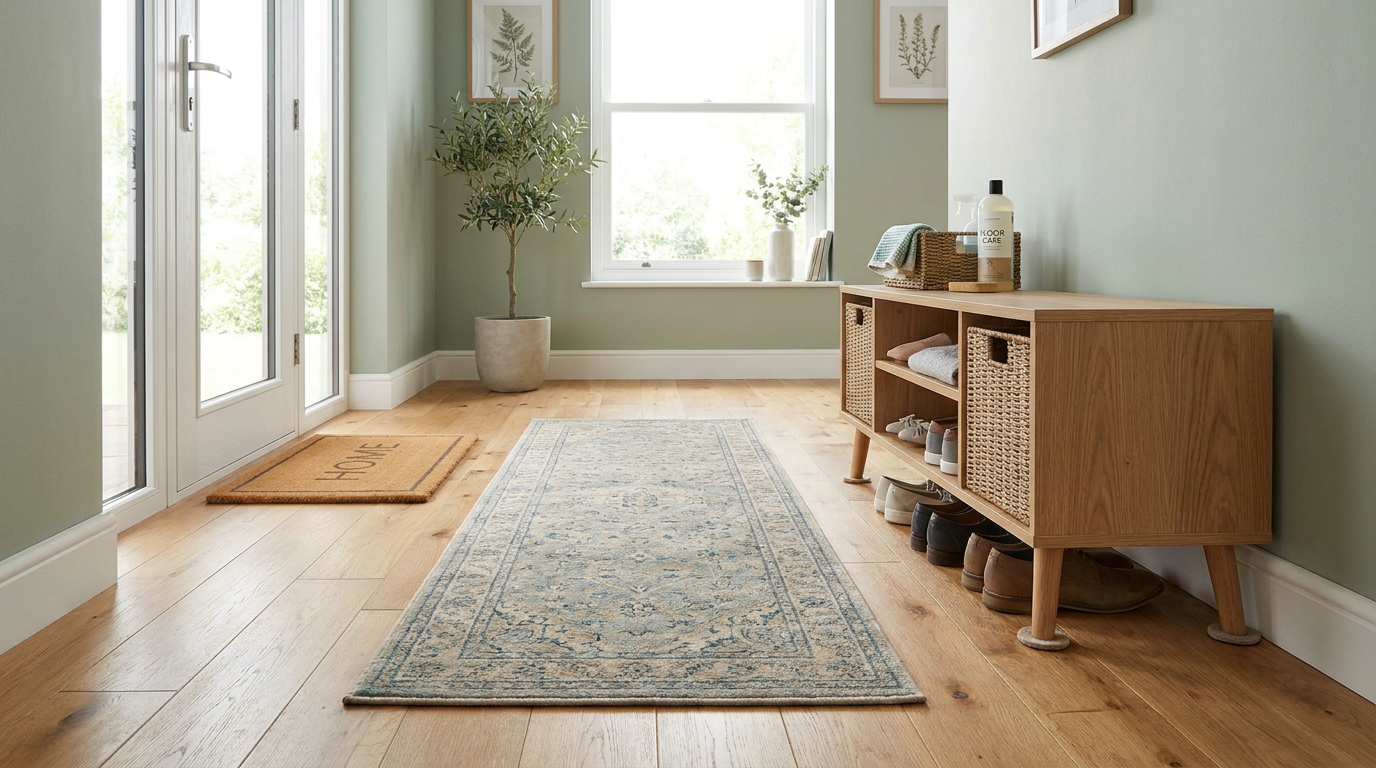
How to prevent future scratches without compromising style
The most beautiful repair is the one you do not have to repeat. Prevention is central to long term hardwood floor care, and fortunately it can be woven into the home in a way that feels deliberate rather than defensive. Bona recommends simple practices such as removing shoes, using entry mats and rugs, adding furniture pads and glides, and avoiding plastic wheeled furniture that can abrade the surface. These habits preserve both the finish and the refined atmosphere of the room.
Begin at the threshold. Entry mats catch grit before it is carried across the floor, and an elegant runner in a hall can soften foot traffic without diminishing the architecture of the space. A dedicated place for shoes near the entry can become part of the home’s rhythm, especially in family households. Tiny particles of grit are among the most common causes of surface scratching, and they often do more damage over time than any single dramatic event.
Furniture deserves equal attention. Felt pads under chairs and tables should be checked regularly, because worn or dirty pads can scratch just as much as bare legs. Heavy furniture should be lifted rather than dragged, and office chairs should use floor appropriate protection rather than hard plastic wheels. If pets share the home, keeping claws neatly trimmed can significantly reduce repeated fine scratching in traffic areas.
A polished prevention routine
- Place entry mats at exterior doors to catch dirt and grit.
- Remove shoes indoors when possible, especially heels or hard soles.
- Use felt pads and glides on all furniture legs.
- Avoid plastic wheeled furniture directly on hardwood surfaces.
- Clean regularly with a microfiber tool and hardwood specific cleaner.
- Address small scratches promptly before they become more visible or collect dirt.
- Trim pet claws and add rugs in high traffic areas where appropriate.
Building a long term hardwood care routine
Scratch repair should not be thought of as a one time rescue. It belongs within a larger rhythm of care that keeps the floor visually consistent season after season. Regular dry cleaning with a microfiber dusting tool prevents grit accumulation, while periodic cleaning with a hardwood specific product keeps the finish clear rather than coated in residue. Small marks can be addressed early, before they darken, widen, or interrupt the room’s overall polish.
Over time, every hardwood floor develops a patina of life, and that is part of its charm. The objective is not sterility. It is balance. A cared for floor can show history while still looking luminous and composed. The distinction lies in whether wear feels gentle and intentional, or neglected and disruptive.
It also helps to think in design cycles. A monthly check of entry mats, felt pads, and trouble spots can prevent many problems. A seasonal evaluation of sheen and finish condition can help you decide whether polishing, spot touch ups, or a professional recoat may be due. This kind of attentive stewardship is what allows hardwood to remain one of the most enduring and sophisticated materials in the home.
Final thoughts: restore the floor, preserve the room
Hardwood floors are more than a practical surface underfoot. They anchor rooms, reflect light, and connect architecture with atmosphere. When scratches appear, the temptation is often to search for a fast universal fix. Yet the most successful repair begins with understanding what has actually been damaged and choosing the gentlest effective method. Surface scratches may respond beautifully to cleaning, concealers, or polish. More serious marks may need touch up work, recoating, or in select cases, refinishing.
Industry guidance from the National Wood Flooring Association and maintenance leaders such as Bona makes one thing clear: careful evaluation, prompt attention, and the right products are the foundation of elegant results. There is no virtue in over sanding a floor that only needs a finish refresh, just as there is little value in disguising a deep gouge with a product that cannot truly protect it. Matching the method to the damage is what preserves both material and beauty.
In the end, repairing scratches on hardwood floors is not only about fixing flaws. It is about restoring visual continuity, protecting craftsmanship, and allowing the room to feel complete again. With a calm, informed approach, your floors can recover their smooth, gracious presence and continue to age with quiet distinction.



No Comment! Be the first one.