


How to Maintain Your Window Seals for an Eco-Friendly Home
Window seal maintenance is not always the first thing people think about when they want a greener home, yet it is one of the most practical places to start. A well-sealed window helps keep heated or cooled air where it belongs, reduces strain on your HVAC system, and supports a more stable and comfortable indoor environment. In a climate that swings between cold winters, humid summers, and shoulder seasons full of moisture shifts, even small gaps around windows can quietly work against your energy goals.
Table Of Content
- Why Window Seal Maintenance Matters for Sustainability
- Understanding What a Window Seal Actually Includes
- Signs Your Window Seals Need Attention
- How to Inspect Window Seals Step by Step
- Tools and Materials That Make the Job Easier
- Replacing Worn Weatherstripping
- Recaulking Around Frames and Trim
- Adjusting Window Hardware for a Better Seal
- Managing Moisture, Condensation, and Indoor Humidity
- Seasonal Window Seal Maintenance Routine
- Repair or Replace: Knowing When Maintenance Is Enough
- Common Mistakes to Avoid
- A Practical Eco-Friendly Mindset for Long-Term Results
- Quick Reference: What to Check First
For many households, sustainability feels most achievable when it is tied to everyday care rather than expensive renovations. That is exactly why window seal maintenance matters. You do not need to replace every window in the house to make a meaningful difference. In many cases, improving weatherstripping, refreshing caulk, adjusting hardware, and checking for hidden leaks can reduce energy waste and improve comfort with relatively low cost and manageable effort.
Natural Resources Canada identifies air leakage control as a top retrofit priority, and windows are among the common areas where conditioned indoor air escapes. ENERGY STAR also notes that sealing air leaks and adding insulation can reduce annual energy bills, with broad savings of up to 10 percent across the home from sealing and insulating measures. That does not mean every drafty room needs a major overhaul. It means small improvements add up, especially when they are done thoughtfully and maintained over time.
This guide takes a calm, maintenance-first approach. You will learn how window seals work, how to spot early signs of trouble, and how to handle practical tasks such as draft testing, weatherstripping replacement, recaulk work, and basic hardware adjustments. We will also look at moisture management, condensation, and when it makes sense to repair rather than replace. The goal is simple: help you protect your home’s building envelope in a way that is efficient, sensible, and environmentally responsible.
Why Window Seal Maintenance Matters for Sustainability
When people hear the phrase green home improvement, they often picture solar panels, heat pumps, or high-performance new construction. Those upgrades can be valuable, but the quieter work of maintaining the building envelope often delivers some of the most immediate benefits. Your windows are part of that envelope, and the seals around them help define the boundary between indoor comfort and outdoor conditions. If that boundary weakens, your home has to work harder to maintain temperature.
Air leakage is more significant than it looks. ENERGY STAR notes that hidden air leaks across a home can add up to the equivalent of an opening as large as an open window. This is a helpful image because it explains why one room may feel chilly even when the windows appear intact. The issue is often not shattered glass or visible damage. It is a collection of subtle weaknesses around sash edges, trim joints, hardware connections, and aging materials that no longer compress or adhere properly.
From an environmental perspective, wasted heating and cooling means wasted energy. If your furnace, boiler, or air conditioner runs longer because outdoor air keeps slipping in, your utility bills rise and your home’s operational footprint increases. By reducing those losses, you are not only improving comfort but also making the most of the energy your home already uses. This is one of the most accessible forms of sustainability because it works with what you have.
There is also a quality-of-life dimension that should not be overlooked. A home with well-maintained window seals typically feels calmer and more even in temperature. Draft reduction can make rooms easier to use, especially spaces near large windows that often feel cold in winter or too warm in summer. That kind of comfort matters because energy efficiency is rarely just about numbers on a bill. It is about creating a home that supports daily life with less waste and less friction.
Understanding What a Window Seal Actually Includes
Many homeowners think of a window seal as a single strip of material, but in practice it is a system. Depending on the window type, the seal can involve weatherstripping along the sash, caulking around interior or exterior trim, gaskets, glazing putty on older windows, and hardware that helps the window close tightly enough for those materials to do their job. If one part of that system fails, the whole assembly can become less effective.
On operable windows, weatherstripping is often the first line of defense against air leakage. It creates a compressible barrier between moving parts so the closed sash fits more tightly against the frame. Compression and magnetic seals are generally among the most airtight operable window types, according to NRCan, but even these products wear over time. Exposure to sunlight, dust, repeated use, paint buildup, and seasonal expansion can all reduce performance.
Caulking serves a different but equally important purpose. Rather than sealing moving parts, it closes fixed joints around frames, trim, and other transitions where air and moisture may enter. NRCan recommends paying attention to trim edges, frame joints, and mitred corners because these are common leakage areas. Cracked, shrinking, or missing caulk is one of the easiest problems to spot and one of the most worthwhile to address.
Hardware plays a role as well. A latch that no longer pulls the sash snugly into place can leave a window technically closed but poorly sealed. Hinges, locks, rollers, and alignment points may all influence how tightly the window fits. This is why a good inspection looks beyond the obvious materials and considers the whole closure system. In many homes, improving a window’s performance is less about one miracle product and more about restoring several small elements so they work together again.
Signs Your Window Seals Need Attention
Some seal problems are easy to notice. You may feel a cold draft near the sill, hear more outside noise than usual, or see daylight at an edge where there should be none. In winter, rooms near leaking windows often feel noticeably cooler, and in summer they can become harder to keep comfortable. These are the moments that usually prompt action, but less obvious warning signs are just as important.
NRCan recommends checking window weatherstripping, hardware, putty, paint, and signs of rot, mold, or staining during inspections. This broader view matters because moisture problems often show up before people connect them to window sealing. Staining on trim, peeling paint, softened wood, and musty odors can all suggest that air and moisture are moving where they should not. In older homes, dried or missing putty can also point to a need for repair.
Condensation is another clue, although it should be interpreted carefully. Moisture on or around windows does not always mean the window itself has failed. Both NRCan and ENERGY STAR note that even high-performance windows can still experience condensation in cold weather, especially if indoor humidity is high. That said, chronic condensation, frost buildup, or moisture collecting in hidden corners can indicate a combination of sealing issues, temperature differences, and ventilation imbalance.
Pests can also take advantage of gaps around windows. Tiny openings that seem unimportant from an energy perspective may be large enough for insects to enter. If you notice repeated drafts, dust accumulation near frame edges, or increased insect activity, it is worth looking more closely at seals and surrounding trim. The key is to think of these symptoms as useful information rather than a sign that everything needs replacing.
How to Inspect Window Seals Step by Step
A thoughtful inspection is the foundation of effective maintenance. Before buying materials or starting repairs, take time to understand which windows are leaking, what kind of leakage is happening, and whether the problem is isolated or part of a broader building envelope issue. A clear assessment helps you spend money where it has the greatest impact and avoid replacing parts that are still working well.
Begin with a visual check during daylight. Look closely at the perimeter of each window, including the sash edges, corners, trim joints, and any place where different materials meet. You are looking for cracked or missing caulk, flattened weatherstripping, loose hardware, peeling finishes, discolored wood, and visible gaps. Open and close the window slowly to see whether it moves smoothly and latches firmly.
Next, try a draft check. On a cool or windy day, move your hand around the edges of the closed window to feel for air movement. Pay particular attention to meeting rails, lower corners, and the joint between trim and wall. This simple method is often enough to identify obvious leakage points without tools. If you want a clearer test, the paper test is especially useful for operable windows.
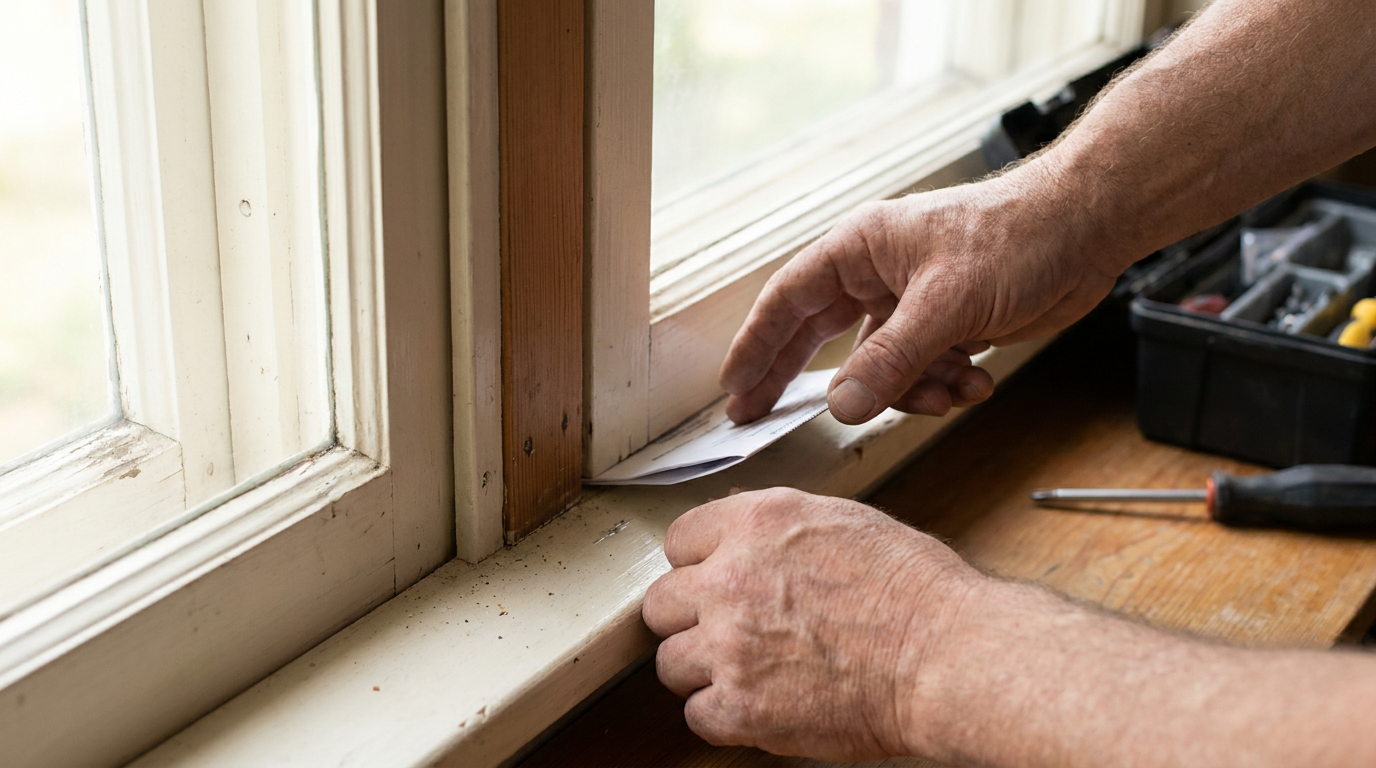
To do the paper test, open the window, place a strip of paper so part of it lies across the sealing surface, then close and latch the window on it. If the paper slides out very easily, the seal at that point may not be tight enough. Repeat this at several locations around the sash. It is a straightforward way to find weak spots and compare performance from one side of the window to another.
Finally, note any patterns. If only one window leaks, the issue may be local to that unit. If several windows on the same elevation show similar problems, exposure to weather and sun may be accelerating wear. If many windows throughout the home feel drafty, it may be time to think in whole-home terms and consider an energy audit. Air sealing works best when it supports overall air barrier continuity rather than isolated fixes in random places.
Tools and Materials That Make the Job Easier
Window seal maintenance does not require an extensive workshop, but using the right materials can make your results more durable and less frustrating. The core supplies often include a putty knife or scraper, cleaning cloths, mild soap, scissors, a tape measure, replacement weatherstripping, caulk, and a caulking gun. In some cases, a screwdriver is all you need to tighten hardware or improve latch alignment.
Cleaning matters more than many people expect. New caulk and weatherstripping need a reasonably clean, dry surface to adhere properly. Dirt, grease, old paint flakes, and loose sealant can all shorten the life of the repair. A patient prep step often determines whether your work lasts one season or several years.
When choosing weatherstripping, match the material to the window type and gap size. Foam tape can be useful for certain low-cost applications, but it is not always the longest-lasting solution. V-strip, rubber, silicone, felt, and tubular products each have advantages depending on whether the window slides, swings, or compresses shut. If possible, bring a sample of the old material or take detailed measurements before purchasing replacements.
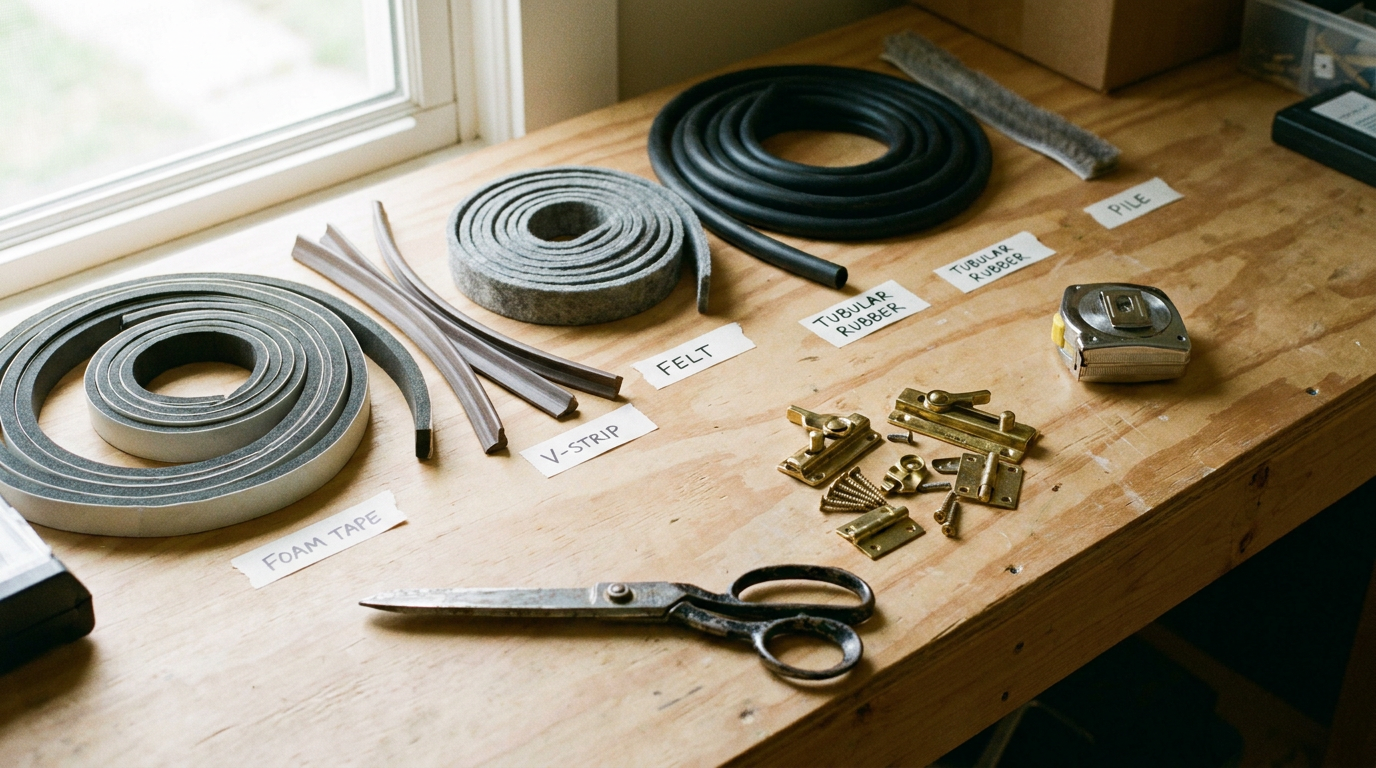
For caulk, pay attention to whether the repair area is interior or exterior and whether movement is expected at the joint. A quality paintable sealant may be ideal indoors around trim, while exterior conditions may call for a more weather-resistant formulation. The best product is usually the one suited to the location, applied carefully, and maintained before it fails. Practical sustainability often looks exactly like this: selecting durable materials that prevent repeat work and unnecessary waste.
Replacing Worn Weatherstripping
Replacing weatherstripping is one of the most effective DIY window maintenance tasks because it directly improves the seal of operable windows. Over time, weatherstripping can flatten, crack, peel, or lose its resilience. When that happens, the sash may close, but it no longer creates enough pressure to keep air from slipping through. Replacing it can noticeably improve comfort, especially in rooms that have always felt just a little drafty.
Start by identifying the existing type and where it is installed. Carefully remove old material without damaging the frame or sash. Some products peel off easily, while others may be stapled, nailed, or set into a narrow kerf. Clean the surface thoroughly and let it dry before installing new material. This simple preparation helps the new strip seat properly and stay in place.
Measure each section accurately and cut clean lengths rather than stretching the material to fit. Weatherstripping should meet corners neatly without bunching or leaving gaps. Once installed, close the window and check that it still operates smoothly. If the fit becomes too tight, you may have chosen material that is too thick for that location. If it still feels loose, the strip may not be contacting the opposing surface consistently.
It is helpful to remember that better sealing should not come at the expense of operability and safety. Bedroom egress windows, in particular, must remain usable. Avoid any repair that permanently seals shut a window required for emergency exit. An eco-friendly home is also a safe home, and maintenance choices should always respect local code requirements and the practical function of each window.
Recaulking Around Frames and Trim
Caulking is one of the most accessible ways to reduce leakage around window assemblies. NRCan notes that caulking around trim, frame edges, and mitred joints can reduce air leakage, and these are often the exact spots where small cracks develop with age. If the window unit itself is still sound, refreshing these joints can deliver a surprisingly worthwhile improvement without major disruption.
Before applying new caulk, remove loose or failed material and clean the joint carefully. The goal is not always to remove every trace of old sealant, but you do want a stable surface and a joint profile that allows the new bead to bond and bridge effectively. Apply the caulk in a steady, controlled line, then tool it lightly for a clean finish and full contact. A neat bead is not only more attractive but usually more durable because it has consistent thickness.
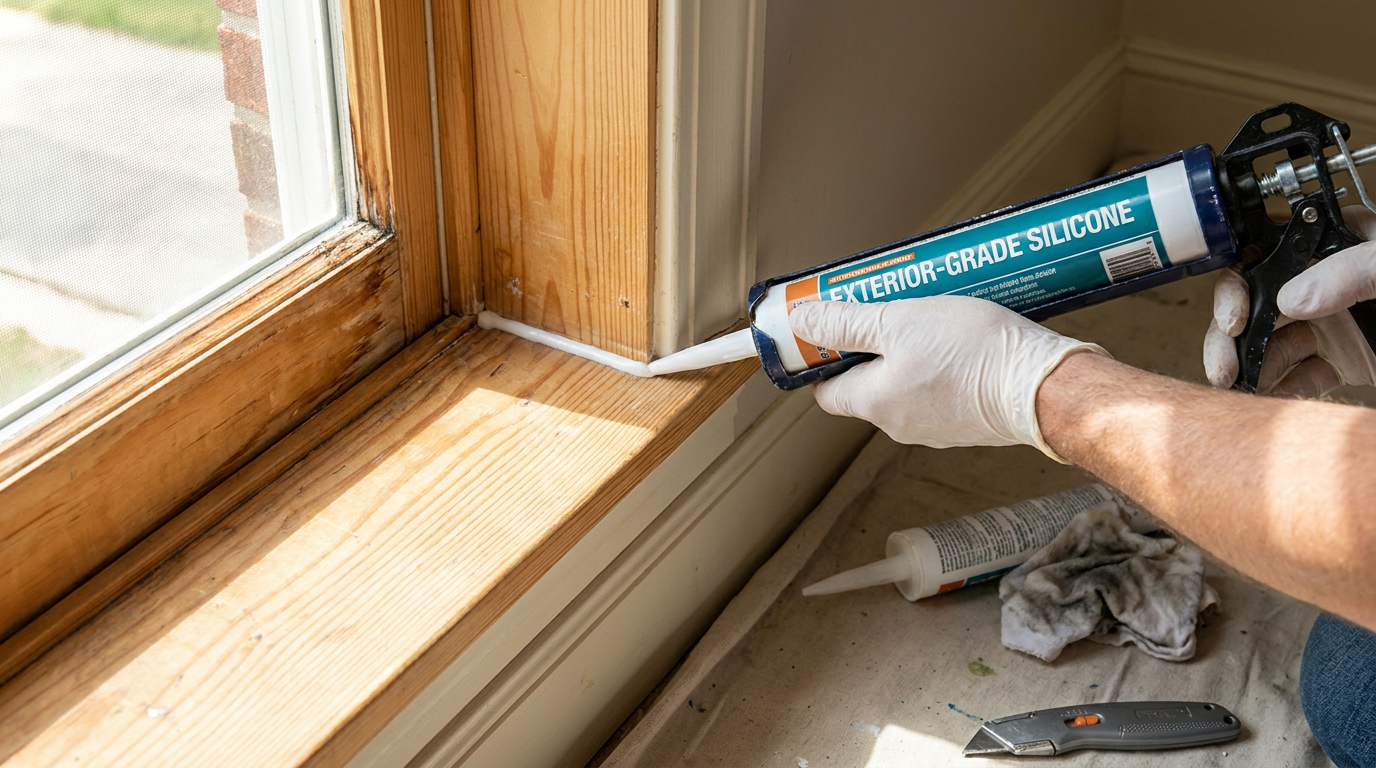
Focus on fixed joints rather than moving components. Caulk should not be used where a sash needs to operate or where drainage paths must remain open. Misplaced sealant can trap water, interfere with function, or create new problems while trying to solve old ones. If you are unsure whether a gap is meant for drainage or ventilation, pause and check the manufacturer guidance or consult a professional before sealing it.
Many homeowners find this work satisfying because the benefits show up quickly. A room may feel less drafty the same day, and the visual improvement around older trim can also refresh the look of the space. This is a good example of sustainable maintenance that supports both performance and longevity. You are extending the useful life of the existing assembly instead of assuming replacement is the only path forward.
Adjusting Window Hardware for a Better Seal
Sometimes the seal material is not the real problem. The window may be slightly out of alignment, or the latch may no longer pull the sash in tightly enough for the weatherstripping to compress. This is especially common with windows that have settled over time or simply seen years of repeated opening and closing. A minor hardware adjustment can restore function and improve airtightness without replacing any components.
Check whether the window closes evenly and whether the latch engages fully without forcing it. Look for loose screws, worn handles, bent components, or friction points that prevent the sash from sitting squarely in the frame. Tightening hardware and cleaning debris from tracks or hinges can sometimes make an immediate difference. The goal is to let the window close the way it was designed to close.
If the sash seems warped or the frame is visibly distorted, a simple adjustment may not be enough. Still, it is worth starting here because many small leaks come from inadequate compression rather than missing material. Once hardware is corrected, repeat the paper test and draft check. You may find that a window once assumed to need replacement simply needed a more secure closure.
This step is often overlooked because it does not feel as tangible as replacing a strip or applying new caulk. Yet it speaks to a broader truth about sustainable home care. Maintenance is often about restoring intended performance rather than adding more products. A quieter, tighter window achieved through a screwdriver and a careful eye is every bit as valuable as a more visible retrofit.
Managing Moisture, Condensation, and Indoor Humidity
As homes become better sealed, moisture management becomes more important, not less. NRCan warns that as homes are tightened, indoor humidity can rise and create condensation or moisture problems if ventilation is not managed. This is a useful reminder because efficiency work should support healthy living conditions, not just lower energy use. A tighter building envelope needs balanced airflow and attention to indoor moisture sources.
Condensation on windows often appears in winter when indoor air holds more moisture than the colder glass surface can handle. This does not automatically mean your repair work was a mistake or that the window has failed. In fact, improved sealing may make indoor humidity more noticeable because less dry outdoor air is sneaking in. The real question is whether your home is ventilating well and whether humidity levels are appropriate for the season.
Practical ways to manage this include using kitchen and bathroom exhaust fans, running a balanced ventilation system if you have one, and keeping an eye on relative humidity during very cold weather. A simple hygrometer can help you understand whether moisture levels are drifting too high. If you consistently see heavy condensation, frosting, mold growth, or damp surrounding materials, treat it as a signal to improve ventilation and moisture control rather than endlessly blaming the window alone.
Important perspective: Better window sealing supports energy efficiency, but the healthiest homes balance airtightness with ventilation. Comfort and sustainability work best together when moisture has a safe path out of the home.
This balanced approach is especially relevant in colder parts of Canada and North America, where indoor humidity can build up quickly during winter. Eco-friendly maintenance is not about sealing every gap without nuance. It is about reducing unwanted leakage while preserving healthy indoor air quality and protecting materials from trapped moisture. That is a more durable form of sustainability because it considers the whole home system.
Seasonal Window Seal Maintenance Routine
The easiest way to keep window seals in good condition is to treat them as part of routine seasonal care. Rather than waiting until a room becomes uncomfortable, build quick inspections into spring and fall maintenance. A brief check twice a year can catch failing caulk, loose hardware, or worn weatherstripping before those issues lead to larger comfort or moisture problems.
In the fall, focus on preparing for heating season. Clean window tracks and frame edges, confirm that latches work properly, test for drafts, and inspect weatherstripping for brittleness or compression. If exterior caulk has cracked after summer sun exposure, this is a good time to plan repairs before winter conditions intensify leakage. The result is a home that enters the cold season more resilient and more efficient.
In the spring, look for signs of moisture damage that winter may have revealed. Check sills, trim, paint, and corners for staining, swelling, or mold. Open windows and confirm they operate smoothly after colder months of limited use. This is also a good season to evaluate whether condensation was persistent over winter and whether humidity management needs adjustment.
If you like structure, a simple maintenance checklist can help. The work does not need to be complicated.
- Inspect all accessible window edges and trim for visible gaps or failed caulk.
- Check weatherstripping for wear, flattening, or missing sections.
- Open, close, and latch each operable window to test alignment and compression.
- Look for staining, rot, mold, or peeling paint that may indicate moisture issues.
- Perform a draft or paper test on windows that feel suspect.
- Note any condensation patterns and review indoor humidity and ventilation.
These small habits reinforce a maintenance-first mindset. They also help spread effort over time, which makes sustainable home care feel more manageable. Instead of facing a large repair all at once, you respond to normal wear in a measured way that protects both your comfort and your budget.
Repair or Replace: Knowing When Maintenance Is Enough
One of the most common misconceptions about drafty windows is that full replacement is always the answer. In reality, many issues can be improved significantly through targeted repair, adjustment, caulking, and weatherstripping. If the frame is structurally sound, the glass is intact, and the operation is reasonably good, maintenance can often extend useful life and improve performance meaningfully.
Replacement becomes more relevant when there is severe rot, repeated water intrusion, failed insulated glass units, major warping, or chronic operational failure that repairs cannot address. Even then, it helps to compare options carefully. In some homes, upgrading a few worst-performing windows and maintaining the rest is the most sensible path. In others, adding interior storm windows can provide an effective interim improvement while preserving existing units.
Interior storm windows and properly sealed existing windows are often useful efficiency upgrades before full replacement. This approach aligns with current interest in lower-cost retrofit strategies that deliver measurable comfort gains without the environmental and financial cost of replacing every unit immediately. It also respects the embodied value of materials already in the home. Keeping a functional window in service longer, while improving its performance, can be a very sustainable decision.
If you are unsure where your home stands, a professional energy audit can help prioritize work. Audits can identify leakage patterns, reveal whether windows are a major source of loss compared with attic or basement leakage, and guide you toward the most cost-effective improvements. This whole-home lens matters because window seals are important, but they work best as part of an integrated building envelope strategy.
Common Mistakes to Avoid
Even simple maintenance can go off course when people rush or use the wrong materials. One common mistake is sealing a problem without understanding whether moisture is involved. If staining or mold is present, do not just cover gaps and move on. Investigate the source so you are not trapping a hidden issue behind fresh sealant.
Another mistake is assuming that a window that looks modern or high efficiency does not need care. Newer windows can resist condensation better and may be better performers overall, but their weatherstripping, hardware, and caulk still age. Maintenance is part of ownership regardless of the product’s original rating. High performance is not a permanent state. It depends on continued upkeep.
Homeowners also sometimes use sealants where they should not. Blocking drainage paths, sealing moving joints, or painting over weatherstripping can interfere with function and shorten service life. It is wiser to make a modest repair correctly than to over-seal a window in ways that create future damage. Sustainability in building maintenance often means restraint and precision rather than doing more.
Finally, avoid treating window leaks in isolation if the home has broader air leakage problems. A draft near the window may partly come from wall penetrations, trim gaps, or attic stack effect drawing air through the assembly. If repairs do not solve the issue, step back and think about the larger envelope. The best results often come from connecting small fixes to a larger understanding of how air moves through the house.
A Practical Eco-Friendly Mindset for Long-Term Results
There is something reassuring about home improvements that do not require a dramatic overhaul. Window seal maintenance is exactly that kind of work. It is grounded, cost-aware, and effective in ways that are easy to feel day to day. A room becomes less drafty. Heating feels less wasteful. Moisture is easier to manage. The house settles into a steadier rhythm.
This is also where sustainable living becomes more approachable. Instead of chasing perfection, you are improving what already exists. You are reducing wasted energy through careful observation and practical care. That mindset not only supports lower bills and a more comfortable home but also reflects a broader principle of environmental responsibility: maintain well, repair thoughtfully, and replace only when necessary.
If you are just getting started, begin with one or two windows that seem most uncomfortable. Inspect them closely, perform a draft or paper test, replace worn weatherstripping, and address any failed caulk around trim. Observe the difference over the next few weeks. Often, the improvement is enough to build confidence and turn this from a chore into a routine part of seasonal upkeep.
Properly maintained window seals will not solve every energy issue in a home, but they are one of the clearest examples of how small, achievable actions can contribute to bigger goals. They support the building envelope, reduce energy waste, and make sustainable living feel less abstract. In the end, that may be the most valuable outcome of all: a home that works better because it is cared for with intention.
Quick Reference: What to Check First
If you want a simple starting point, focus on the areas most likely to produce worthwhile results. These checks can help you prioritize your time and budget without feeling overwhelmed.
- Feel for drafts around sash edges, meeting rails, and lower corners.
- Inspect caulk around trim, mitred joints, and frame-to-wall transitions.
- Look for weatherstripping that is brittle, missing, flattened, or painted over.
- Test whether latches pull the sash in tightly enough to compress the seal.
- Check for moisture clues such as staining, peeling paint, mold, or soft wood.
- Monitor condensation and compare it with indoor humidity and ventilation habits.
That short list is often enough to reveal where the biggest opportunities are. It keeps the work practical, which is important. The most effective sustainable habits are usually the ones people can actually maintain over time.



No Comment! Be the first one.