


How to Check and Maintain Flashing and Trim for a More Sustainable Home
When people think about a sustainable home, they often picture solar panels, high performance insulation, or new windows. Those upgrades matter, but everyday durability matters too. Some of the most important work happens in the small, quiet parts of the building envelope, especially around windows, doors, roof edges, and wall penetrations where flashing and trim help manage water and air. Keeping these details in good condition is one of the most practical, affordable ways to protect your home and reduce unnecessary waste.
Table Of Content
- Why Flashing and Trim Matter More Than They Seem
- What Flashing and Trim Actually Do in the Building Envelope
- The Sustainability Case for Maintenance Instead of Premature Replacement
- When to Inspect Flashing and Trim
- Where to Look First
- A Step by Step Flashing and Trim Inspection Process
- What Common Problems Look Like
- Simple Maintenance Tasks Homeowners Can Often Do Themselves
- When a Repair Is Fine and When a Professional Is the Better Choice
- How Flashing and Trim Support Energy Efficiency
- The Indoor Air Quality and Mold Prevention Connection
- Common Misconceptions to Avoid
- A Simple Seasonal Maintenance Routine
- How Climate Resilience Changes the Conversation
- Final Thoughts
Flashing and trim are easy to overlook because they are not dramatic systems. Yet they sit at the edges of the places where homes most often struggle. If water gets behind trim or flashing fails to direct moisture away from an opening, the result can be hidden rot, mold, insulation damage, staining, and air leakage that gradually reduces comfort and efficiency. In many homes, these issues begin quietly and remain invisible until repair becomes much more expensive.
That is why maintenance deserves a place in any conversation about greener living. Repairing a failed caulk joint, replacing a corroded flashing section, or repainting vulnerable trim at the right time can extend the life of existing materials for years. From a sustainability perspective, that is meaningful. A longer lasting window surround or exterior assembly helps avoid premature replacement, reduces the embodied carbon tied to new products, and supports the performance of the home you already have.
There is also a strong energy case for paying attention here. Natural Resources Canada notes that windows and doors can account for up to 35 percent of total house heat loss. That figure helps explain why openings around trim and flashing are such a high value area for routine inspection. You do not need a full renovation to make a difference. In many cases, careful seasonal maintenance is enough to preserve efficiency, comfort, and durability.
This guide walks through how to check and maintain flashing and trim step by step. It is written for homeowners who want practical actions, not pressure. You do not need to become a building scientist to improve your home. You just need to know what these components do, where they tend to fail, what signs to look for, and when a simple repair is reasonable versus when it is time to bring in a professional.
Why Flashing and Trim Matter More Than They Seem
Trim is sometimes mistaken for a decorative finish, but on a real house it often does more than frame a window or tidy up an edge. Trim covers joints, protects vulnerable transitions, supports finish layers, and often conceals the narrow gaps where air leakage and water intrusion can begin. Behind the trim, there may be sealant, shims, insulation, or air sealing materials that help complete the opening. If trim fails or pulls away, the performance of the assembly around it can weaken quickly.
Flashing has a different role, but it is just as important. Its job is to direct water out and away from vulnerable joints. Around windows, doors, skylights, and roof intersections, proper flashing is part of a larger water management strategy. Caulk helps with sealing, but it is not a substitute for correctly layered flashing. A durable home relies on both. In simple terms, flashing sheds water while sealants and trim help close smaller gaps and protect the finish.
Government energy and building guidance consistently connects these details to long term performance. NRCan advises continuous caulk around window trim where it meets the wall, at mitred trim joints, and between trim and the frame to reduce air leakage. It also notes that exterior finishing such as flashing should direct water away from openings. ENERGY STAR guidance reinforces that sealing behind trim can still deliver substantial value because hidden gaps may remain even when a window appears tight from the inside.
These ideas matter because many building problems are cumulative rather than sudden. A tiny gap at a trim joint may let in wind driven rain over a season. A lifted edge of metal flashing may not leak during a light shower but may fail during a storm. A crack in paint may expose wood to repeated moisture cycles that slowly break down the surface. Sustainable maintenance is about catching these small issues while they are still small.
Practical sustainability often starts with preserving what already works. A home that stays dry, airtight, and well maintained will usually last longer, perform better, and require fewer resource intensive replacements.
What Flashing and Trim Actually Do in the Building Envelope
The building envelope is the layer that separates indoor conditions from outdoor weather. It includes walls, roofs, windows, doors, insulation layers, air barriers, and moisture management details. Flashing and trim sit at some of the most sensitive intersections within that envelope. Their role is not isolated. They work alongside the weather resistive barrier, siding, roofing, sealants, and interior air sealing to keep rain out and conditioned air in.
At windows and doors, top flashing is especially important because it helps intercept water that runs down the wall above. Side flashing and sill details help carry that water away from the opening so it does not collect where wood and sheathing can stay damp. NRCan guidance notes that proper flashing should direct water away from windows, doors, skylights, and their frames, and that top flashing should integrate under the air barrier while side and bottom flashings are layered appropriately. That layering is what makes drainage possible.
Trim contributes by covering and protecting the finish edges around the opening. Exterior trim boards or casings often sit where different materials meet, such as a window frame and siding, or a door frame and cladding. If those joints open up, they can become pathways for air leakage and water intrusion. Paint, stain, and caulk therefore act as part of a maintenance system, not just a cosmetic finish.
One helpful way to think about it is to imagine every opening in your home as a carefully managed interruption in the wall. Every interruption needs a strategy for drainage, air sealing, movement, and protection from weather. Flashing handles water direction. Trim protects edges and joints. Sealants close smaller gaps. When all of them are maintained together, the assembly performs much better than any one part can perform alone.
The Sustainability Case for Maintenance Instead of Premature Replacement
Many homeowners assume the greenest choice is to replace older components with newer, more efficient ones as soon as possible. Sometimes replacement is necessary, especially if an assembly has failed badly. But in many cases, the more sustainable move is to maintain and extend the life of what you already have. That principle applies strongly to flashing and trim because they are relatively low cost elements that protect larger, more resource intensive parts of the home.
When trim, flashing, and sealant are neglected, damage can spread into sheathing, framing, insulation, drywall, flooring, or finishes. A failed six dollar tube of sealant can eventually lead to thousands of dollars in repair work and substantial material waste. By contrast, timely inspection and targeted repair keep assemblies functioning longer. This delays replacement of windows, doors, siding, and related components, which reduces the environmental burden tied to extraction, manufacturing, packaging, and transport of new materials.
There is also an operational energy benefit. Air leakage around openings can undermine insulation and make heating and cooling systems work harder. NRCan says windows and doors can account for up to 35 percent of total house heat loss, which means preserving the performance of these openings matters even before full upgrades are considered. Well maintained trim joints, caulk lines, and flashing details help support the energy performance your home was designed to have.
This is one reason low carbon maintenance is gaining attention. It is practical, accessible, and often more affordable than replacement. It also aligns with climate resilience. As precipitation patterns shift, freeze thaw cycles become more demanding, and storms become more intense in many regions, moisture control at exterior joints becomes even more important. Looking after flashing and trim is no longer a minor chore. It is part of adapting homes to real world weather stress.
When to Inspect Flashing and Trim
The best routine is a seasonal inspection in spring and fall, with extra checks after major storms, heavy snowmelt, or strong wind events. Spring is useful because winter often exposes weaknesses through freeze thaw movement, ice, snow load, and trapped moisture. Fall is equally helpful because it gives you a chance to prepare the home before cold weather returns and before wet, windy conditions become more frequent.
These inspections do not need to be complicated. In many homes, a calm walk around the exterior with a flashlight, a phone camera, and a notepad is enough. The goal is to look slowly, rather than glance quickly. Small cracks, lifting joints, staining, and rust are much easier to notice when you pause at each opening and scan from top to bottom.
It is also smart to inspect after repainting, recaulking, or replacing nearby components. A fresh finish can conceal details if the work was rushed, and movement after repair can reveal whether a joint is stable. In other words, maintenance is not a one time event. It is a cycle of observing, repairing, and checking the results over time.
If your home is in a coastal climate, a forested area, or a place with frequent wind driven rain, you may want to inspect more often. Salt air can accelerate corrosion, shade can slow drying, and heavy vegetation can trap moisture against trim. Older homes with many joints and layered renovations also deserve a more careful eye because hidden conditions are more common.
Where to Look First
Start with windows and doors because these are among the highest risk and highest value parts of the envelope. Focus first on the top edge of trim, where water naturally arrives from above. Then check the side joints, mitred corners, the trim to wall line, and the lower sill area where water can sit or splash. Look for peeling paint, split caulk, softened wood fibers, loose trim pieces, staining, or dark lines that suggest repeated wetting.

Next, examine roof to wall intersections, especially where a lower roof meets a vertical wall. These locations often depend on correctly layered flashing and are vulnerable to debris buildup and repeated wetting. Step flashing, kickout flashing, and related details can fail quietly over time if fasteners loosen or if roofing changes were done without careful water management. Pay attention to rust, lifted metal edges, cracked sealant at transitions, and staining on nearby siding.
Move on to penetrations such as vents, pipes, light fixtures, and electrical service entries. Although these may not have decorative trim in the same way windows do, they still depend on flashing and sealant details that can deteriorate. Any penetration through the wall or roof deserves inspection because it interrupts the continuity of the envelope.
Finally, look indoors around the same openings. Check for paint bubbling, soft drywall, musty odors, staining at upper corners, discolored trim, or condensation patterns that seem unusual. A dry interior does not always mean the exterior assembly is healthy, but interior clues can still help confirm where a problem may be developing.
A Step by Step Flashing and Trim Inspection Process
A structured process makes inspections more useful because it helps you compare conditions over time. Begin by choosing a dry day with good daylight. Walk the perimeter and note each window, door, roof intersection, and wall penetration. If your home has multiple stories, inspect what you can safely reach from the ground and binoculars, and hire help for areas that require unsafe ladder work.
- Look at the top of each opening first. Water almost always starts above. Check whether metal head flashing is visible, straight, secure, and free of corrosion. If trim covers the flashing edge, look for swelling, paint failure, or dark staining beneath the top trim board.
- Inspect trim joints and corners. Mitred joints often open as wood moves with moisture and temperature changes. Small separations can admit water, especially on sunny or weather exposed elevations.
- Check the trim to wall connection. NRCan advises continuous caulk around window trim where it meets the wall. Look for gaps, brittleness, shrinkage, or places where old caulk has pulled away from either surface.
- Inspect the trim to frame connection. This is another area NRCan identifies. If the joint is open, both air leakage and water entry become more likely.
- Examine the sill and lower corners. Lower sections often show the earliest signs of prolonged wetting because gravity carries water down. Watch for rot, staining, insect activity, or soft spots.
- Check metal flashings for rust, dents, and lifted edges. Corroded metal loses reliability over time. A lifted edge can direct water inward instead of away.
- Look for fastener issues. Missing, backed out, or rusted fasteners can allow trim and flashing to shift. Movement at one small point can affect the whole joint.
- Scan nearby materials. Damaged siding, failed paint, clogged gutters, or poor drainage can all overload flashing and trim with unnecessary moisture.
As you move through the list, take photos. A picture from spring and another from fall can reveal change that is easy to miss in memory. Label the photos by location, especially if you are monitoring a crack or stain to see whether it is stable or worsening.
If you are comfortable doing so, gently press painted wood trim with a finger or blunt tool in suspicious areas. Sound wood should feel firm. If it feels soft, crumbly, or spongy, moisture may have been present for some time. Be careful not to damage the finish, and stop if the surface seems fragile enough that probing would make things worse.
What Common Problems Look Like
Failed caulk often shows up first as hairline cracking, loss of flexibility, or visible gaps where the sealant has separated from one side of the joint. Older caulk may also appear chalky, brittle, or unevenly shrunk. In sustainable maintenance terms, this is one of the best issues to catch early because resealing a sound joint is relatively simple and prevents much larger problems.
Paint failure can be another early warning. Peeling, bubbling, or cracking paint is not always cosmetic. It may indicate moisture cycling beneath the surface, especially on horizontal trim or at bottom corners. If you simply repaint without addressing the joint or moisture source, the problem often returns.
Metal flashing problems tend to show as rust, staining below joints, bent edges, missing sections, or flashing that appears trapped behind newer finishes. Improperly layered flashing may not be obvious without removing materials, but clues include repeated leaks after storms, concentrated staining at one corner, or moisture patterns that recur after resealing. In those cases, the issue may be hidden behind trim or cladding.
Trim movement is also worth taking seriously. If boards are separating at corners, pulling away from the wall, or showing recurring gaps after repeated caulking, the underlying assembly may be moving due to moisture exposure, structural settling, or installation issues. Repeatedly filling the same joint without identifying the cause is rarely a lasting solution.
One of the most common misconceptions is that caulk alone is enough. In reality, flashing provides the primary water management layer, while caulk is only one part of the defense.
Simple Maintenance Tasks Homeowners Can Often Do Themselves
Many flashing and trim maintenance tasks are homeowner friendly if the work is limited to safe, accessible areas and the existing materials are generally sound. Cleaning, documenting, trimming vegetation, repainting, and renewing small sections of sealant are all manageable for many people. The key is to work carefully, choose compatible products, and avoid trapping moisture where drainage should occur.
Start by cleaning the area. Dirt, pollen, and chalking paint can prevent sealants and coatings from adhering properly. Use a soft brush and mild cleaner appropriate for the material, then allow the area to dry fully. Never seal over a wet joint and assume it will be protected. Moisture trapped behind a fresh bead of caulk can continue causing damage.
If old sealant has failed, remove loose and deteriorated sections before applying new material. Replace it with a high quality exterior sealant appropriate for the joint, exposure, and paint finish. Tool the bead neatly so it bonds to both sides of the joint without creating thick ridges that trap water. Focus on continuity. Small missed gaps at corners or ends can defeat an otherwise tidy repair.
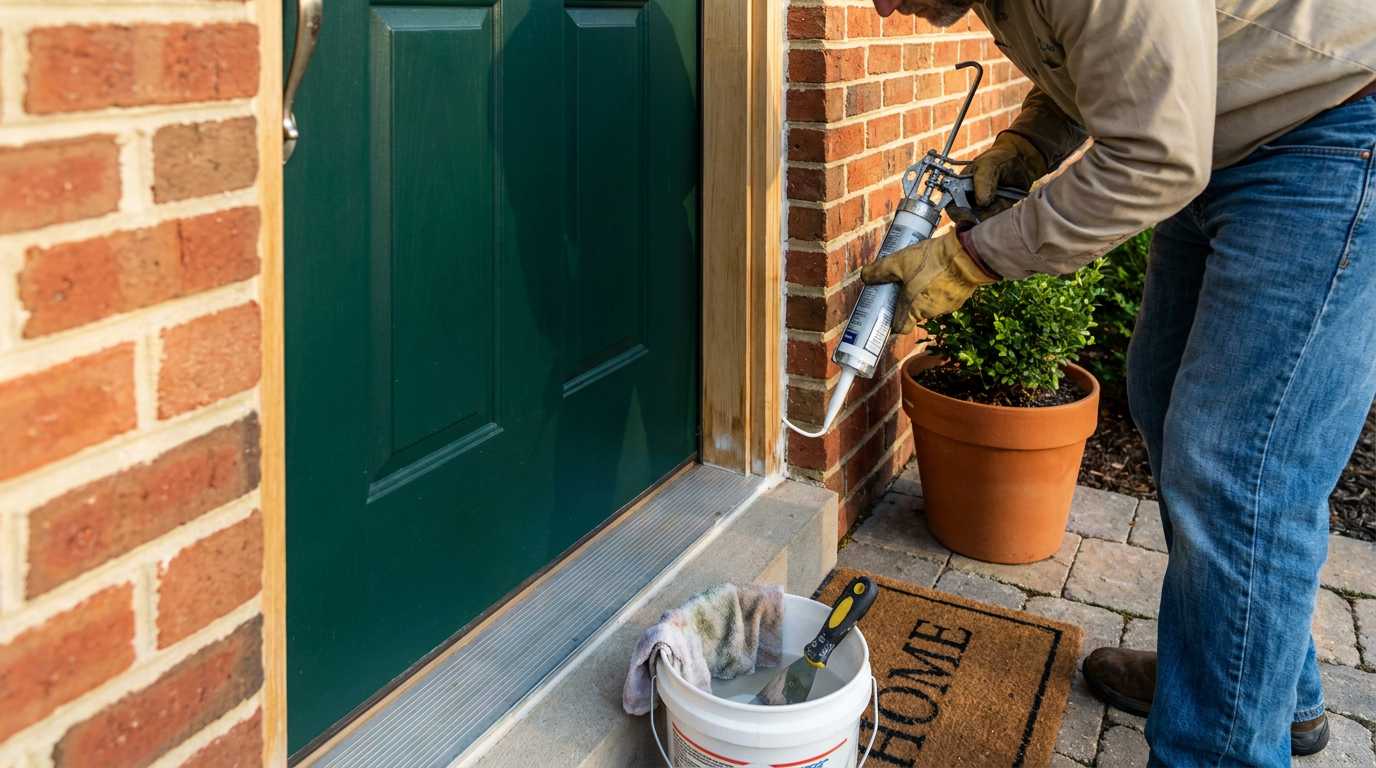
Repainting or refinishing trim also matters. Exterior coatings help shed water and protect wood or fiber based materials from repeated wetting and drying. Scrape loose paint, sand where needed, spot prime bare areas, and apply a durable exterior coating suited to your climate. Pay extra attention to end grain, lower edges, and horizontal trim surfaces because these are the areas most likely to absorb moisture.
Keep nearby conditions working in your favor as well. Clear debris from roof valleys and behind trim ledges. Maintain gutters and downspouts so water is not cascading over window heads or soaking lower walls. Trim back plants that hold moisture against siding and prevent air circulation. Sometimes the most effective flashing and trim maintenance is simply reducing the amount of water the assembly has to manage.
When a Repair Is Fine and When a Professional Is the Better Choice
Homeowners can often handle surface maintenance, but some situations deserve professional evaluation. If you see recurring leaks, soft or rotted wood, corrosion that has eaten through flashing, missing flashing, or evidence that water is getting behind siding or roof materials, the problem may involve the underlying layering of the assembly. That is not just a caulk issue. It may require selective removal and proper reconstruction.
Call a professional if moisture returns soon after resealing, if interior staining keeps spreading, or if mold odor appears near openings. The same applies if flashing is located in difficult roof areas, at upper stories, or wherever ladder work would be risky. Good maintenance should improve safety and resilience, not compromise either one.
A skilled contractor can also help if you are unsure whether a detail was installed correctly in the first place. New windows do not eliminate maintenance, and even efficient products still depend on good flashing and air sealing to perform well. If an opening was retrofitted without proper integration to the weather resistive barrier, repeated finish repairs may only cover the symptom.
In some cases, an energy advisor or building envelope specialist may be useful as well. Air leakage around openings can sometimes be confirmed through blower door testing or infrared imaging. Those services can be especially helpful if you are trying to reduce drafts and improve energy performance without immediately replacing windows.
How Flashing and Trim Support Energy Efficiency
Energy efficiency is often discussed in terms of insulation values and mechanical systems, but openings are where theory meets real world detailing. A high quality wall can still underperform if air leaks persist around windows and doors. ENERGY STAR guidance notes that sealing behind window or door trim can still provide substantial payoff because hidden gaps may remain even when windows seem airtight. That is an important reminder that performance depends on the whole assembly, not just the visible frame.
Air leakage creates drafts, temperature swings, and pressure imbalances that make a home feel less comfortable. It can also carry moisture into cavities where condensation risk increases. By maintaining trim joints and sealant lines, you help preserve the air sealing layer around openings. This may not be as dramatic as replacing all your windows, but it is often one of the most cost effective steps available.
NRCan reports that ENERGY STAR certified windows are about 20 percent more energy efficient than the average window, certified doors about 15 percent more efficient, and skylights about 35 percent more efficient. It also notes that replacing all windows with ENERGY STAR certified models can save an average of 45 percent on energy bills, though that is a full upgrade figure rather than a maintenance only figure. The practical takeaway is that if your home already has reasonably good openings, it makes sense to protect their performance through maintenance before deciding on replacement.
Well maintained flashing also helps energy performance indirectly by keeping insulation dry. Wet insulation rarely performs as intended. If water enters around an opening and dampens adjacent materials, thermal resistance falls, drying potential changes, and the assembly becomes less efficient. Moisture management and energy efficiency are closely linked, even when the connection is not immediately visible.
The Indoor Air Quality and Mold Prevention Connection
Moisture control is not only about preserving wood or paint. It also affects indoor air quality. EPA and other building guidance increasingly emphasize that uncontrolled moisture at openings, seams, and flashing details can contribute to mold and related indoor problems. A leak that stays hidden inside a wall cavity may not be obvious until odors, staining, or health related concerns begin to appear.
That is why sustainable home care should include moisture awareness, not just visible finish care. If trim is stained, if lower wall materials feel cool and damp, or if a room near an exterior opening seems musty after rain, it is worth investigating. A home can look neat on the surface while still holding moisture within the assembly.
Good ventilation and weatherization work best when the building envelope is also managing moisture properly. If you tighten a drafty home but leave water entry points unresolved, you may improve comfort while accidentally increasing the consequences of trapped moisture. Balanced, durable performance comes from treating air sealing, drainage, flashing, and maintenance as connected systems.
This is also one reason seasonal checks are so valuable. You are not only protecting finishes. You are supporting a healthier interior environment by reducing the chance that hidden dampness becomes an indoor air quality problem later on.
Common Misconceptions to Avoid
One common misconception is that trim is only decorative. In reality, trim can conceal important joints where air leakage and water intrusion happen. If it is split, soft, or pulling away, the problem may be more than aesthetic. The visible finish is often giving you useful information about the condition behind it.
Another misconception is that if the interior looks dry, the exterior assembly must be fine. Unfortunately, many leaks remain hidden for a long time. Water can travel along surfaces, collect behind finishes, and dry slowly enough that visible signs appear only after damage is advanced. Exterior inspections are therefore essential even when the inside appears normal.
Homeowners also sometimes assume that new windows mean no maintenance is needed. Better products can certainly improve efficiency, but performance still depends on proper installation, flashing, and upkeep. Sealants age, coatings wear, and movement occurs in every home. New does not mean maintenance free.
Finally, not all discoloration is cosmetic. Stains, peeling paint, rust marks, darkened wood, or recurring mildew can indicate active moisture issues. It is worth treating these signs as clues rather than merely as blemishes to cover.
A Simple Seasonal Maintenance Routine
If you want a realistic routine you can actually keep, aim for a short checklist in spring and fall. Walk the home exterior, inspect all accessible windows and doors, check roof to wall intersections from the ground, look for failed sealants and paint, and note any areas where water may be lingering. Follow with targeted cleaning and simple repairs while conditions are dry.
- Inspect caulk lines at trim to wall, trim joints, and trim to frame connections
- Check for peeling paint, soft wood, swelling, or staining
- Look for rust, lifted edges, or loose fasteners on visible flashing
- Clear debris from areas that shed water near openings and roof intersections
- Confirm gutters and downspouts are directing water well away from walls
- Photograph areas you want to monitor over time
- Schedule professional help for any recurring or hidden moisture concerns
This routine does not need to take all weekend. For many homes, an hour or two of careful observation twice a year is enough to catch the most important issues. The value comes from consistency. Small, repeated attention is usually more effective than waiting for a major problem to force a major project.
How Climate Resilience Changes the Conversation
Climate resilience has become a more relevant part of home maintenance because weather patterns are becoming less predictable in many regions. Heavier rain, stronger winds, prolonged damp periods, and more aggressive freeze thaw cycling all increase the stress on exterior joints and water management details. Assemblies that once seemed adequate may be pushed harder than before.
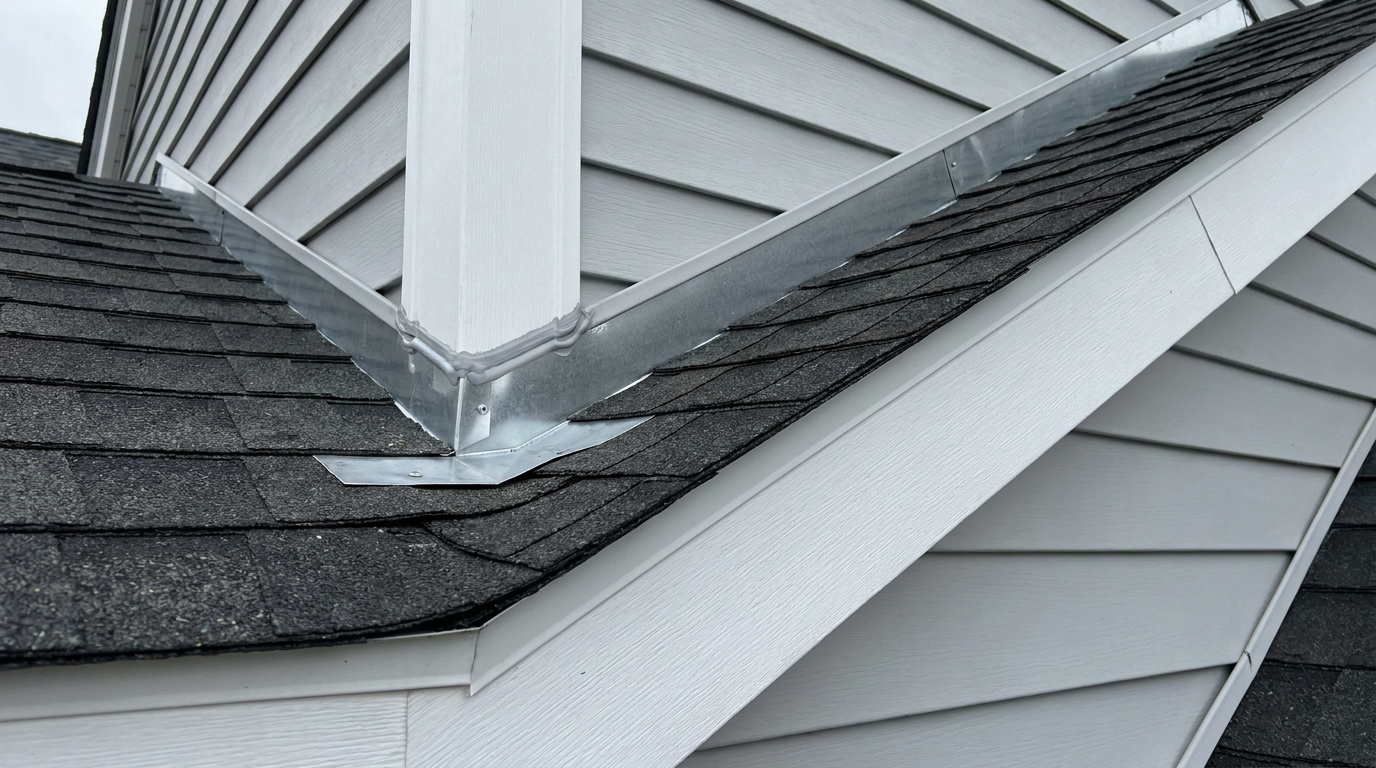
That makes routine flashing and trim maintenance more valuable, not less. You may not be able to control weather intensity, but you can improve your home’s ability to manage it. A secure top flashing, intact paint film, open drainage path, and sound sealant joint can make the difference between a weather event that passes harmlessly and one that begins a slow pattern of damage.
This resilience perspective also supports a broader sustainability mindset. Not every environmentally responsible action is about adding new technology. Sometimes it is about caring for the home in a way that helps it absorb stress, stay functional longer, and avoid wasteful failure. Thoughtful maintenance is a quiet form of adaptation.
Final Thoughts
Flashing and trim rarely get much attention, yet they protect some of the most important edges in a home. They help keep water moving in the right direction, reduce the risk of hidden damage, support energy efficiency, and preserve the life of windows, doors, siding, and finishes. In practical terms, they are exactly the kind of small but consequential details that make sustainable homeownership feel achievable.
You do not need to approach this work with perfectionism. A calm seasonal habit is enough. Inspect in spring and fall, document what you see, address minor problems promptly, and ask for professional help when the issue appears deeper than the surface. That approach is good for comfort, good for durability, and good for the resources already invested in your home.
For homeowners who want greener choices without unnecessary complexity, this is a reassuring place to begin. Maintaining flashing and trim is affordable, grounded, and effective. It protects both the performance of the building envelope and the long term value of the home, while quietly supporting a lower impact way of living.



No Comment! Be the first one.