


How to Maintain Your Sump Pump: A Step-by-Step Guide for Reliable Basement Flood Protection
A sump pump is one of those home systems that gets ignored when everything is dry and suddenly becomes the most important piece of equipment in the house when heavy rain hits. If your basement or crawl space depends on a sump pump, routine maintenance is not optional. It is basic risk management. A pump that has not been tested, cleaned, or checked for power and drainage problems can fail right when groundwater rises, and the result can be soaked flooring, damaged drywall, ruined storage, mold risk, and expensive cleanup.
Table Of Content
- Why sump pump maintenance matters more than most homeowners think
- Know the parts of your sump pump system
- How often should you maintain and test a sump pump?
- Tools and supplies to have before you start
- Step by step sump pump maintenance
- Step 1: Inspect the area around the sump pit
- Step 2: Disconnect power and remove the pit cover if needed
- Step 3: Clean the sump pit and pump intake area
- Step 4: Check the float switch for free movement
- Step 5: Test the pump by adding water to the pit
- Step 6: Inspect the check valve and discharge line
- Step 7: Check the power source and alarm features
- Step 8: Test the backup sump pump and battery system
- Step 9: Reassemble the system and document what you found
- Common sump pump problems and what they usually mean
- Maintenance mistakes that cause preventable failures
- Best practices for long term basement flood prevention
- What to do if your basement floods anyway
- When to call a professional
- Final thoughts
That is why a practical maintenance routine matters. Federal guidance in Canada notes that sump pumps are common and effective at moving water away from foundations and basements when heavy rain, ice, or snowmelt overwhelms other drainage systems. In plain terms, the pump is often your last working line of defense before water gets into finished or stored spaces. When you look at it that way, regular maintenance is not just a plumbing task. It is part of overall flood readiness for the house.
This guide explains how to maintain your sump pump step by step, with a focus on prevention. The goal is to help you catch small problems before they become a flooded basement, a burned out motor, or a failed backup system during a power outage. We will cover the full sump system, not just the pump itself, because the pit, float switch, discharge line, check valve, power source, and backup all have to work together if you want reliable protection.
Most homeowners can handle the basic inspection and testing described here with simple tools and a little care. If you find wiring issues, major clogging, repeated pump cycling, signs of sewer cross connection, or chronic groundwater problems, call a licensed plumber or qualified contractor. Good maintenance does not replace professional work when the system design is wrong. It simply helps make sure a properly installed system stays ready.
Why sump pump maintenance matters more than most homeowners think
A sump pump has a simple job. It collects water that drains into the sump pit and pumps it away from the house before it rises high enough to flood the basement. But that simple job depends on a chain of parts working correctly under stressful conditions. Storms bring more water. Storms also bring power outages. Discharge lines can freeze in winter. Debris can jam floats. Batteries can weaken without obvious warning. A small issue in any one of those places can shut down the whole system.
Routine maintenance is valuable because failures are often preventable. A stuck float, a dirty pit, a blocked discharge line, a dead backup battery, or a bad check valve can all be found with a short inspection before the next storm. Once the basement is taking on water, your choices are limited and your costs go up fast. Flooring, insulation, base trim, drywall, storage boxes, and electrical systems do not care whether the damage came from a major flood or a pump that had not been tested in two years.
There is also a bigger resilience issue. Guidance from Canada and the United States increasingly frames sump pump care as part of broader flood mitigation. That includes backup power, proper grading, drainage improvements, discharge routing, and related devices such as backwater valves. A sump pump is important, but it works best as one part of a complete water management strategy around the home.
Insurance is another reason to take maintenance seriously. Many homeowners assume all water damage is covered the same way, but flood related losses can be treated differently under insurance policies. Ready.gov notes that many property insurance policies do not cover flood losses, and separate flood insurance may be needed in some areas. Even where there is coverage, claim limits, deductibles, and exclusions can make a preventable pump failure much more expensive than people expect.
Know the parts of your sump pump system
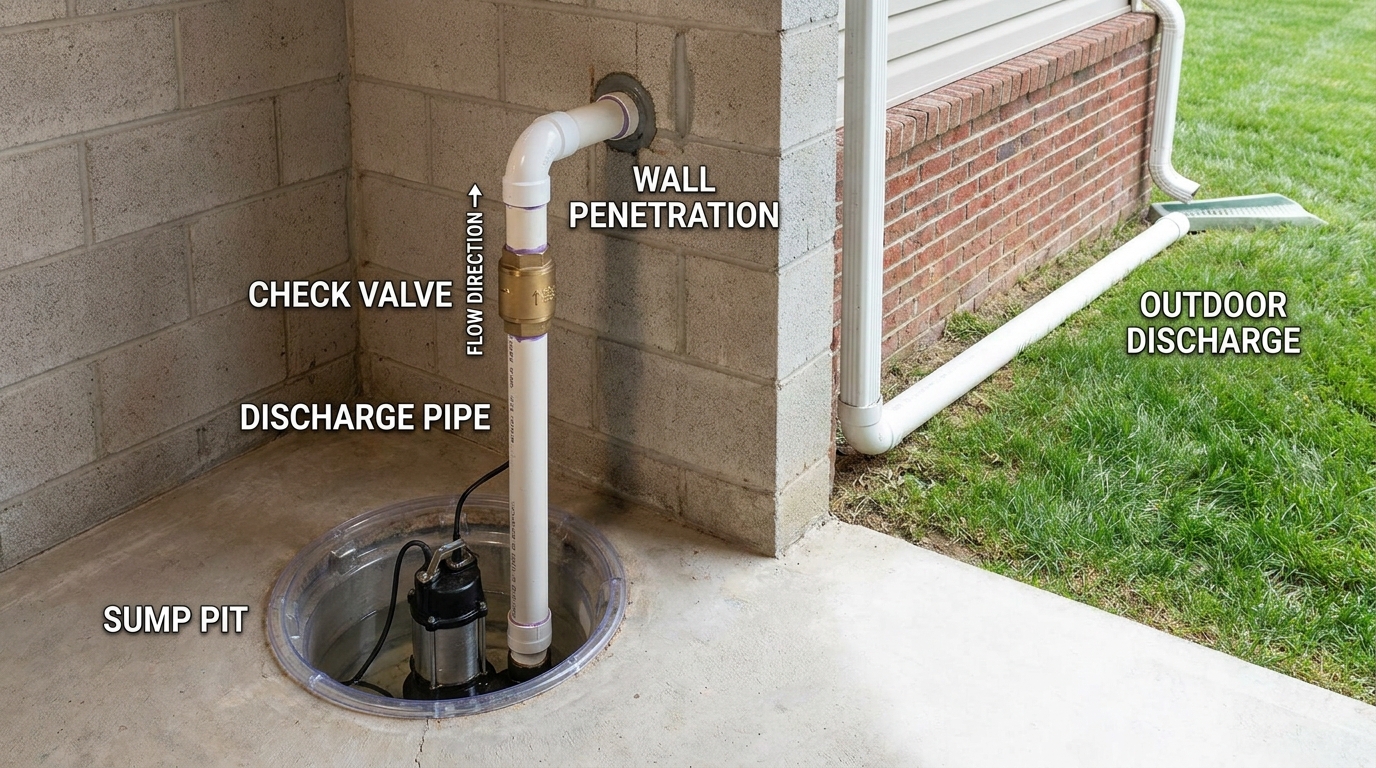
Before you maintain a sump pump, you need to know what you are looking at. A complete system usually includes the sump pit or basin, the pump itself, a float switch or pressure switch, a discharge pipe, a check valve, an electrical outlet, and in many homes a backup pump or backup power source. The check valve is especially important because it helps prevent water from flowing back into the pit after the pump shuts off. Without it, the pump can cycle more often than necessary and wear out faster.
The discharge pipe matters just as much as the pump. If the line is clogged, crushed, frozen, or routed poorly, the pump may run but still fail to move water safely away from the foundation. Federal Canadian guidance stresses that the discharge pipe should stay unobstructed and direct water away from the house. That sounds basic, but it is one of the most common weak points in the field. Water dumped too close to the foundation often circles right back to the sump system.
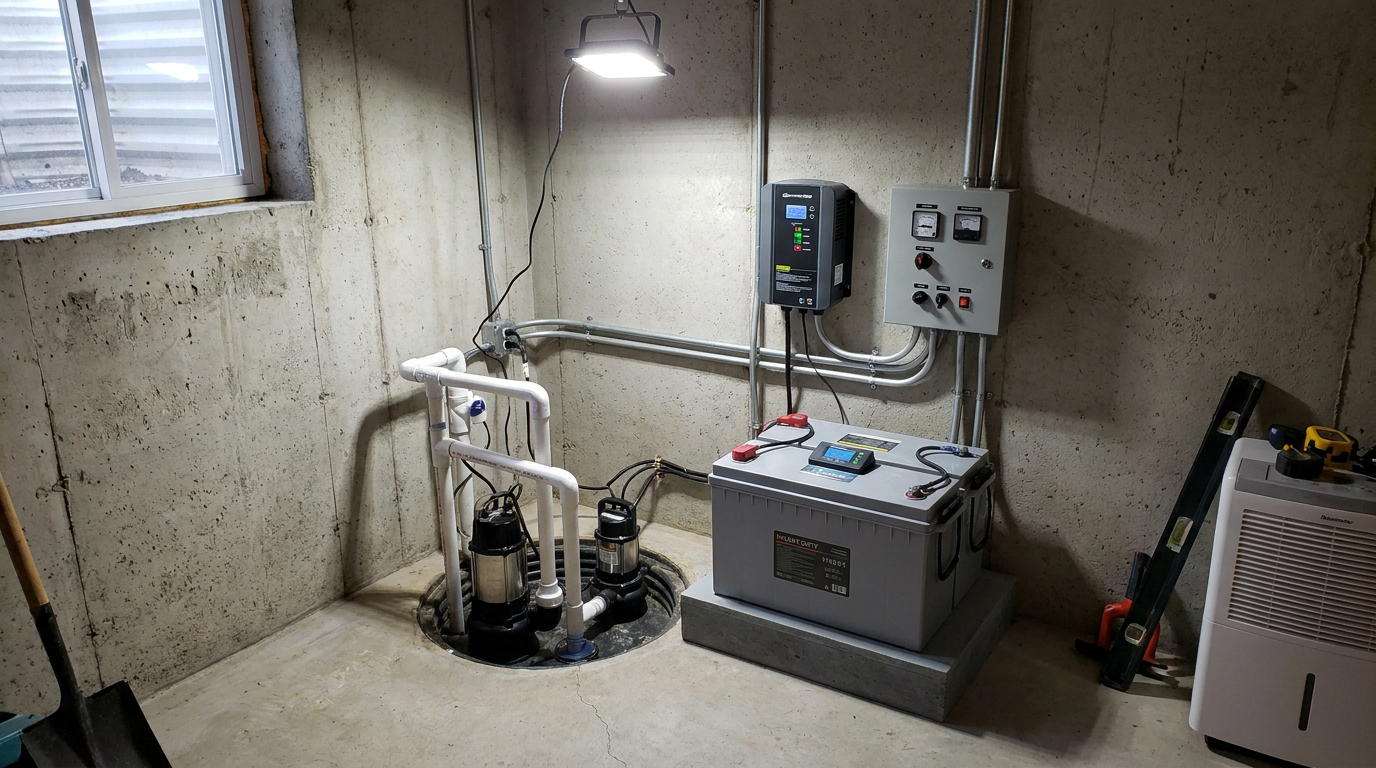
If your system has a backup sump pump, understand how it is powered. A backup tied to the same electrical source as the main pump will not help during a power outage. Battery backup systems are the most common recommendation because they keep operating when storms knock out utility power. Some homes use water powered or generator supported systems, but each type has its own maintenance requirements. The main point is simple. A backup is only useful if it can work when the primary system cannot.
Take a few minutes to identify each part in your basement. Follow the discharge line from the pump to the wall. Find the check valve. Look for the float switch and confirm there is enough space around it to move freely. Locate the outlet and see whether the cord connection looks secure and dry. If there is a backup battery box and charger, note the brand and model so you can look up the manufacturer instructions later.
How often should you maintain and test a sump pump?
The best maintenance schedule depends on how much your pump runs, how old it is, and how much flood risk your property has. A home with a high water table or frequent spring runoff needs more attention than a house where the pump only runs occasionally. As a practical rule, inspect the system at least every three to four months and always before major rainy seasons or snowmelt periods. In many homes, early spring and early fall are the minimum checkpoints.
Backup systems need extra attention. Canada.ca recommends testing backup pump performance two to five times per year depending on the model and installation. That is good advice because batteries age gradually and can look fine right up until the moment they are needed. If your area sees summer storms and winter freeze conditions, seasonal testing is not overkill. It is the price of reliability.
You should also do a quick visual check after any major storm or power outage. Make sure the pump actually ran if water entered the pit, make sure the discharge point outside is not buried or blocked, and make sure the battery charger on a backup unit has returned to normal status. Heavy use periods are when small weaknesses show up. Catch them right after the event while the evidence is still visible.
If your pump is older, increase the inspection frequency. Most sump pumps do not last forever, and a unit nearing the end of its service life needs closer observation. Regular cycling, unusual noise, vibration, rust, slow pumping, and frequent on and off behavior are all signs that maintenance alone may not be enough. In that case, testing helps you decide whether repair or replacement is the smarter move.
Tools and supplies to have before you start
You do not need a truck full of gear to maintain a sump pump, but a few basics make the job safer and cleaner. Gather work gloves, safety glasses, a flashlight, a bucket, old towels or rags, a small plastic scoop, a wet dry vacuum if you have one, and a few gallons of clean water for testing. Keep the pump manual nearby if possible. If you do not have it, most manufacturers post PDFs online by model number.
It also helps to keep a notepad or phone handy to record the date of the inspection, anything you cleaned, and any signs of wear. This sounds minor, but home maintenance is easier when you build a pattern. If a battery held charge well last spring and now drops quickly during a test, that history matters. If the pump starts making more noise than it did six months ago, that pattern matters too.
For safety, never work around a wet electrical connection. If there is standing water around the outlet or pump cord connection, shut off power at the breaker and call a professional if you are not comfortable evaluating the situation. Plumbing maintenance is straightforward. Electrical hazards are not. Take that distinction seriously every time you work around a sump system.
Step by step sump pump maintenance
Step 1: Inspect the area around the sump pit
Start with the simplest part of the job. Look at the floor around the pit, the outlet, and the visible pipe connections. You are looking for moisture staining, corrosion, mineral deposits, loose fittings, and any sign that water has been escaping where it should not. A dry floor does not guarantee perfect performance, but visible dampness or staining can point to a loose discharge fitting, a leaking check valve connection, or past overflow from the pit.
Check that stored items are not blocking access to the pump or battery backup. Homeowners often build obstacles around utility corners over time, and that can make emergency service harder or interfere with ventilation around chargers and batteries. A sump system should stay accessible. If you have to move boxes and shelves in the middle of a storm, the setup is already wrong.
Smell can tell you something too. A musty odor may point to chronic dampness. A sewage smell can suggest a drainage problem that needs professional review, especially if there is any suspicion that the sump was improperly tied into the sanitary sewer. The EPA warns that sump pumps connected to sanitary sewers can overload those systems and contribute to sewer overflows and backups. That kind of connection is not a shortcut. It is a real problem.
Step 2: Disconnect power and remove the pit cover if needed
Unplug the pump before putting your hands into the pit or moving the unit. If the plug is hardwired or difficult to access, shut off the breaker and confirm power is off. Some pits have sealed or screwed covers, while others are loose fitting. Remove the cover carefully and set it aside where it will not crack or warp. If the cover has vent or wire openings, note how it sits so you can reinstall it correctly.
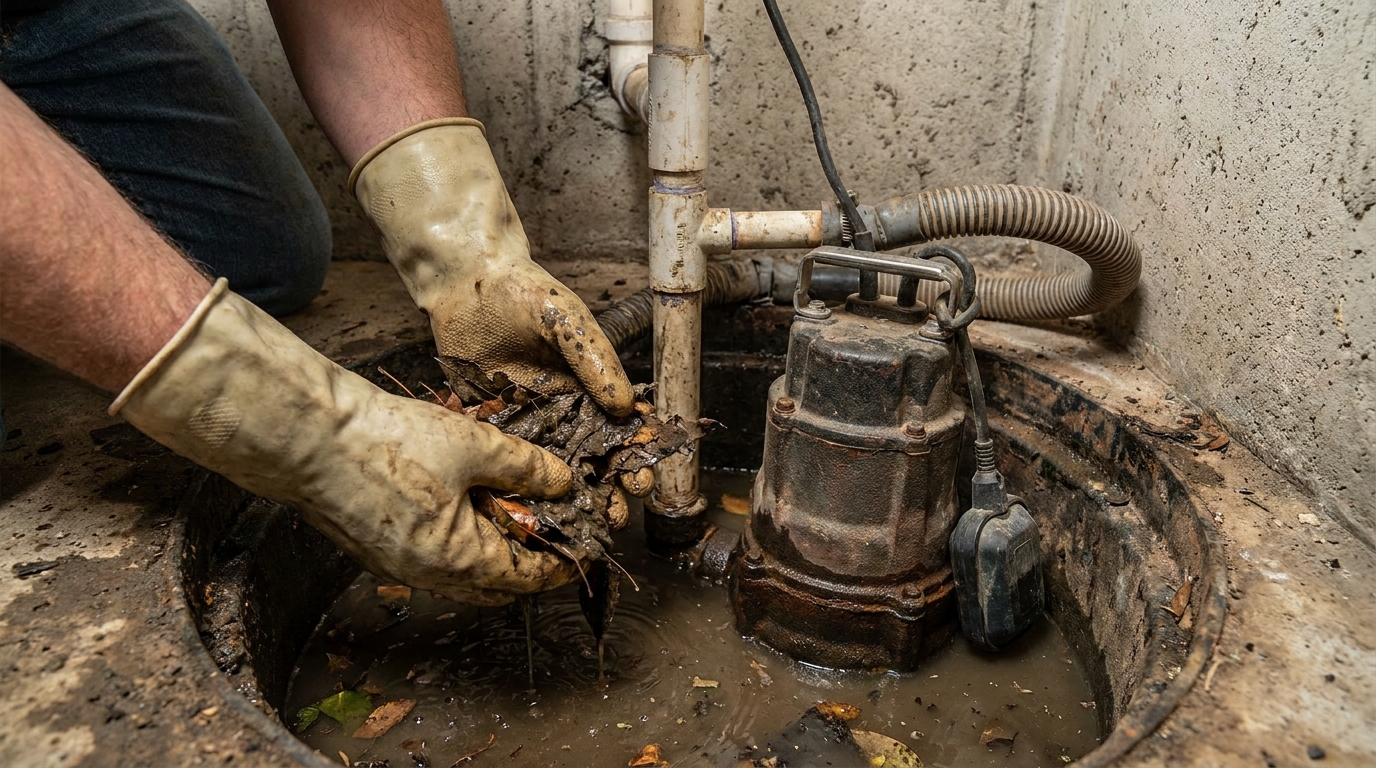
Once the pit is open, shine a flashlight inside and assess what has collected there. Small amounts of sediment are normal. Large debris, gravel, mud, or signs of greasy buildup are not. If the pit has become a catchall for dirt from basement work or general housekeeping neglect, that debris can interfere with pump performance and float movement.
Take your time here. A clean view of the basin often explains a lot. You may notice that the pump is sitting unevenly, that the float is trapped against the sidewall, or that the intake area has visible buildup. These are the kind of issues that cause failure even when the motor itself is still fine.
Step 3: Clean the sump pit and pump intake area
Use a scoop, bucket, or wet dry vacuum to remove loose sediment and debris from the basin. Be careful not to damage the float arm, wiring, or pump housing while cleaning. If there is a removable pump screen or intake opening you can access safely, wipe away slime and deposits. The goal is not to make the basin look new. The goal is to remove anything that can jam moving parts or choke water flow.
Pay special attention if you live in an area known for iron rich groundwater. Michigan State University Extension notes that iron ochre can clog basement drain pipes, sump pumps, and discharge piping. That kind of buildup can hide in the system even when the pump still turns on. If you see orange brown slime or stubborn deposits, that may be part of a larger drainage issue that requires more than a surface cleaning.
Do not use harsh chemicals in the pit unless the manufacturer specifically allows it. Most maintenance is mechanical, not chemical. Water movement, debris removal, and clear components matter more than household cleaners. If you suspect severe mineral or iron buildup inside the drainage system beyond the pit, speak with a plumber who understands local groundwater conditions.
Step 4: Check the float switch for free movement
The float switch is one of the most common failure points because it has to move freely to trigger the pump. Lift it gently by hand if the design allows and make sure it is not rubbing the basin wall, the pump body, or tangled wires. On vertical float designs, check that the float can travel up and down without sticking. On tethered designs, make sure the cord length allows proper movement without catching.
A float that cannot rise will not start the pump when the pit fills. A float that cannot drop may keep the pump running longer than it should. Both problems create risk. The first leads to flooding. The second can overwork the motor or cause short cycling depending on the setup.
If the switch seems sticky, do not ignore it because the motor still runs during manual testing. A pump that only works when helped by hand is not ready for the next storm. Replace worn float switches or have the unit serviced. This is a small repair compared with the cost of water damage cleanup.
Step 5: Test the pump by adding water to the pit
Once the pit is clean and the float is confirmed to move freely, restore power and test the pump with clean water. Pour enough water into the basin to raise the float and trigger a full pump cycle. Watch what happens. The pump should start at the expected water level, discharge water strongly, then shut off after the level drops. This is the most practical test because it simulates the way the system actually works under real conditions.
Listen during the cycle. A healthy pump typically produces a steady motor sound and noticeable water movement through the discharge line. Grinding, rattling, long delays before startup, or weak discharge flow are signs something needs attention. If the pump hums but does not move water, shut it down and investigate before running it again. A blocked intake, failed impeller, or discharge obstruction may be the cause.
Repeat the test once more if needed to confirm consistent operation. One successful cycle is good. Two similar cycles are better. Consistency is what you are after. A pump that works once and then stalls on the next try is telling you it cannot be trusted under sustained storm conditions.
Step 6: Inspect the check valve and discharge line
Follow the discharge pipe from the pump upward and toward the exit point. Look for leaks at joints, signs of vibration, and any section that appears unsupported or stressed. Check the check valve orientation and condition. Most check valves have a flow arrow. It should point away from the pump in the direction of discharge. If the valve fails, water can run back into the pit and force the pump to run more often than necessary.
Now inspect the outdoor discharge point. Water should be routed well away from the foundation so it does not recycle back toward the footing drain or sump basin. Clear leaves, mud, mulch, snow, and ice from the outlet area. In cold climates, pay close attention to sections where freezing is likely. A frozen discharge line is a classic winter failure point because the pump may run against a blockage and go nowhere.
If the line terminates too close to the house, fix that problem. Routing matters. The best pump in the world cannot protect a basement if it keeps dumping water next to the wall it is supposed to protect. This is one of the simplest upgrades homeowners can make, and it often has an immediate effect on reducing repeat pump cycles during wet weather.
Step 7: Check the power source and alarm features
Make sure the pump is plugged into a properly functioning outlet and that the cord is not loose, frayed, or stretched across the floor where it could be damaged. If the system has a ground fault device or dedicated circuit, test it according to the manufacturer instructions. Many sump pump problems turn out to be power problems, not plumbing problems. An outlet that trips under load or a cord connection exposed to moisture should be corrected right away.
If your system includes a high water alarm, test that as well. Alarms are useful because they tell you the main pump is failing to keep up or the water level is rising beyond normal range. A silent alarm with a dead battery helps no one. Basic operational checks take only a few minutes and can give you valuable warning before an overflow happens.
Do not run extension cords to a sump pump as a long term solution. If the outlet arrangement is poor, have it corrected properly. This is life safety equipment for your house, not a temporary tool setup. Reliable power is part of sump pump maintenance, not a separate issue.
Step 8: Test the backup sump pump and battery system
If you have a backup sump pump, test it several times a year. This point deserves emphasis because storms that bring basement water often bring power outages at the same time. Ready.gov recommends a sump pump with battery, generator, or other backup power source for exactly this reason. If the main pump depends on utility power and that power fails, the backup becomes the system that actually matters.
Check the battery case for corrosion, swelling, loose terminals, or warning lights on the charger. Review the manufacturer status indicators and perform a live test if the unit allows it. Some systems have a test button. Others require adding water to activate the backup float. The point is to confirm the secondary pump runs, the battery holds charge, and the charger is maintaining the system correctly.
Canada.ca recommends checking backup pump performance two to five times per year depending on the model and installation. Follow that guidance and your manufacturer instructions together. Replace aging batteries on schedule rather than waiting for visible failure. Batteries are wear items. Treat them that way.
Step 9: Reassemble the system and document what you found
Once cleaning and testing are complete, reinstall the pit cover securely and return the area to a safe, accessible condition. Make sure cords are arranged properly, lids are seated, and the discharge setup is unchanged from the tested condition. If you moved anything for inspection, put it back carefully. Small mistakes at reassembly create the kind of hidden problems that show up later under pressure.
Write down the date of the maintenance, the results of the test, and any issues you noticed. Record the battery age if there is a backup system. Note whether the outdoor discharge point needed cleaning or whether the check valve showed leakage signs. This simple record helps you spot recurring problems and plan replacements before failure happens.
If the system passed every test, that is good news. But the real value of maintenance is in building confidence based on evidence, not assumption. You are not guessing the pump works. You have just seen it work, and you have checked the parts around it that support that performance.
Common sump pump problems and what they usually mean
When a sump pump misbehaves, the symptom usually points toward a handful of likely causes. A pump that does not start may have a power issue, a stuck float, a failed switch, or a dead motor. A pump that runs but does not move water may have a blocked intake, clogged discharge line, frozen outlet, bad impeller, or failed check valve arrangement that lets water return too quickly. A pump that cycles constantly may be undersized, badly adjusted, or fighting water that is being discharged too close to the foundation.
Noise matters too. Rattling can come from pipe movement or loose fittings. Grinding can indicate internal wear. Loud banging can happen when the discharge setup lacks proper support or when check valve action is rough. None of these should be ignored just because the system still runs. Mechanical systems usually get louder before they fail outright.
If water enters the pit but drains slowly even though the pump turns on, look beyond the pump. Hidden clogging in perimeter drains or discharge piping may be reducing flow. Iron ochre can be part of that picture in some regions. This is a good example of why sump maintenance has to include the whole drainage system. A healthy motor cannot overcome blocked pathways indefinitely.
Practical rule: if the pump starts reliably, moves water strongly, and shuts off at the right level, the system is doing its job. If any one of those three actions is weak or inconsistent, do not wait for the next storm to sort it out.
Maintenance mistakes that cause preventable failures
The most common mistake is assuming that installation equals protection forever. A sump pump is not a one time purchase that can be forgotten in a corner of the basement. It is a working mechanical system that lives in a dirty environment and is often needed during the worst possible conditions. If you never test it, you are trusting luck more than maintenance.
Another common mistake is ignoring the discharge route. Homeowners sometimes focus on the pump because it is visible, while the actual failure point is outside where the pipe is buried in snow, clogged with debris, or discharging next to the foundation. The pump can be running exactly as designed and still fail to protect the basement if the water has nowhere safe to go.
Backup complacency is another problem. People install a battery backup and then never check the battery condition again. That defeats the point. A backup that shares the same power source as the main pump is also a false sense of security. During an outage, both systems can fail together. That is why independent backup power is so strongly recommended in flood guidance.
One more mistake is trying to solve every water issue with the sump pump alone. If exterior grading pitches toward the house, gutters dump at the foundation, downspouts are short, or footing drains are compromised, the pump ends up doing too much work. Maintenance is important, but it cannot compensate for poor drainage design around the building.
Best practices for long term basement flood prevention
Good sump pump maintenance should be paired with broader flood prevention measures. Keep gutters clean and extend downspouts well away from the house. Maintain proper grading so surface water flows away from the foundation. If your home is in a higher risk area, talk with a qualified contractor about backwater valves, drainage improvements, and foundation waterproofing upgrades where appropriate. These are not trend driven add ons. They are practical ways to reduce pressure on the sump system.
It also makes sense to review your insurance coverage and understand what water related losses are and are not covered. A pump can reduce risk, but no system is perfect. Knowing where the policy limits are helps you make better decisions about storage, finishing basements, and investing in backup protection. Important documents and valuables should not be stored low in areas that depend on a pump for protection.
As weather patterns become less predictable and heavy rain events become more common in many regions, climate resilience is no longer an abstract concept. For homeowners, it often starts with basic maintenance of drainage and pumping systems. That is not dramatic advice, but it is the kind that saves real money. Houses last longer when water is managed properly.
What to do if your basement floods anyway
Even a well maintained sump pump can be overwhelmed by extreme conditions, blocked drains, or extended outages. If your basement floods, put safety first. Stay clear of standing water if there is any chance electrical circuits are energized. Shut off power to the affected area only if you can do so safely. If there is doubt, call an electrician or emergency professional before entering the water.
Do not pump a flooded basement dry all at once. Ready.gov advises pumping out water slowly, about one third of the water per day, to reduce the risk of wall collapse or floor buckling. That advice surprises many homeowners, but it is sound. Soil pressure outside the basement can remain high, and removing interior water too quickly can create a dangerous imbalance.
After the immediate event, inspect or have a professional inspect the sump pump, electrical components, backup system, and any materials that got wet. Flooding often leaves behind sediment and contamination that affect future pump performance. Cleanup is not the end of the job. Restoring the sump system to reliable working order is what prepares the house for the next storm.
When to call a professional
Call a licensed plumber or qualified sump specialist if the pump fails repeated tests, trips breakers, runs constantly, leaks at pipe joints you cannot easily repair, or shows signs of major wear. Professional help is also the right move if you suspect improper sewer connections, severe iron ochre clogging, damaged perimeter drains, or a discharge route that cannot be corrected easily from the exterior.
If your basement has flooded before and the pump appears undersized or overwhelmed during ordinary storms, ask for a full system review rather than another quick repair. Sometimes the real fix is a better pump, a larger basin, a more effective check valve setup, improved discharge routing, or a properly designed backup system. Repairing the same symptom every year is not maintenance. It is a sign the system design needs improvement.
Electrical concerns should also trigger a professional call. Water and electricity are a bad combination, and no homeowner should take chances with damaged cords, wet outlets, or uncertain wiring near the pit. A good contractor will respect the limits of the system and tell you when it needs more than a tune up.
Final thoughts
Maintaining a sump pump is not complicated, but it does require consistency. Clean the pit, verify float movement, test the pump with water, inspect the discharge line and check valve, confirm reliable power, and test the backup system several times a year. Those steps do not take long, and they address the problems that cause many preventable failures. In return, you get a much better chance that the system will work when heavy rain, snowmelt, or groundwater pressure tests your basement.
The bigger lesson is that sump pump maintenance is really water management maintenance. The pump, the pipe, the grading, the backup power, and the drainage strategy all have to support one another. When homeowners understand that, they stop treating the sump pump as a hidden appliance and start treating it like the flood protection equipment it really is.
If you make this inspection part of your seasonal home routine, you will reduce the odds of a bad surprise and increase the odds of a dry basement. That is the kind of maintenance that pays for itself. Quietly, practically, and at the exact moment it counts.



No Comment! Be the first one.