


Transform Your Space: A Step-by-Step Guide to Furniture Refinishing
There is something quietly transformative about furniture refinishing. A worn table, a tired chest, or a scratched cabinet may look past its prime at first glance, yet beneath the faded finish there is often a remarkable foundation waiting to be revealed. Refinishing allows you to preserve craftsmanship, reduce waste, and shape a piece so it feels beautifully at home in your interior. It is both practical and expressive, a meeting point between utility and artistry.
Table Of Content
- Why Furniture Refinishing Feels So Rewarding
- Begin With Safety, Especially for Older Furniture
- Create a Safe Workspace
- Step 1: Assess the Piece Before You Touch the Finish
- Refinishing vs. Restoration
- Step 2: Gather the Right Materials and Choose Thoughtfully
- A Beginner Supply List
- Step 3: Clean Thoroughly Before Sanding or Stripping
- Step 4: Decide Whether to Sand, Strip, or Scuff and Recoat
- How to Sand Elegantly and Effectively
- Step 5: Repair Damage Before You Apply Color
- Step 6: Test Your Finish Before Committing
- Step 7: Apply Stain, Paint, or Oil With Restraint
- Choosing a Finish by Use and Style
- Step 8: Let It Cure Properly and Reassemble With Care
- Designing for Elegance: How Finish Choice Changes the Mood
- Common Mistakes Beginners Should Avoid
- Disposal, Cleanup, and Responsible Finishing
- When to Call a Professional
- Final Thoughts: Bringing Character Back Into the Room
For beginners, furniture refinishing can seem intimidating because it involves more than paint and sandpaper. It asks for observation, patience, material awareness, and a thoughtful respect for safety. Old coatings, dust, chemical strippers, and unknown finishes require a measured approach, especially when working with vintage or painted furniture. The good news is that you do not need advanced carpentry skills to achieve an elegant result. You simply need a clear process and the willingness to move carefully from one stage to the next.
This guide is designed to help you refinish furniture with confidence while maintaining a refined aesthetic. You will learn how to assess a piece, choose the right tools and products, work safely, prepare surfaces correctly, repair minor damage, and apply a finish that highlights beauty rather than hiding it. The goal is not to produce a rushed makeover. The goal is to create a piece with grace, character, and longevity.
Why Furniture Refinishing Feels So Rewarding
Refinishing is one of the most satisfying forms of home improvement because the transformation is immediate and deeply personal. Instead of purchasing something mass-produced, you are reworking a piece that already has a story. A modest thrifted dresser can become an anchor in a bedroom. An inherited coffee table can find new life in a contemporary living room. Through finish, color, and texture, you can create a dialogue between past and present.
There is also a growing appeal in the sustainability of refinishing. Reusing quality furniture rather than discarding it supports a more circular way of designing a home. Solid wood construction, detailed joinery, and classic proportions are often found in older pieces, and these are qualities worth preserving. Refinishing offers a way to honor craftsmanship while reducing the environmental impact associated with replacing furniture.
Design-wise, the most elegant results tend to avoid excess. Rather than heavily distressing a piece or coating it in an opaque finish that obscures all detail, a sophisticated refinishing project often celebrates natural grain, warm undertones, subtle color shifts, and matte or satin sheens. The finished piece should feel considered, not overworked. It should sit comfortably within a room, adding depth and presence without shouting for attention.
Begin With Safety, Especially for Older Furniture
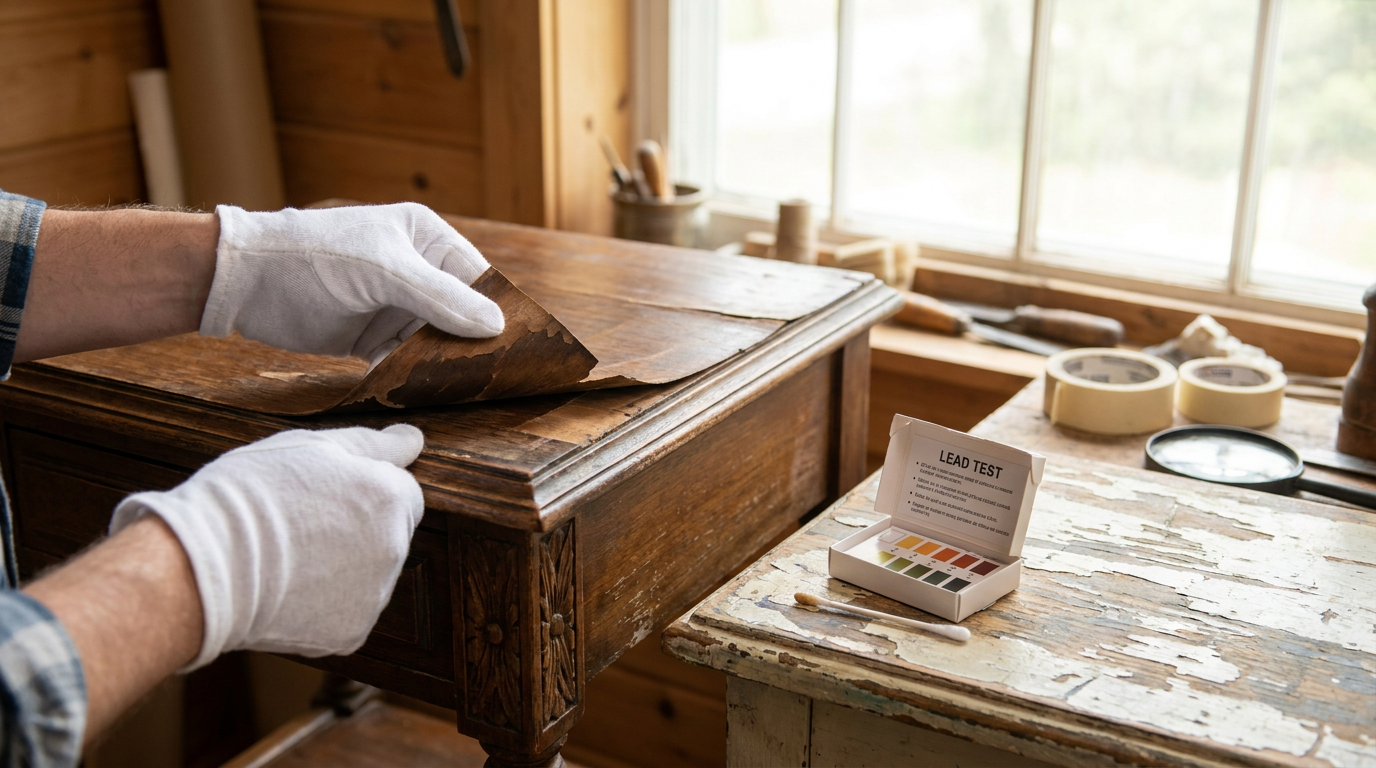
Before you think about stain colors or topcoats, begin with safety. This is essential when refinishing older furniture, especially painted pieces. In North America, guidance from the U.S. EPA notes that homes built before 1978 may contain lead-based paint, and disturbing painted surfaces can create hazardous dust. If you are working on an older item with unknown coatings, the wisest approach is to test first or assume the finish may be hazardous until proven otherwise. This is not alarmist advice. It is simply responsible practice.
Lead dust can travel easily. It can settle on clothing, hands, floors, and nearby surfaces, which means a small project can affect more than the furniture itself. Keep children and pets completely away from the work zone. Work in a contained area with a protective floor covering, and avoid creating unnecessary airborne dust. If you suspect lead paint, do not proceed casually with aggressive sanding.
Chemical safety matters just as much. Some older stripping products contain ingredients that have raised serious health concerns, including methylene chloride. For DIY projects, it is far better to choose lower-toxicity alternatives and carefully read every label for ventilation, protective equipment, and disposal instructions. A refined project is not simply beautiful in the end. It is thoughtful from the very beginning.
Important: If a piece may contain lead-based paint or an unknown hazardous finish, test it first or treat it as potentially hazardous until you can confirm otherwise. Safe refinishing begins with containment, ventilation, protective gear, and careful cleanup.
Create a Safe Workspace
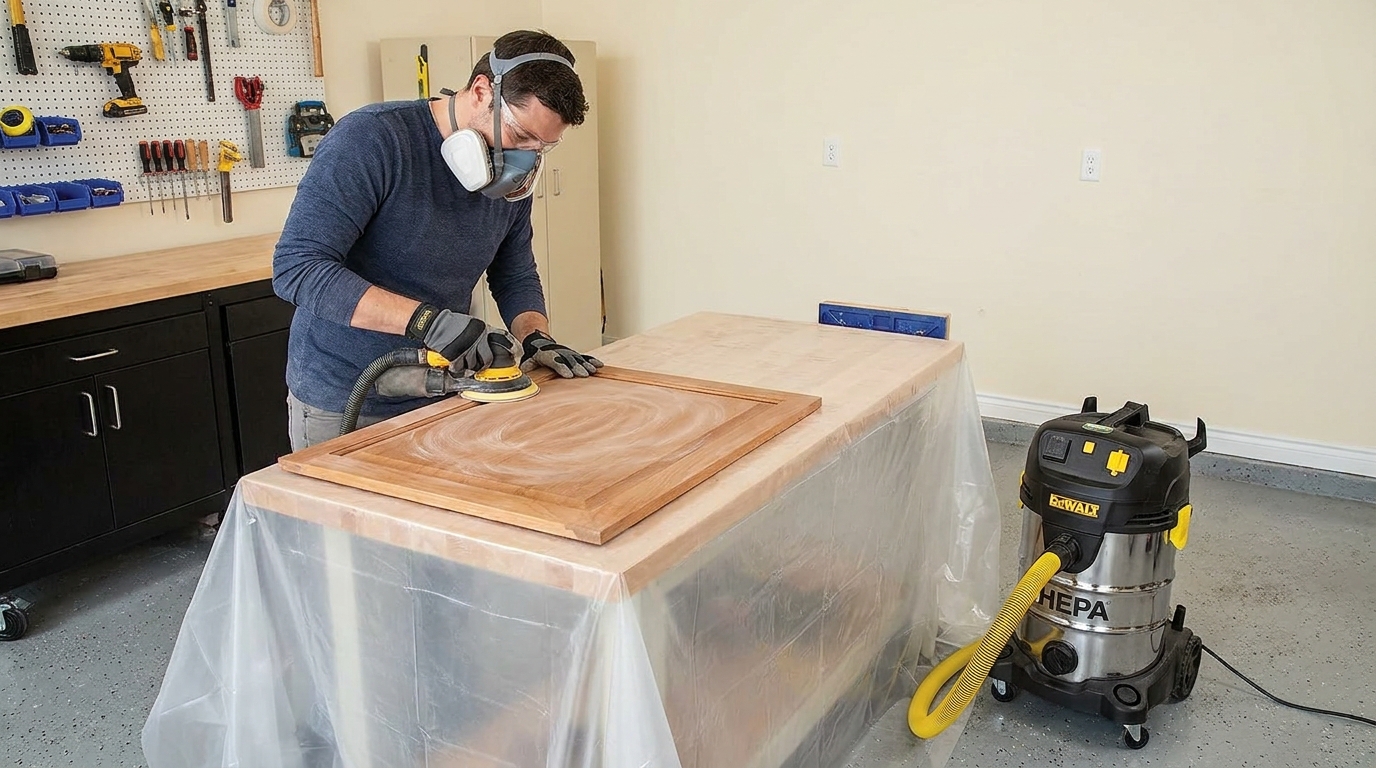
Your workspace should feel orderly and controlled. Cover floors with plastic sheeting or another protective layer, tape off the area if needed, and keep windows open when products require ventilation. If you are indoors, use fans strategically to direct fumes away from the room, but avoid creating airflow that spreads dust throughout the home. A garage with the door open or a covered outdoor workspace can work well, provided weather and humidity are appropriate.
Wear gloves, safety glasses, and a suitable mask or respirator depending on the products and dust involved. Not every project demands the same level of protection, so follow manufacturer instructions closely. Keep separate clothing for refinishing work and wash your hands thoroughly afterward. It may seem like a small ritual, yet these details matter greatly when old finishes are involved.
Cleanup deserves the same care as the project itself. EPA guidance emphasizes dust-minimizing practices such as containment, HEPA vacuuming, and damp cleaning. Dry sweeping can redistribute harmful particles into the air, so it is better to use a HEPA vacuum where appropriate and follow with damp wipes or mops. Collect rags, finish residue, dust, sludge, and used stripper materials according to local hazardous waste rules.
Step 1: Assess the Piece Before You Touch the Finish
The first practical step in furniture refinishing is assessment. Look at the piece in natural light and ask what it truly needs. Is the finish scratched but stable, or is it flaking and uneven? Is it solid wood, veneer, laminate, or a combination of materials? Are there water rings, missing hardware, loose joints, chipped corners, or previous repairs that will affect your approach?
This stage is where beginners often save themselves from frustration. Not every piece should be stripped to raw wood. Sometimes a light sanding and a fresh topcoat are enough. Sometimes a painted piece is best repainted rather than stained. Sometimes veneer damage means you need a more delicate hand. If you start refinishing without understanding the material and condition, you may remove too much, choose the wrong products, or create an avoidable repair problem.
Study the style as well as the structure. Elegant refinishing begins with respect for proportion, silhouette, and detail. A slender mid-century console may look stunning in a soft walnut stain with a satin finish. A country pine table may benefit from a gentler matte topcoat that preserves its warmth. The more accurately you see the piece, the better your refinishing decisions will become.
Refinishing vs. Restoration
It helps to understand the distinction between restoration and refinishing. Refinishing focuses on the surface, meaning the existing coating is removed, repaired, or refreshed to improve appearance and protection. Restoration usually implies a broader return to original condition, which may include structural work, traditional materials, or historically accurate finishes. As a beginner, you are most likely refinishing, though small restoration tasks like tightening joints or replacing period-appropriate hardware may be part of the process.
This distinction matters because it shapes your expectations. You are not necessarily trying to make a piece look new. You are trying to make it look intentional, cared for, and suitable for daily life. In many cases, a little age and texture add charm. Refinishing should refine the story, not erase it.
Step 2: Gather the Right Materials and Choose Thoughtfully
A successful refinishing project depends on using appropriate materials rather than accumulating every product on the shelf. Your exact supplies will vary, but most projects require cleaning materials, sandpaper in several grits, wood filler if needed, tack cloth or damp wiping cloths, brushes or foam applicators, stain or paint if desired, and a protective topcoat. You may also need a scraper, putty knife, stripping product, clamps, and replacement hardware.
When choosing finishes, consider both aesthetics and indoor air quality. Low-VOC and water-based products have become increasingly popular for good reason. They are often easier for beginners to use, generally dry faster, and can be more comfortable in home environments when used correctly. Oil-based finishes still have advantages in some applications, particularly for depth and durability, but they require careful ventilation and cleanup.
The most refined material choices tend to support the character of the wood rather than conceal it. Warm walnut, honey oak, soft chestnut, and natural clear finishes can all feel timeless when paired with the right sheen. Satin and matte topcoats often look more sophisticated than overly glossy surfaces, especially in contemporary interiors. They reflect light softly and allow form and grain to remain the focal point.
A Beginner Supply List
- Cleaning solution: A gentle degreaser or wood-safe cleaner to remove oils, wax, and dirt before refinishing.
- Sandpaper: Coarse, medium, and fine grits depending on the condition of the surface.
- Protective gear: Gloves, eye protection, and a suitable mask or respirator.
- Repair materials: Wood filler, glue, clamps, and a putty knife for small defects.
- Finish products: Stain, paint, oil, shellac, lacquer, varnish, or polyurethane based on your desired look and durability.
- Application tools: Quality brushes, lint-free cloths, foam applicators, and stirring sticks.
- Cleanup tools: HEPA vacuum if needed, damp cloths, waste bags, and proper disposal containers for rags and residues.
Buying quality basics usually leads to a better result than trying to compensate with excessive products later. A good brush, a reliable topcoat, and patient surface preparation will always do more for elegance than trend-driven shortcuts.
Step 3: Clean Thoroughly Before Sanding or Stripping
Old furniture accumulates more than dust. It can hold wax, polish, kitchen grease, smoke residue, body oils, and layers of product that interfere with adhesion. Cleaning is therefore not an optional prelude. It is a vital first treatment. If you sand dirt into the surface or apply finish over wax, the result may be blotchy, sticky, or uneven.
Use a cleaner suitable for furniture surfaces and avoid soaking the wood. Wipe methodically, paying attention to carved details, drawer fronts, edges, and handles where buildup tends to collect. If hardware is removable, take it off and label each piece so reassembly is simple. Sometimes this basic cleaning step already reveals that a piece is in better condition than you expected.
Allow the furniture to dry completely before moving on. A calm, dry surface gives you a more accurate read of scratches, veneer chips, and finish failure. It also prevents moisture from interfering with sanding and repair materials. Beginners often rush here, but refined results come from honoring each stage fully.
Step 4: Decide Whether to Sand, Strip, or Scuff and Recoat
One of the most common misconceptions about furniture refinishing is that sanding is always the answer. In reality, the best method depends on the existing finish and the age of the piece. If the coating is thin and worn, sanding may be appropriate. If there are multiple heavy layers of old finish or paint, a stripper may be more effective. If the surface is fundamentally sound and you only want to refresh it, a light scuff sand followed by a new coat may be enough.
For painted or older furniture, think carefully before using power sanders aggressively. Sanding can produce a large amount of dust, which becomes a serious concern when old paint may contain lead. If there is any doubt, test first and use lead-safe work practices. Dust control is not a decorative concern. It is a health measure.
If you use a chemical stripper, choose a lower-toxicity product and follow its instructions exactly. Apply it in a controlled manner, let it work for the recommended time, and scrape gently to avoid gouging the wood. Work in manageable sections rather than trying to strip the whole piece in one hurried pass. Patience here protects the integrity of the surface.
How to Sand Elegantly and Effectively
Sanding should feel deliberate, not aggressive. Begin with the least abrasive grit that will reasonably remove the old finish or smooth the flaws. Move with the grain whenever possible and keep pressure even so you do not create dips. Edges, corners, and veneer surfaces require particular care because they can be sanded through surprisingly fast.
As you progress to finer grits, the wood begins to feel silkier and more responsive to stain or finish. Vacuum dust between stages and wipe the surface with a damp cloth or tack cloth, depending on your finishing system. A beautifully smooth substrate is what allows topcoats to look soft, luminous, and expensive. The elegance you admire in finished furniture is often hidden in the discipline of sanding.
Step 5: Repair Damage Before You Apply Color
Once the old surface has been removed or softened, defects become easier to see. Small dents, nail holes, chipped veneer, hairline cracks, and loose trim can all be addressed before finishing. This is the stage where a piece shifts from merely stripped to genuinely restored in spirit. Repairs do not have to be invisible, but they should feel harmonious.
Use wood glue for loose joints and allow it to cure fully under proper pressure if clamping is needed. Fill minor imperfections with a suitable wood filler and sand smooth once dry. If you are working with veneer, proceed gently. Veneer can absolutely be refinished, but it requires restraint because the top layer is thin. Missing veneer sections may call for patching, while loose edges can often be reglued carefully.
Color matching matters if your goal is sophistication. A poorly chosen filler can appear as pale spots under stain or dark marks under clear finish. Test repair products where possible, and remember that some fillers accept stain differently from real wood. In certain cases, a tinted filler or a strategic use of paint may produce the most polished final effect.
Step 6: Test Your Finish Before Committing
Testing is one of the most elegant habits a beginner can develop. Wood species, existing undertones, and sanding differences all affect how a stain or finish will look. A color that appears rich on the label may turn red, muddy, or overly dark on your piece. Test patches in an inconspicuous area, on the underside, or on a prepared wood sample before you move to full application.
This is also the moment to refine your design vision. Ask yourself whether the room would benefit from warmth, contrast, or softness. A cool gray stain may feel flat in a room that already lacks warmth. A deep espresso finish may overwhelm a delicate vintage form. A natural finish with a satin topcoat may reveal more beauty than a darker, trend-driven stain.
Sheen testing is just as important as color testing. Gloss levels alter the emotional quality of furniture. High gloss can feel formal or dramatic, but it also highlights imperfections. Satin is often a graceful middle ground, offering a soft reflection and practical durability. Matte feels contemporary and understated, especially on larger pieces with strong architectural lines.
Step 7: Apply Stain, Paint, or Oil With Restraint
When the surface is properly prepared, finish application becomes a pleasure rather than a struggle. Whether you choose stain, paint, hardwax oil, shellac, lacquer, varnish, or polyurethane, the principle is the same: apply thin, even coats and respect drying times. Thick coats often lead to drips, tackiness, visible brush marks, and uneven curing. Refinement comes from lightness of hand.
If staining, work with the grain and wipe excess consistently so the tone develops evenly. Some woods absorb stain more readily than others, so a conditioner may help in certain cases. If painting, choose a furniture-appropriate paint and use high-quality tools for a smooth result. Brush carefully in long passes and resist the urge to keep touching an area after it begins to set.
For clear finishes, the goal is depth without heaviness. Shellac can create a classic warmth, lacquer can produce a very smooth refined surface, oils can emphasize natural grain, and polyurethane or varnish can offer durability for high-use pieces. Water-based topcoats are increasingly popular for their lower odor and clarity, while oil-based options can add amber richness. The best choice depends on the visual mood you want and the demands of daily life.
Choosing a Finish by Use and Style
- Dining tables and desks: Favor durable protective finishes that can handle wear, moisture, and repeated cleaning.
- Dressers and sideboards: Satin clear coats, oils, or carefully chosen stains often balance beauty and practicality.
- Decorative side tables and accent pieces: You have more freedom to prioritize nuance, softness, and visual depth.
- Painted furniture: Select a topcoat only if the paint system recommends it or if the piece needs extra protection.
The most sophisticated finish is not necessarily the most dramatic one. It is the one that suits the proportions of the piece, complements the room, and allows touch, light, and material to feel in harmony.
Step 8: Let It Cure Properly and Reassemble With Care
Dry to the touch does not always mean cured. One of the easiest ways to spoil a beautiful refinishing job is to rush reassembly or place objects on a surface too soon. Follow product guidance for curing times and give the finish the stillness it needs. This waiting period can feel inconvenient, yet it is part of the craft. Fine results often ask for restraint long after the last brushstroke.
When the finish is ready, reinstall hardware thoughtfully. Clean original hardware if it suits the style, or replace it with something understated and complementary. The best hardware updates feel almost inevitable, as if the piece was always meant to wear them. Avoid overly ornate options unless they genuinely support the furniture’s character.
Drawer liners, felt pads, and subtle interior details can elevate the final result beautifully. These finishing touches may be small, but they create an experience of care. Refinishing is not only about what the eye sees from across the room. It is also about how the piece feels to use every day.

Designing for Elegance: How Finish Choice Changes the Mood
A refined furniture makeover is rarely about bold novelty alone. More often, it is about subtle balance. The undertone of a stain can warm a cool room or soften a stark one. A satin finish can make wood grain look velvety under evening light. A painted finish in a muted stone, olive, taupe, or charcoal can feel architectural and grounded rather than trendy.
Color theory plays an understated but important role here. Warm woods like walnut and chestnut pair beautifully with creams, linen tones, brass, and muted greens. Lighter oak-inspired finishes can brighten spaces that rely on natural textures and Scandinavian simplicity. Darker finishes bring depth and gravitas, but they need enough surrounding light and contrast to avoid heaviness.
The current movement toward elegant, understated refinishing is a welcome one. Rather than forcing every vintage piece into a distressed farmhouse aesthetic, more homeowners are choosing finishes that preserve original character. This approach allows craftsmanship to remain visible and gives a room a more layered, collected quality. Tasteful refinishing feels timeless because it does not chase attention. It creates atmosphere.
Common Mistakes Beginners Should Avoid
Most refinishing mistakes come from speed rather than lack of talent. Skipping cleanup, failing to test the finish, sanding too aggressively, applying thick coats, and ignoring curing times are all common errors. Another major mistake is treating every old piece as harmless. Unknown paint and finish layers can carry real health risks, especially when disturbed without containment or proper cleanup.
It is also easy to overcorrect aesthetically. Beginners sometimes choose stains that are too dark, topcoats that are too glossy, or hardware that overwhelms the original silhouette. When in doubt, edit. Simplicity often looks more luxurious than excess. If the shape of the furniture is already beautiful, your refinishing choices should support it quietly.
Do not underestimate surface preparation. Uneven sanding leads to uneven absorption. Poor dust removal leaves texture in the final finish. Inadequate repair work becomes more visible after stain is applied. If there is one principle to remember throughout the entire process, it is this: the quality of the final result is built during preparation.
Disposal, Cleanup, and Responsible Finishing
Once the project is complete, the work is not entirely finished until the space is safely cleaned and the waste is handled properly. Paint sludge, stripper residue, finish containers, solvent-soaked rags, sanding dust, and contaminated materials may require special disposal depending on your municipality. Even if you are a homeowner working on a single piece, local hazardous waste guidance still matters. Never assume all materials can go directly into household trash.
Rags deserve special attention because some finishing products can create fire risks if cloths are left crumpled together. Follow product instructions carefully for drying, storage, or disposal. Keep waste contained and out of reach of children and pets. If your project involved suspect coatings, be especially diligent about cleaning the area thoroughly with appropriate methods.
Responsible refinishing is part of beautiful living. It protects your household, respects the materials you use, and aligns the craft of making with the values of care and sustainability. The elegance of a room is never only visual. It is also reflected in how thoughtfully it was created.
When to Call a Professional
Not every piece should be a DIY project, and recognizing that can save both money and regret. If a furniture item is valuable, historically significant, heavily veneered, structurally unsound, or likely to contain hazardous coatings that you are not prepared to manage safely, professional refinishing may be the better path. The same is true if you want a specialized finish such as high-gloss lacquer, complex color matching, or major restoration work.
There is no failure in choosing expertise. In fact, it reflects discernment. A beginner project should feel educational and enjoyable, not dangerous or overwhelming. Start with a manageable piece like a side table, nightstand, or simple wooden chair before moving on to larger heirlooms.
The confidence you build on smaller projects will sharpen your eye and your technique. Over time, you will begin to recognize joinery styles, wood grain behavior, finish compatibility, and the subtle relationship between product choice and visual outcome. Refinishing teaches patience, and patience is one of the most beautiful design tools you can cultivate.
Final Thoughts: Bringing Character Back Into the Room
Furniture refinishing is far more than a cosmetic update. It is an act of renewal that blends craftsmanship, sustainability, and personal style. With the right approach, even a beginner can turn a neglected piece into something elegant and useful. The secret is not perfection. It is care. Care in assessing the piece, care in protecting your health, care in preparing the surface, and care in choosing a finish that suits the furniture and the room around it.
When done thoughtfully, refinishing has a remarkable effect on a space. It introduces warmth where there was once wear, individuality where there was once generic function, and history where there was once disposal. The result is furniture that feels grounded, tactile, and quietly luxurious. It reminds us that beauty does not always need to be bought new. Very often, it simply needs to be revealed.
So begin with one piece. Choose something with promise, set up your workspace carefully, move slowly through each step, and trust the process. In the soft glow of the final finish, you will discover that refinishing is not only about transforming furniture. It is also about transforming the way you see your home, your creativity, and the hidden potential in what you already have.



No Comment! Be the first one.