


How to Install a Smart Thermostat: A Step-by-Step Guide for Homeowners
There is something deeply satisfying about a home that seems to understand you. The temperature feels right when you wake up, the living room is comfortable by the time everyone gathers in the evening, and you are not wasting money heating or cooling empty rooms all day. That is part of the appeal of a smart thermostat. It is not only a gadget on the wall. It is a small daily luxury that can make home life feel smoother, calmer, and more in tune with your routine.
Table Of Content
- Why Homeowners Love Smart Thermostats
- Before You Buy or Install: Start with Compatibility
- What to check before installation
- Tools and Supplies You Will Need
- Basic tools for the job
- Step 1: Turn Off Power to Your HVAC System
- Step 2: Remove the Old Thermostat Cover and Document the Wiring
- Step 3: Remove the Old Base Plate
- Step 4: Install the Optional Power Accessory If Needed
- Step 5: Mount the New Smart Thermostat Base
- Step 6: Connect the Wires to the New Thermostat
- Step 7: Attach the Thermostat Display and Restore Power
- Step 8: Follow the App Setup for System Configuration
- Step 9: Create a Realistic Schedule for Comfort and Savings
- A simple schedule-building mindset
- Step 10: Test Heating, Cooling, and Fan Functions
- Common Installation Mistakes to Avoid
- When to Call a Professional
- How to Get the Most Value After Installation
- The Emotional Return on a Small Upgrade
- Final Thoughts
For many homeowners, this upgrade also comes with a practical benefit that is hard to ignore. In Canada, heating and cooling can represent nearly two-thirds of home energy costs, and Natural Resources Canada says a smart thermostat may help reduce those costs by nearly 8% in some cases. NRCan also notes that lowering the thermostat by 1°C for eight hours can save about 2% on heating energy use. Those numbers help explain why schedule-based temperature control matters so much. Small adjustments made at the right time can add up to meaningful savings over a season.
The good news is that installing a smart thermostat is often a very approachable DIY project. You do not need to be a seasoned contractor to feel successful here. What you do need is a little patience, a clear understanding of your HVAC system, and the confidence to move step by step. Major brands now offer app-guided compatibility checks and detailed setup instructions, which has made the process far less intimidating for first-time homeowners.
This guide will walk you through everything you need to know, from checking compatibility and turning off power to labeling wires, mounting your new thermostat, and setting up a schedule that supports real comfort and savings. If you have been wanting a home that feels easier to manage and more responsive to your lifestyle, this is a beautiful place to begin.
Why this upgrade matters: ENERGY STAR says certified smart thermostats are independently certified using actual field data to deliver energy savings and improve comfort. In other words, this is not just about convenience. It is about creating a home that feels better to live in while supporting smarter energy use.
Why Homeowners Love Smart Thermostats
Before diving into tools and wires, it helps to understand why smart thermostats have become such a popular project. Most people first notice the convenience. You can adjust the temperature from your phone, check settings while you are away, and avoid the familiar worry of wondering whether you left the heat or air conditioning running too long. There is reassurance in that kind of visibility. It makes your home feel more manageable even when life feels busy.
Then there is the comfort factor, which is often more meaningful than people expect. A smart thermostat can help reduce the daily temperature swings that make a home feel inconsistent. Instead of remembering to change settings manually, you can create schedules that align with sleeping, waking, leaving, and returning. Some models also use occupancy patterns, geofencing, or sensors to make adjustments automatically. The result is not just efficiency. It is a more settled atmosphere.
There is also an emotional ease that comes from reducing bill stress. Utility costs can feel unpredictable, especially during extreme seasons. A smart thermostat does not erase those costs, but it can help you use your system with more intention. If your heating or cooling has been running on habit rather than strategy, this single device can give you a more thoughtful rhythm that benefits both comfort and budget.
For families, hybrid workers, and anyone who values a home that supports everyday wellbeing, that combination of comfort and control feels especially powerful. It is a modest change on the wall, but it can influence the way the whole house feels.
Before You Buy or Install: Start with Compatibility
The most important first step is compatibility. This is where a little preparation prevents a lot of frustration later. Not every thermostat works with every HVAC setup, so before removing your old thermostat, take time to identify the type of system you have and compare it with the smart thermostat manufacturer’s compatibility tool. Google Nest and ecobee both encourage homeowners to use their checkers before purchase or installation, and that advice is worth following.
Most smart thermostats are designed for many 24V HVAC systems, but there are differences between single-stage and multi-stage systems, heat pumps, dual-fuel systems, and systems that require special handling. Current models are getting better at supporting heat pumps and more complex equipment, which is wonderful news for homeowners, but it also means you should not assume all units are interchangeable. A few minutes spent checking now can save you from rewiring or returning a thermostat later.
One common source of anxiety is the C wire, also called the common wire. Many homeowners worry that not seeing a C wire means a smart thermostat is out of reach. That is not always true. Google Nest notes that some installations require a C wire or a power accessory such as the Nest Power Connector, while ecobee says homes without a C wire can often use a Power Extender Kit. The key point is simple: lacking a visible C wire does not automatically mean you cannot install a smart thermostat, but you do need to confirm what your chosen model needs.
You should also understand an important misconception before you begin. A smart thermostat does not save money simply because it exists on the wall. The greatest benefit comes from proper setup, realistic scheduling, and using temperature setbacks in ways that match your household. Installation is the first step. Configuration is where the real payoff begins.
What to check before installation
- Your HVAC system type. Look for information on your furnace, air handler, heat pump, or current thermostat manual.
- Your existing wiring. Remove the thermostat cover if possible and inspect the terminal labels without disconnecting anything yet.
- Whether you have a C wire. It may be connected to the current thermostat or tucked behind the wall unused.
- Manufacturer compatibility tools. Use the app or website for the exact smart thermostat model you plan to install.
- Rebates or incentives. In Canada, NRCan notes that utilities or efficiency programs may offer rebates for ENERGY STAR certified smart thermostats.
If you are shopping for a thermostat rather than installing one you already own, look for an ENERGY STAR certified model. That certification is not just a branding detail. It reflects field-data-backed performance standards focused on energy savings and comfort.
Tools and Supplies You Will Need
This is a simple project in terms of tools, which is one reason it appeals to so many homeowners. You do not need a workshop’s worth of equipment. What matters more is working carefully and keeping track of each wire and screw as you go. A calm setup helps you feel in control from the beginning.
Gather your new smart thermostat kit first and read through the included instructions before touching the old one. Most brands provide a wall plate, mounting screws, optional trim plate, labels, and the thermostat display itself. If your home needs a power accessory or extender kit because there is no C wire, make sure that is on hand as well. Some of those accessories install at the HVAC control board rather than at the thermostat location, so you will want to know that before you start.
Basic tools for the job
- Screwdriver set, usually a small flat-head and Phillips
- Drill, if new holes are needed for mounting
- Level, for a neat installation
- Masking tape or wire labels, if labels are not included
- Smartphone, for photos and app-guided installation
- Needle-nose pliers, if wires need gentle repositioning
It is also wise to have your Wi-Fi password nearby, since most smart thermostats connect during setup. That small detail can save you from wandering through the house mid-project looking for login information while wires sit exposed on the wall.
Step 1: Turn Off Power to Your HVAC System
This step is non-negotiable. Before removing the old thermostat, turn off power to your heating and cooling system at the breaker panel. Even though thermostat wiring is low voltage, shutting off power protects both you and the equipment. It also prevents the thermostat from accidentally triggering the system while wires are disconnected.
After switching the breaker off, go back to the thermostat and try adjusting the temperature so the furnace or air conditioner would normally turn on. If nothing happens, you can proceed with more confidence. This extra check is a simple habit, but it creates a safer and calmer working experience.
If your home has multiple breakers related to HVAC equipment, take an extra moment to ensure the correct one is off. Safety is part of confidence. When you know the system is powered down properly, the rest of the installation feels much less stressful.
Step 2: Remove the Old Thermostat Cover and Document the Wiring
Once the power is off, remove the faceplate or cover of your existing thermostat. Many covers snap off gently, while others may need a small screw loosened first. Inside, you will see wires connected to terminals labeled with letters such as R, W, Y, G, and possibly C or O/B depending on your system. Do not disconnect anything yet.
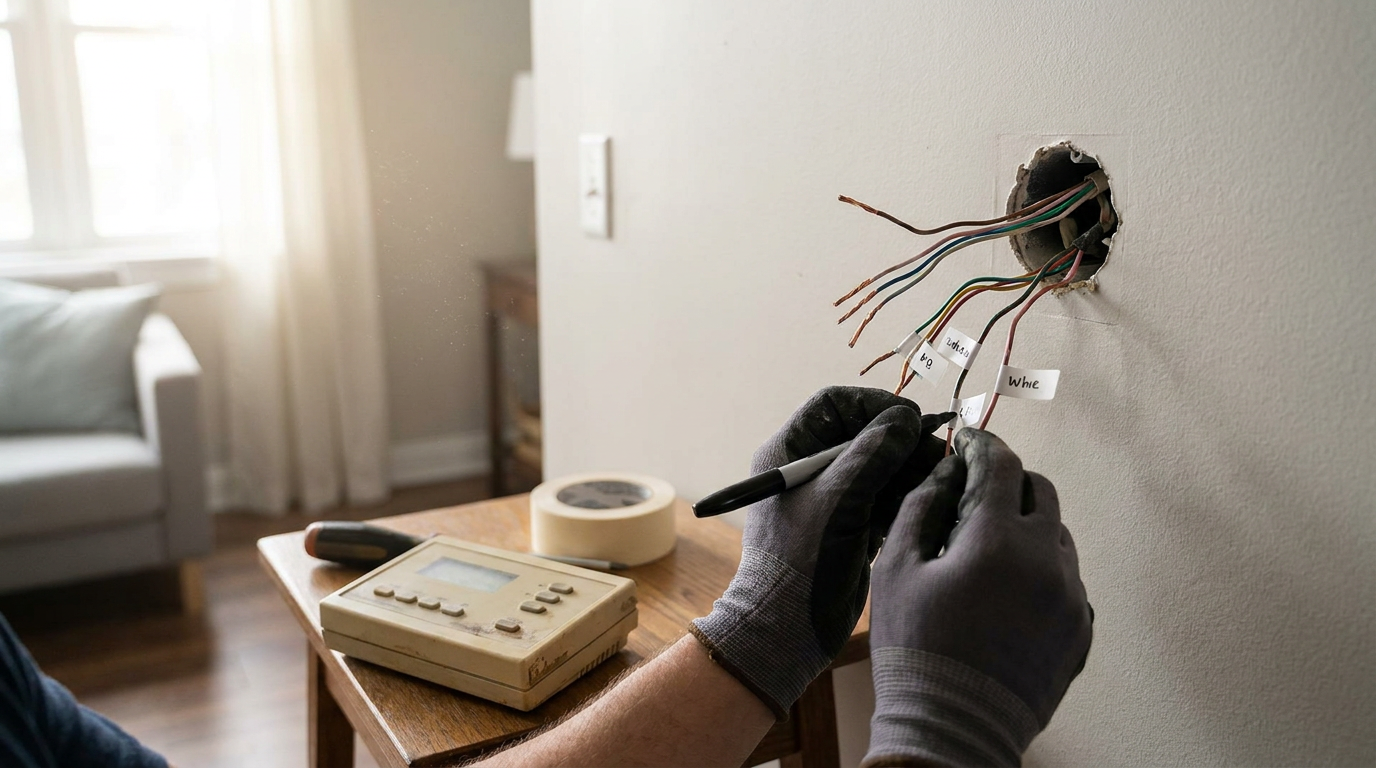
This is the moment to document everything clearly. Take several photos from different angles using your phone. Make sure the labels are easy to read. These photos can be incredibly reassuring later if you need to double-check where a wire belongs. Even confident DIYers rely on photos for this step because they remove uncertainty.
Next, label each wire according to the terminal it is attached to. Do not label based on wire color alone. The color conventions are common, but they are not guaranteed. What matters is the terminal letter. If your new thermostat kit includes wire stickers, use them. If not, masking tape and a pen work perfectly well.
As you begin loosening terminal screws, be careful not to let the wires fall back into the wall. Some homeowners wrap them gently around a pencil or tape them to the wall to keep them visible. This tiny precaution can save you from a surprisingly annoying recovery effort.
Step 3: Remove the Old Base Plate
After all wires are labeled and free, unscrew the old thermostat base from the wall. You may find paint outlines, small holes, or drywall marks underneath, especially if the previous thermostat was larger. Most smart thermostat kits include a trim plate to cover older marks if needed. This is useful if you want the finished result to feel polished and intentional, especially in visible areas like a hallway or living room.
Before mounting the new plate, inspect the wires and wall opening. If the wiring looks damaged, brittle, or unusual compared with the manufacturer’s guide, pause and investigate further. The goal of a DIY project is not rushing through uncertainty. A thoughtful installation always looks and feels better in the end.
You can also use this time to lightly clean the wall surface. That small reset often makes the upgrade feel more meaningful. It is a reminder that even technical changes can contribute to the beauty and calm of your home.
Step 4: Install the Optional Power Accessory If Needed
If your chosen thermostat requires a C wire and your system does not have one at the thermostat location, this is the point where you may need to install a power accessory. Depending on the brand, that might be a Nest Power Connector, an ecobee Power Extender Kit, or another compatible solution. The exact method varies by manufacturer and by HVAC setup.
These accessories are often installed near the HVAC control board rather than at the wall thermostat itself. If that sounds more advanced than you expected, do not panic. Many manufacturers provide app-based guidance with diagrams and clear prompts. Still, this is the point where some homeowners choose to call an HVAC technician, especially if the furnace panel wiring feels unfamiliar.
There is no shame in that decision. A successful home project is not about proving anything. It is about creating a safer, more comfortable home in a way that feels manageable. If the wall-thermostat wiring is simple but the control board work feels beyond your comfort zone, getting help for that one step can still leave you feeling empowered overall.
Step 5: Mount the New Smart Thermostat Base
Once your wiring is ready, position the new thermostat base against the wall. Feed the labeled wires through the opening in the base and use a level to make sure it is straight. A thermostat may be a practical device, but in daily life it is also part of the visual landscape of your home. A neat installation makes a difference.
Mark the screw holes and drill pilot holes if needed, especially if you are mounting into drywall without existing anchors in the right spots. Secure the base firmly, but avoid overtightening. The plate should sit flat and stable against the wall.
If your kit includes a trim plate and you need it to cover marks or gaps, install that first according to the manufacturer’s directions. The end result should feel intentional rather than patched together. In a well-loved home, those details matter because they support both function and atmosphere.
Step 6: Connect the Wires to the New Thermostat
This is the step many homeowners worry about most, but it is usually very manageable if your wires are labeled clearly. Insert each wire into the corresponding terminal on the new thermostat base. Follow the labels exactly. Again, rely on terminal letters rather than wire colors if there is any discrepancy. Most smart thermostat terminals are clearly marked, and many use push connectors that make the process straightforward.
Gently tug each wire after insertion to confirm it is secure. Make sure no bare copper is excessively exposed beyond the connector. If a wire is frayed or bent awkwardly, straighten it carefully with pliers before trying again. Neat wiring improves reliability and makes the setup process smoother.
If the manufacturer’s app asks you to confirm which wires are connected, take your time. This app-guided step is one of the reasons installation has become easier for beginners. Instead of interpreting everything alone, you are often guided screen by screen through what the thermostat needs to see.
If a terminal mentioned in the app does not match what you have, or if your system setup appears more complex than expected, stop before forcing a decision. Uncertainty around heat pump reversing valves, dual-fuel systems, or unusual wiring is a valid reason to consult the brand’s support line or a professional installer. Thoughtful pauses are part of good DIY.
Step 7: Attach the Thermostat Display and Restore Power
With the wires connected and the base mounted, attach the smart thermostat display according to the instructions. In most cases, it snaps or presses gently into place. Once attached, return to the breaker panel and restore power to the HVAC system.
The thermostat should begin powering on within a few moments. If it does not, double-check that the breaker is on and review the wiring, especially the power connections. Some thermostats may take a little time to boot up fully, so give it a minute before assuming something is wrong.
This is often the moment when the project starts to feel real. The sleek screen lights up, the interface appears, and the upgrade shifts from idea to presence. There is a subtle pleasure in seeing a smarter, more responsive version of home comfort come to life right where the old thermostat used to be.
Step 8: Follow the App Setup for System Configuration
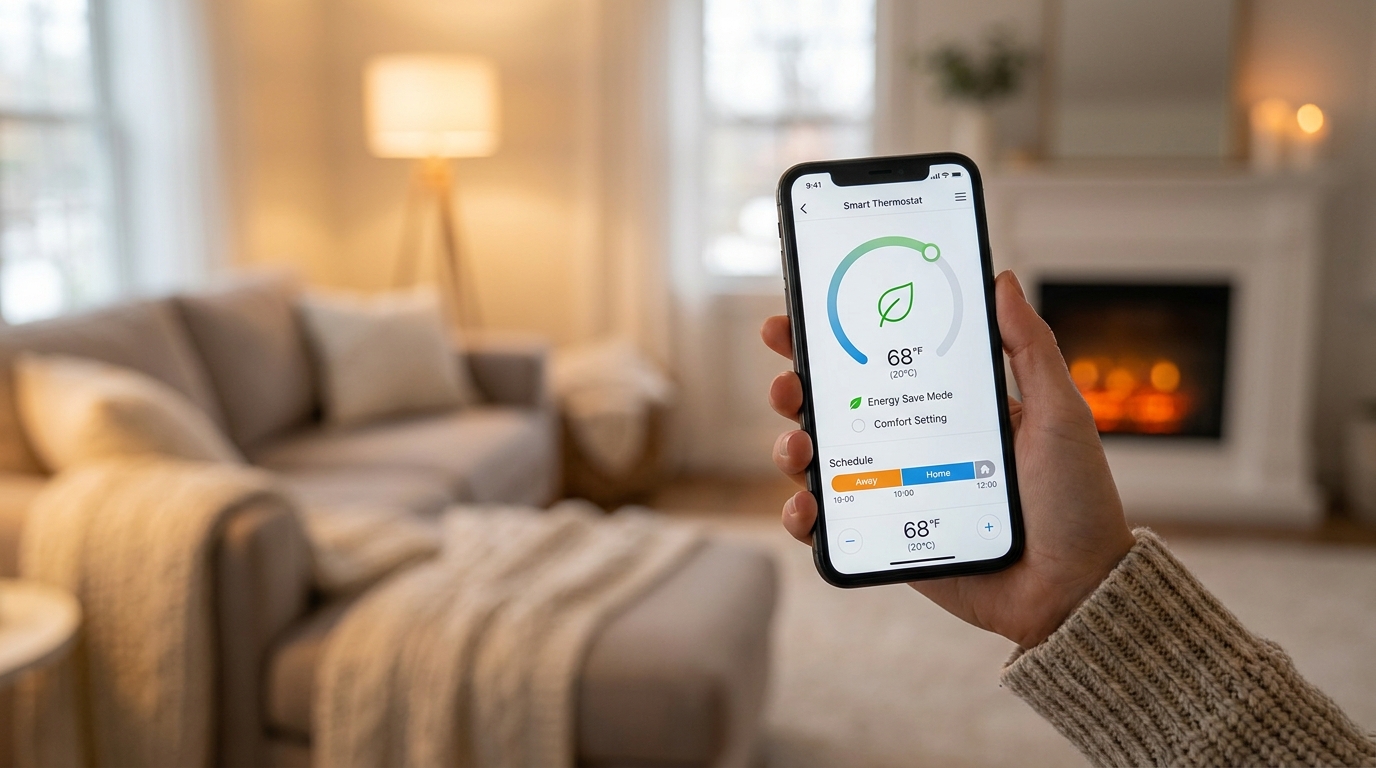
Now comes the digital side of installation. Download the manufacturer’s app if you have not already, connect the thermostat to your Wi-Fi network, and follow the prompts to configure your HVAC system. This process usually includes identifying whether you have forced air heating, central air, a heat pump, or another setup. The app may also ask about fan control, stages, and auxiliary heat depending on your system.
This stage matters more than many people realize. Proper configuration affects not only whether the thermostat works, but also how well it delivers comfort and efficiency over time. If the system type is entered incorrectly, the thermostat may not control heating and cooling properly. That is why even though the physical installation may be quick, the setup deserves your full attention.
You may also be asked whether you want to enable features such as learning behavior, geofencing, occupancy sensing, weather response, or energy reports. These features can be genuinely helpful, especially for households with changing schedules. At the same time, do not feel pressured to activate everything immediately. Start with the basics and build from there if that feels more comfortable.
Remember that the emotional promise of smart home technology is not to make life feel more complicated. It is to remove small burdens. Set up what supports your routine and skip what does not.
Step 9: Create a Realistic Schedule for Comfort and Savings
This is where the most meaningful benefits begin. NRCan explains that smart thermostats work best when paired with schedules and habits like temperature setbacks while sleeping or away. A smart thermostat can help you save money, but it usually does so by making efficient habits easier and more automatic. If you leave the temperature the same all day and night, the device has fewer opportunities to improve your energy use.
Think about the rhythm of your household. When does the first person wake up. When is the house usually empty. Do you prefer cooler sleeping temperatures. Is anyone home during the day working remotely or caring for children. The best schedule is not the most aggressive one. It is the one you can actually live with comfortably.
For example, if your home is empty during weekdays, you might set a modest setback while everyone is out and have the temperature return to a comfortable level shortly before arrival. If you sleep best in a cooler room, you can let the system ease down overnight and warm up again before morning. NRCan states that lowering the thermostat by 1°C for eight hours can save about 2% on heating energy use, which shows how even modest setbacks can contribute over time.
The goal is to create a home that feels cared for without requiring constant manual decisions. Once your schedule reflects real life, the thermostat begins to support you quietly in the background.
A simple schedule-building mindset
- Morning comfort: Set a comfortable temperature before the household wakes up.
- Daytime adjustment: Reduce heating or cooling when the home is empty or less active.
- Evening return: Bring the home back to comfort before everyone settles in.
- Night setback: Adjust for sleeping preferences and lower energy use.
If your thermostat offers learning mode, energy history, or room sensors, give it a little time. The first week is often about refinement. Watch how the house feels and make gentle adjustments rather than chasing perfection on day one.
Step 10: Test Heating, Cooling, and Fan Functions
Once setup is complete, test each available mode carefully. Turn on heating and confirm warm air begins after the system starts. Then test cooling if weather permits, followed by fan-only mode if your system supports it. Allow enough time for the HVAC equipment to respond, since some systems have built-in delays to protect components.
Listen and feel rather than relying only on the screen. Is the right mode activating. Does the air temperature match your expectation. Are there any unusual delays or noises. This quick testing step helps you catch setup issues early, when everything is still fresh in your mind.
If the equipment does not respond properly, revisit the app configuration and wiring map. Heat pump systems in particular may need careful attention to settings such as reversing valve behavior. Again, there is no downside to slowing down and checking. Thoughtful troubleshooting is part of the process, not a sign of failure.
Common Installation Mistakes to Avoid
Most smart thermostat problems come from a small number of avoidable issues. The first is skipping the compatibility check and assuming any thermostat will work with any system. The second is labeling wires by color instead of terminal letter, which can lead to incorrect connections. The third is failing to configure the thermostat properly after installation, which reduces both comfort and energy-saving potential.
Another common mistake is expecting savings without using schedules or setbacks. Smart thermostats are powerful, but they are not magic. Their value comes from using your HVAC system more intentionally and more consistently. If the setup is left on default settings that do not match your routine, you may miss the benefit you were hoping for.
Finally, some homeowners become discouraged too quickly if a C wire or accessory is involved. It is true that some systems need additional power support, but that does not necessarily make the project inaccessible. Brands have expanded accessory ecosystems specifically to make installation possible in more homes. If one path is not simple, another may still be available.
When to Call a Professional
DIY installation is wonderfully achievable in many homes, but there are times when professional help is the smarter and more peaceful choice. If you discover unusual wiring, a line-voltage thermostat, corrosion at the terminals, or a complicated HVAC setup that does not match the app guidance, it is worth bringing in an expert. The same is true if you need to work at the furnace control board and feel uncertain doing so.
Homes with multi-stage heating and cooling, dual-fuel systems, advanced heat pump setups, or older retrofitted equipment sometimes require a more careful hand. A professional can also help if your system powers on but behaves incorrectly after installation. There is a difference between a satisfying DIY win and a stressful weekend of trial and error. Choosing support when needed protects both your equipment and your peace of mind.
Think of it this way: the goal is not to do every part alone. The goal is to create a comfortable home thoughtfully. Sometimes that means installing the thermostat yourself. Sometimes it means knowing where your comfort level ends and asking for help at the right moment.
How to Get the Most Value After Installation
Once the thermostat is up and running, a few simple habits can help you enjoy the upgrade more fully. Review your schedule after the first week and then again after the first full season change. Households evolve, and a thermostat that reflects your real routine will always perform better than one set once and forgotten. Seasonal tuning is a small task with outsized comfort benefits.
Use the app’s energy insights if available. Many smart thermostats show runtime data, schedule patterns, or opportunities to reduce waste. This information can help you understand your home more clearly. If certain rooms never seem comfortable, you may discover that the issue is airflow, insulation, or system balance rather than thermostat settings alone. In that sense, a smart thermostat can become a window into how your home actually behaves.
If your thermostat supports sensors, geofencing, or voice assistant integration, consider adding those features gradually. They can make the experience feel even more seamless, especially in larger homes or homes where rooms are used differently throughout the day. Just remember that more features do not always equal more happiness. The best smart home routines are the ones that feel quietly helpful rather than demanding attention.
Also take a moment to explore local utility rebates or retrofit programs if you have not already. In some Canadian regions, ENERGY STAR certified smart thermostats may qualify for incentives. That can improve the payback of your purchase and make the project feel even more rewarding financially.
The Emotional Return on a Small Upgrade
What makes a smart thermostat such a compelling home project is not just the technology itself. It is the feeling that comes with it. A more comfortable morning. A cooler bedroom at night. Less second-guessing when you leave the house. More confidence when utility bills arrive. These are quiet benefits, but they shape daily life in meaningful ways.
Home comfort is deeply personal. It affects sleep, concentration, family routines, and the subtle sense of ease we crave in our own spaces. When a home responds more gracefully to the people living in it, it feels more supportive. That is why this upgrade resonates beyond efficiency charts and app features. It helps your home care for you a little better.
For homeowners who want a project that is practical, approachable, and genuinely life-improving, installing a smart thermostat is a lovely place to start. It is one of those rare upgrades that blends savings with atmosphere, and convenience with comfort. Done well, it does not just change the wall. It changes the experience of living in the home.
Final Thoughts
If you have been hesitating because the process seemed too technical, let this be your reminder that many homeowners complete this project successfully with a little preparation and patience. The key is to begin with compatibility, follow the wiring carefully, and give equal attention to setup and scheduling after installation. The physical swap is only part of the story. The real value comes from shaping the thermostat around your life.
Start slowly, read your model’s instructions closely, and trust the support tools built into today’s apps and compatibility checkers. If you run into something unusual, pause and get help rather than pushing through uncertainty. A calm, confident installation always pays off.
And once it is done, enjoy the subtle pleasure of a home that feels just a little smarter, a little gentler on your budget, and a little more aligned with the way you actually live. Sometimes the best home upgrades are the ones you feel every day without having to think about them at all.


No Comment! Be the first one.