


A Step-by-Step Guide to Repairing Drywall Like a Pro
Drywall damage shows up in almost every home sooner or later. Maybe it is a dent from moving furniture, a doorknob hole, a popped fastener, a cracked seam above a doorway, or a corner that has taken too many bumps. The good news is that a lot of drywall repair is manageable for homeowners. You do not need to be a finisher by trade to get solid results, but you do need the right tools, the right materials, and a method that matches the type of damage.
Table Of Content
- Why Drywall Repair Is a Good DIY Project
- Start by Identifying the Type of Damage
- Tools and Materials You Will Need
- Do Not Skip Safety and Dust Control
- Understanding Joint Compound and Tape
- Step 1: Prepare the Damaged Area Properly
- Step 2: Match the Repair Method to the Size of the Damage
- Small Holes, Dents, and Surface Damage
- Cracks at Seams or Corners
- Medium Holes
- Larger Holes
- Step 3: Install Backing and a Patch for Larger Openings
- Step 4: Apply the First Coat the Right Way
- Step 5: Build the Repair with Thin, Wider Coats
- Step 6: Sand Lightly and Intentionally
- Step 7: Prime Before You Paint
- How to Handle Specific Common Repairs
- Nail Pops and Screw Pops
- Corner Damage
- Doorknob Holes
- Recurring Cracks
- Common Drywall Repair Mistakes to Avoid
- When to Call a Pro
- Final Tips for a Professional Looking Result
- Conclusion
The biggest mistake people make is treating every wall defect the same way. A tiny nail hole, a loose tape seam, and a six inch puncture are not repaired the same way. If you use too much compound, skip prep, rush drying time, or paint without primer, the patch often shows through later. Good drywall work is usually not about speed. It is about clean prep, thin coats, patience, and paying attention to what caused the damage in the first place.
This guide breaks the process down in a straightforward way. You will learn how to identify common drywall problems, choose materials that make sense for DIY use, repair small and large areas, finish the patch smoothly, and avoid the common issues that lead to visible seams and failed repairs. If you want walls that look clean again without paying for a full service call, this is the practical path.
Why Drywall Repair Is a Good DIY Project
Drywall repair is one of the more approachable home maintenance jobs because the damage is often localized. Unlike plumbing or electrical work, many drywall problems are right in front of you and limited to a small section of wall. That makes it easier to control the repair and learn as you go. Home improvement guidance commonly treats simple patching as a beginner friendly project, especially for small dents, fastener holes, and minor impact damage.
That said, a clean result still depends on workmanship. The wall surface is broad, flat, and visible in changing light, so flaws stand out more than people expect. A repair that looks fine when wet can dry with shrinkage, ridges, bubbles, or uneven texture. That is why professional guidance consistently recommends multiple thin coats instead of one heavy coat. Thin layers are easier to control, easier to sand, and less likely to crack or sink.
Drywall repair also teaches useful basics that carry over into other interior projects. You learn how to prep a surface, work cleanly, understand drying time, feather edges, sand lightly, and prime before painting. Those are small skills on their own, but together they make a big difference in build quality around the house.
Start by Identifying the Type of Damage
Before you pick up a putty knife, look closely at the wall. What caused the damage matters because the best repair depends on both the size of the area and the reason it failed. Drywall can fail cosmetically from normal wear, but it can also show symptoms of movement, moisture, poor fastening, or repeated impact. If you patch over the symptom without dealing with the cause, the repair can come back.
Small issues usually include picture hanger holes, screw holes, tiny dents, and shallow chips in the paper face. These are the easiest repairs and often need little more than lightweight filler or all purpose joint compound. Medium damage includes holes from door handles, broken spots from furniture, or larger dents where the gypsum core has fractured. Bigger openings often need a patch, backing support, or a cutout replacement piece.
Then there are repairs that should make you slow down and inspect more carefully. A seam crack that keeps returning may point to movement. A soft brown stain, peeling paint, or crumbling drywall may suggest past or active moisture. Mold spotting, wet insulation, or repeated swelling around windows or ceilings should not be treated as a cosmetic patch job. Fix the leak or moisture source first, then replace damaged materials as needed.
Practical rule: If the drywall is soft, stained, moldy, or repeatedly cracking in the same place, stop and address the underlying issue before you patch the surface.
Tools and Materials You Will Need
The best drywall repair jobs usually come from a simple, sensible setup rather than a huge collection of specialty tools. For most homeowners, the core kit includes a utility knife, a drywall saw, a putty knife or taping knife, a sanding sponge or sanding block, joint compound, drywall tape, primer, and matching paint. For larger openings, add a patch kit or a piece of replacement drywall and some wood backing strips. A drill and drywall screws are useful when the repair is too large for filler alone.
Knife size matters more than many people realize. A narrower four inch or six inch knife is good for loading compound into a small repair and embedding tape. A wider ten inch or twelve inch knife helps feather later coats so the repair blends into the surrounding wall. If you only use a narrow knife all the way through, you tend to leave a visible hump around the patch because the transition stays too tight.
Choice of compound also matters. Taping compound is meant for embedding tape. Topping compound is generally easier to sand and better suited for finish coats. All purpose compound can handle both jobs in simpler repairs and is often the most practical choice for homeowners who do not want multiple boxes or buckets open at once. Product names vary by brand and region, but the workflow stays the same. Use the right material for the stage of the repair, and the finish work gets easier.
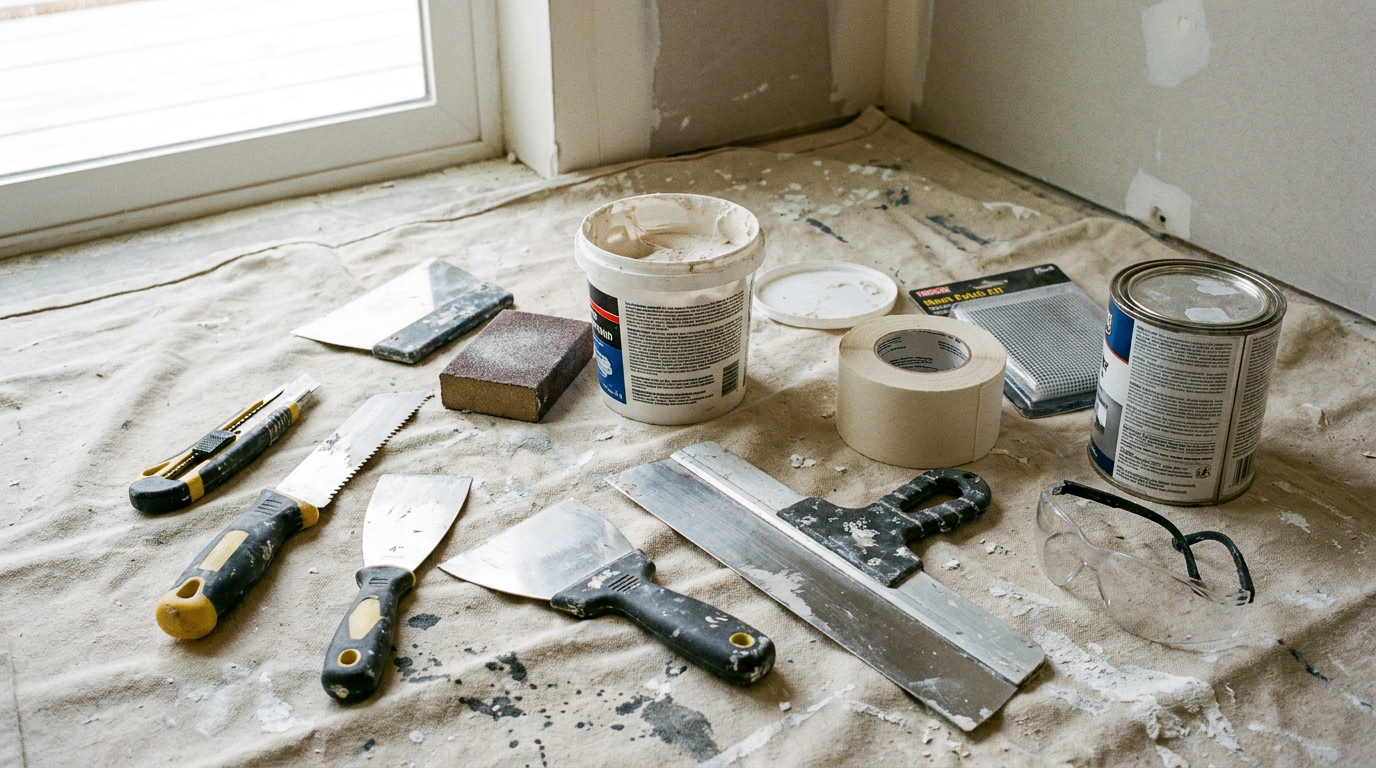
There are also convenience products worth knowing about. Ready mixed compounds save prep time. Dust control and lower dust formulations can make cleanup more manageable, especially indoors. Ultra thin wall repair patches are handy for small to medium holes when you want a quick solution. None of these products replace good technique, but they can make the job more forgiving for DIY users.
Do Not Skip Safety and Dust Control
Drywall cutting and sanding create a fine dust that gets everywhere. It can irritate your eyes, nose, and lungs, and it settles into nearby rooms if you are careless. Even a small patch can make more mess than expected. Put down a drop cloth, move furniture if you can, and consider sealing the work area off from the rest of the room when you are doing multiple repairs.
At minimum, wear eye protection and a dust mask or respirator suitable for fine particulates. If you are cutting overhead, a hat helps keep dust and crumbs out of your hair. Vacuuming with a HEPA capable vacuum is a smart move where possible, especially before priming and painting. A slightly damp cloth can help wipe the surrounding wall after sanding, but do not soak the patch area or you can soften fresh compound.
Also watch out for what is behind the wall. If you are repairing a larger hole and plan to cut it square, check for nearby switches, receptacles, plumbing lines, or other concealed systems. On an older wall, be cautious if the repair area is close to past renovations or damaged finishes that could involve materials beyond ordinary drywall dust. The repair itself may be simple, but the work area still deserves respect.
Understanding Joint Compound and Tape
Many bad drywall repairs come down to using the wrong material at the wrong stage. Joint compound is not just one thing. Taping compound is designed to bond well and hold tape in place. Topping compound is usually easier to sand and is better for later finish coats. All purpose compound sits in the middle and is a good general use choice for small to moderate repairs where convenience matters more than squeezing out the last bit of finishing efficiency.
Tape choice matters too. Mesh tape is easy to handle and popular with DIYers, but that does not make it the best option for every repair. Paper tape often embeds flatter and can produce stronger finished joints in the right application, especially on seams and cracks. The key is to embed the tape firmly with enough compound underneath it. If there is not enough compound behind the tape, you can get blistering or poor adhesion. If there is too much, you create extra sanding and a bulky repair.
Think of drywall finishing as controlled layering. The first coat is there to bond and bridge. The next coats build the surface and flatten the transition. The final coat is there to make the repair disappear under primer and paint. Once you understand that sequence, the whole job makes more sense.
Step 1: Prepare the Damaged Area Properly
Prep is what separates a durable repair from a cosmetic coverup. Start by removing anything loose or weak. That includes torn paper, crumbling gypsum, old flaking compound, and loose tape. Use a utility knife to trim ragged edges and create a clean working area. If the wall surface has dented inward but is still attached, press gently to see whether the gypsum core is solid or fractured underneath.
For small dents and nail holes, prep may be nothing more than scraping away a raised edge and dusting off the area. For a medium or large hole, you may need to square the opening so the patch has clean, straight sides. This feels counterintuitive to beginners because you are making the hole bigger, but a neat opening is easier to patch well than a random jagged tear. A clean perimeter gives you better fit, better support, and a more consistent finished surface.
If the damage is from a popped fastener, do not just cover the bump. Set the loose fastener or remove it, then install a new drywall screw into solid framing nearby to pull the board tight again. Otherwise the movement remains in the wall and the bump can reappear. If the paper face is torn around the fastener, trim it smooth before applying compound.
Step 2: Match the Repair Method to the Size of the Damage
Small Holes, Dents, and Surface Damage
Small holes from nails, screws, or anchors are usually the easiest fixes. Once the area is clean and stable, press a small amount of joint compound or patching filler into the hole with a putty knife. Pull the knife tight across the surface so the filler packs the void rather than just skims over it. Let it dry fully, then apply a second thin coat if needed to account for shrinkage.
Shallow dents and chips in the paper face are repaired the same way, but feather the edges a little wider. The goal is not just to fill the low spot. It is to create a smooth transition so light does not catch the patch later. If the paper face is fuzzy or torn, trim or seal the loose material first so it does not bubble under wet compound.
Cracks at Seams or Corners
Hairline cracks are common around doors, windows, and long drywall seams, especially in houses that experience minor seasonal movement. The wrong approach is smearing filler on top of the crack and hoping for the best. That often looks fine for a few weeks, then the line prints right back through. A better repair is to open the crack slightly with a knife, remove loose material, apply compound, and embed tape over the area.
Paper tape is often a strong choice for seam repairs because it lays flat when embedded well. Apply a bed of compound, press the tape in, then pull the knife over it firmly to remove excess while leaving enough material underneath. After it dries, apply wider coats on top, each one feathered farther out. If the crack is caused by movement that continues, the repair may still return, but this method gives you a much better chance of a lasting result than surface filler alone.
Medium Holes
For holes a few inches wide, you can often use a patch kit or create your own patch. Metal or composite repair patches are convenient because they bridge the opening and provide a ready surface for compound. They work well for straightforward wall damage in standard locations. The tradeoff is that some patches can leave a slight buildup that requires careful feathering with wider finish coats.
A drywall patch cut to fit the opening can yield a flatter result. This method takes more prep but often looks better in the end. If there is no framing behind the opening, you will need a backing support, which leads to the next step.
Larger Holes
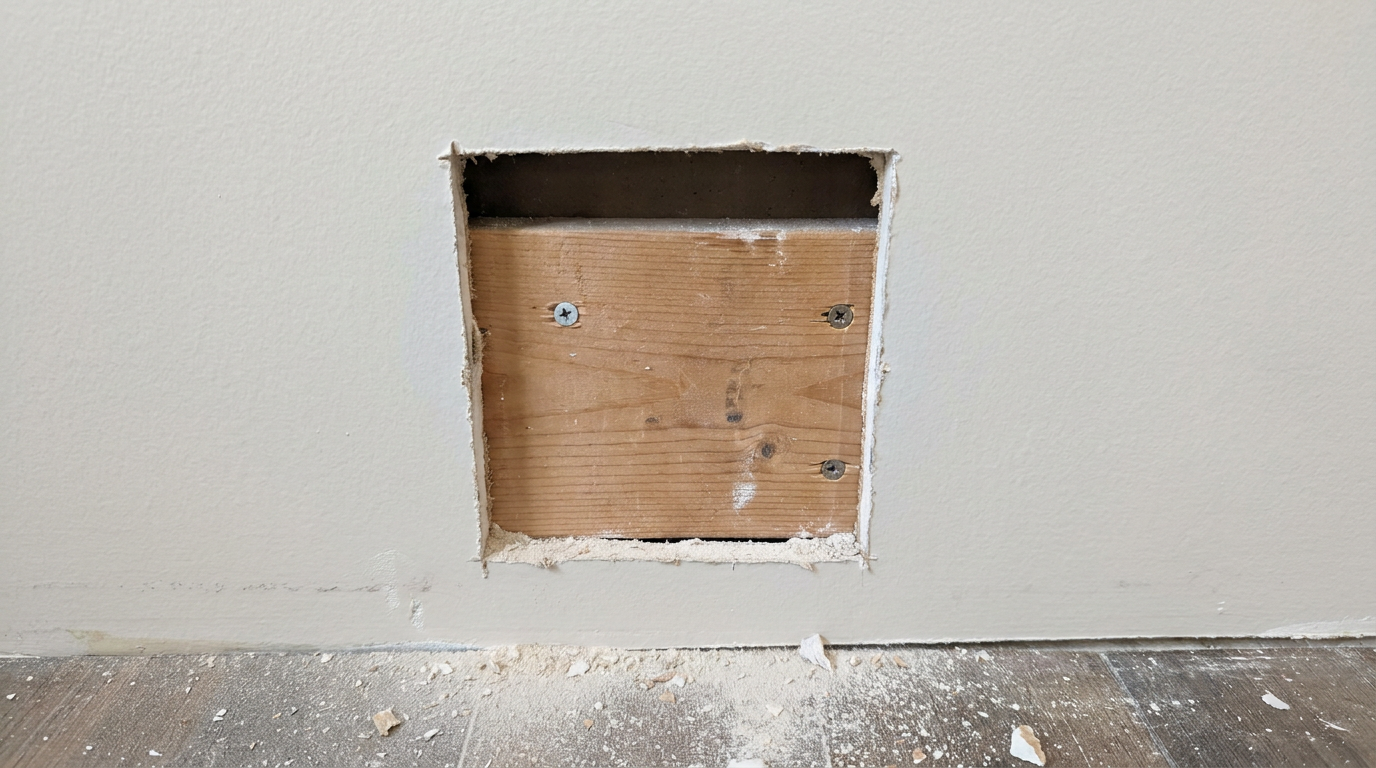
Larger punctures and broken sections usually need backing support or a cut back to framing. For many homeowner repairs, the practical method is to square up the hole, screw wood strips behind the drywall so they bridge the opening, then screw a new drywall piece to those strips. This creates a firm patch that sits flush with the wall surface and gives the compound something stable to work over.
Some people use a California patch or no tape patch for certain repairs, especially when they want to avoid backing in a small opening. It can work, but it takes care and a clean fit. For most DIY users, backing support is more forgiving and usually easier to understand on the wall.
Step 3: Install Backing and a Patch for Larger Openings
When a hole is too large for filler alone, start by cutting the damaged area into a neat square or rectangle. Measure the opening and cut a matching drywall patch from scrap or a new piece. Then cut two wood strips long enough to extend beyond the opening on each side. Slip them into the cavity and hold them tight against the back of the existing drywall while driving screws through the wall face into the strips.
Once the backing is secure, place the drywall patch into the opening and screw it to the backing strips. Keep the patch flush with the surrounding surface. If it sits proud, the repair becomes harder to finish. If it sits low, you can still build it out with compound, but that means more coats and more drying time.
After the patch is installed, apply compound at the joints and embed tape over all seams. Press the tape firmly into the wet compound, then scrape off excess with the knife. This is where patience starts paying off. Do not try to bury the whole repair in one pass. The goal of the first coat is to lock everything together and leave a fairly flat base for the next coats.
Step 4: Apply the First Coat the Right Way
The first coat is usually where beginners either overwork the repair or leave too much material. Load the knife with a manageable amount of compound and spread it evenly over the damaged area or seam. If you are embedding tape, make sure there is enough compound underneath to bond it fully. Then draw the knife along the tape with firm, steady pressure. You want the tape seated flat without starving it of compound.
If you see blisters or bubbles forming under the tape, stop and fix them while the material is still wet. Lift that section if necessary, add a bit more compound beneath it, and re-embed it. Do not assume the next coat will hide a blister. It usually will not. That trapped air often shows up even worse after painting.
Once the first coat is on, leave it alone and let it dry fully. Dry time depends on product type, humidity, and coat thickness. This is why thin coats matter so much. Thick coats can stay soft underneath even when the surface looks dry. If you sand or recoat too early, the repair can tear, gouge, or crack later.
Step 5: Build the Repair with Thin, Wider Coats
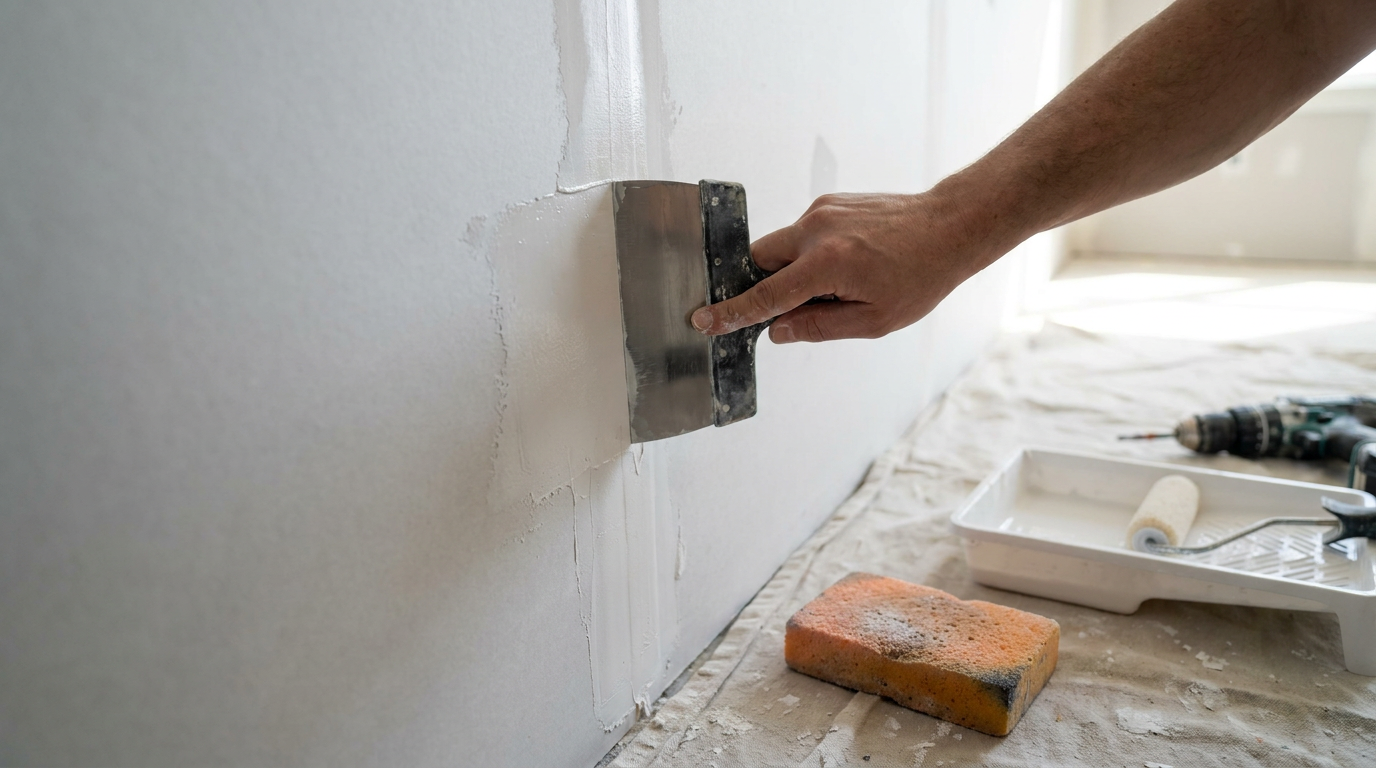
After the first coat dries, scrape off any ridges or knife lines before applying more compound. You do not need to sand aggressively at this point. A quick pass with the knife or a light sanding sponge is often enough. Then apply a second coat that extends wider beyond the repair than the first. This widening process is called feathering, and it is what makes the patch blend into the wall rather than standing out as a lump.
For a small patch, the second coat may be all you need before final touch up. For a taped seam or larger patch, plan on at least two to three coats total. Each coat should be thin, smooth, and slightly wider than the one before it. Use a wider knife for the outer coats so the edges taper gradually into the existing surface. This is especially important in walls that get strong side lighting from windows.
If you are using different compounds for different stages, this is where topping compound can help. It often sands more easily and leaves a cleaner final surface. If you are using all purpose compound for everything, that is fine too. Just be prepared to keep coats thin and give each one enough drying time.
Step 6: Sand Lightly and Intentionally
Sanding is there to refine the surface, not to rescue a bad application. If you put on huge ridges and heavy blobs, sanding becomes a dusty fight that usually makes things worse. The better approach is to apply smoother coats so sanding is light and controlled. Use a sanding sponge or sanding block with a fine grit and focus on high spots, edges, and knife marks rather than grinding down the whole repair.
Be careful not to over sand into the drywall paper face. Once you damage the paper, you create fuzzing and weak spots that can show through the finish. You can also dish out the middle of the repair if you bear down too hard. Run your hand over the surface and look along the wall from an angle. That side view will reveal bumps and edges better than a straight on look.
Dust control matters here. Vacuum the repair area and wipe surrounding surfaces before priming. If dust stays on the wall, it can interfere with paint adhesion and leave a gritty finish. A clean surface gives you a much better chance of the patch disappearing after paint.
Step 7: Prime Before You Paint
Skipping primer is one of the most common reasons a drywall patch flashes through the final paint. Joint compound is porous and absorbs paint differently than the surrounding painted wall. If you apply finish paint directly over a patch, the repaired area may show as a dull spot, a different sheen, or a visible outline even if the surface is smooth.
Use a quality primer over the repaired area and let it dry fully before painting. In some cases, especially with larger repairs or sheen sensitive walls, it makes sense to prime a broader section or even the whole wall. That gives a more uniform base. Paint blending is easier on flat paints than on satin or semi gloss, where sheen differences are more obvious.
Texture also matters. If the surrounding wall has orange peel, knockdown, or another texture, the patch may need texture matching before the final paint coat. This is often harder than the patch itself. Test your texture method on scrap or a less visible area first. A smooth patch in the middle of a textured wall will usually stand out, no matter how good the compound work is.
How to Handle Specific Common Repairs
Nail Pops and Screw Pops
If a nail or screw head is pushing the paint outward, do not just cover the bump. Press on the area to check whether the board is loose. Set the fastener back if possible or drive a new drywall screw into solid framing nearby to secure the panel. Then dimple the surface slightly, apply thin coats of compound, sand smooth, prime, and paint.
Corner Damage
Outside corners get beaten up by traffic, vacuums, furniture, and moving boxes. If the metal or vinyl corner bead underneath is intact and only the surface is chipped, you can rebuild it with compound in thin passes. If the corner bead is bent, loose, rusting, or torn free, patching over it is usually not enough. That often calls for replacing the damaged section of bead before refinishing.
Doorknob Holes
These are common and usually straightforward. If the hole is small to medium, a patch kit may work fine. If the paper around the impact area is crushed or torn wide, a cutout patch with backing support often gives a cleaner result. Once repaired, consider adding a door stop so you do not repeat the problem.
Recurring Cracks
If a crack returns after a proper taped repair, the issue may not be the drywall finish itself. Movement in framing, truss uplift, seasonal shifts, or stress around openings can all contribute. You can improve the cosmetic repair, but if the structure keeps moving, the wall finish may keep telling you about it. In those cases, a broader inspection may be worthwhile.
Common Drywall Repair Mistakes to Avoid
The most common mistake is trying to finish the repair in one thick coat. Heavy compound shrinks more, takes longer to dry, cracks more easily, and creates more sanding. Thin coats are slower on paper but faster in practice because they are easier to control and easier to make disappear.
Another mistake is assuming all compounds do the same job equally well. Using the wrong material can make tape harder to embed, increase shrinkage, and turn sanding into unnecessary work. For simple household repairs, all purpose compound is often enough, but it still helps to understand why taping and topping compounds exist and when they are useful.
Over sanding is also a problem. People often think more sanding means a better result, but aggressive sanding can damage the face paper, flatten texture around the repair, and create low spots. Better knife work reduces sanding. The wall should be built smooth first and only refined with sanding afterward.
One more mistake worth mentioning is treating moisture damage like a normal dent. If drywall has absorbed water, softened, stained, or molded, cosmetic filler is not a real solution. Remove the cause of moisture first, assess whether the drywall and insulation are still sound, and replace damaged material where needed.
When to Call a Pro
There is no shame in handing off a drywall repair when the scope goes beyond a typical homeowner patch. If the damage covers a large area, involves ceilings, includes significant texture matching, or follows water intrusion, a professional may save you time and frustration. The same goes for repairs around complicated corners, repeated structural cracking, or walls with multiple previous patch attempts that have built up unevenly.
A pro is also worth considering when finish quality matters a lot. Entryways, long hallway walls, and spaces with strong daylight can be unforgiving. A repair that seems acceptable in a spare room may be obvious in a front room with side light. If you know that level of finish matters to you, it can be cheaper in the long run to bring in help before the wall gets overworked.
Final Tips for a Professional Looking Result
Work clean. Keep your knife edges free of dried chunks. Mix or stir ready mixed compound if it feels stiff, but do not over thin it. Wipe dust before every new stage. Good drywall finishing is often just a series of small, disciplined habits rather than any one advanced trick.
Check your work in raking light before priming. Shine a work light or flashlight along the wall at a low angle. That will show ridges, edges, and shallow depressions you might miss under normal room lighting. It is much easier to fix those before primer and paint than after everything is finished.
Finally, do not judge the repair too early. Drywall work often looks rough between stages. The first coat is not the finish. The second coat still may not look impressive. The result comes from the full sequence: prep, support if needed, tape, thin coats, light sanding, primer, and paint. Stick to that order and most ordinary wall damage becomes very manageable.
Conclusion
Repairing drywall like a pro is less about special talent and more about using the right process. Once you learn to match the repair method to the damage, choose sensible tools and materials, and build the surface with thin, controlled coats, the work gets a lot less intimidating. Small holes, cracks, dents, and even larger punctures can often be repaired successfully by a patient homeowner.
The practical takeaway is simple. Start with diagnosis, not filler. Clean and stabilize the area. Use proper backing and tape when the damage calls for it. Let each coat dry fully, sand lightly, and always prime before painting. If the damage points to moisture or movement, solve that first. Follow those basics, and your wall repair will not just look better on day one. It will hold up better over time too.



No Comment! Be the first one.