


How to Properly Insulate Your Walls: A Step-by-Step Guide for Better Comfort and Efficiency
Wall insulation is one of those upgrades that does not look exciting when it is finished, but you feel it every day after the work is done. Rooms stay more even in temperature, drafts are reduced, outside noise often drops, and heating and cooling equipment does not have to work as hard. If your house feels cold near exterior walls in winter or overheats in summer, poor insulation and air leakage are usually part of the problem. For many homeowners, improving the walls is one of the smartest ways to make a house more comfortable without changing how it looks.
Table Of Content
- Why Wall Insulation Matters More Than Many Homeowners Realize
- Step 1: Identify Your Wall Type and Project Conditions
- How to check what is inside your wall
- Step 2: Check for Moisture Problems Before You Insulate
- Step 3: Choose the Right Insulation Material for the Wall
- Fiberglass batts
- Mineral wool batts
- Dense-pack cellulose
- Spray foam
- Rigid foam and continuous exterior insulation
- Step 4: Know Your Target R-Value and Climate Needs
- Step 5: Gather Tools and Safety Gear
- Step 6: Air Seal the Wall Before Installing Insulation
- Step 7: Install Insulation Correctly in Open Stud Walls
- How to install batt insulation properly
- What a good insulation job looks like
- Step 8: Insulating Closed Walls Without Major Demolition
- Step 9: Add Continuous Exterior Insulation When the Project Allows It
- Step 10: Finish the Wall With the Right Control Layers
- Common Mistakes to Avoid
- Which Insulation Method Is Best for Beginners?
- Cost, Payback, and When the Work Is Worth Doing
- Final Thoughts
The key point beginners need to understand is simple. The best wall insulation method depends on the wall type and how much access you have. Open stud walls during a remodel are very different from finished walls in an older house. A wood-framed wall needs a different approach than masonry. A project done from the inside may call for one method, while a siding replacement creates the chance to do something much better from the outside. There is no single product that is automatically the best in every situation.
Research from the U.S. Department of Energy and ENERGY STAR keeps coming back to the same practical lesson. Air sealing and insulation need to work together. Walls and rim joists can make up more than 40 percent of a home’s total building envelope area, so this is a big part of the house to ignore. Many insulation jobs underperform not because the material is bad, but because gaps, compression, missed penetrations, and thermal bridging were left unaddressed. If you want the job to pay off, the process matters as much as the product.
This guide breaks the work into clear steps. You will learn how to identify your wall type, choose insulation materials, prepare the wall, install insulation correctly, and avoid common mistakes that cost performance. The goal is not to make every homeowner into a building scientist. The goal is to help you make sound decisions and carry out a practical wall insulation project that improves comfort, efficiency, and long-term durability.
Why Wall Insulation Matters More Than Many Homeowners Realize
Exterior walls are a major part of the boundary between conditioned indoor space and outdoor weather. Heat moves through walls by conduction, and air leaks through cracks and gaps around framing, outlets, plumbing, windows, and other penetrations. When both problems are present, rooms become harder to keep comfortable and utility bills rise. Even a good furnace or air conditioner cannot make up for a leaky, underinsulated envelope.
Another issue is that the labeled R-value of an insulation product is not the same as whole-wall performance. A batt might be rated at a solid number per inch, but studs, top plates, headers, and other framing members create thermal bridges. Those wood parts conduct heat more readily than the insulated cavities between them. That is why modern best practice often includes some form of continuous insulation on the exterior when the project allows it.
There is also a comfort factor that does not show up fully on a utility bill. Poorly insulated walls create cold surfaces in winter and hot surfaces in summer, which can make a room feel uncomfortable even when the thermostat reading looks normal. This is why some rooms feel chilly when you sit near an exterior wall. Good insulation helps stabilize interior surface temperatures, which makes the space feel more consistent and livable.
The biggest mistake in wall insulation is thinking the material alone solves the problem. Real performance comes from the combination of correct insulation, good air sealing, and proper installation.
Step 1: Identify Your Wall Type and Project Conditions
Before buying anything, you need to know what kind of wall you are dealing with. In most homes, exterior walls fall into one of a few categories. They may be open wood-frame walls during renovation, closed finished wood-frame walls in an existing house, or masonry walls made from block, brick, or concrete. The practical method changes with each one.
An open wall means the drywall or plaster is removed, or the wall is being built new. This is the easiest situation for insulation because you can see the stud bays, wiring, plumbing, and gaps that need sealing. Most DIY-friendly wall insulation work happens in open walls. If you have access during a remodel, this is the best time to do the job right.
A closed wall means the interior finish is still in place. In that case, you either need to open the wall from inside, drill access holes and blow insulation into the cavities, or wait until exterior siding is removed and insulate from outside. ENERGY STAR commonly recommends blowing insulation into uninsulated wood-frame cavities from the exterior when siding is off, then adding exterior insulating sheathing in many climate zones. This approach can improve both thermal performance and air sealing without a full interior gut job.
Masonry walls are a different animal. Solid masonry or block walls are often insulated from the interior with rigid foam or a new framed wall, or from the exterior with continuous insulation as part of a cladding upgrade. Moisture control becomes especially important with masonry because these walls store and release water differently than framed walls. If your house is masonry and you are unsure about moisture behavior, it is worth getting advice specific to that wall assembly before you proceed.
How to check what is inside your wall
If you do not know what your wall contains, start with the basics. Remove a cover plate from an exterior wall outlet and use a flashlight to look into the cavity edge. In some cases, you can see whether insulation is present. You can also measure wall thickness at door jambs and window returns to get clues about framing depth. A small inspection hole in an inconspicuous location can tell you much more than guessing.
Age of the house matters too. Older homes may have little or no cavity insulation, or the insulation may have settled, been installed unevenly, or gotten damp years ago. Newer homes often have cavity insulation but may still benefit from exterior continuous insulation during re-siding. Do not assume that because a wall has some insulation, it is performing well enough to leave alone.
Step 2: Check for Moisture Problems Before You Insulate
Insulation should never be used to hide a moisture problem. If water is getting into the wall from roof leaks, failed flashing, bulk water intrusion, plumbing leaks, or chronic condensation, you need to solve that first. Wet insulation loses effectiveness, and persistent moisture can lead to mold, rot, and indoor air quality issues. A dry wall assembly is the starting point for a durable insulation project.
Look for staining, peeling paint, musty odors, decayed sheathing, rusted fasteners, or signs of repeated dampness around windows and sill areas. Check the exterior too. Missing caulk, bad siding details, damaged house wrap, clogged gutters, and poor flashing are all common sources of moisture entry. If the wall has visible damage, insulation is not the first repair. Water management is.
Condensation risk also needs a little thought, especially in cold climates. This is where beginners often hear broad advice about vapor barriers and get confused. The truth is more practical than that. Moisture control depends on climate, wall design, and materials. Some walls need a smart vapor retarder, some use painted drywall as part of the strategy, and others rely on exterior insulation to keep the cavity warmer and reduce condensation risk. If you are changing the wall assembly significantly, follow local code and climate-appropriate guidance.
Step 3: Choose the Right Insulation Material for the Wall
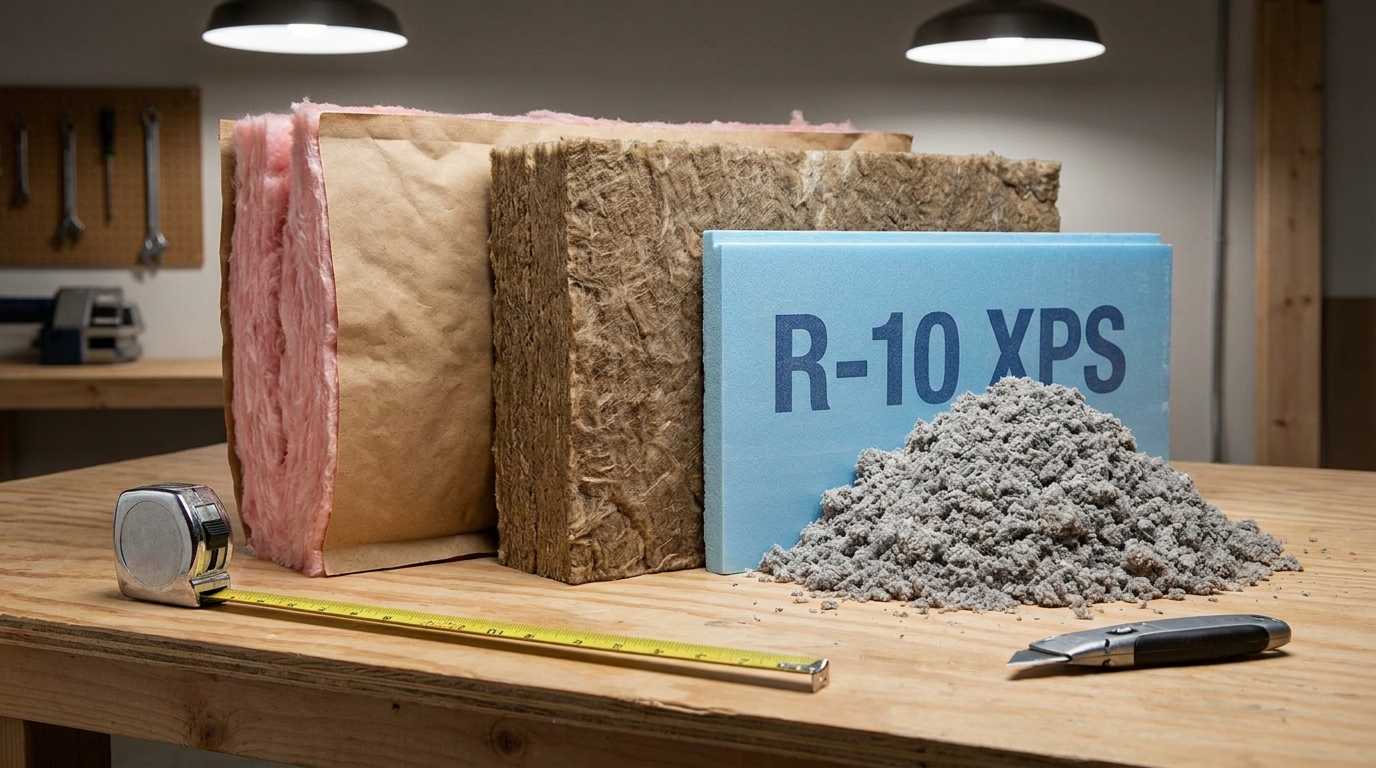
There are several common wall insulation materials, and each has strengths and limits. For beginners, the easiest way to choose is by matching the material to the wall condition rather than chasing the highest advertised R-value. Most fibrous insulation products deliver around R-3 to R-3.5 per inch, but actual results depend heavily on installation quality and thermal bridging through framing. In plain terms, a well-installed moderate product usually beats a poorly installed premium one.
Fiberglass batts
Fiberglass batts are one of the most common and affordable choices for open stud walls. They are widely available, easy to transport, and fairly straightforward for DIY work when stud spacing is regular and obstructions are minimal. Precut batts for 2×4 and 2×6 walls save time and can deliver good results if they fit snugly without being compressed.
The weakness of fiberglass batts is not the material itself. It is the installation quality. Batts lose performance when they are stuffed behind wiring, cut poorly around boxes, left with side gaps, or compressed to fit where they should have been split and fitted. If you choose fiberglass, work patiently and aim for full depth, full width, and continuous contact with the air barrier.
Mineral wool batts
Mineral wool is a strong all-around option for open walls. It is denser than fiberglass, often easier to friction-fit into stud bays, and valued for fire resistance and sound control. It handles minor irregularities well and tends to stay in place nicely during installation. Many homeowners like it for comfort-focused upgrades in bedrooms, exterior walls near traffic, and walls that benefit from improved acoustic control.
Mineral wool usually costs more than fiberglass, but many people find the handling and fit worth the extra expense. It still needs proper cutting and fitting around obstacles, but it is generally forgiving and solid for DIY. If you want a cavity insulation material that feels a bit more robust in the wall, this is often a good choice.
Dense-pack cellulose
Dense-pack cellulose is a very effective option for retrofits and closed-wall applications. It is blown into wall cavities through access holes and can fill irregular spaces more completely than batts. It is especially useful when you want to improve an older wall without removing all the interior finish. In many retrofit projects, this is one of the most practical methods available.
Cellulose is less of a beginner DIY product unless you have the right equipment and know how to hit proper density. Underfilled wall cavities can settle over time and leave empty space at the top, which defeats the point. Because of that, many homeowners hire this part out even if they handle prep and finish work themselves.
Spray foam
Spray foam can insulate and air seal at the same time, which makes it valuable in difficult assemblies and leakage-prone areas. It can be very effective at rim joists, odd cavities, and places where controlling airflow is just as important as adding R-value. There are cases where it is the right tool and worth the cost.
That said, spray foam is not automatically the best choice for every wall. It is usually more expensive, more installation-sensitive, and less forgiving than batts in straightforward stud bays. For many beginner projects, it is overkill unless there is a clear reason to use it. Reserve it for situations where air sealing challenges or assembly constraints justify the added complexity and cost.
Rigid foam and continuous exterior insulation
Rigid foam board is often used as continuous insulation on the exterior side of wall sheathing. This is one of the most important modern best practices because it reduces thermal bridging through the studs. Instead of insulating only between framing members, continuous insulation adds a thermal layer across the entire wall face. That improves real-world performance more than many homeowners expect.
This method is especially attractive during siding replacement or major exterior renovation. If the siding is already coming off, you have a rare chance to improve the wall assembly in a meaningful way. Exterior foam or mineral wool boards, combined with good flashing and a proper weather-resistant barrier strategy, can raise comfort and efficiency while also improving moisture performance when designed correctly.
Step 4: Know Your Target R-Value and Climate Needs
You do not need to memorize every code table, but you should understand the basic target range for your climate and wall depth. For uninsulated 2×4 wood-frame walls, 2021 IECC-based guidance commonly lands in the R-13 to R-20 cavity range, often with added continuous insulation in colder zones. A 2×6 wall has room for more cavity insulation, but wall performance still depends on the whole assembly, not only the cavity fill.
This matters because some homeowners focus only on the labeled batt package and ignore the wall as a system. Studs interrupt the insulation layer. Plates, headers, and corners create additional thermal bridges. Air leaks around penetrations bypass insulation entirely. That is why the best result usually comes from combining the right cavity insulation with careful air sealing and, when possible, continuous insulation.
If you are not sure what your local requirement is, check current local code or ask the building department before you buy materials. Requirements can vary by climate zone and project type. If rebates or tax incentives are part of your plan, confirm that your intended materials and installation approach align with those program rules too.
Step 5: Gather Tools and Safety Gear
A wall insulation project is not complicated in the same way as structural work, but it does require a careful setup. Good tools make the job cleaner and reduce mistakes. For most open-wall insulation projects, you will want a tape measure, straightedge, utility knife, insulation knife or serrated blade, caulk gun, acoustic sealant or quality caulk, canned foam for small gaps, work light, stapler if your product needs it, and a shop vacuum for cleanup.
Protective gear matters more than many first-time DIYers expect. Wear gloves, long sleeves, eye protection, and a proper dust mask or respirator suited to the material you are handling. Fiberglass and mineral wool can irritate skin and lungs during cutting and handling. If you are working around old plaster, paint, or unknown materials in an older home, pause and consider whether asbestos or lead paint could be an issue before disturbing finishes.
Step 6: Air Seal the Wall Before Installing Insulation
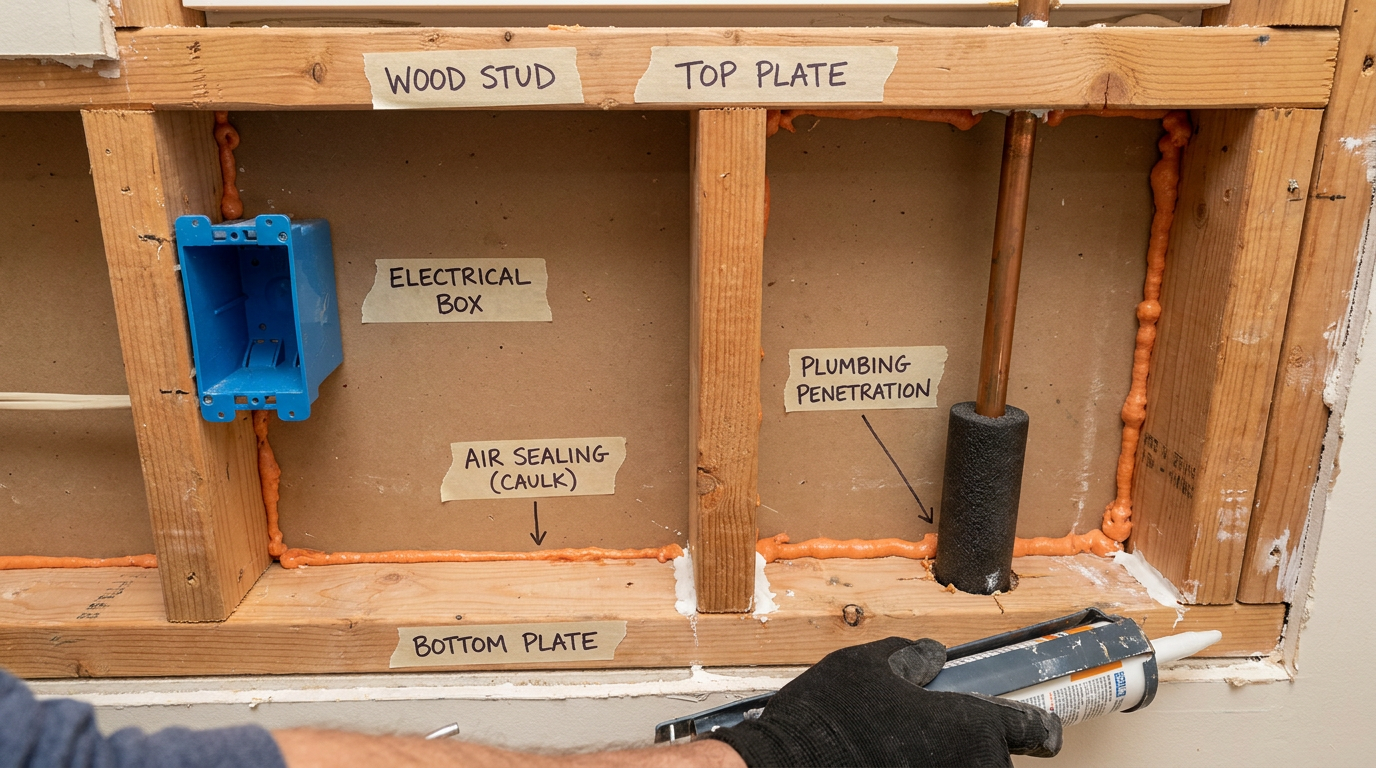
This is the step most often skipped, and it is the step that separates average results from good ones. Before the insulation goes in, seal the places where air can move through the assembly. Pay close attention to wire penetrations, plumbing holes, top plates, bottom plates, corners, window and door rough openings, and the edges of any sheathing gaps you can access. If the wall connects to a basement, crawlspace, or attic, transitions are especially important.
Use high-quality caulk for narrow joints and canned foam for small to moderate penetrations where appropriate. Large openings may need backing material plus sealant. Around windows and doors, use products that are suitable for those assemblies and will not warp frames. The point is to create a continuous air control layer so your insulation is not bypassed by moving air.
Rim joists deserve special attention if they are accessible as part of the project. They are often one of the leakiest and most poorly insulated areas in a house. Even though they are not part of the main wall field, they affect comfort and heat loss significantly. If you are already improving walls nearby, it makes sense to include them in the scope.
Step 7: Install Insulation Correctly in Open Stud Walls
If your wall cavities are open, this is where a beginner can do solid work with patience. Start by measuring the cavity depth and spacing so you are using the right product for the framing. The insulation should fill the cavity completely without being crammed in. A snug fit is good. Compression is not.
How to install batt insulation properly
Cut each batt cleanly so it fits the cavity height. Place it gently into the stud bay so it touches the back of the cavity and the face remains even with the studs. If there is wiring running across the bay, do not mash the batt behind it. Split the batt thickness or notch and fit it so part goes behind the wire and part in front. This keeps the insulation thickness more consistent.
Around electrical boxes, cut the batt to fit tightly around the box rather than leaving an open area. Around pipes, fit the insulation neatly without bunching it up. Every bay should look full, even, and uncompressed when finished. If one section bulges beyond the stud face, trim and refit it rather than forcing the drywall over it later.
With faced batts, follow the manufacturer instructions and local practice for fastening the flanges. Avoid over-stapling or stretching the facing awkwardly. The goal is a neat installation that keeps the batt in full contact with the cavity while preserving the intended control layers in the assembly.
What a good insulation job looks like
A good wall insulation job looks almost boring. There are no visible voids at the edges. The insulation is not slumped, folded, or compressed. The cuts around boxes and penetrations are neat. The cavity depth is fully filled, and the face is reasonably flush with the studs. If your installation looks rough, it probably is rough in terms of performance too.
Insulation works best when it is continuous, full-depth, and aligned with the wall’s air barrier. Gaps and compression can cut performance more than most homeowners expect.
Step 8: Insulating Closed Walls Without Major Demolition
Finished walls call for a different strategy. If the cavities are empty or underinsulated, one of the most practical methods is to blow insulation into the wall through drilled access holes. This can be done from the interior, but it is often cleaner and more effective from the exterior when siding is being replaced. That is one reason insulation upgrades pair well with re-siding projects.
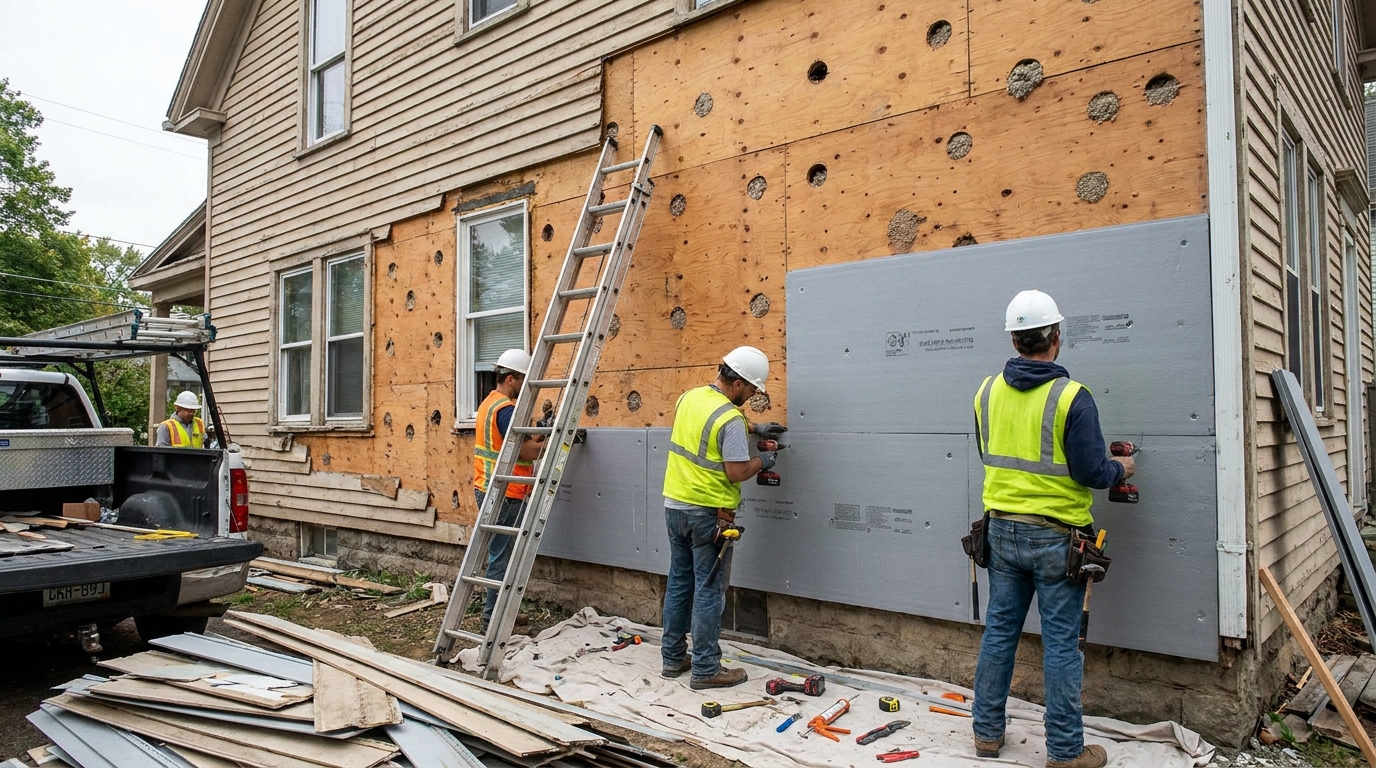
In an exterior retrofit, the usual process is to remove siding, inspect sheathing condition, drill access holes into each stud bay, blow in cellulose or fiberglass to the proper density, patch the holes, and then proceed with the exterior upgrade. In many climate zones, this is also a strong opportunity to add continuous insulating sheathing before the new siding goes back on. That combination addresses both empty cavities and thermal bridging.
This kind of retrofit is effective because it improves a lot of wall area without gutting finished rooms. It is especially valuable in older homes where interior trim, plaster, or historic finishes would be costly to disturb. For homeowners planning siding work anyway, it can be one of the highest-value building envelope improvements available.
Step 9: Add Continuous Exterior Insulation When the Project Allows It
If there is one upgrade that deserves more attention in modern wall work, it is continuous insulation on the exterior. Studs interrupt cavity insulation every 16 or 24 inches, and those framing members reduce the overall wall performance. Exterior insulation creates a more uniform thermal layer across the wall, which cuts thermal bridging and improves comfort.
This method is not always feasible for a small DIY project because it can involve changes to window trim, door details, flashing, siding attachment, and water management layers. But when the exterior is already being rebuilt, it deserves serious consideration. Done correctly, it can make the wall assembly perform much better than cavity insulation alone.
There are different products and detailing methods for continuous insulation, including rigid foam and exterior mineral wool boards. The best choice depends on climate, wall design, cladding type, and fastening details. This is an area where careful planning matters, because the insulation layer has to work with the weather-resistant barrier, flashing, and drainage plane rather than against them.
Step 10: Finish the Wall With the Right Control Layers
After insulation is installed, the wall still needs to be closed up correctly. That means paying attention to the layers that control air, vapor, and water. This is where oversimplified advice causes trouble. There is no universal rule that every wall always needs the same vapor barrier in the same place. The right detail depends on your climate and wall assembly.
For many standard framed walls, drywall and paint can be part of the interior control strategy, while the exterior sheathing and weather-resistant barrier handle drainage and weather protection. In other walls, a smart vapor retarder or another control layer may be appropriate. If you are matching an existing code-approved assembly, keep the new work consistent with that assembly rather than inventing your own layer stack without a plan.
When in doubt, local code requirements and manufacturer instructions should guide the finishing steps. This is one area where following tested wall assemblies is better than relying on internet shortcuts. Good moisture control is mostly about getting the layers in the right order and keeping bulk water out of the assembly in the first place.
Common Mistakes to Avoid
The most common wall insulation mistakes are basic, but they have a real effect on performance. Many jobs fail because the installer assumes any insulation in the cavity is good enough. That is not how it works in practice. Small errors repeated across dozens of stud bays add up to a wall that performs far below expectations.
- Skipping air sealing first. Insulation does not stop air movement by itself in the same way a dedicated air barrier does. If you leave penetrations open, the wall will still leak.
- Compressing batt insulation. Stuffing a batt into too little space reduces its effective thickness and lowers performance.
- Leaving gaps around boxes and pipes. Even small voids create cold spots and reduce continuity.
- Using the same method for every wall. Open cavities, finished walls, and masonry each call for different solutions.
- Focusing only on advertised R-value. Whole-wall performance depends on installation, thermal bridging, and airtightness too.
- Ignoring moisture problems. Water issues should be repaired before insulation goes in.
- Assuming spray foam is always best. It is useful in some assemblies, but it is not the default answer for every project.
Which Insulation Method Is Best for Beginners?
For a true beginner working on open stud walls, fiberglass or mineral wool batts are usually the most realistic starting point. They are accessible, understandable, and can perform well when installed carefully. Mineral wool often gives a cleaner fit and adds better sound control, while fiberglass is commonly the lower-cost entry point. Either can be a good choice if you match the product to the stud depth and install it properly.
For older finished walls, dense-pack cellulose is often the practical winner, especially if you can access the cavities during siding replacement. It is not always the easiest DIY route, but it is one of the strongest retrofit solutions because it fills enclosed spaces with less disruption. If you are already investing in new siding, pairing blown-in cavity fill with continuous exterior insulation can be a very smart move.
Spray foam makes the most sense in targeted areas, leakage-prone transitions, and difficult assemblies where its air sealing benefits justify the extra cost. It is not the best first-choice material for every homeowner or every wall. Practical building work is rarely about using the fanciest product. It is about using the right product in the right place.
Cost, Payback, and When the Work Is Worth Doing
Wall insulation cost varies a lot because access drives the price. Open wall work during a remodel is usually far cheaper per square foot than trying to upgrade finished walls later. Exterior retrofits can cost more upfront, but they often make sense when combined with siding replacement because labor and access are already built into the project. That is why timing matters almost as much as material choice.
The payback is not only about utility bills. Better wall insulation improves comfort, reduces drafts, and can make rooms more usable year-round. It may also improve acoustic performance and help HVAC systems run more steadily. For many households, those comfort gains are just as valuable as the energy savings.
If you are planning multiple envelope upgrades, sequence them thoughtfully. Wall insulation, window flashing repairs, siding replacement, attic air sealing, and rim joist work often overlap in useful ways. A coordinated approach usually produces better long-term results than doing each task in isolation.
Final Thoughts
Properly insulating your walls is not about finding a miracle material. It is about reading the wall correctly, solving moisture issues first, air sealing carefully, and installing the chosen insulation with attention to detail. For open wood-frame walls, fiberglass or mineral wool batts are often the most approachable DIY methods. For closed-wall retrofits, dense-pack blown-in insulation is often the practical path, especially when siding work creates exterior access.
The larger lesson is that wall insulation works best as part of the whole wall assembly. Thermal bridging, air leakage, and moisture control all affect how the finished job performs. If you keep those factors in view and avoid rushing the installation, you can make a meaningful improvement to the comfort and efficiency of your home.
For beginners, that is the right mindset to carry into the project. Do not chase hype. Do not assume higher R-value solves every problem. Focus on fit, coverage, sealing, and assembly details. That is how walls go from looking insulated to actually being insulated.



No Comment! Be the first one.