



Essential Steps for Weatherproofing Your Home This Fall
Fall is when smart homeowners get ahead of winter instead of reacting to it. Once temperatures drop, small exterior problems become bigger ones fast. A loose shingle turns into a leak, a clogged gutter sends water against the foundation, and a draft around a door starts pulling heat out of the house every hour of the day. Weatherproofing in fall is not about one miracle fix. It is about tightening the building envelope, managing water properly, and taking care of weak points before cold weather starts testing them.
Table Of Content
- Start With a Full Exterior Inspection
- Manage Water First Because Water Damage Gets Expensive Fast
- Roof and flashing details matter more than most homeowners think
- Seal the Obvious Air Leaks Around Doors, Windows, and Penetrations
- How to approach windows and doors realistically
- Do not overlook small penetrations
- Check the Attic Because Heat Loss Often Starts at the Top
- Why attic work also helps prevent winter moisture problems
- Inspect Siding, Trim, and Exterior Joints Before Freeze-Thaw Cycles Begin
- Do Not Ignore Foundation Drainage and Basement Clues
- Seal and Support the Duct System for Better Whole-Home Performance
- Know the Best Order of Operations
- Short-Term Weekend Tasks That Deliver Real Value
- Long-Term Improvements Worth Planning
- Use Rebates and Tax Incentives Where Available
- Common Misconceptions That Lead to Wasted Money
- When to Call a Professional
- A Practical Fall Weatherproofing Mindset
The good news is that effective weatherproofing does not always start with expensive replacements. In many homes, the best first steps are basic and practical. The U.S. Department of Energy and ENERGY STAR consistently point to air sealing and insulation as foundational improvements because they improve comfort, reduce energy waste, and support the rest of the house. ENERGY STAR says sealing air leaks and adding insulation may save up to 10 percent on annual energy bills, and those gains come with fewer drafts and a more even indoor temperature. That makes weatherproofing one of the rare home maintenance jobs that protects the structure and pays back through daily comfort.
This article focuses on actionable steps you can take to weatherproof your home’s exterior this fall, with a few important indoor checks that support exterior performance. We will start with water management because water causes the costliest damage. Then we will move to air leaks, insulation, ductwork, and larger upgrades worth planning if your home still feels cold or inefficient after the basics are done. If you want the straight answer on where to start, it is this: keep water out, stop air leaks, then improve insulation.
Weatherproofing works best when you treat the house as a system. Roofs, gutters, siding, windows, doors, attic insulation, and ductwork all affect how well the home handles wind, rain, and cold.
Start With a Full Exterior Inspection
Before you buy supplies or schedule larger work, walk the house slowly and inspect the exterior from top to bottom. This first pass tells you where your biggest risks are. Bring a notepad, take photos, and look at the home the way water and cold air do. You are checking for paths in. Every crack, failed joint, backed-up gutter, and missing piece of flashing is a potential entry point.
Begin at the roofline and work downward. Look for damaged shingles, exposed nail heads, deteriorated flashing around chimneys and vents, sagging gutters, open joints in trim, cracked caulk at penetrations, and any signs of staining under eaves. On siding and masonry, look for separation around pipes, cable entries, exterior outlets, vents, hose bibs, and window trim. At grade level, pay attention to soil that slopes toward the house, standing water, mulch piled too high against siding, and downspouts that discharge too close to the foundation.
This inspection matters because weatherproofing is about prioritizing the highest-value work first. Homeowners often jump straight to windows because windows are visible. But in real houses, leaks and energy loss commonly happen around trim, attic hatches, vents, plumbing penetrations, rim joists, and duct connections. A careful inspection helps you avoid spending money in the wrong place and gives you a practical order of operations.
Manage Water First Because Water Damage Gets Expensive Fast
If there is one place homeowners should not cut corners, it is water management. Rain and melting snow do not need a large opening to cause trouble. Repeated wetting can stain framing, rot trim, feed mold growth, weaken sheathing, and raise the risk of foundation seepage. FEMA guidance emphasizes keeping gutters and downspouts clear and making sure water is directed away from the home. That advice sounds simple because it is simple, but it is also one of the highest-value weatherproofing tasks you can do in fall.
Start by cleaning out gutters thoroughly. Remove leaves, twigs, roofing granules, and any sediment sitting in the troughs. Then run water through the system and watch how it drains. Check for leaks at seams, poor slope, loose hangers, and overflow points. A gutter that looks intact from the ground can still be failing if sections are back-pitched or clogged at the outlet. That overflow often lands right at the base of the wall where it creates foundation moisture issues or icy walkways later in the season.

Next, check the downspouts. A working gutter system is only as good as its discharge point. Downspouts should move water well away from the foundation, not dump it next to the house. If your downspouts end too close to the wall, add extensions or splash blocks so runoff is carried farther out. This is a straightforward fix that can reduce basement seepage, protect the foundation, and lower the chance of winter freeze-thaw damage around the perimeter.
Pay attention to grading as well. The soil around the house should slope away so water does not sit against the foundation. Over time, mulch beds settle, foot traffic compacts soil, and landscaping changes can accidentally direct water back toward the structure. Fall is a good time to correct those low spots. Also trim back shrubs and branches that trap moisture against siding or drop debris directly into gutters.
Roof and flashing details matter more than most homeowners think
The roof is your first weather barrier, so fall is the right time to look for obvious issues before snow and ice make access difficult. You do not need to climb onto a steep roof to do a useful inspection. From the ground with binoculars, or from a safe ladder position at the eaves, look for lifted shingles, missing tabs, rusted flashing, loose vent boots, and debris collecting in roof valleys. Any weak point in the roof assembly can let water into the house when wind-driven rain arrives.
Flashing deserves special attention because leaks often start at transitions, not open fields of roofing. Chimneys, skylights, plumbing stacks, wall-to-roof intersections, and dormers all depend on proper flashing to move water back out. Caulk is not a substitute for correct flashing, and repeated patching usually means there is a larger detail problem that should be repaired properly. If you see staining in the attic, around chimney chases, or at upper interior ceilings, address the exterior source before winter.
Seal the Obvious Air Leaks Around Doors, Windows, and Penetrations
Once water management is under control, move to air sealing. This is where many homes see the quickest comfort improvement. DOE and ENERGY STAR recommend sealing common leakage points such as doors, windows, vents, attic hatches, plumbing penetrations, and trim gaps. These fixes are often affordable, DIY-friendly, and effective enough that caulking and weatherstripping can pay for themselves in a year or less through energy savings.
It helps to know what air leakage looks like in real life. ENERGY STAR identifies common signs such as drafts, visible gaps around trim, outside odors entering the home, pests or dust getting in, and peeling paint near openings. Those are useful clues because they tell you where the building envelope is underperforming. If one room always feels colder than the rest of the house, there is usually a reason, and it is often a leak or insulation gap rather than a problem with the furnace itself.
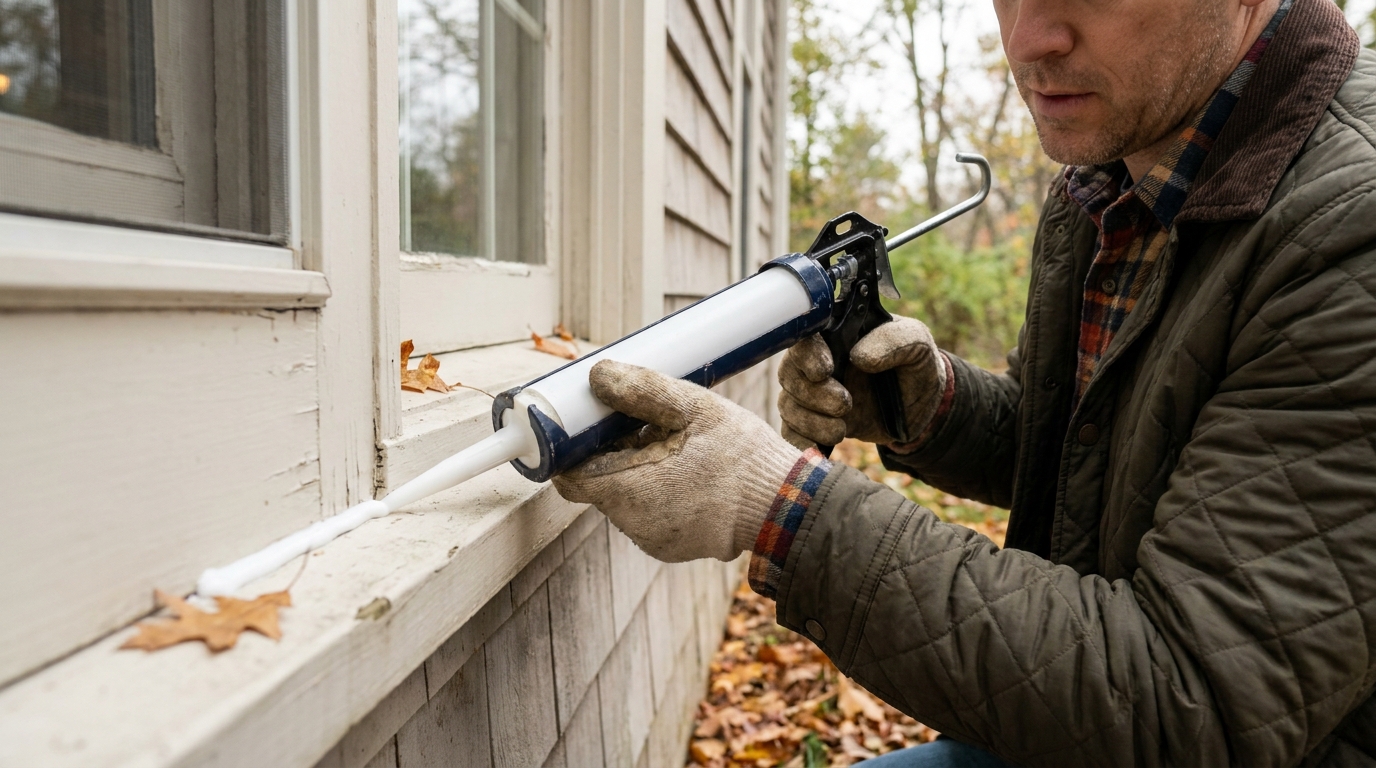
Use the right material for the right type of gap. Caulk is for stationary joints and cracks that do not move, such as gaps between siding and trim, around fixed exterior penetrations, and at stationary window or door trim. Weatherstripping is for moving parts such as doors and operable windows. Mixing them up is a common mistake. If you put caulk where movement occurs, it will fail. If you use weatherstripping where a rigid seal is needed, air and moisture can still get through.
How to approach windows and doors realistically
Windows and doors deserve attention, but not every draft means full replacement is necessary. Start by inspecting exterior trim and the joints where frames meet siding or masonry. Remove failed caulk, clean the area, and apply a fresh, compatible exterior sealant. On the interior side, check for movement around casing, stool joints, and signs of air movement at the edges. Many older windows perform noticeably better once the surrounding gaps are sealed correctly.
At doors, inspect the threshold, side jamb weatherstripping, and top seal. Close the door on a sheet of paper in a few spots. If it slides out easily, the seal may be weak. Replace compressed or torn weatherstripping and adjust the strike if needed so the door latches tightly. Do not forget the sweep at the bottom of the door, especially on doors leading to garages, porches, or decks where wind exposure is stronger.
Operable windows often leak at locking points and worn seals. Make sure locks pull the sash tight when engaged. If the house has storm windows, check that they are closed properly and the frames are in good condition. Storm windows can still add value on older homes if the primary windows are structurally sound but not highly efficient. If replacement windows are already needed because units are failing or frames are deteriorated, choose products suited to your climate. In colder northern climates, ENERGY STAR recommends lower U-factor windows because they insulate better in cold weather.
Do not overlook small penetrations
Some of the biggest comfort gains come from sealing the smallest openings. Walk around the house and inspect where utility lines, refrigerant lines, pipes, vents, exhaust ducts, and cables pass through walls. These are often left with oversized holes or old sealant that has dried out and pulled away. Seal these penetrations with the appropriate exterior-rated product. The material matters because some gaps need flexible sealant while larger openings may need backing material or foam designed for exterior use.
Dryer vents and bath fan exhaust terminations should also be checked for proper flaps and intact housings. A stuck-open flap can let cold air and pests enter the wall cavity or the house itself. Exterior electrical boxes and light fixtures can leak as well if their mounting surfaces are uneven or poorly sealed. These are small details, but weatherproofing is a details job. Small leaks add up because they are working all day and all night.
Check the Attic Because Heat Loss Often Starts at the Top
If a home still feels cold after obvious leaks are sealed, the attic is usually the next place to investigate. Warm air rises, and if the top of the house is leaky, you are constantly losing conditioned air into the attic. Adding insulation helps, but as DOE and ENERGY STAR emphasize, air sealing should come first. If you bury leaks under new insulation without sealing them, you leave performance on the table because the escape routes remain open.
Start with the attic hatch or pull-down stairs. These are common weak points. A poorly sealed hatch can act like an open window to the attic. Add weatherstripping around the perimeter and make sure the panel closes tightly. If you have pull-down stairs, consider an insulated cover designed for attic access points. Then look for penetrations below the insulation layer, including around wiring, plumbing stacks, recessed lights that are not insulation-contact rated, duct chases, and bath fan housings.
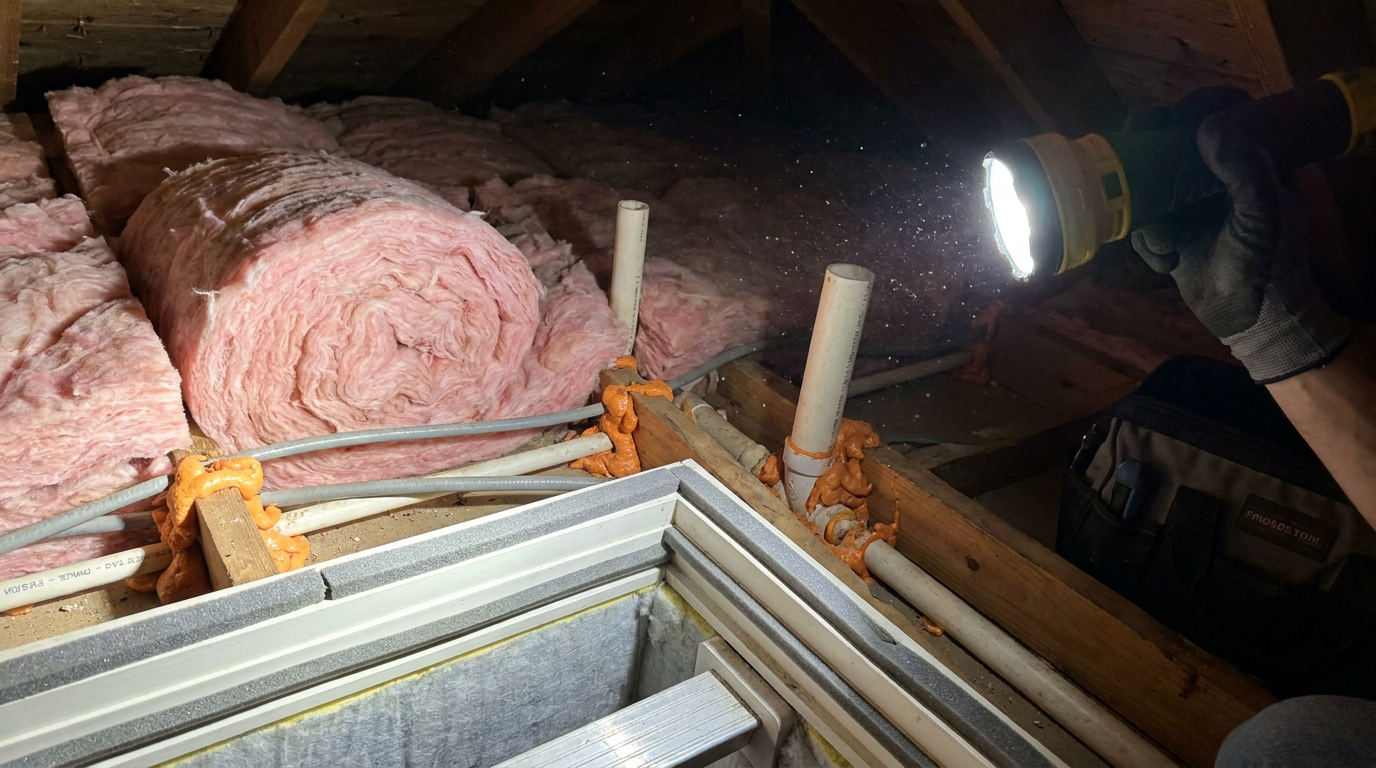
After leaks are sealed, evaluate insulation depth and condition. Insulation that is thin, uneven, compressed, or missing in key areas will not perform as intended. Attic insulation is one of the most cost-effective longer-term upgrades for many houses, especially older homes with modest existing levels. A well-sealed and well-insulated attic can make upper floors more comfortable, reduce winter heat loss, and lessen the chance of uneven roof temperatures that contribute to ice dam problems.
Why attic work also helps prevent winter moisture problems
Attic weatherproofing is not only about energy use. It also supports moisture control and roof durability. When too much warm air escapes into the attic, it can warm portions of the roof deck unevenly. In snowy climates, that can contribute to melting and refreezing at colder edges, which is part of how ice dams form. By reducing air leakage from the living space into the attic, you help the roof stay closer to outdoor temperature conditions, which is generally what you want in winter.
Bath fan ducts should vent outdoors, not dump warm moist air into the attic. Check that duct connections are secure and that the termination point outside is clear. This is another example of how weatherproofing and moisture management overlap. A house that leaks air also tends to move moisture where it does not belong. Tightening the envelope in the right places reduces both comfort problems and hidden durability issues.
Inspect Siding, Trim, and Exterior Joints Before Freeze-Thaw Cycles Begin
Exterior cladding does not have to be visibly damaged to need maintenance. Siding, trim, and exterior joints are exposed to sun, rain, wind, and seasonal movement every year. Fall is the right time to inspect them because freeze-thaw cycles are hard on already weakened materials. Look for open butt joints, cracked sealant, soft trim boards, peeling paint, and areas where caulk has separated from the substrate.
Peeling paint is not only a cosmetic issue. It can be a sign that moisture is getting behind the finish or that air leakage is causing temperature swings at the surface. ENERGY STAR includes peeling paint among the possible signs of leakage, and it is worth taking seriously. Scrape, repair, prime, and repaint damaged areas as conditions allow, especially on wood trim that can absorb water. Protective finishes are part of weatherproofing because they keep materials from taking on moisture and deteriorating faster.
On masonry homes, inspect mortar joints, especially around openings and where different materials meet. Hairline cracks may be cosmetic, but wider cracks or repeated cracking can signal movement or water intrusion risk. Sealants at dissimilar material joints such as masonry-to-trim or siding-to-flashing should remain flexible and well-bonded. If those joints fail, wind-driven rain often finds a way in.
Do Not Ignore Foundation Drainage and Basement Clues
Many homeowners think of weatherproofing as something that happens above grade, but foundation drainage is part of the same system. If water is not being controlled at the roof and around the yard, the basement or crawl space usually pays the price. Damp walls, musty smells, efflorescence, or seasonal seepage are signs that water is reaching the foundation too often. Fall is the time to reduce that load before winter precipitation arrives and frozen ground slows drainage.
Check whether downspouts discharge far enough away and whether splash pads are still in place and angled correctly. Make sure planting beds are not trapping runoff against the wall. If there are window wells, clear debris and verify that drains are functioning. Small corrections outside often improve basement conditions more effectively than trying to manage symptoms indoors.
If the house has a crawl space, inspect access doors, vents where applicable, and any obvious openings where air or pests enter. In colder conditions, uncontrolled air movement through the lower parts of the house can make floors feel colder and raise heating demand. Weatherproofing should improve comfort from the ground up, not just at the windows.
Seal and Support the Duct System for Better Whole-Home Performance
Ductwork does not always get included in fall weatherproofing conversations, but it should. DOE notes that a typical home can lose about 20 to 30 percent of the air moving through ductwork because of leaks, holes, and poor connections. That is a major penalty, especially when ducts run through attics, crawl spaces, garages, or other unconditioned areas. If warm air is leaking out before it reaches the rooms, the heating system has to work harder and comfort suffers.
Start by inspecting exposed ducts for disconnected sections, loose joints, torn flexible duct, and deteriorated insulation. Look around boots where ducts meet floors, walls, or ceilings because those transitions often leak too. If you can safely access them, seal joints with appropriate duct mastic or UL-listed foil tape designed for duct sealing. Avoid common cloth duct tape for long-term sealing because it does not hold up well in these applications.
Duct sealing is especially useful if some rooms are consistently harder to heat than others. While balance issues can have multiple causes, leaky ducts are a common contributor. If the system is older, poorly laid out, or mostly concealed, professional testing and sealing may be the better route. The key point is that weatherproofing is not only about stopping outside air at the walls. It is also about keeping conditioned air moving efficiently through the house once it has been heated.
Know the Best Order of Operations
One of the biggest mistakes homeowners make is doing weatherproofing work in the wrong sequence. The most effective order is straightforward. First, inspect and repair water-management systems. Second, seal obvious air leaks. Third, add insulation in accessible areas such as the attic after air sealing is done. Fourth, evaluate duct leakage and other whole-home performance issues. Finally, plan larger upgrades such as replacement windows, siding replacement, or major envelope improvements only if the basics are in good shape and the home still underperforms.
This sequence matters because each step supports the next. If gutters overflow and roof flashing leaks, better insulation will not solve the problem. If you add insulation before sealing air leaks, heated air will still escape through the same gaps. If you replace windows while ignoring attic bypasses or downspout discharge, you may spend heavily without fixing the main causes of discomfort or moisture risk. Good workmanship starts with the system, not the showroom.
- Fix water control first by cleaning gutters, repairing downspouts, checking flashing, and correcting drainage away from the foundation.
- Seal air leaks next around doors, windows, penetrations, trim, attic hatches, and other obvious gaps.
- Add or improve insulation in the attic and other accessible areas after the leaks are sealed.
- Address duct leakage if comfort remains uneven or ducts run through unconditioned spaces.
- Plan major upgrades carefully when components are already near end of life or the house still needs better thermal performance.
Short-Term Weekend Tasks That Deliver Real Value
If you want a practical weekend plan, focus on the tasks that give the best return for time and money. Clean the gutters, flush the downspouts, and confirm that water exits far from the foundation. Seal visible exterior gaps around penetrations and trim. Replace worn weatherstripping at doors and operable windows. Add a door sweep where daylight or airflow is visible under the door. Weatherstrip the attic hatch and check for obvious insulation gaps.
These are not glamorous upgrades, but they are effective. They also help you learn how your home behaves. By doing these jobs yourself, you start noticing where the building was never sealed well to begin with, where water consistently lands after rain, and which materials have reached the point where patching is no longer enough. That practical knowledge makes future maintenance decisions better and cheaper.
A simple but useful habit is to test on a windy day. After completing the basic sealing work, walk indoors and check the usual trouble spots with your hand near trim, baseboards, sill areas, and access hatches. If drafts are noticeably reduced, you know the work is paying off. If one area still feels cold, that is the spot to investigate more deeply rather than assuming the whole house needs a major upgrade.
Long-Term Improvements Worth Planning
Some houses need more than maintenance-level weatherproofing. If you have already handled water management and air sealing but the home still feels inefficient, longer-term upgrades may be the right next step. Attic insulation is often first on that list because it is accessible and usually delivers a strong return. In some homes, rim joist sealing and insulation, crawl space improvements, or better wall insulation strategy may also be appropriate depending on construction type and climate.
Window replacement should usually be treated as a targeted upgrade, not the automatic first move. If existing windows are structurally failing, difficult to operate, or have failed seals, replacement makes sense. But if the frames are serviceable, sealing around them and improving the rest of the envelope may deliver more value first. When replacing, pay attention to climate-specific performance. Lower U-factor windows are generally preferred in colder northern regions because they offer better insulation in winter conditions.
Siding replacement can also be an opportunity to improve weatherproofing if the cladding is nearing end of life. Done properly, it gives access to water-resistive barriers, flashing details, and sometimes exterior continuous insulation depending on the project scope. That is part of the broader trend toward whole-home envelope upgrades instead of isolated fixes. The best projects solve multiple issues at once rather than addressing symptoms one by one.
Use Rebates and Tax Incentives Where Available
Recent federal programs have expanded incentive pathways for insulation, air sealing, duct sealing, and other energy-efficiency upgrades. Depending on your location, income eligibility, and the specific measures installed, you may qualify for rebates, tax credits, or utility incentives that lower the cost of weatherproofing work. For many homeowners, this changes the math on fall improvement projects. Work that once felt easy to postpone becomes more realistic when part of the cost is offset.
Before starting larger jobs, check current federal, state, local, and utility program details. Requirements can change, and documentation often matters. In some cases, products or installation methods must meet specific standards to qualify. Keep receipts, product information, and contractor paperwork organized from the start. Weatherproofing is preventive maintenance, but it is also now part of a bigger push toward home energy upgrades that improve efficiency and resilience.
Common Misconceptions That Lead to Wasted Money
One of the most common misconceptions is that weatherproofing starts and ends with replacing windows. Windows matter, but they are often not the main source of drafts or heat loss. Homes frequently leak more through attics, penetrations, trim gaps, and poorly sealed access points than through the glass area itself. Spending heavily on replacement windows before addressing those basics can leave the house feeling disappointing for the money invested.
Another common mistake is treating caulk and weatherstripping as interchangeable. They are different tools for different conditions. Caulk belongs at stationary joints. Weatherstripping belongs where parts move. Using the wrong material shortens the life of the repair and can allow the same leak to return quickly. It is a small distinction, but it is exactly the kind of detail that separates durable work from temporary patching.
Homeowners also underestimate gutters. Gutters do not just keep water from pouring off the roof edge. They are a major part of protecting siding, landscaping, basements, and foundations by controlling where water lands. A clogged or badly sloped gutter system can quietly create structural moisture problems that cost far more than regular cleaning and maintenance ever would.
Finally, adding insulation without air sealing first is a frequent missed opportunity. Insulation slows heat flow, but it does not stop moving air from escaping through holes and cracks. If the house is still leaking, the insulation cannot perform to its full potential. The best results come from sealing first, then insulating.
When to Call a Professional
Some weatherproofing tasks are ideal for capable homeowners, and others deserve professional help. Routine gutter cleaning, downspout extensions, replacing basic weatherstripping, and sealing small accessible gaps are reasonable DIY jobs for many people. But steep roofs, chimney flashing problems, widespread rot, concealed moisture damage, complex duct issues, and major insulation upgrades often require trained eyes and safe work practices.
If you suspect roof leaks, recurring basement water intrusion, large areas of failed cladding, or significant attic bypasses around mechanical systems, bring in a qualified contractor. The same goes for older homes where multiple systems have been modified over time. In those houses, what looks like a simple draft can be connected to a deeper problem in the envelope. Good contractors do more than sell a product. They explain the cause, the repair approach, and how the fix ties into the rest of the building.
A Practical Fall Weatherproofing Mindset
The best weatherproofing plan is not flashy. It is methodical. You inspect, prioritize, seal, direct water correctly, and improve weak areas in the right order. That approach respects how houses actually work. It also avoids the cycle of chasing symptoms each winter instead of fixing root causes when conditions are favorable in fall.
If you remember only three things, make them these. First, manage water before it gets into the structure. Second, seal the obvious air leaks because they are often low-cost and high-value. Third, improve insulation and duct performance once the leaks are under control. That is the sequence that delivers better comfort, lower energy waste, and fewer unpleasant surprises when the weather turns.
Fall gives homeowners a narrow but valuable window to get ahead of winter. Use it well. A house that is properly weatherproofed feels steadier, drier, and easier to heat. Just as important, it stands a better chance of avoiding the kind of cold-weather damage that is expensive, disruptive, and usually preventable with solid maintenance done at the right time.


No Comment! Be the first one.