



A Practical Guide to Duct Inspection for a Healthier Home
When people think about a healthier home, they often focus on visible surfaces, better cleaning habits, or perhaps the air filter in the furnace. What gets missed is the network behind the walls, ceilings, crawlspaces, basements, and attics that quietly moves conditioned air through the house every day. Your duct system is part of the home’s respiratory system. If it is leaking, disconnected, dirty in specific ways, or exposed to moisture, it can affect not only comfort but also indoor air quality and energy use.
Table Of Content
- Why duct inspection matters more than most homeowners realize
- Inspection first, cleaning only when there is evidence
- What a homeowner can safely inspect
- Step by step: how to inspect your ducts
- Step 1: Start at the air handler, furnace, or heat pump indoor unit
- Step 2: Inspect visible metal duct joints and seams
- Step 3: Examine flex ducts for sagging, crushing, or disconnection
- Step 4: Check duct insulation and location
- Step 5: Inspect supply registers, return grilles, and room by room clues
- Step 6: Look for evidence of moisture, pests, and contamination
- Step 7: Turn the system back on and observe performance clues
- Common signs your ducts may need repair, sealing, or professional testing
- What inspection can lead to, and what it should not be confused with
- When to call a professional
- Duct inspection as part of sustainable living
- How often should you inspect your ducts?
- A simple maintenance checklist to keep in mind
- Final thoughts
That is why duct inspection deserves more attention than it usually gets. It is not an extreme measure, and it is not something only older homes need. In practical terms, a duct inspection is a low cost diagnostic step that helps you see whether your HVAC system is delivering air as intended, whether it is wasting energy, and whether it may be pulling pollutants from places where they do not belong. In a home that aims to be both healthy and efficient, that is a smart place to start.
There is also an important distinction to make early. Duct inspection is not the same as duct cleaning. The U.S. Environmental Protection Agency notes that duct cleaning is usually unnecessary unless there is visible contamination, mold, musty odor, vermin, or another specific concern. Ordinary dust on registers does not automatically mean your ducts are contaminated. Inspection comes first because it tells you whether cleaning, sealing, repair, insulation improvements, or no action at all is the appropriate next step.
From a sustainability perspective, this matters even more. ASHRAE has noted that duct leakage can waste a substantial amount of energy, especially when ducts run through unconditioned spaces like attics, crawlspaces, or garages. In some cases, those losses can reach 20 to 40 percent of the energy from an otherwise well operating air conditioner. A home that leaks conditioned air into unconditioned spaces is not just less comfortable. It is working harder than it needs to, using more electricity or fuel, and potentially drawing in dust, humidity, insulation fibers, or other contaminants along the way.
This guide will walk you through what duct inspection is, why it matters, how to inspect accessible ductwork safely, what warning signs to look for, and when it is time to bring in a qualified HVAC professional. The goal is not to make every homeowner into a technician. The goal is to help you make better decisions about a system that plays a central role in comfort, air quality, and long term efficiency.
Why duct inspection matters more than most homeowners realize
In a forced air home, ducts carry heated or cooled air from the air handler to supply registers and bring return air back to the system. If those pathways are intact, sealed, and properly supported, your HVAC system can deliver air with less waste and better balance. If they are damaged or leaky, the system may still appear to function, but it often does so less efficiently and less cleanly. That means higher bills, uneven temperatures, and avoidable strain on equipment.
The health side of the equation is just as important. Leaky return ducts can pull air from attics, crawlspaces, garages, or wall cavities. Those areas may contain dust, moisture, insulation fibers, musty smells, pest debris, or even vehicle related pollutants in the case of attached garages. Once drawn into the duct system, some of that contamination can be recirculated through occupied rooms. Even when the home feels warm in winter or cool in summer, the quality of the delivered air may be poorer than it should be.
Inspection also supports a more modern approach to home performance. Today, efficient homes are increasingly viewed as systems rather than a collection of separate upgrades. Air sealing, ventilation, filtration, insulation, heat pumps, humidity control, and duct integrity all affect one another. If you plan to electrify your home, improve ventilation, or invest in efficiency upgrades, understanding the condition of your ducts is a sensible first step because good equipment performs best when the distribution system is sound.
A healthier home is not just about the equipment you buy. It is also about whether the air can move cleanly, efficiently, and predictably through the systems you already have.
This systems based perspective is especially relevant in climates with significant heating or cooling loads. In Canada and across much of North America, long heating seasons and increasingly hot summers make HVAC performance more important than ever. Duct leaks, disconnected runs, and missing insulation can quietly undermine comfort for months before anyone notices the source. Inspection helps bring those hidden issues into view.
Inspection first, cleaning only when there is evidence
One of the most common misconceptions about ductwork is that any visible dust near a vent means the ducts must be dirty and need cleaning. EPA guidance does not support that assumption. Dust on return grilles is often normal because returns are designed to pull air from occupied rooms, and some particles naturally collect on the grille over time. That alone does not prove contamination inside the ducts.
What inspection helps you determine is whether there is evidence of a specific problem. Visible mold like growth, musty smell, water staining, pest activity, heavy debris from construction, disconnected sections, or substantial dust streaking around joints are all more meaningful clues than a dusty vent cover. If contamination is present, it is important to understand the source. Cleaning without correcting leaks or moisture issues may only treat the symptom for a short time.
This is one reason thoughtful maintenance tends to be more effective than reactive maintenance. By checking the duct system periodically, you can identify loose joints, missing insulation, poor filter fit, or moisture exposure before they become bigger issues. That approach tends to be more affordable, less disruptive, and more aligned with sustainable home care because it favors targeted action over unnecessary services.
What a homeowner can safely inspect
You do not need specialized equipment to do a useful first pass. A careful visual inspection of accessible areas can reveal many of the most common duct problems. The key word is accessible. You should inspect ducts you can reach safely in places such as unfinished basements, utility rooms, crawlspaces with stable access, garages, and attics that are safe to enter. You should not open sealed mechanical components, disturb suspicious materials, or attempt repairs beyond your comfort level.
Before you begin, gather a flashlight, a phone or camera for photos, a notebook, work gloves, and if needed a dust mask. If you are going into an attic or crawlspace, wear stable shoes and move carefully. Turn off the HVAC system at the thermostat before touching accessible duct sections, register covers, or the filter compartment. This makes the inspection easier and reduces the chance of pulling loose material into the system while you are examining it.
During the inspection, it helps to think in zones. Start near the air handler or furnace, where many problems begin at the plenum, connections, and filter area. Then follow visible supply and return runs as far as you safely can. Finally, check a sampling of supply registers and return grilles throughout the living space for clues related to airflow, dust patterns, and comfort differences between rooms.
Step by step: how to inspect your ducts
Step 1: Start at the air handler, furnace, or heat pump indoor unit
The mechanical area tells you a great deal about the condition of the overall system. Look at the blower compartment access area, the filter slot, the plenum where ducts connect, and any visible seams or joints. You are looking for gaps, loose tape, rust, dark dust streaks, signs of condensation, and anything that appears disconnected or improvised. If the area around the unit is dusty and the filter does not fit tightly, particles may be bypassing the filter and entering the system.
Check the air filter next. A clogged filter restricts airflow, but a poorly fitting filter can be just as problematic because unfiltered air can move around the edges. Make note of the filter size, fit, and condition. If there is visible dust buildup in the compartment beyond what you would expect from normal use, it is worth discussing with a professional because it can point to bypass or return side leakage.
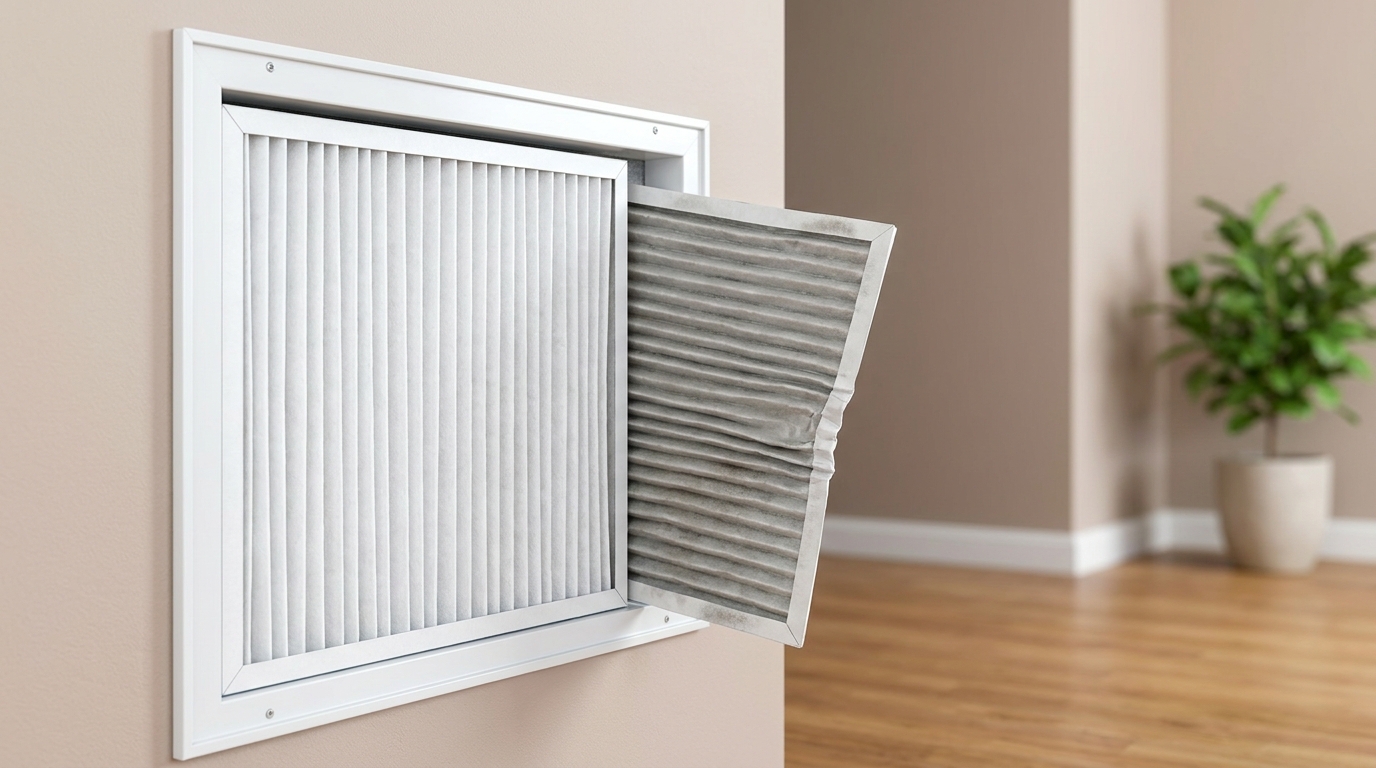
Also notice whether there are musty or stale odors near the unit. Odors do not diagnose a problem on their own, but they can be useful clues when paired with visible moisture stains, corrosion, or biological growth. If you see standing water, active dripping, or heavy corrosion, address that promptly because moisture in HVAC systems should never be ignored.
Step 2: Inspect visible metal duct joints and seams
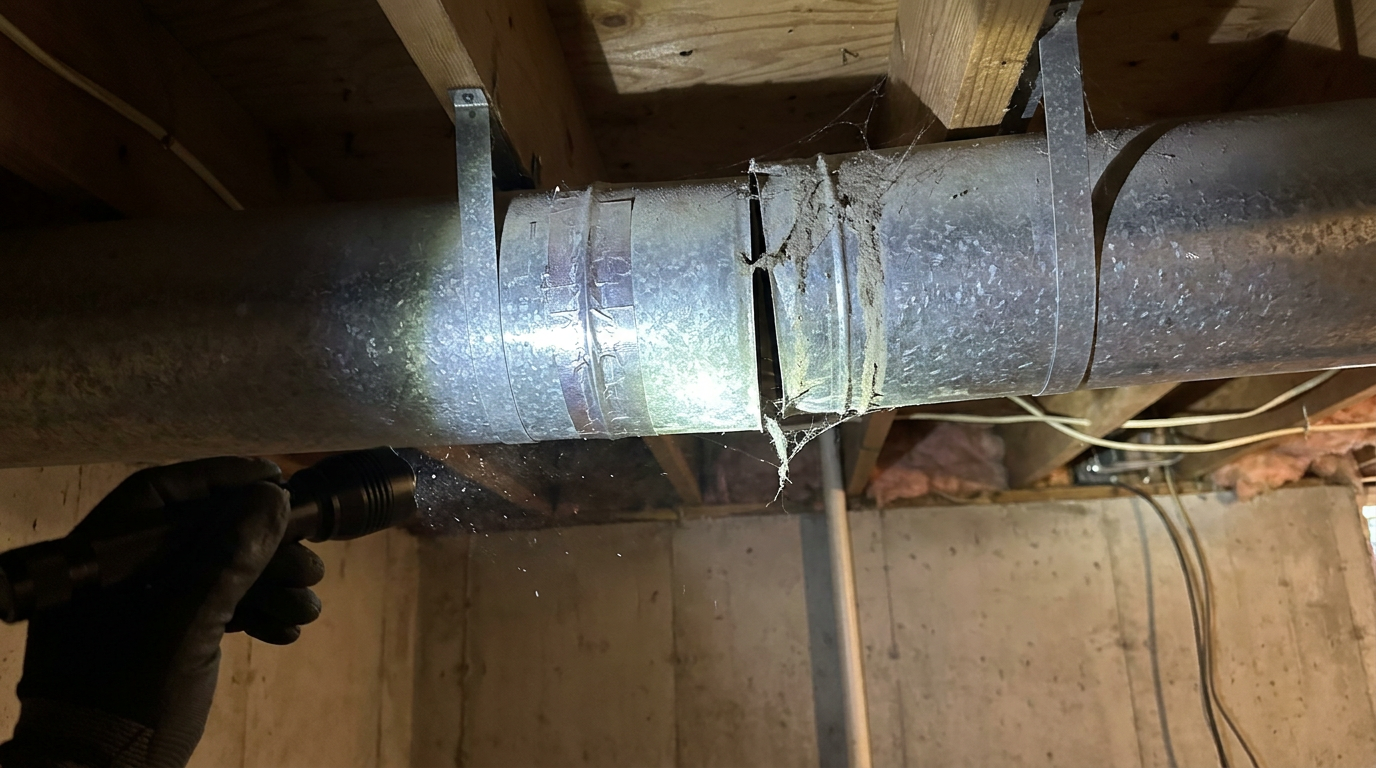
Now move outward from the equipment and examine exposed sheet metal ducts. Focus especially on joints, elbows, transitions, and branch connections, since leaks are more likely at seams than in the middle of a straight run. Dark streaks around a connection can indicate that air is escaping or being pulled in, carrying dust with it. Loose or peeling tape is another common sign that a seal has failed.
Take a close look at the materials used for sealing. Approved foil tape and water based mastic are common best practice materials for sealing ducts. Generic cloth backed duct tape, despite its name, is not a durable long term solution for duct sealing. If you see old cloth tape drying out or peeling away, make note of it. NRCan specifically recommends approved foil based products or mastic for plenums and supply and return ducts.
If a joint seems loose, avoid forcing it or applying random tape as a quick fix unless you are confident in the correct repair method. A small gap can be straightforward, but a larger connection issue may reflect movement, poor support, or pressure problems elsewhere in the system. Inspection is about documenting what you see so the right remedy can follow.
Step 3: Examine flex ducts for sagging, crushing, or disconnection
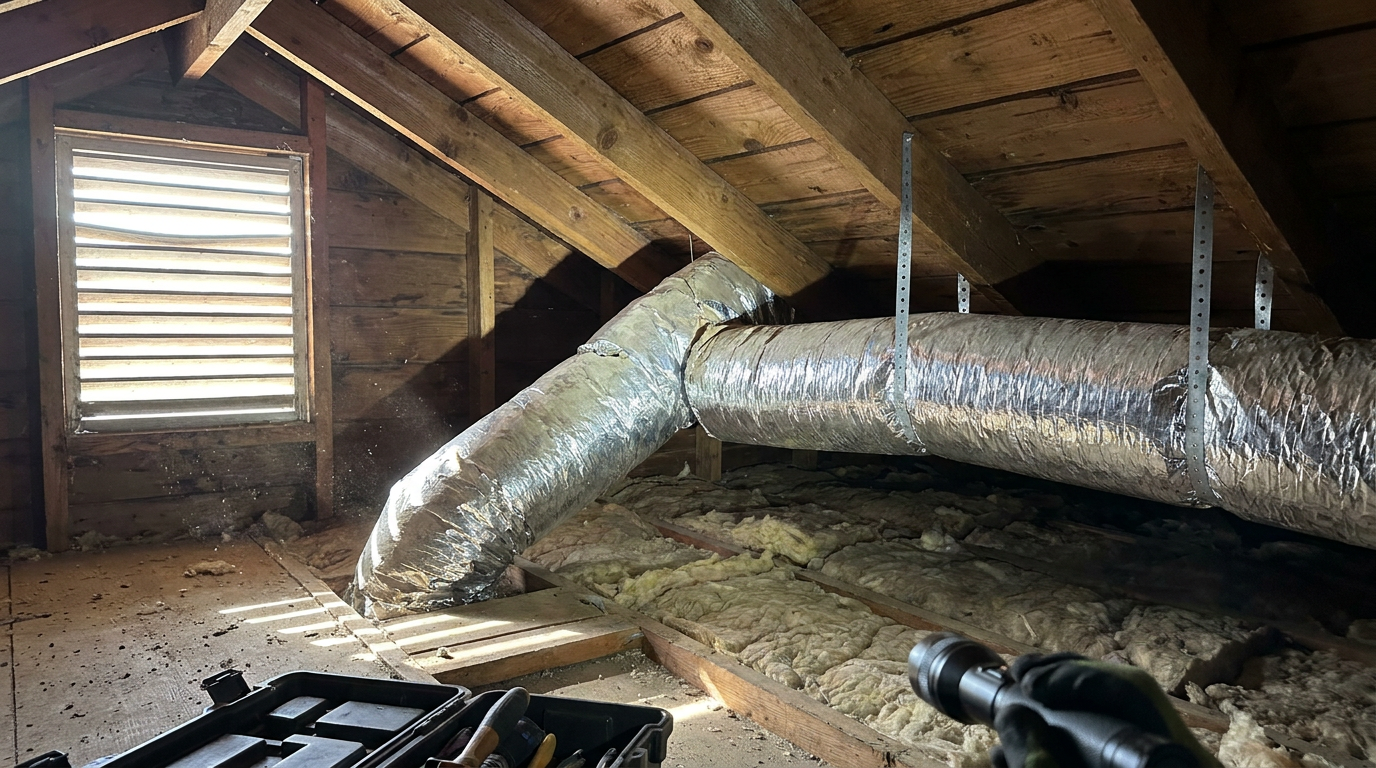
If your home uses flexible ducts, inspect them carefully because they can be vulnerable to airflow reducing damage. A flex duct should be supported at intervals and should not be sharply bent, crushed, pinched, or hanging excessively. Even if the outer jacket looks intact, the inner liner may be constricted in a way that reduces airflow to a room.
Watch for sections that have slipped off collars or boots, especially near branch takeoffs or register connections. In attics and crawlspaces, these disconnections can go unnoticed for a long time because the system still runs, yet much of the conditioned air may be spilling into an unconditioned area. In heating season, that can mean cold rooms and higher utility bills. In cooling season, it can mean humidity issues and wasted electricity.
Also inspect the insulation around flex ducts. If the outer insulation jacket is torn or compressed, thermal losses may increase, particularly in very hot attics or cold crawlspaces. Even when leakage is not severe, poor duct insulation can reduce the temperature of delivered air before it reaches occupied rooms. That translates into less comfort and more run time for the equipment.
Step 4: Check duct insulation and location
Where the ducts are located matters almost as much as their condition. Ducts running through conditioned space are generally less vulnerable to severe energy losses than ducts in attics, garages, crawlspaces, or exterior wall cavities. Still, all ducts benefit from being sealed and properly connected. If your ducts are in unconditioned areas, inspect the insulation wrap closely for tears, wet spots, compression, and missing sections.
Moisture stains on insulation deserve special attention. They may be related to roof leaks, condensation, or humidity issues, and any of those can compromise duct materials and indoor air quality. If insulation is wet, mold growth may become a concern depending on the material and duration of exposure. The practical response is not panic. It is simply to recognize that moisture plus airflow pathways can become a meaningful indoor environmental issue if left unresolved.
For homeowners planning future energy upgrades, duct location is valuable information. If a major retrofit is on the horizon, such as a heat pump conversion or broader air sealing work, knowing whether ducts are inside or outside the conditioned envelope can help prioritize improvements. In many homes, duct repairs and sealing are among the most sensible early measures because they improve the performance of whatever equipment the home uses next.
Step 5: Inspect supply registers, return grilles, and room by room clues
Move through the home and look at a representative sample of supply registers and return grilles. Remove a few covers if that can be done easily and safely. A light amount of dust is ordinary, but heavy debris, signs of remodeling residue, pest droppings, or damp residue warrant closer attention. If recent renovation work took place and registers were left uncovered, construction dust may have entered the system.
Pay attention to comfort patterns as you move from room to room. Rooms that are consistently stuffy, slow to heat, difficult to cool, or obviously different from the rest of the house may point to airflow restrictions, disconnected ducts, balancing issues, or leakage. The grille itself may not show the full story, but uneven comfort is often one of the first real world signs that the duct system needs attention.
Return grilles are particularly worth checking because return side leaks can draw contaminants into the system. If there are gaps around the grille box, loose connections in nearby accessible returns, or strong dust accumulation patterns on surrounding surfaces, make note of them. A return system that is tight and well designed helps the whole house breathe more predictably.
Step 6: Look for evidence of moisture, pests, and contamination
Duct systems should be dry, intact, and protected from intrusion. As you inspect, look for rust, water staining, damp insulation, musty smells, insect remains, rodent droppings, gnaw marks, nesting material, or visible debris inside openings. These signs are more important than ordinary dust because they suggest a condition that can affect both system hygiene and home health.
If you suspect mold, approach that carefully. Mold can be difficult to identify visually, and not every dark patch is mold. What matters most is whether there is visible growth combined with moisture or a persistent musty smell. In that case, the moisture source should be identified and corrected. Cleaning or replacing contaminated duct components may be appropriate, but only after the underlying issue is addressed.
Garages, crawlspaces, and attics deserve added caution because they can introduce contaminants that homeowners do not immediately associate with ducts. Attached garages can expose ducts to fumes. Crawlspaces can contribute humidity and soil related odors. Attics can contain insulation dust and seasonal heat extremes. When ducts leak in these locations, the problem is not just wasted conditioned air. It is also unintended air exchange with spaces that are not meant to supply breathable air to the living area.
Step 7: Turn the system back on and observe performance clues
After the visual inspection, turn the HVAC system back on and walk through a few rooms while it is running. Put a hand near supply registers to compare airflow from room to room. You do not need exact measurements to notice if one room receives much weaker airflow than another of similar size. That kind of imbalance can point to crushed flex duct, disconnected runs, blocked dampers, leakage, or design issues.
Listen for whistling at joints, rattling around boots, or unusual sounds near the air handler. Sound is not a precise diagnostic tool, but changes over time can be useful clues. Likewise, pay attention to how long the system runs and whether certain rooms lag behind the thermostat area. Comfort patterns often reveal distribution problems that are not obvious from a quick glance alone.
If you have an energy audit report, blower door test results, or previous service notes, compare your observations to those documents. More homeowners are using energy audits as a starting point for identifying both envelope and duct leakage, and that broader view is helpful. Duct inspection works best when it is part of understanding the home as a complete system.
Common signs your ducts may need repair, sealing, or professional testing
A visual inspection can be very informative, but it does not replace diagnostics in every case. Some symptoms strongly suggest that a professional evaluation is worthwhile. These include rooms that are consistently uncomfortable, a sudden rise in heating or cooling bills, strong dust buildup soon after cleaning, persistent musty odors, visible disconnected ducts, or evidence of moisture damage around the system.
Another sign is if ducts pass through an attic, garage, or crawlspace and the home struggles with comfort despite reasonably efficient equipment. ASHRAE notes that leakage in these unconditioned areas can have a major energy impact, which means the equipment itself may not be the root problem. A homeowner may assume the fix is a larger furnace or air conditioner, when in reality the air distribution network is what needs attention.
If anyone in the household is sensitive to indoor air quality, recurring respiratory irritation, unexplained odors, or pollutant concerns should be taken seriously. Duct issues do not explain every indoor air problem, but they can contribute by transporting contaminants from undesirable spaces into occupied rooms. In those cases, a more complete HVAC and ventilation assessment is often worthwhile.
- Loose, disconnected, or crushed duct sections
- Dust streaking or dark lines around joints and seams
- Torn or missing duct insulation in unconditioned spaces
- Musty smells, moisture stains, or visible corrosion
- Poor filter fit or signs of dust bypass around the filter slot
- Rooms with weak airflow or persistent temperature imbalance
- Evidence of pests, nesting, or renovation debris in ducts
- Higher energy bills without another clear explanation
What inspection can lead to, and what it should not be confused with
A good inspection can lead to several different outcomes, and not all of them involve major work. In some homes, the result is simple reassurance that the accessible ducts are intact and there is no strong evidence of leakage or contamination. In others, the inspection may reveal targeted issues such as a damaged flex run, poor filter fit, missing insulation, or a few leaky joints near the plenum that are worth sealing.
When leakage is the concern, professional duct sealing may be the right next step. EPA states that sealing duct air leaks can save energy on heating and cooling bills and can help prevent contaminants from entering the ductwork and circulating through the home. In practical terms, that means better comfort with less wasted output from the HVAC system. It also often means the system can deliver ventilation and filtration more consistently.
What inspection should not automatically lead to is unnecessary duct cleaning. Cleaning has its place, but the evidence should drive the decision. If there is visible contamination, mold associated with moisture, pest activity, or heavy debris from a renovation, then cleaning or component replacement may be appropriate. If there is no such evidence, the more effective action may be sealing, repairing, insulating, or improving filtration instead.
When to call a professional
Homeowners can do a great deal with a flashlight and careful observation, but some situations are best handled by a qualified HVAC professional. If you find disconnected ducts in hard to access areas, visible mold like growth, major water damage, persistent low airflow, repeated condensation, or signs that ducts may be drawing air from an attached garage or crawlspace, a professional assessment is the safest next move. The same is true if your home has complex duct routing or if you are considering significant HVAC upgrades.
Professional services may include duct leakage testing, airflow measurement, static pressure testing, thermal imaging, and inspection of concealed connections. In some cases, an energy auditor can help connect duct performance to broader issues such as envelope leakage, ventilation imbalance, or oversized equipment. This kind of systems based diagnosis can prevent expensive guesswork and lead to more durable solutions.
It is also worth seeking help before or after major renovation work. EPA guidance notes that during remodeling, duct registers should be sealed to keep dust and debris out of the system. If a project has already taken place without those precautions, post renovation inspection may help determine whether contamination entered the duct network and whether targeted cleaning or filter changes are warranted.
Duct inspection as part of sustainable living
Sustainable living is often framed around big upgrades, but many of the most effective choices are quieter and more practical. Duct inspection is a good example. It does not have the visible appeal of a new heat pump or upgraded windows, yet it supports the performance of those investments by helping conditioned air arrive where it is supposed to go. It also helps avoid unnecessary services and identifies repairs early, which is almost always more resource efficient than waiting for a larger failure.
This is especially relevant in homes moving toward electrification. Efficient heat pumps and balanced ventilation systems depend on sound air distribution. If ducts leak significantly, the promise of modern high efficiency equipment is undermined. In that sense, duct inspection is not an isolated chore. It is part of preparing the home for lower carbon, healthier, and more resilient performance over time.
There is a broader healthy buildings theme emerging in industry guidance as well. Energy efficiency and indoor environmental quality are increasingly treated as complementary goals rather than competing ones. That is a helpful shift because homeowners should not have to choose between lower bills and better air. Well maintained ducts support both outcomes by reducing waste while helping keep unintended pollutants out of the airflow pathway.
How often should you inspect your ducts?
For most homes, a visual inspection of accessible ductwork every one to two years is a sensible baseline, with quicker checks whenever filters are changed or seasonal maintenance is being done. You should also inspect after major events that may affect the system, such as roof leaks, pest problems, renovation work, flooding, unusual odors, or unexplained changes in comfort. Homes with ducts in attics or crawlspaces may benefit from somewhat more frequent attention because those locations expose materials to greater temperature swings and a higher chance of unnoticed damage.
If you already schedule annual HVAC servicing, consider adding a simple duct condition review to that routine. Even a brief documented check near the air handler, plenum, filter area, and accessible runs can catch issues early. Over time, these observations create a useful maintenance history that makes it easier to spot changes before they become expensive problems.
The point is not to create anxiety around the system. It is to normalize inspection as one of the small habits that keep a home healthier and more efficient. Just as you might check caulking, clean gutters, or replace filters, checking accessible ducts can become part of a calm and practical home care rhythm.
A simple maintenance checklist to keep in mind
- Check the filter regularly and make sure it fits tightly in the slot.
- Inspect accessible ducts near the air handler for loose joints, failed tape, and dust streaking.
- Look at ducts in attics, crawlspaces, or garages for crushed sections, disconnections, or insulation damage.
- Watch for moisture, rust, musty smells, and signs of pests.
- Pay attention to room by room comfort and airflow differences.
- Document what you see with photos so changes are easier to track.
- Use approved sealing materials such as foil tape or mastic when appropriate, not generic cloth duct tape.
- Call a professional when problems involve hidden ducts, contamination, moisture, or persistent performance issues.
Final thoughts
Duct inspection is one of those home maintenance tasks that rarely feels urgent until something is clearly wrong. Yet it has a meaningful effect on how a home feels, how much energy it uses, and what kind of air moves through daily life. Because ducts are often out of sight, it is easy to assume they are fine as long as the furnace or air conditioner still turns on. In reality, small problems in the distribution system can quietly erode comfort, efficiency, and indoor air quality long before equipment failure gets anyone’s attention.
The encouraging part is that inspection is accessible. A careful homeowner can learn a great deal by checking the air handler area, visible joints, flex duct condition, insulation, register clues, and signs of moisture or pests. That first layer of observation often points clearly toward the next best step, whether that is no action, better filtration, targeted sealing, repair, or a professional diagnostic visit.
In a healthier home, air should move with purpose. It should arrive where it is needed, with as little waste and contamination as possible. Regular duct inspection helps support that goal in a grounded and practical way. It is not glamorous, but it is one of the quieter habits that can make a home feel better, run better, and age more gracefully over time.


No Comment! Be the first one.