



Essential ERV and HRV Maintenance: Your Guide to Fresh, Clean Indoor Air
Fresh indoor air matters more than many homeowners realize. In newer homes especially, tighter building envelopes do a better job of holding in heat and reducing drafts, but they also make it harder for stale air, excess humidity, and everyday indoor pollutants to leave on their own. That is where a heat recovery ventilator or energy recovery ventilator becomes such an important part of the home. These systems are designed to bring in outdoor air and exhaust indoor air in a controlled, balanced way while helping reduce energy loss.
Table Of Content
- Why ERVs and HRVs Matter in Modern Homes
- ERV vs HRV: A Quick Refresher Before You Maintain It
- Why Routine Maintenance Makes Such a Noticeable Difference
- Your Simple ERV and HRV Maintenance Schedule
- Before You Start: Read the Manual and Power the Unit Off
- Step 1: Check and Clean the Filters
- Step 2: Clean the Core Carefully
- Step 3: Wipe the Interior and Inspect the Cabinet
- Step 4: Look at the Fans, Drain, and Drain Pan
- Step 5: Check Outdoor Intake and Exhaust Hoods
- Step 6: Inspect Indoor Grilles and Airflow Paths
- Step 7: Restart the Unit and Listen
- Seasonal Tips for Better Performance
- Winter
- Spring and Summer
- Smoke and Outdoor Air Quality Events
- Common Misconceptions About ERV and HRV Maintenance
- Signs Your System May Need Professional Service
- How Maintenance Supports Sustainability Without Adding Stress
- A Practical Annual ERV and HRV Maintenance Checklist
- Final Thoughts
The good news is that ERV and HRV maintenance is usually much simpler than people expect. It is not a highly technical routine in most cases, and it does not need to become another overwhelming item on your home maintenance list. With a few practical checks throughout the year and a more complete annual cleaning, you can support better airflow, healthier indoor air quality, and more dependable energy performance.
Natural Resources Canada recommends annual maintenance for residential HRV and ERV equipment so the system can operate at peak efficiency. In practical terms, that usually means cleaning or replacing filters, cleaning the core as directed by the manufacturer, and checking basic components and airflow settings. If you have been treating your ventilator as a set it and forget it appliance, this is a helpful time to reset that assumption. Like any hardworking part of a home, it performs best with regular attention.
This guide is designed to make the process feel approachable. We will look at the difference between ERVs and HRVs, why maintenance matters, what homeowners can usually do safely on their own, what signs suggest a problem, and when it makes sense to call in a professional. The goal is not perfection. It is to help you create a simple rhythm of care that protects both your indoor air and your long term energy efficiency.
A well maintained ERV or HRV does two jobs at once: it supports healthier indoor air while helping your home avoid unnecessary heating and cooling losses.
Why ERVs and HRVs Matter in Modern Homes
Modern homes are often built or renovated with better insulation, tighter air sealing, and more efficient windows than older housing stock. This is a positive shift for comfort and energy use, but it also changes how a house breathes. Natural Resources Canada notes that tight homes need controlled ventilation because the building envelope is less able to exchange air passively. Without that controlled exchange, indoor air can become stale, humid, or uneven in quality.
An HRV, or heat recovery ventilator, transfers heat between outgoing stale air and incoming fresh air. In colder seasons, it can help warm incoming air using heat from the exhaust stream. An ERV, or energy recovery ventilator, does something similar but also transfers some moisture. That makes ERVs especially useful in conditions where humidity management is part of the comfort equation, such as very dry climates or regions with high cooling loads.
These systems are increasingly part of a whole home performance mindset. Instead of seeing ventilation as separate from comfort or efficiency, homeowners are beginning to understand it as one connected system. Fresh air, filtration, humidity balance, airtightness, insulation, and heating and cooling all influence one another. Looking after your ERV or HRV is not just a mechanical task. It is part of maintaining a healthier, smarter home overall.
There is also a growing awareness around indoor air quality because of wildfire smoke, allergy seasons, and broader health concerns. The U.S. Environmental Protection Agency has noted that HRVs and ERVs can support improved indoor ventilation and may be part of a broader strategy for increasing outdoor air exchange when indoor air quality is a concern. That said, the system only works well when airflow paths are open and components are clean.
ERV vs HRV: A Quick Refresher Before You Maintain It
Before getting into the maintenance routine, it helps to understand what type of unit you have. Many homeowners use the terms interchangeably, but they are not exactly the same. An HRV transfers heat only, while an ERV transfers heat and moisture. This difference affects how the system behaves across seasons and why your manufacturer instructions may not be identical to someone else’s.
In practical terms, both systems need regular homeowner care. Both rely on airflow through filters, fans, ducts, and a core. Both can lose effectiveness when dust builds up or filters become clogged. Both can become noisy, imbalanced, or less efficient when small issues are ignored over time. So while the design details differ, the maintenance mindset is very similar.
If you are not sure whether you have an ERV or HRV, start with the label on the unit or your home documentation. Most units are located in a mechanical room, basement, utility area, or near other HVAC equipment. The service manual is especially important because the correct cleaning method for the core can vary by model. Some cores can be rinsed gently, while others require a more specific process or should not be washed in the same way.
Why Routine Maintenance Makes Such a Noticeable Difference
When homeowners think about ventilation equipment, they often assume maintenance is mainly about preserving efficiency. That is certainly part of it, but it is not the whole story. A dirty filter or neglected core can also reduce airflow, which means the system may not be delivering the fresh air your home actually needs. That can affect comfort, humidity, odors, and overall indoor air quality.
Maintenance also helps the system do its energy saving job properly. If air pathways are restricted, fans may need to work harder and heat recovery performance may drop. In winter, this can mean your heating system carries a heavier load than necessary. In summer, especially with an ERV, poor maintenance can interfere with the balanced exchange that helps support comfort and moisture control.
There is a reliability benefit as well. Small issues often show up quietly at first, perhaps as a slight increase in noise, a bit of condensation where it should not be, or weaker airflow at a grille. Addressing these early can reduce the chance of bigger service calls later. Like many home systems, the ventilator is easiest to care for when attention is regular and calm rather than delayed until there is a clear malfunction.
Just as importantly, a manageable maintenance routine makes the system feel less mysterious. Homeowners who understand what to check tend to notice changes sooner and feel more confident discussing problems with a technician when professional support is needed.
Your Simple ERV and HRV Maintenance Schedule
The easiest way to keep ventilation maintenance from feeling overwhelming is to divide it into a light routine and a deeper annual reset. You do not need to do everything every month. A seasonal glance and an annual cleaning are often enough for most households, though homes with pets, renovations, heavy dust, allergy concerns, or smoke exposure may benefit from more frequent checks.
A realistic rhythm looks like this: inspect filters every one to three months, do a basic visual inspection of the unit and vents seasonally, and complete a fuller cleaning at least once a year in line with NRCan guidance and your manufacturer’s manual. If your home is in an area with wildfire smoke, heavy pollen, or long winters with snow and ice, seasonal checks become even more valuable.
- Every 1 to 3 months: check filters for dust buildup and inspect air intake and exhaust vents for visible obstruction.
- Seasonally: look at the cabinet, drains if applicable, grilles, controls, and listen for unusual sounds during operation.
- Annually: clean or replace filters, clean the core as directed, wipe the interior, inspect fans and drain pan, and confirm outdoor hoods are clear.
- As needed: call a professional for airflow balancing, electrical issues, persistent condensation, motor problems, or performance concerns you cannot resolve.
This kind of schedule is enough to keep most residential systems in good working order without turning ventilation care into a major project.
Before You Start: Read the Manual and Power the Unit Off
The most important first step is simple. Read your unit’s service or owner’s manual before opening anything. This may sound obvious, but ERV and HRV models vary in layout, filter type, core removal method, and cleaning instructions. The manual tells you what can be safely removed, what should never be immersed or scrubbed aggressively, and how often the manufacturer recommends service.
Once you are ready to do maintenance, turn off the unit. Depending on the model, that may mean using a wall control, a service switch, or the breaker if indicated by the manufacturer. The goal is to work safely and avoid drawing dust into the system while components are removed. Keep a soft cloth, vacuum with brush attachment, mild soap if approved, and a sink or basin ready if your core or filters are washable.
Taking a photo before removing parts can also help. It gives you a reference for how filters and panels fit back into place. This small step can save time and reduce uncertainty during reassembly.
Step 1: Check and Clean the Filters
Filters are usually the easiest and most important homeowner maintenance task. They catch dust and particles before air moves through the system, helping protect the core and support cleaner airflow. Over time, those filters load up with debris. When that happens, the unit has to work harder, airflow can drop, and the fresh air supply to your living spaces may be reduced.
Open the access panel and remove the filters carefully. Some are reusable and designed to be washed, while others are disposable and should be replaced. Follow the instructions for your model closely. A washable filter can often be vacuumed gently first and then rinsed with mild soap and water, but it should be fully dry before going back into the unit.
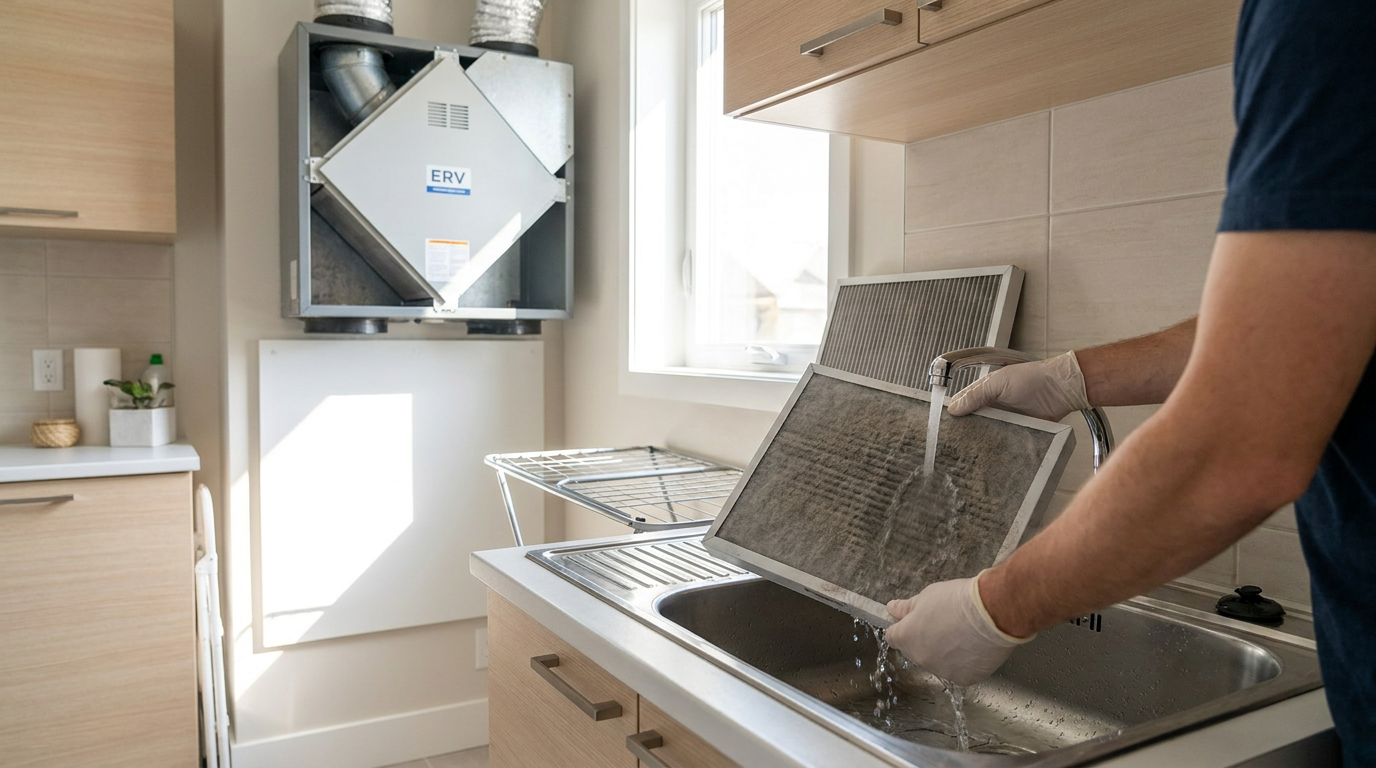
If your home has pets, frequent cooking, nearby construction, or high outdoor particulate levels during certain seasons, your filters may need attention more often than the standard recommendation. A quick visual check can tell you a lot. If the filter surface looks matted, gray, or obviously dusty, do not wait for the annual maintenance window. Clean or replace it sooner.
It is also wise to note the condition of the filter every time you inspect it. If it becomes dirty very quickly, that can point to high indoor dust levels, unusual outdoor contaminants, or a maintenance interval that should be adjusted. The goal is not to keep the filter pristine. It is to avoid letting it become restrictive.
Step 2: Clean the Core Carefully
The core is central to how an HRV or ERV works. This is the component where heat, and in the case of an ERV some moisture, is transferred between outgoing and incoming air streams. Because it sits at the heart of the exchange process, a dirty core can compromise both performance and efficiency.
Natural Resources Canada notes that homeowner maintenance typically includes cleaning the core according to the service manual. This matters because cleaning methods differ by design. Some cores can be removed and washed gently with mild soap and water. Others may need a more delicate rinse or dry cleaning approach. Some ERV cores in particular require extra care because their moisture transfer media can be damaged by improper washing.
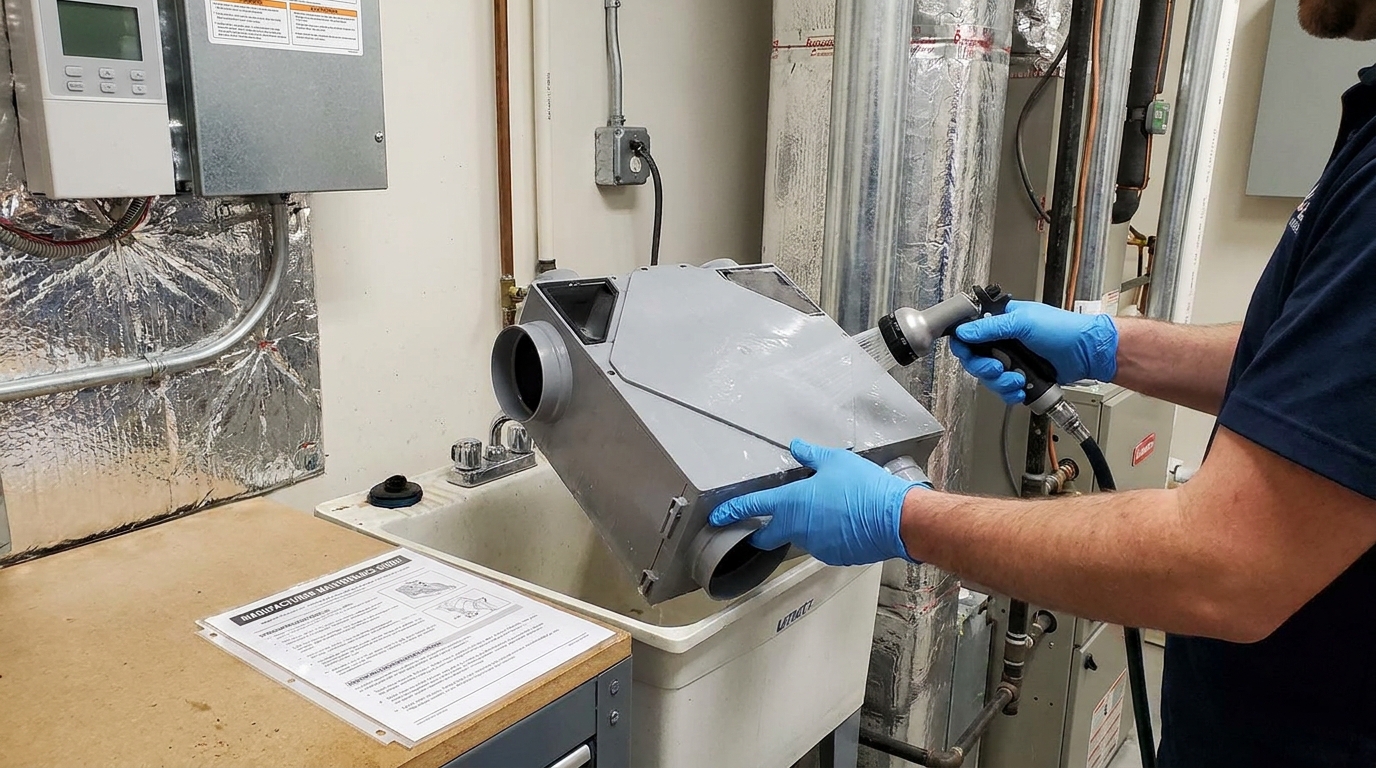
As you remove the core, look for visible dust, residue, or signs of damage. If there is buildup, clean it using only the method approved by the manufacturer. Let the core dry completely if washing is permitted. Reinstall it in the proper orientation, since putting it back incorrectly can reduce performance or disrupt airflow.
This step often feels more technical than it actually is, but the manual makes the difference. If you are unsure after reading it, it is perfectly reasonable to stop and book a service visit rather than risk damaging a costly component.
Step 3: Wipe the Interior and Inspect the Cabinet
With filters and the core removed, take a few minutes to look inside the cabinet. Dust can settle in the bottom of the unit or around accessible surfaces, especially if maintenance has been delayed. Use a soft cloth or vacuum brush attachment to remove loose debris. Avoid bending components or disturbing wiring.
This is also a good time to look for clues about moisture issues. If you notice staining, standing water, unusual grime, or signs of moldy odor, the unit may need closer evaluation. Ventilation systems naturally deal with temperature differences and, in some climates, condensate. But moisture should still be managed properly, not allowed to linger inside the cabinet.
Check gaskets, latches, and access doors while you are there. If the panel does not close snugly, the system may draw air in ways it should not. Small details like seals and fit can affect performance more than many homeowners expect.
Step 4: Look at the Fans, Drain, and Drain Pan
Many HRVs and ERVs have internal fans that can collect dust over time. If the fan blades are accessible and your manual says they can be cleaned by the homeowner, wipe them gently or use a soft brush. Dust accumulation on fans can affect airflow and sometimes contribute to noise or imbalance. Be gentle, since blades and housings can be damaged if handled roughly.
If your unit includes a condensate drain and drain pan, inspect those parts as well. Make sure the pan is clean and the drain line is not clogged. Standing water or a blocked drain can lead to moisture problems and should not be ignored. In colder climates, winter operation can make condensation management especially important.
Some homeowners find the drain line easy to forget because it is out of sight. Adding it to your annual checklist helps prevent that. A quick inspection is often all it takes to spot a developing issue early.
Step 5: Check Outdoor Intake and Exhaust Hoods
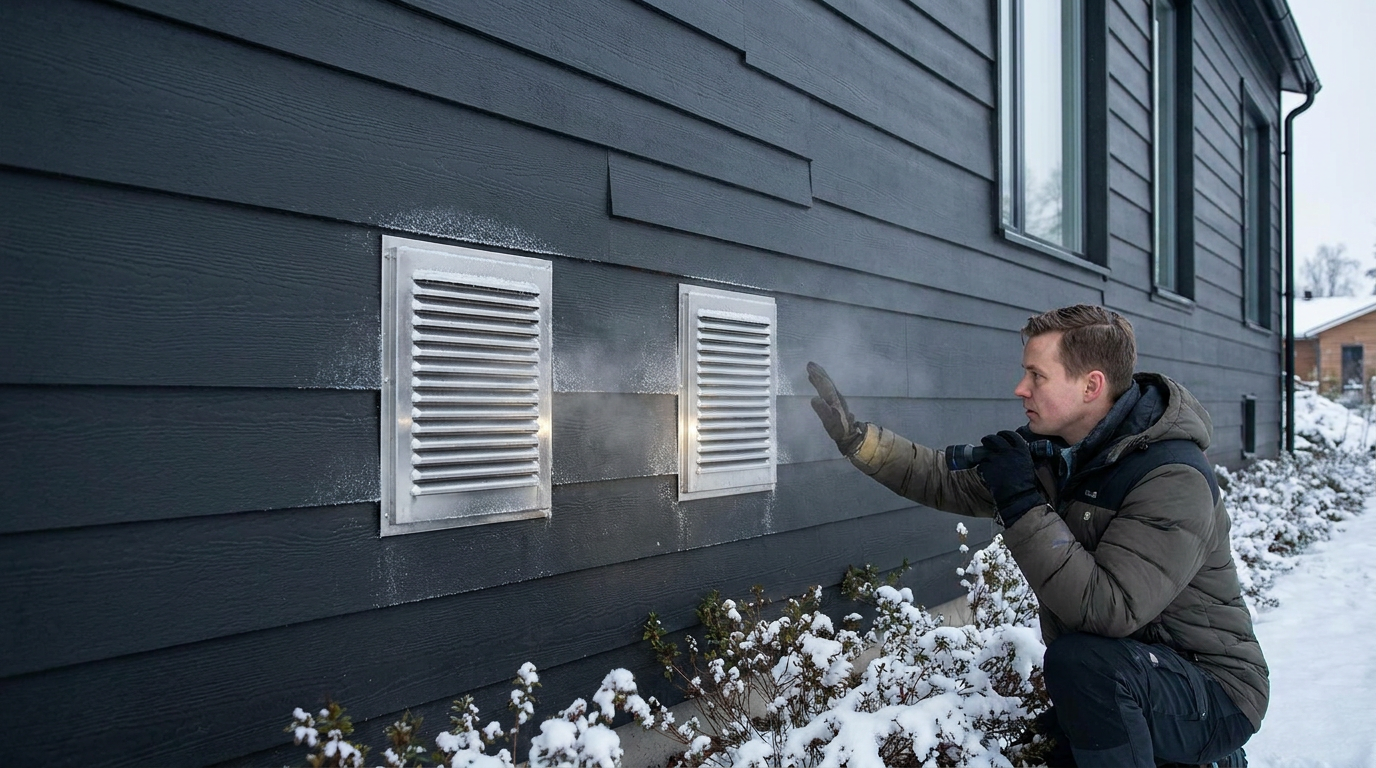
Your ventilator depends on clear exterior openings. If the intake or exhaust hood is blocked by leaves, lint, snow, insect nests, or windblown debris, airflow can be reduced and system performance can suffer. Seasonal checks are especially helpful here because outdoor conditions change quickly.
Walk outside and locate both hoods. Remove any visible debris and make sure screens are not packed or obstructed. In winter, ice and drifting snow can be a problem. During warmer months, vegetation growth or insect activity may be the bigger issue. Keeping these openings clear is one of the simplest ways to support balanced ventilation.
If you live in an area affected by wildfire smoke or very poor outdoor air quality at certain times of year, this is also a good reminder that more ventilation is not always automatically better in every moment. Outdoor air exchange remains important, but operation may need to be adjusted depending on local conditions, filtration strategy, and guidance from your HVAC professional.
Step 6: Inspect Indoor Grilles and Airflow Paths
Indoor supply and exhaust grilles are easy to overlook because they blend into ceilings and walls. Over time, however, dust can collect on them and nearby furnishings can partially block airflow. Walk through the house and make sure vents are open and unobstructed by curtains, storage, or furniture.
If the grilles are dusty, wipe or vacuum them gently. This does not replace cleaning the unit itself, but it supports consistent airflow through the whole system. You may also notice that one room feels stuffier than others or that a bathroom exhaust point seems weaker than expected. Those observations can help identify whether your system needs adjustment or professional balancing.
Balanced ventilation works best when the whole path is respected, not just the main box in the mechanical room. Clean grilles and clear circulation support the fresh air distribution the system was designed to provide.
Step 7: Restart the Unit and Listen
Once everything is dry, clean, and back in place, restore power and restart the unit. Pay attention to how it sounds. Most well functioning units produce a steady, fairly unremarkable operating noise. New rattling, vibration, humming, or intermittent sounds can point to a loose panel, misaligned component, or fan issue.
Check the control panel or wall control for normal operation. If your unit has multiple modes, review that they are functioning as expected. Some homes use intermittent settings, some run continuously at low speed, and some integrate with dehumidistats or timers. This is a good moment to reconnect with how your system is intended to operate day to day.
If airflow feels noticeably stronger after cleaning, that is a sign the maintenance was worthwhile. Even small improvements in airflow consistency can make the home feel fresher and more stable in humidity.
Seasonal Tips for Better Performance
Winter
Winter is often when homeowners become most aware of their HRV or ERV because windows stay closed and indoor air can feel dry or stale. In cold regions, an HRV can be especially valuable for fresh air exchange while reducing heat loss. Keep an eye on exterior vents for snow or frost blockage, and make sure condensate management is working properly.
Many units have a defrost cycle or cold weather operating mode. If yours does, review the manual so you understand what is normal. A temporary shift in operation during extreme cold may be part of the design, not a fault. If indoor humidity remains consistently too high, however, it may be worth checking settings and discussing airflow balance with a technician.
Spring and Summer
Spring often brings pollen and more outdoor debris, which can load filters faster. It is a good season for a visual check even if you completed annual cleaning recently. Summer introduces a different question, especially for ERV owners, because moisture management becomes more relevant. An ERV can help moderate humidity transfer while bringing in outdoor air, but only if the core and airflow paths are in good condition.
If you rely heavily on air conditioning, ventilation settings should still align with comfort and indoor air quality goals. Closing off or ignoring the ventilator entirely can create stale conditions in an otherwise efficient home. A balanced approach is usually best.
Smoke and Outdoor Air Quality Events
During wildfire smoke events or periods of poor outdoor air quality, ventilation strategy becomes more nuanced. Fresh air exchange remains important, but outdoor conditions matter. This is one reason filters and system controls should be understood before you need to make a quick decision. If your area experiences smoke regularly, talk with an HVAC professional about the best operating approach for your setup and what role your broader filtration system plays.
Common Misconceptions About ERV and HRV Maintenance
One of the most common misconceptions is that these systems require no attention once installed. In reality, regular homeowner maintenance is part of normal ownership. Filters and cores gather dust, outdoor hoods get blocked, and airflow can change over time. Annual maintenance is not an optional extra if you want reliable performance.
Another misconception is that ERVs and HRVs are basically the same thing in every respect. They share a purpose, but they handle moisture differently. That distinction matters for climate suitability and for maintenance instructions, especially regarding the core. Always use the manual for your exact model rather than assuming all units should be cleaned the same way.
Some people also believe that if they have had ducts cleaned, the ventilator itself does not need separate attention. That is not true. Duct cleaning does not replace filter care, core cleaning, or inspection of the unit’s components. The ventilation appliance still needs direct maintenance to operate well.
Finally, there is the idea that more ventilation always means better air quality. Fresh outdoor air is valuable, but conditions matter. Smoke, extreme humidity, or severe temperatures can affect how the system should be managed. Good indoor air quality is about balance, not simply maximizing one variable at all times.
Signs Your System May Need Professional Service
Many maintenance tasks are homeowner friendly, but some issues deserve expert attention. If your unit continues to make unusual noise after cleaning and reassembly, airflow seems significantly weak, or controls are not responding normally, it is time to call a professional. The same goes for recurring condensation issues, water leaks, electrical concerns, or error codes.
Airflow balancing is another area where professional help can be especially valuable. ERVs and HRVs are designed for balanced ventilation, and that balance can drift if dampers are altered, ducts leak, or components wear. If one part of the house consistently feels under ventilated or if you suspect the unit is not performing as intended, a technician can measure airflow properly rather than relying on guesswork.
Professional service also makes sense after major home changes such as finishing a basement, replacing windows, completing an airtightness upgrade, or altering the HVAC system. Since the house works as a connected system, ventilation performance may need to be reviewed after these changes.
How Maintenance Supports Sustainability Without Adding Stress
There is something reassuring about home maintenance that serves more than one purpose. Looking after your ERV or HRV is not just about protecting an appliance. It supports healthier air, steadier comfort, and more efficient use of energy in a home that is already working hard to be high performing. That is a practical kind of sustainability, the kind built into everyday decisions rather than added as a separate lifestyle project.
It is also worth noting that efficient ventilation is becoming more visible in the broader housing conversation. NRCan has highlighted the role of HRVs and ERVs in better performing homes, and Canada’s ENERGY STAR HRV and ERV Version 2.4 specification is scheduled to take effect on January 1, 2028. For homeowners thinking ahead about future upgrades or replacements, that is a reminder that ventilation is an evolving part of smart home performance, not a fringe feature.
The best maintenance routines are the ones people actually keep. A simple calendar reminder every few months, a note near the mechanical room, or a recurring task in your phone is often enough. You do not need an elaborate spreadsheet to care for the system well. You just need a repeatable habit.
A Practical Annual ERV and HRV Maintenance Checklist
If you want one straightforward reference point, use this checklist once a year and revisit the filters more often as needed. It covers the homeowner tasks that support both indoor air quality and energy efficiency in a manageable way.
- Turn off the unit and review the manufacturer’s service manual.
- Remove and clean or replace filters.
- Remove and clean the core according to the manufacturer’s instructions.
- Vacuum or wipe accessible interior surfaces inside the cabinet.
- Inspect fans for dust buildup if homeowner access is permitted.
- Check the drain pan and condensate line, if your unit has them.
- Inspect seals, access doors, and latches for proper closure.
- Clear exterior intake and exhaust hoods of debris, snow, or nests.
- Wipe indoor grilles and ensure airflow is not blocked.
- Restart the unit and listen for normal, steady operation.
- Book professional service if you notice persistent noise, moisture issues, weak airflow, or control problems.
That may look like a long list on paper, but in practice it is usually a modest task once you are familiar with your unit. Most homeowners find that the second time is much easier than the first.
Final Thoughts
Your ERV or HRV is one of the quieter contributors to daily comfort. It does not ask for much attention, but it does need some. Filters, the core, airflow paths, and seasonal checks all play a role in helping the system deliver what it was designed to provide: a healthier stream of fresh air with less wasted energy.
If you have been putting off maintenance because it felt technical or easy to ignore, this is a good place to start small. Check the filters. Read the manual. Set a reminder for a deeper annual cleaning. In a tight, efficient home, ventilation is too important to leave entirely to chance.
Well maintained ventilation is a practical form of care for your house and everyone in it. It supports cleaner indoor air, steadier humidity, and more thoughtful energy use without demanding perfection. And that is often what the best home systems do. They make everyday living feel a little lighter, a little healthier, and a little more resilient over time.



No Comment! Be the first one.