



How to Inspect Your Home’s Insulation for Better Energy Efficiency
Insulation rarely gets much attention until a home feels drafty, a utility bill jumps, or one room never seems to match the rest of the house. Yet insulation is one of the quiet systems that shapes everyday comfort, HVAC performance, and energy use across every season. A thoughtful inspection can reveal whether your home is holding heat where it should in winter, resisting unwanted heat gain in summer, and protecting key parts of the building from moisture stress over time.
Table Of Content
- Why insulation inspection matters as part of sustainable home maintenance
- What insulation actually does and what it does not do
- When to inspect your insulation
- Tools and safety basics before you begin
- Start in the attic because it is often the biggest opportunity
- What to check around the attic hatch
- Roof clues that point to attic insulation problems
- Do not stop at the attic: check rim joists, crawlspaces, and floors over unconditioned areas
- Inspect ducts too, especially if they run through attics or crawlspaces
- How to estimate whether your insulation level is likely adequate
- Warning signs that call for closer attention
- Small fixes that often make a meaningful difference
- When to call a professional
- How insulation inspection connects to rebates, tax credits, and larger retrofit plans
- A simple inspection routine homeowners can repeat each year
- Common misconceptions to leave behind
- The bottom line
For homeowners who want a more sustainable home without taking on a major renovation all at once, insulation inspection is a very practical place to start. It is relatively accessible, often low cost, and useful whether your next step is a small DIY improvement or a larger retrofit planned with a contractor. It also supports a broader goal that matters more and more in North America, which is reducing wasted energy while making homes more comfortable, durable, and resilient.
Authoritative guidance from ENERGY STAR and the U.S. Department of Energy has been consistent on one important point. Air sealing and insulation work best together, and in most cases air sealing should come first. Insulation slows heat flow, but it does not stop air leakage on its own, so adding more insulation without addressing gaps can leave a surprising amount of performance on the table.
That is why a regular insulation check is so valuable. According to ENERGY STAR, homeowners can save an average of 15 percent on heating and cooling costs, or about 11 percent on total energy costs, by air sealing and insulating attics, floors over crawl spaces, and accessible basement rim joists. Those are meaningful savings, but the benefits also extend to quieter indoor comfort, less strain on heating and cooling equipment, and fewer opportunities for hidden moisture problems to develop.
This guide is designed to make the process feel manageable. You do not need to become a building science expert in an afternoon. What you do need is a clear sense of where to look, what signs matter most, and how to decide whether the fix is a small seasonal task or a job for a professional.
Inspect first, air seal first, then insulate to the right level for your climate and your home. That sequence is one of the most dependable ways to improve comfort and reduce energy waste.
Why insulation inspection matters as part of sustainable home maintenance
When people think about energy efficiency, they often imagine high tech equipment such as heat pumps, smart thermostats, or solar panels. Those upgrades can be excellent, but the building envelope still does much of the quiet work. If the shell of the home is underperforming, conditioned air escapes more easily, outdoor air enters where it should not, and heating or cooling systems have to work harder to keep conditions stable.
That is why insulation inspection fits naturally into a sustainable maintenance routine. It helps you identify waste before it grows into a larger issue. It can also reveal whether a future equipment upgrade would benefit from envelope improvements first, especially if you are considering a heat pump. A tighter, better insulated home may allow for a smaller system size, which can lower upfront cost as well as operating cost.
There is also a durability angle that is easy to overlook. Poor insulation conditions often travel with other problems such as moisture intrusion, condensation, duct leakage, or inadequate ventilation details. A seasonal inspection can help you catch these concerns earlier, when the fix is usually simpler and less expensive. In that sense, insulation is not just about utility bills. It is about protecting the long term health of the home.
In both the United States and Canada, public guidance increasingly treats insulation and air sealing as part of whole home efficiency rather than isolated tasks. ENERGY STAR, DOE, NRCan, and CMHC all connect insulation upgrades to comfort, lower greenhouse gas emissions, and better long term building performance. For ordinary homeowners, that is encouraging because it means this work is not about perfection. It is about practical improvement.
What insulation actually does and what it does not do
Insulation reduces heat transfer. In winter, it helps keep indoor heat from escaping to colder outdoor conditions. In summer, it helps slow heat moving into the house from a hot roof, attic, or wall assembly. This thermal resistance is usually expressed as R-value in the United States, while Canada often also references RSI. Higher numbers indicate greater resistance to heat flow, but the right target depends on climate zone and location within the house.
What insulation does not do, at least not reliably on its own, is stop air movement. Gaps around plumbing penetrations, wiring holes, attic hatches, top plates, recessed fixtures, and duct connections can still leak conditioned air even if there is plenty of insulation nearby. That is why a house can technically have insulation and still feel drafty or uneven from room to room.
It is also important to understand that visible thickness tells only part of the story. Most common fiberglass, cellulose, and mineral wool insulation products offer roughly R-3 to R-3.5 per inch, so depth is a useful first estimate. Still, compressed insulation, wet insulation, missing sections, or major gaps can significantly reduce effective performance. In other words, two attics with similar looking insulation depth may behave very differently.
This is one of the biggest misconceptions homeowners run into. More insulation is not automatically better if moisture problems, air leaks, and ventilation details are left unresolved. A better approach is balanced and methodical. Look at condition, continuity, climate needs, and air leakage together.
When to inspect your insulation
The best times for a basic inspection are usually in early fall and early spring. Fall gives you a chance to prepare before heating season, while spring can reveal how your home performed over winter, especially if ice dams, condensation, or unusual cold spots appeared. If summer cooling bills are a bigger concern in your region, a late spring attic check can also be helpful before hot weather arrives.
You should also inspect insulation after any event that could affect the building envelope. Roof leaks, pest activity, storm damage, plumbing leaks, major HVAC work, or renovations are all good reasons to take a closer look. New recessed lighting, wiring updates, or bath fan changes can alter the attic plane in ways that create air leakage paths if the work was not carefully sealed.
Beyond seasonal checks, there are a few everyday clues worth paying attention to. Rooms that are much colder or warmer than the rest of the house, uneven snow melt on the roof, stale drafts around upper floors, and unexpectedly high heating or cooling costs can all point toward insulation or air sealing issues. These signals do not confirm a single cause, but they are useful prompts for a deeper look.
Tools and safety basics before you begin
A homeowner inspection does not require specialized equipment, but a few simple tools make the process easier. A flashlight or headlamp, tape measure or ruler, notepad or phone for photos, gloves, long sleeves, eye protection, and a dust mask or respirator are sensible starting points. If you are entering an attic, stable footwear and careful footing are essential.
Attics and crawlspaces can present real safety issues, so it is worth moving slowly. Watch for exposed nails, low framing, electrical hazards, loose boards, and areas where stepping between joists could damage the ceiling below. If you see signs of mold, active roof leaks, vermiculite insulation, animal infestation, or unsafe wiring, it is best to stop and call a qualified professional.
For many homes, a careful visual inspection from the attic hatch, basement perimeter, or crawlspace entrance will tell you a great deal without requiring you to disturb anything. The goal is not to poke at every corner. It is to gather enough information to understand whether insulation is continuous, dry, appropriately deep, and paired with effective air sealing.
Start in the attic because it is often the biggest opportunity
If your home has an accessible attic, this is usually the most valuable place to inspect first. Warm air rises, and attics are one of the most common locations for heat loss and air leakage. They are also where deficiencies are often easiest to spot visually, especially in homes with older insulation that has settled, shifted, or been disturbed over time.
Begin by looking across the attic floor rather than focusing immediately on one corner. You are trying to see the overall pattern. Is the insulation generally level and consistent, or are there noticeable low spots, bare areas, and pathways where the material appears disturbed or thin. If the insulation is level with or below the joists, that is often a sign the attic may be underinsulated for many modern climate recommendations.
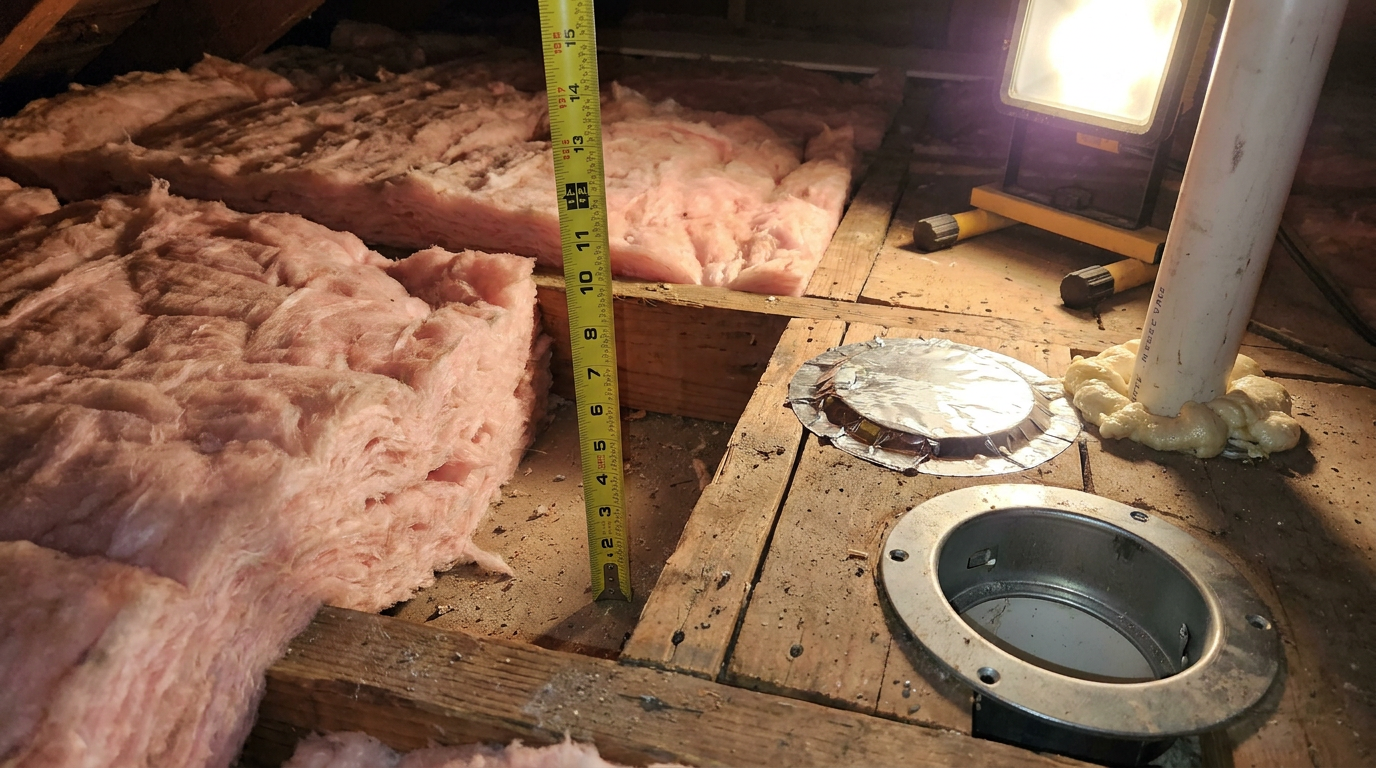
Next, measure insulation depth in a few representative areas. This does not produce a perfect R-value, but it gives you a practical estimate. Since common fiberglass, cellulose, and mineral wool products often provide around R-3 to R-3.5 per inch, depth can help you judge whether the attic is likely far below, close to, or above the baseline you expected. In many colder U.S. climate zones, ENERGY STAR guidance points toward attic retrofit levels as high as R-49 to R-60, though exact targets vary by zone and assembly.
As you inspect, look for signs that the insulation is not performing as intended. Wet or matted material can indicate roof leaks or condensation issues. Compressed sections offer less thermal resistance than properly fluffed material. Wind washed areas near eaves can show where outside air is moving through the attic and reducing effectiveness. Missing insulation around edges, valleys, or service areas is also common, especially where previous work crews needed access.
Pay close attention to interruptions in the attic air barrier. Areas around plumbing stacks, electrical penetrations, chimneys, recessed light fixtures, bath fan housings, and attic access hatches are frequent leakage points. Even small openings can add up. If you can see gaps where air from the living space could move into the attic, that area likely deserves air sealing before more insulation is added.
What to check around the attic hatch
The attic hatch is a small detail with outsized importance. If it lacks weatherstripping, does not close tightly, or has little insulation attached to the back side, it can become a reliable path for warm air to escape in winter and hot attic air to influence indoor conditions in summer. This is one of the simplest issues to improve, and often one of the most worthwhile.
Check whether the hatch sits flush and whether the frame appears sealed. Look for dirty lines or dust patterns around the perimeter, which can indicate air movement. If the hatch itself is lightweight and uninsulated, you may be losing energy through a location you use only a few times a year.
Many homeowners can address this with careful weatherstripping and an insulation panel or insulated cover appropriate to the hatch type. The key is to maintain a reliable seal without creating a cumbersome assembly that people stop using properly. Practical, repeatable improvements tend to last longest.
Roof clues that point to attic insulation problems
Sometimes the attic tells on itself from the outside. In colder climates, uneven snow melt on the roof can suggest that heat is escaping through underinsulated or poorly air sealed sections. Ice dams along the eaves can also be associated with attic heat loss, though roof design and ventilation also play a role. These conditions are not diagnostic on their own, but they are useful warning signs.
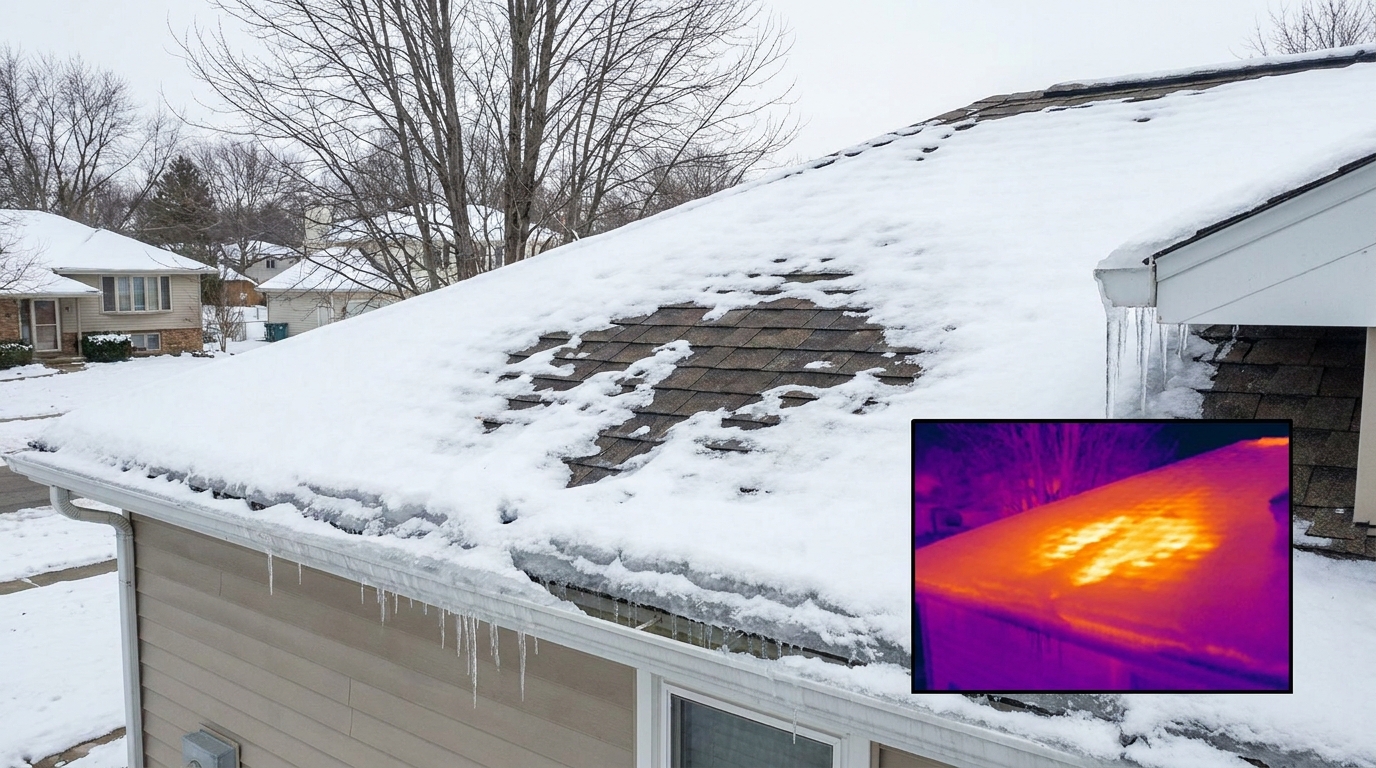
If you notice these winter patterns, it is worth correlating them with what you see inside the attic. Are there thin insulation areas near the eaves. Are there visible bypasses around top plates or utility penetrations. Is there evidence of warm, moist interior air entering the attic and raising the local temperature. The value comes from connecting symptoms to likely causes rather than assuming more insulation alone will solve everything.
Do not stop at the attic: check rim joists, crawlspaces, and floors over unconditioned areas
Attics deserve priority, but they are not the only location where insulation problems matter. Basement rim joists, crawlspaces, and floors over garages or unconditioned basements can be major loss points. These areas are especially important if the first floor feels chilly, floors are cold underfoot, or you notice drafts near baseboards and corners.
The rim joist, located at the perimeter where the floor framing meets the foundation wall, is often underinsulated or poorly sealed in older homes. It can contain multiple small gaps around framing joints, service penetrations, and sill plates. Because it sits at the edge of the house, it is exposed to outdoor temperature swings and can have a meaningful impact on comfort.
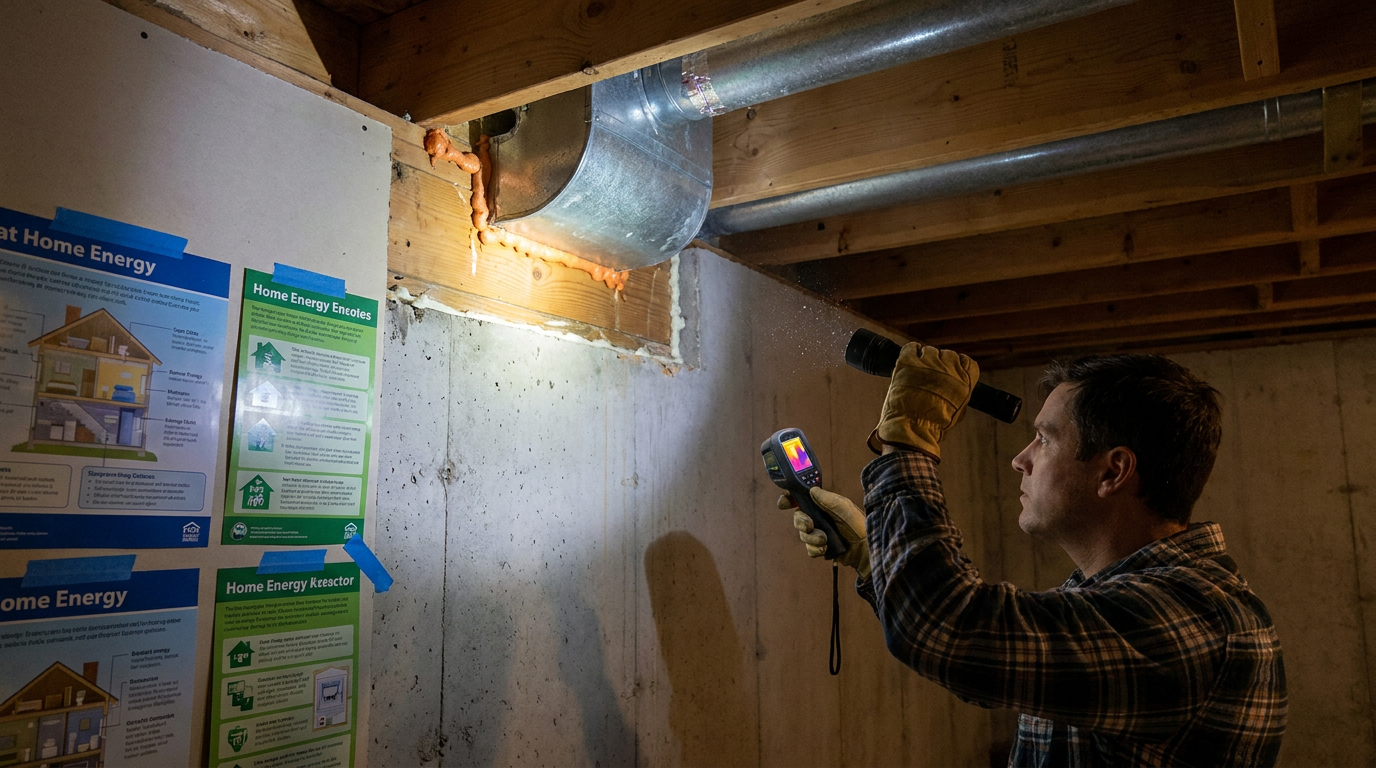
In a basement or crawlspace inspection, look for missing sections of insulation, dampness, staining, sagging batts, and areas where insulation has fallen away from the subfloor. Also look for visible air pathways around ducts, pipes, and wiring. If insulation is present but unsupported, compressed, or damp, it may not be performing well at all.
Floors over vented crawlspaces are another common issue. If the insulation is hanging down, torn, or exposed to moisture, it is not likely to deliver the comfort you expect. A crawlspace should also be evaluated as part of a broader moisture strategy, since bulk water, ground vapor, and ventilation conditions can all affect insulation durability and indoor air quality.
Inspect ducts too, especially if they run through attics or crawlspaces
Many homeowners think of insulation and HVAC as separate topics, but they overlap more than it first appears. Ductwork that runs through unconditioned attics, crawlspaces, or basements can leak conditioned air before it ever reaches the rooms you are paying to heat or cool. If those ducts are also poorly insulated, energy losses grow even further.
During your inspection, look for disconnected sections, loose joints, torn duct insulation, and obvious gaps at fittings and boots. Dust streaks around seams can indicate leakage. If a room is difficult to keep comfortable, the issue may not be just low insulation in the building envelope. It may also involve air distribution losses through ducts outside the conditioned space.
This is one reason DOE and ENERGY STAR emphasize a whole home view. A house with decent R-values can still waste substantial energy if ducts leak or if attic bypasses allow indoor air to escape. Conversely, targeted air sealing and duct improvements can sometimes deliver comfort gains that feel larger than the scope of the work would suggest.
How to estimate whether your insulation level is likely adequate
Homeowners often want a quick answer to a simple question: do I have enough insulation. The most honest answer is that adequacy depends on climate zone, assembly type, and existing conditions. An attic in Minnesota and an attic in coastal British Columbia do not need to perform in exactly the same way. A wall assembly also has different practical targets than an attic floor or a basement ceiling.
That said, you can still make a useful first assessment. Measure depth in accessible areas, identify the likely material type, estimate approximate R-value using the common rule of thumb of roughly R-3 to R-3.5 per inch for many loose fill and batt products, and compare that rough estimate to current guidance for your location. Then note whether the insulation is continuous and dry, since performance on paper means less if the installation quality is poor.
In the United States, DOE and ENERGY STAR provide climate zone tables that can help homeowners understand recommended retrofit levels. In many colder zones, attic targets rise into the R-49 to R-60 range. In Canada, the same principle applies, though programs, code references, and climate frameworks differ. NRCan and CMHC typically frame these decisions within broader energy retrofits and local guidance.
If your home seems clearly below current recommendations, that does not mean you need to rush into a complete overhaul. It does mean your inspection has identified a likely opportunity. From there, the next step is to prioritize air sealing and moisture issues first, then evaluate whether adding insulation makes sense in that assembly.
Warning signs that call for closer attention
Some insulation issues are subtle, but others are easier to recognize once you know what to watch for. These signs suggest that performance, durability, or indoor air quality could be affected:
- Insulation level at or below attic joists, especially in colder climates where deeper coverage is typically recommended.
- Compressed, flattened, or wind-blown insulation that is no longer evenly distributed.
- Wet, stained, or moldy insulation, which often points to a roof leak, condensation, or ventilation problem.
- Visible gaps around penetrations such as pipes, wires, top plates, vents, and attic access points.
- Cold floors or drafty perimeter rooms above crawlspaces, garages, or unfinished basements.
- Uneven snow melt or ice dams that may indicate attic heat loss.
- High energy bills despite equipment upgrades, suggesting the envelope may still be underperforming.
None of these signs should be read in isolation. A single clue may have more than one cause. Still, when several signs appear together, it is usually worth moving from a basic inspection to a more structured plan.
Small fixes that often make a meaningful difference
One of the most reassuring things about insulation inspection is that not every problem leads to a major project. In many homes, a few targeted improvements can reduce energy waste and improve comfort noticeably. Sealing the attic hatch, weatherstripping access panels, addressing accessible gaps around plumbing and wiring penetrations, and repairing small sections of disturbed insulation are all relatively modest steps.
For basement or crawlspace areas, accessible air sealing around rim joists and penetrations can also be worthwhile. If ducts are visibly disconnected or insulation jackets are torn, those are practical corrections to prioritize. The exact material and method depend on the assembly, but the principle is simple. Fix the obvious pathways for unwanted air movement first.
This measured approach aligns well with sustainable home maintenance. Rather than replacing materials unnecessarily or assuming every home needs a complete rework, you are improving what exists, preserving useful assemblies where possible, and investing where performance gains are likely to be real. It is a calmer and often more cost effective path.
When to call a professional
A homeowner inspection can reveal a great deal, but some situations benefit from professional assessment. If you find widespread moisture damage, suspected mold, chronic ice dam issues, inaccessible or complex rooflines, pest contamination, electrical safety concerns, or signs of ventilation imbalance, professional guidance is wise. The same is true if you are planning a major retrofit and want to be confident that the work is being prioritized correctly.
Energy auditors can add useful diagnostic tools such as blower door testing and infrared thermal imaging. A blower door depressurizes the house to help locate air leaks more systematically, while thermal imaging can show missing insulation and temperature irregularities across surfaces. These tools are especially helpful when comfort problems are persistent but not obvious from a visual walk through.
In Canada, an EnerGuide home evaluation may also be relevant, especially if you are considering rebate or loan programs. In both the U.S. and Canada, current incentives can make insulation and air sealing improvements more financially attractive, and a professional assessment may help document priorities before work begins. That can prevent wasted spending on the wrong upgrade sequence.
How insulation inspection connects to rebates, tax credits, and larger retrofit plans
There is a practical reason this topic is especially timely. Expanded incentives and home energy programs have kept insulation, air sealing, and envelope upgrades very much in the mainstream. In the U.S., federal tax credits and EPA and DOE guidance continue to support qualifying improvements. In Canada, NRCan and CMHC programs have helped keep attic upgrades, foundation improvements, and air sealing in focus.
If you are already considering replacing a furnace, installing a heat pump, or upgrading windows, an insulation inspection is a strong first step. It helps you understand whether the house itself is making your equipment work harder than necessary. In some cases, improving the envelope first can reduce the size and cost of the HVAC upgrade that follows.
This is where whole home thinking becomes so useful. Rather than chasing one symptom at a time, you can map the building as a system. Air leaks, insulation gaps, duct losses, and moisture details all interact. Once you see the pattern, investment decisions tend to become clearer and more confident.
A simple inspection routine homeowners can repeat each year
Consistency matters more than complexity. A repeatable annual routine can help you catch changes early and build a practical record of your home’s condition over time. You do not need a long checklist every month. You need a few meaningful observations made regularly and carefully.
- Pick one or two times each year, ideally in fall and spring, for a focused walk through.
- Start in the attic if it is safe and accessible, then move to the basement, crawlspace, or garage-adjacent areas.
- Measure insulation depth in a few spots and photograph anything unusual.
- Check for moisture, compression, missing areas, and visible air leakage points.
- Note any comfort complaints from the previous season, such as cold floors, hot bedrooms, or drafts.
- Review your energy bills for changes that do not match weather patterns or occupancy changes.
- Prioritize small air sealing and maintenance fixes first, then reassess whether additional insulation is warranted.
Over time, this routine becomes less about one big task and more about quiet stewardship. That is often the most sustainable approach to homeownership. Small, informed decisions made regularly tend to protect both the building and the budget.
Common misconceptions to leave behind
It helps to end with a few reminders that can keep homeowners from feeling discouraged or misled. First, insulation alone does not fix drafts. If air sealing is skipped, even generous insulation levels may not deliver the comfort improvement you expect. Second, more insulation is not always the right first move. Moisture problems, ventilation concerns, and thermal bypasses should be addressed before layering on additional material.
Third, attics are not the only places worth inspecting. Basement rim joists, crawlspaces, floors over unconditioned spaces, and duct runs can all be meaningful sources of energy loss. Fourth, appearance alone is not enough to judge performance. Depth, compression, continuity, and dryness all matter. A fluffy looking section may still be underperforming if it is interrupted by leaks or installation gaps.
And finally, an efficient home is not built through a single product. It comes from the relationship between the envelope, mechanical systems, moisture control, and everyday maintenance habits. That perspective is not more complicated. In many ways, it is simply more realistic.
The bottom line
Inspecting your home’s insulation is one of the highest value maintenance habits you can adopt if you care about comfort, energy efficiency, and sustainable living. It is approachable, evidence based, and often revealing in ways that expensive upgrades alone are not. By checking key areas such as the attic, rim joists, crawlspaces, and ducts, you can identify where energy may be slipping away and where practical fixes are likely to have the greatest impact.
The most credible path forward is also the least overwhelming. Inspect first. Air seal first. Then insulate to the right level for your climate and assembly. That sequence respects both building science and the reality of everyday homeownership. It helps you avoid wasted effort, protect indoor comfort, and make future upgrades more effective.
If your goal is a home that feels calmer to live in and lighter to operate, this is a strong place to begin. Insulation may be out of sight, but its effect is present every day. A careful inspection turns that hidden layer into something you can understand, improve, and use to support a more durable and energy conscious home.



No Comment! Be the first one.