


How to Effectively Detect Leaks in Your Plumbing System Before They Get Expensive
A plumbing leak rarely starts as a dramatic burst pipe. More often, it begins as a slow drip at a valve, a worn toilet flapper, a loose supply connection, or a hidden seep inside a wall cavity. That is why leak detection matters so much in routine home maintenance. If you catch a leak early, the repair is often straightforward and affordable. If you miss it, the same problem can turn into rotten framing, stained ceilings, mold growth, damaged flooring, and a much larger bill.
Table Of Content
- Why Early Leak Detection Matters More Than Most Homeowners Think
- The First Signs That Tell You a Leak May Be Present
- A Practical Leak Detection Workflow That Actually Works
- Step 1: Compare Your Recent Water Bills
- Step 2: Shut Off All Water Use in the House
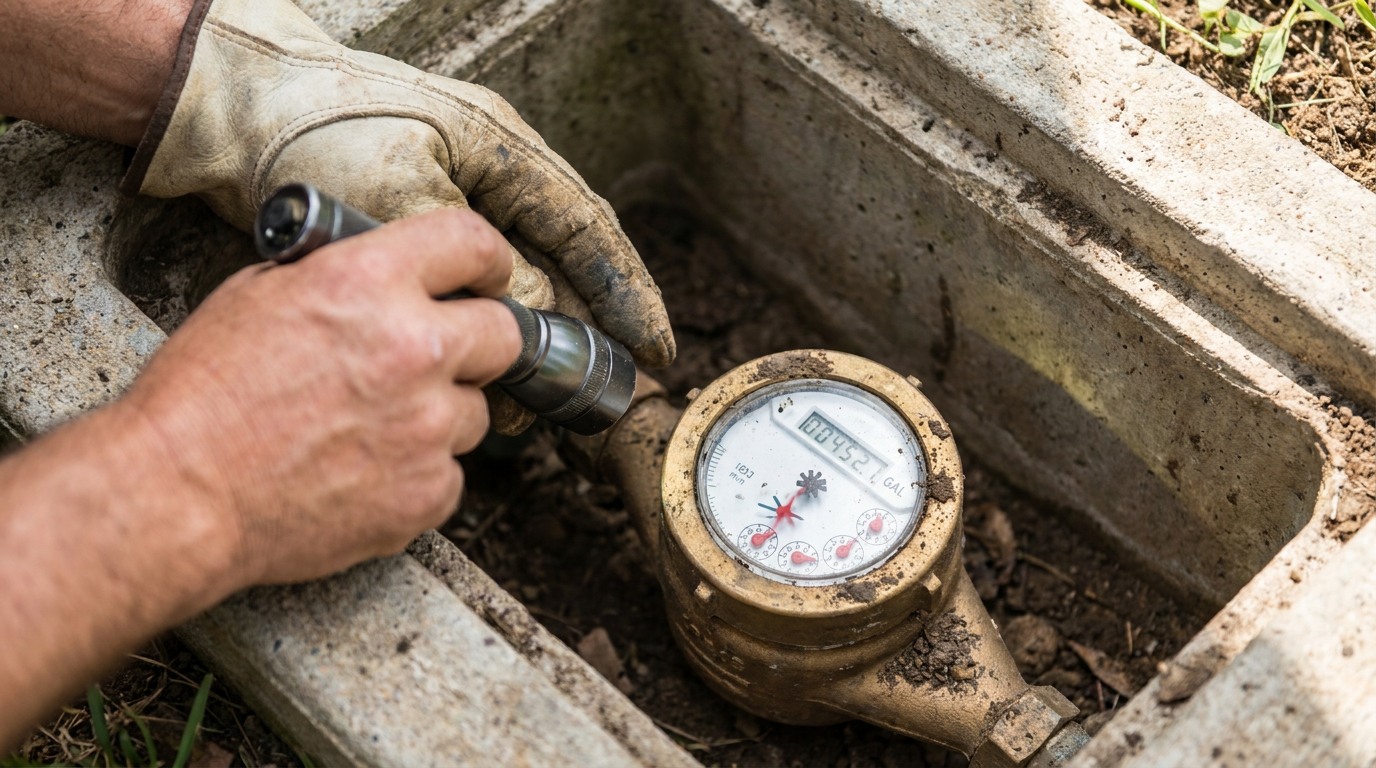
- Step 3: Perform a Water Meter Leak Test
- Step 4: Isolate Interior Plumbing From the Service Line
- How to Check the Most Common Leak Locations Inside the Home
- Toilets: The Silent Leak That Gets Missed Most Often
- Under Sinks and Vanity Cabinets
- Faucets and Showerheads
- Appliance Supply Lines
- Water Heater Area
- Basements, Crawlspaces, and Utility Rooms
- Do Not Forget Outdoor Plumbing and the Service Line
- Modern Leak Detection Tools That Make the Job Easier
- Common Misconceptions That Lead to Missed Leaks
- When You Should Call a Professional Plumber
- What to Do Next if You Confirm a Leak
- Building Leak Detection Into Regular Home Maintenance
- Final Thoughts
This is not just about saving water, although that matters too. The EPA states that the average family can waste 180 gallons of water per week, or about 9,400 gallons per year, from household leaks. Those numbers are big enough to affect both your utility costs and the overall wear on your home. Interior water damage also remains one of the most common sources of residential insurance claims, which tells you how often small plumbing issues turn into major repair work.
The good news is that effective leak detection does not have to be complicated. Homeowners can follow a practical system that works in real houses: observe, isolate, test, inspect, and verify. You start by paying attention to the signs, then use your water meter and a few simple checks to narrow down the location. From there, you inspect the fixtures, appliances, and pipe runs that most often fail. This article will walk you through that process in a clear way so you can find problems before they become expensive.
For readers in the United States and Canada, the broader message is the same. Water conservation and monitoring matter, and metering is a key part of catching problems early. Statistics Canada has reported that 38 percent of Canadian households with a municipal water supply had a water meter, which reinforces how measurement supports leak awareness. Whether your goal is lower bills, less water waste, or preventing structural damage, the path starts with knowing how to look for leaks properly.
Why Early Leak Detection Matters More Than Most Homeowners Think
People often assume a leak has to be obvious to be serious. In practice, some of the worst leaks are the quiet ones. A toilet can run internally for weeks without leaving a puddle on the floor. A washing machine hose can seep only during certain cycles. A pipe inside a wall can leak slowly enough that the first sign is bubbling paint or a faint musty smell. By the time water is visible, the damage may already be well underway.
Water does not need much space to travel. It can move along framing, soak into subflooring, stain drywall, and settle in insulation long before it reaches an open surface. That is why a dry floor does not prove your plumbing is leak free. Some leaks route directly into wall cavities, crawlspaces, or slab edges. Others only appear when pressure changes in the system or when a specific fixture is being used.
Leak detection is also a money issue in two directions. First, you pay for wasted water. Second, you pay for damaged materials and repair labor if the leak is ignored. Cabinets, trim, flooring, drywall, and paint all suffer when moisture is allowed to linger. Mold remediation and structural drying add another layer of cost, and those expenses usually rise quickly once water gets into enclosed areas.
Early detection saves more than water. It reduces repair costs, limits mold risk, protects finishes, and gives you more control over when and how a plumbing repair gets done.
Another important point is that leak risk is not limited to old homes. Newer houses can have failed supply hoses, faulty shutoff valves, loose fixture connections, or appliance line issues just like older properties. Modern low flow fixtures help reduce normal water use, but they do not remove the need for inspection. Any plumbing system with fittings, valves, seals, and flexible lines can leak.
The First Signs That Tell You a Leak May Be Present
Before you touch the meter or start opening cabinets, it helps to know what signs actually point to a leak. The most obvious clue is a higher water bill without a clear reason. If your household routine has not changed and your usage rises, that is worth investigating. A single unexplained spike does not always mean a leak, but it should put you on alert, especially if the next bill stays high.
Sound is another useful clue. Listen for faint dripping, hissing, trickling, or a toilet that seems to refill when no one has used it. In quiet parts of the house, especially at night, these noises stand out more clearly. If you hear water moving when every fixture is off, you may be dealing with a hidden leak or a fixture that is running internally.
Visual signs matter too. Look for water spots, peeling paint, swollen baseboards, darkened grout lines, warped flooring, and soft drywall. Under sinks, even minor pooling around drain traps, shutoff valves, or supply lines can signal an active problem. In utility spaces, rust marks, mineral buildup, or corrosion around pipe joints often point to slow leakage over time.
Smell can tell you a lot as well. A persistent musty odor in a bathroom, laundry room, basement, or cabinet interior may mean there is chronic moisture somewhere nearby. That does not always prove a plumbing leak, since condensation can also cause dampness, but it is enough to justify a closer look. If odor comes with staining or material swelling, take it seriously.
A Practical Leak Detection Workflow That Actually Works
The best way to find a plumbing leak is not to guess room by room at random. Instead, use a sequence that narrows the problem logically. Start by observing symptoms, then isolate the plumbing system, test the water meter, inspect common failure points, and confirm what you find. This prevents wasted effort and makes it easier to distinguish a fixture problem from a service line problem.
Many homeowners go straight to visible plumbing under a sink, but that can miss the bigger picture. If you do not know whether the whole system is moving water when it should be idle, you are working without a baseline. The water meter is often the best first test because it tells you whether water is flowing anywhere in the system, even if the leak is hidden.
Once the meter suggests a leak, you can divide the house into likely zones. Bathrooms, kitchens, laundry rooms, basements, crawlspaces, and water heater areas are the usual places to focus first. Outdoor hose bibs and irrigation lines can also contribute, especially in warmer months or after freezing weather. The goal is not to inspect everything with equal intensity. The goal is to inspect the most failure prone points first and then move outward.
Step 1: Compare Your Recent Water Bills
Before doing anything else, look at the last few months of water use if you have access to billing data. A steady increase with no change in occupancy or habits often points to a plumbing issue. Seasonal irrigation can raise water use, and so can filling a pool or running a humidifier more often, so keep those factors in mind. Still, a sustained increase without a clear reason deserves follow up.
This step is helpful because it gives context. A one day drip may not show up clearly on a bill, but a toilet leak or supply line seep that runs continuously usually will. If your utility provides daily or hourly usage data through an online portal, review it. Water use during sleeping hours or when the house is empty can be especially revealing.
Step 2: Shut Off All Water Use in the House
To do a clean leak test, stop all intentional water use. Turn off faucets, showers, dishwashers, clothes washers, ice makers if possible, irrigation systems, and any appliance that may call for water automatically. Make sure no one flushes a toilet or starts using a fixture during the test period. You want the plumbing system at rest.
If the house has a recirculation system, a humidifier, or other equipment that uses water on its own, account for that too. The cleaner the test conditions, the more confidence you can have in the result. This sounds simple, but it is an important step. A leak test is only useful if you eliminate normal water use first.
Step 3: Perform a Water Meter Leak Test
Go to your water meter and note the reading carefully. Some meters have a small leak indicator dial or digital flow marker that moves even with very low water use. If all fixtures are off and that indicator is still moving, water is going somewhere. That does not tell you where yet, but it confirms that the system needs more investigation.
For a basic test, record the meter reading, wait 15 to 30 minutes without using any water, and check it again. If the reading changes, there is likely a leak. If you want an even stronger test, repeat the process over one or two hours or overnight, as long as you can be sure no one uses water. The longer the quiet period, the easier it is to spot slow movement.
If the meter moves while all fixtures are off, do not assume the leak is inside the house. One common misconception is that every leak must be at a visible fixture. In reality, the service line between the meter and the house can leak too. That is why isolation matters in the next step.
Step 4: Isolate Interior Plumbing From the Service Line
If your home has a main shutoff valve inside or just after the water enters the building, use it as a diagnostic tool. Turn off that main interior shutoff, then check the meter again. If the meter stops moving, the leak is likely somewhere inside the house plumbing. If the meter continues to move even with the house isolated, the problem may be on the service line between the meter and the structure.
This one test can save a lot of time. Without it, homeowners may spend hours inspecting toilets and sinks when the real problem is underground outside. Service line leaks are not always visible at the surface, especially if the soil drains well or the leak is small. Unexplained meter movement after interior shutoff is a strong reason to call a plumber or leak detection specialist.
How to Check the Most Common Leak Locations Inside the Home
Once you know the leak is likely inside, move to the fixtures and appliances that fail most often. Residential plumbing usually leaks at connections, seals, valves, hoses, and tanks before it leaks in the middle of a solid pipe run. That is good news because these are the areas you can actually inspect and test without opening finished walls right away.
Use a flashlight, paper towels, and your hands. Feel for dampness around fittings and valves. Wipe suspect joints dry, then come back later and see if moisture returns. Look for green or white mineral deposits on metal parts, since these often signal slow seepage. Fresh drips are obvious, but long term staining can be just as important.
Toilets: The Silent Leak That Gets Missed Most Often
Toilets deserve special attention because they often leak without showing water outside the fixture. A worn flapper, a misadjusted float, or a fill valve that does not seal properly can let water move continuously from the tank into the bowl. You may hear occasional refilling, but not always. That is why toilets are among the first things to test when a meter shows unexplained movement.
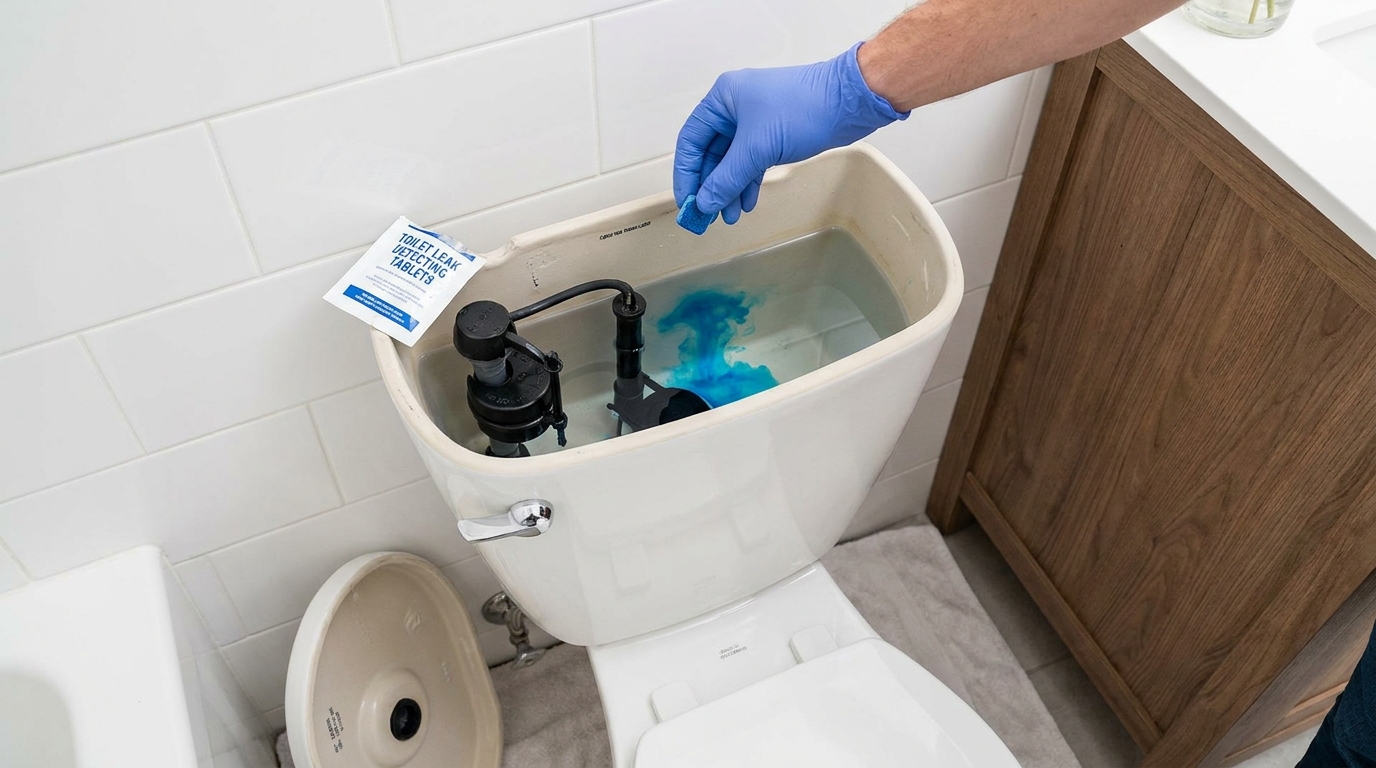
The easiest method is a dye test. Put a dye tablet or a few drops of food coloring into the toilet tank, wait about 10 to 15 minutes, and do not flush. If color appears in the bowl, water is leaking past the flapper or through another internal path. This is a simple test, but it is very effective and costs almost nothing.
While the tank lid is off, inspect the components. Check whether the flapper is seated properly, whether the chain is snagging, and whether the fill valve is running higher than it should. If the water level reaches the overflow tube, the toilet may be wasting water even if the flapper is in decent shape. Replacing internal toilet parts is often inexpensive, and catching this leak early can save a surprising amount of water.
Under Sinks and Vanity Cabinets
Kitchen and bathroom sinks leak in predictable places. The most common trouble spots are the shutoff valves, flexible supply tubes, drain traps, sink strainers, and faucet connections. Open every cabinet and use a flashlight to inspect the back corners, the cabinet floor, and the wall penetrations where pipes come through. Even a small amount of moisture can stain wood or particleboard quickly.
Do not just look. Reach in and feel around the connections, especially if the plumbing is crowded or hidden behind stored items. Supply line leaks may only bead up on the underside of a fitting, where they are easy to miss visually. Drain leaks often show up after running water, so run each faucet for a minute and then check the trap and drain joints while the pipes are wet internally.
If you find swelling, delamination, or a musty smell inside a vanity, that often means the leak has been present for a while. A dry paper towel wiped around a compression nut or shutoff valve can help reveal slow seepage. This method is simple, but in practice it catches many of the leaks homeowners overlook.
Faucets and Showerheads
A dripping faucet or showerhead is easy to dismiss because the water goes straight down the drain. Still, it counts as a leak and can add up over time. More important, dripping may indicate worn internal parts or pressure issues that deserve attention. If the fixture also has moisture around the base, escutcheon, or handle trim, there may be leakage where water is getting into the wall or cabinet rather than only out of the spout.
In showers, inspect grout lines, caulk joints, and the wall behind trim plates if accessible. Not every moisture problem near a shower is a pipe leak. Some are enclosure failures that let splash water migrate into framing. From a maintenance standpoint, though, the damage risk is similar, so it still needs prompt correction.
Appliance Supply Lines
Appliances are a major source of hidden leaks because they are often tucked into tight spaces and checked rarely. Focus on washing machines, dishwashers, refrigerators with ice makers or water dispensers, and any utility sink with flexible supplies. These lines can loosen, crack, or fail with age, especially if they are kinked or under strain.
Pull appliances forward if you can do so safely, and inspect behind them with a flashlight. Look for damp flooring, corrosion at valves, staining on the wall, and any signs that water has been running down the supply line. Refrigerator lines are especially easy to ignore because they are small and hidden. A slow leak there can damage flooring and subfloor for months before anyone notices.
Water Heater Area
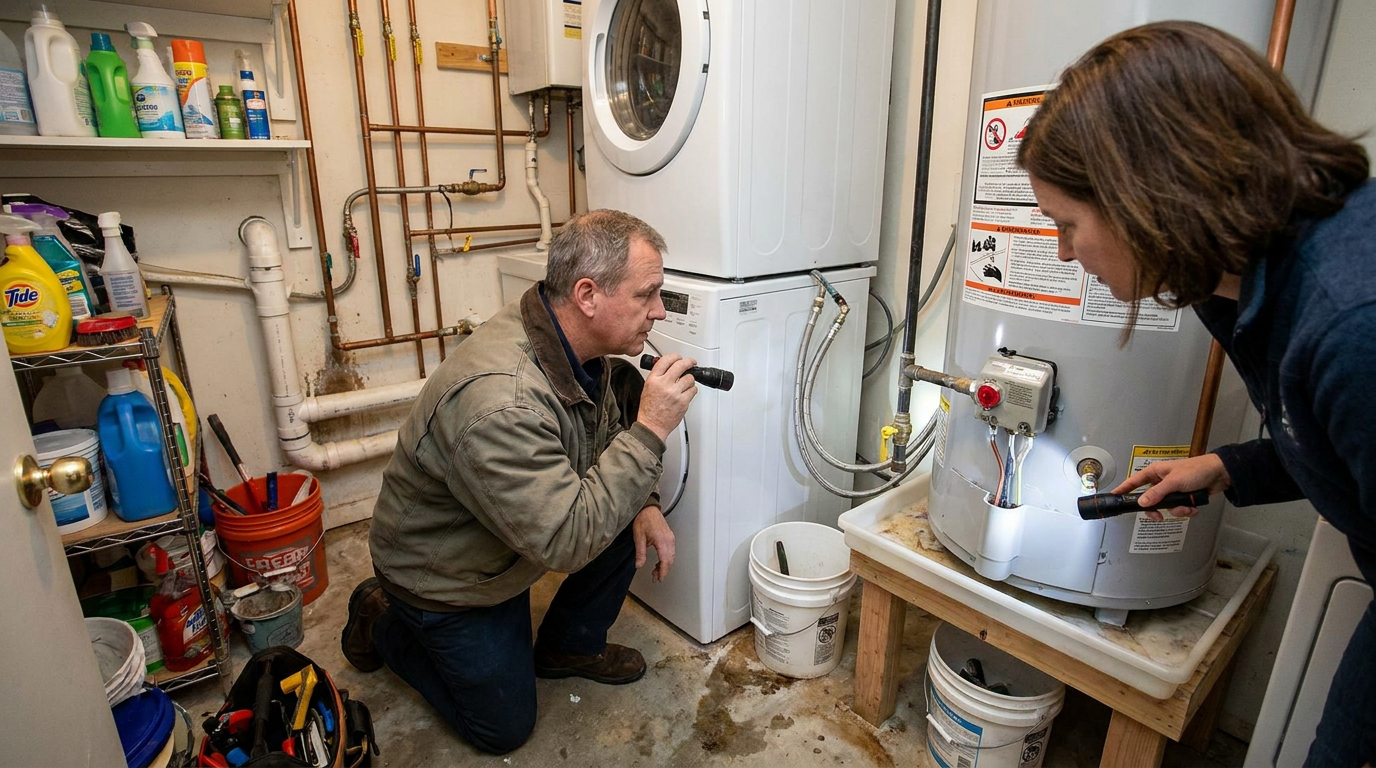
The water heater deserves a careful inspection because problems there can range from minor valve drips to full tank failure. Check the cold and hot water connections, the drain valve, the temperature and pressure relief valve discharge area, and the drain pan if one is installed. Rust streaks, crusty mineral deposits, or standing water around the base all point to a problem that should not be ignored.
Some water heater leaks are intermittent. For example, a relief valve may only discharge under certain pressure or temperature conditions. A tank itself may seep slowly before showing a visible puddle. If the unit sits in a finished area or near storage, any leak becomes more urgent because the damage spread can be fast and expensive.
Basements, Crawlspaces, and Utility Rooms
These spaces tell the truth about a home’s plumbing because the pipes are often more exposed. Look for damp insulation, stained joists, mineral marks on copper or galvanized pipe, dripping at threaded joints, and puddling near floor drains. Use a bright light and inspect along the pipe runs rather than only where they are easy to reach. Small leaks often leave a trace line or mineral crust before they produce open dripping.
Crawlspaces deserve extra attention because leaks there can go unnoticed for a long time. Moisture in a crawlspace can also be caused by ground water or poor vapor control, so you need to distinguish plumbing leaks from general dampness. If one area is consistently wetter directly under a supply or drain line, that is a strong clue. If the smell is musty and insulation is sagging below pipes, investigate further.
Do Not Forget Outdoor Plumbing and the Service Line
Indoor plumbing gets most of the attention, but outdoor leaks are common too. Check hose bibs, yard hydrants, exposed piping, and irrigation components if your property has them. Freeze damage can split fittings in ways that only leak when the line is opened. A hose left pressurized all season can hide a bad washer or cracked connection until the bill arrives.
If your meter suggests a leak and the interior plumbing has been ruled out, the service line becomes the next suspect. Signs can include soggy soil, unusually green patches in the yard, or a section of ground that never seems to dry. Still, not every service line leak creates visible surface evidence. In many cases, meter movement with the house shut off is the strongest clue.
Because service line leaks are harder to access and may require specialized equipment, this is often the point where calling a professional makes sense. Acoustic listening tools, pressure testing, and thermal methods can help pinpoint underground losses with less guesswork. The key for the homeowner is to know when the evidence points beyond interior fixtures.
Modern Leak Detection Tools That Make the Job Easier
Manual inspection is still important, but modern leak detection technology has improved a lot. EPA guidance now points homeowners toward leak detection and flow monitoring systems that can identify irregular water use and, in some cases, automatically shut off the water supply. That is a major shift from periodic checking to continuous monitoring. It is particularly useful for vacation homes, basements, older plumbing systems, and homes with previous water damage.
Basic water sensors are small devices placed near high risk areas like water heaters, washing machines, sinks, and toilets. If moisture reaches the sensor, it sounds an alarm or sends an alert to your phone. These are affordable and easy to add, but they only react once water reaches the sensor location. Whole home flow monitors go a step further by tracking usage patterns and spotting unusual flow even when no visible water has appeared.
Automatic shutoff systems add another layer of protection. If a monitored system detects continuous flow or sudden abnormal use, it can close a motorized valve and stop the supply before damage spreads. These systems cost more upfront, but they can be worthwhile where insurance risk, travel schedules, or finished basements raise the stakes. They are not a replacement for good plumbing maintenance, but they can limit the consequences of a failure.
Common Misconceptions That Lead to Missed Leaks
One of the biggest mistakes homeowners make is assuming they would see a leak if one existed. In reality, many leaks stay hidden for a long time. A toilet tank leak goes into the bowl. A wall leak goes into the cavity. A service line leak goes into the soil. Visible water is only one possible symptom, not the only one.
Another misconception is that a low bill means the plumbing is fine. Bills can vary for many reasons, and some leaks are intermittent. A small problem may stay under the radar for a while, especially in larger households where normal use fluctuates. It is better to look for patterns and compare usage over time than to rely on one statement cycle.
Homeowners also often assume newer homes are protected from leak problems. New construction can have loose fittings, defective hoses, poor installation at valves, or appliance connection issues just like older buildings. Good workmanship matters more than age alone. A new system still benefits from regular checks.
There is also confusion between leaks and other causes of high water use. Irrigation changes, guests, pool filling, humidifiers, and seasonal habits can all raise consumption. That is why the meter test is so valuable. It helps separate actual leakage from simple changes in demand.
When You Should Call a Professional Plumber
There is a lot a homeowner can do with observation, a meter test, and a careful inspection. Still, some situations clearly call for professional help. If the meter continues to move after you shut off the interior main, that suggests a service line issue or another problem beyond a normal fixture repair. If you see water staining on ceilings or walls but cannot trace the source, hidden piping may need specialized diagnosis.
Call a plumber if you find active leakage at the water heater tank, pressure relief valve behavior you do not understand, corrosion around major shutoff valves, or repeated moisture in the same area after basic repairs. The same goes for slab leak concerns, recurring mold odor, or flooring that stays warm, damp, or stained without explanation. These are not good places for trial and error.
Leak detection specialists may use acoustic equipment, infrared imaging, pressure tests, or tracer methods to pinpoint hard to find losses. The cost of that service is often lower than the cost of opening the wrong wall or letting damage continue. A good plumber should also help you distinguish between a plumbing leak, condensation problem, drainage issue, and enclosure failure.
What to Do Next if You Confirm a Leak
Once you confirm a leak, act in a practical order. First, stop or limit the water if possible by closing the nearest fixture valve or the main shutoff. Second, dry the area as much as you can using towels, fans, and ventilation. Third, protect nearby materials such as rugs, stored items, and wood cabinetry from further moisture. Then arrange for the repair or handle it immediately if it is a simple fix you are qualified to make.
Do not focus only on the plumbing connection itself. Check for secondary damage around it. Water may have run behind trim, into cabinet bases, below flooring, or into wall materials. If drywall is soft, flooring is cupped, or a musty smell persists, the leak may have been active longer than expected. Fixing the pipe but ignoring the moisture can leave you with mold, rot, or finish failure later.
After the repair, verify that the problem is truly solved. Repeat the meter test, inspect the area again after use, and monitor the next water bill. This final step gets skipped too often. A confirmed repair should be followed by a confirmed result.
Building Leak Detection Into Regular Home Maintenance
The best way to avoid expensive surprises is to treat leak detection as routine maintenance rather than an emergency response. A few minutes of checking each month can catch a problem while it is still small. Open sink cabinets, glance at toilet bases, inspect the water heater area, and pay attention to any change in smell or sound. These are simple habits, but they are effective.
Seasonal checks make sense too. In spring and fall, inspect outdoor hose bibs, irrigation lines, basements, and crawlspaces. Before a vacation, consider shutting off the main water supply if practical, or at least monitoring the home with smart leak sensors. In colder climates, winterization and freeze protection are part of leak prevention as much as comfort.
If your home has had a leak before, step up your monitoring. Past trouble spots tend to deserve repeat inspection, and repaired areas should be checked again after a few weeks. Homes with older valves, flexible appliance hoses, finished basements, or intermittent occupancy benefit the most from a more deliberate leak detection plan.
Final Thoughts
Effective leak detection is not about fancy tools alone. It starts with paying attention, using the meter, and checking the right places in the right order. The practical workflow is simple: observe, isolate, test, inspect, and verify. That approach helps you catch hidden leaks, separate fixture problems from service line problems, and avoid the expensive damage that comes from waiting too long.
If you remember one thing, let it be this: a leak does not need to be visible to be serious. Toilets can waste water silently, supply lines can seep behind appliances, and pipes can leak into walls long before stains appear. The earlier you check, the more options you have and the less the repair usually costs.
For most homeowners, this is one of the most valuable maintenance skills to learn. A careful leak check protects your water bill, your finishes, your framing, and your peace of mind. In a house, small problems stay small only when somebody catches them in time.


No Comment! Be the first one.