


How to Flush and Maintain Your Water Heater for Better Performance and Longer Life
A water heater does its job quietly, which is exactly why many homeowners forget about it until there is a problem. The shower runs cold too soon, the tank starts making rumbling sounds, energy bills creep up, or rust colored water shows up at a faucet. By the time those symptoms are obvious, sediment, corrosion, or wear may already be working against the system. Regular maintenance is one of the few simple home care tasks that can make a real difference in performance, operating cost, and service life.
Table Of Content
- Why Flushing a Water Heater Matters
- Know Your Water Heater Before You Start
- Tools and Supplies You Will Need
- Basic supply checklist
- Safety Steps You Should Never Skip
- Step by Step: How to Flush a Tank Style Water Heater
- Step 1: Attach the hose to the drain valve
- Step 2: Open a hot water faucet to vent the system
- Step 3: Open the drain valve and start draining
- Step 4: Use a partial flush or repeat cycles if needed
- Step 5: Close the drain valve and refill the tank
- Step 6: Restore power or gas only after the tank is full
- How Often Should You Flush Your Water Heater?
- What to Do If the Drain Valve Is Slow or Clogged
- Beyond Flushing: The Other Maintenance Checks That Matter
- Check for leaks at fittings and around the base
- Inspect the temperature pressure relief valve
- Inspect the anode rod
- Confirm a sensible temperature setting
- Special Notes for Heat Pump Water Heaters
- Common Misconceptions Homeowners Should Ignore
- When It Is Time to Call a Professional
- How Maintenance Helps Efficiency and Utility Costs
- A Simple Maintenance Schedule to Follow
- Final Thoughts
For most tank style water heaters, the single most useful maintenance step is a periodic flush. Over time, minerals and sediment settle at the bottom of the tank. That layer acts like insulation between the burner or heating elements and the water above it, forcing the unit to work harder and longer. The result can be lower efficiency, less available hot water, extra stress on components, and a shorter lifespan for the heater.
This guide focuses on hands on maintenance techniques that many homeowners can handle themselves. It covers how to flush a conventional tank water heater, the tools you need, the safety steps you should never skip, and the other checks that help keep the unit in good shape. It also explains when not to push ahead, because good maintenance is not about taking risks. It is about understanding the system, working carefully, and knowing when a professional plumber should step in.
If your home has hard water, well water, or heavy hot water use, this kind of maintenance matters even more. Mineral heavy water creates faster sediment buildup, and a busy household puts more demand on the tank. Since water heaters are among the bigger energy users in a home, especially in colder climates, keeping yours clean and operating properly can pay off in comfort and utility savings.
Practical rule of thumb: Many manufacturers recommend flushing a tank style water heater about once a year. If your home has hard water or the heater sees heavy use, every six months may make more sense.
Why Flushing a Water Heater Matters
Inside a tank water heater, minerals naturally fall out of suspension as water is heated and cooled over and over. Those particles settle to the bottom, where they collect into a layer of sediment. In the early stages, that buildup may not seem like much. Over time, though, it can reduce the tank’s effective capacity, trap heat in the bottom of the tank, and create popping or rumbling noises as water pushes through the sediment layer.
For a gas water heater, sediment can sit directly above the burner area, making heat transfer less efficient. For an electric unit, sediment can affect how the lower heating element performs and may increase wear if the element is buried or overheating against the buildup. In both cases, the heater may run longer to do the same job. That means more energy use and more wear on parts that are not cheap to replace.
Flushing helps remove this buildup before it becomes a serious problem. It is worth correcting one common misunderstanding here. Flushing does not always mean you are trying to strip the tank perfectly clean in a single pass. The real goal is to move sediment out of the bottom of the tank and restore a clearer flow. Sometimes that happens in one smooth drain. Sometimes it takes multiple drain and refill cycles, especially if the heater has been neglected for years.
Another point homeowners often miss is that a newer heater still needs maintenance. Sediment does not wait until a tank is old, and corrosion protection components like the anode rod start doing their work from day one. A system can look new from the outside and still be due for service inside the tank.
Know Your Water Heater Before You Start
Before you touch any valves, take a minute to identify what type of unit you have. This article is mainly about tank style water heaters, which store hot water in a cylinder and include a drain valve near the bottom. If you have a tankless water heater, the maintenance routine is different and typically involves descaling through service valves with a pump and cleaning solution. If you have a heat pump water heater, flushing the tank may still apply if it is a storage type model, but you also need to clean filters and maintain the condensate drain.
You should also know whether your tank style heater is gas or electric. The shutdown procedure differs. Electric units must have power turned off at the breaker before draining or refilling. Gas units usually need the gas control set according to the manufacturer’s instructions, often to off or pilot, before service begins. Restoring operation at the wrong time can damage components. For example, an electric heating element can burn out quickly if power is restored before the tank is completely full of water.
Take a quick look at the data plate or owner’s manual if you have it. The manual will tell you the approved maintenance steps, the thermostat setting range, and the location of major components such as the temperature pressure relief valve and anode rod access point. Manufacturer specific guidance matters, especially if you want to stay in line with warranty requirements.
Tools and Supplies You Will Need
This is a simple job in theory, but it goes smoother when you have what you need laid out in advance. You do not want to stop halfway through with a tank partially drained while you search the garage for a hose washer or adjustable wrench. The setup is straightforward and usually uses common household tools.
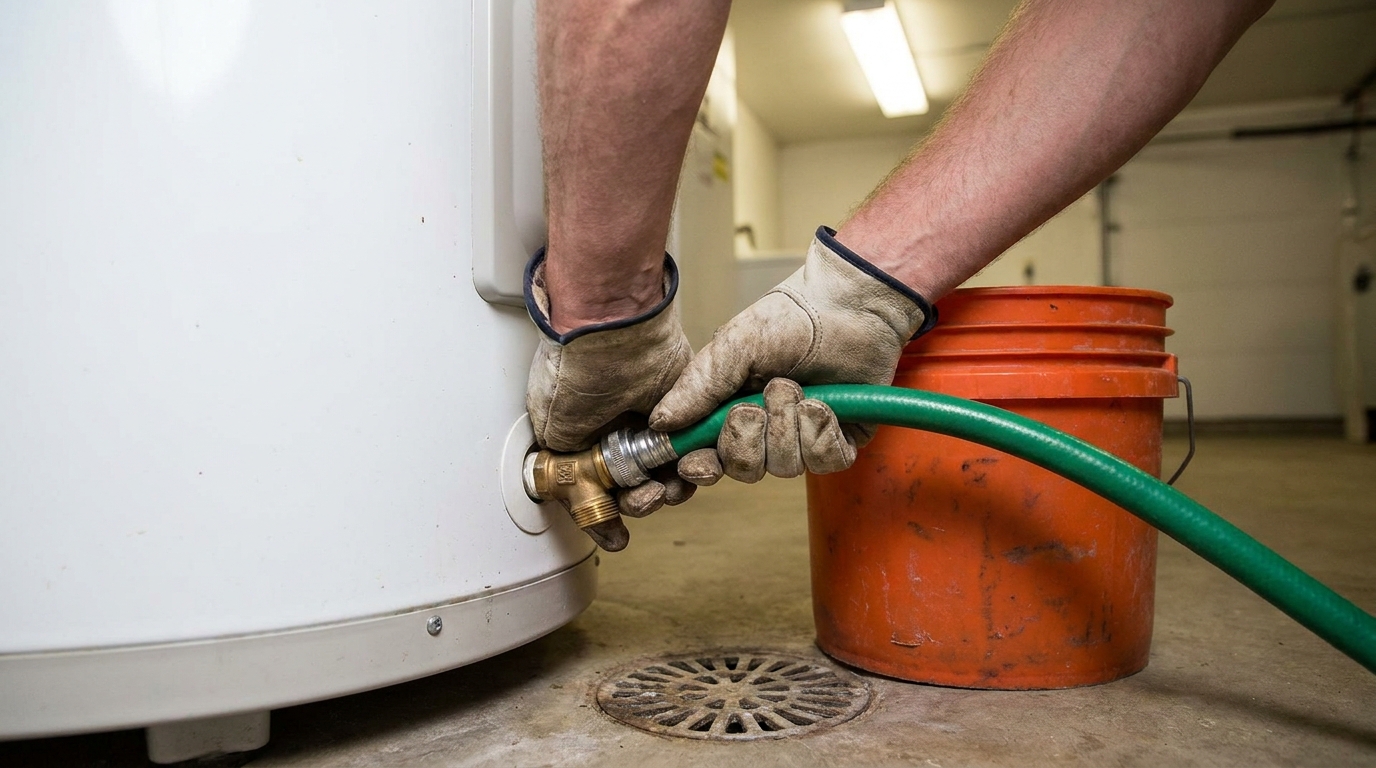
For most tank flushes, you will need a standard garden hose long enough to reach a floor drain, utility sink, or safe outdoor discharge point. You may also want a bucket, a pair of work gloves, old towels or rags, and a flashlight for checking fittings and valves. If the drain valve cap or nearby fittings need adjustment, an adjustable wrench or channel lock pliers may help, though many plastic drain valves should be handled gently and not forced.
If you plan to inspect the anode rod, that is a separate task that may require a socket set, breaker bar, and enough overhead clearance to lift the rod out. Not every homeowner wants to tackle that part, but it is worth understanding because the anode rod plays a major role in tank longevity. More on that later in the article.
Basic supply checklist
- Garden hose
- Bucket or access to a floor drain
- Work gloves
- Old towels or rags
- Flashlight
- Adjustable wrench if needed
- Owner’s manual or model information
Safety Steps You Should Never Skip
Water heater maintenance is manageable, but it is not something to rush through. Hot water can scald you, tanks can contain pressure, and electric or gas components must be handled properly. The most important part of the whole job is the safe shutdown and cool down process.
Start by turning off the heat source. For an electric water heater, switch off the breaker and verify the unit has no power. For a gas heater, set the control according to the manufacturer’s instructions, typically to off or pilot. If you are in any doubt about the correct gas control procedure, stop and check the manual. Do not guess with gas equipment.
Next, close the cold water supply valve feeding the tank. This stops fresh water from entering while you begin draining. Then give the tank time to cool if it has been heating recently. Some homeowners do a flush after several hours of light use or after shutting the unit down well in advance so the water temperature drops to a safer level. Draining very hot water through a hose is not a smart shortcut. It increases burn risk and can damage some surfaces or hoses.
Before opening the drain valve, open a hot water faucet somewhere in the house. This allows air into the system and helps the tank drain more smoothly. It also gives you a way to purge air later when the tank is refilled. These are small steps, but they make the process much easier and safer.
Never restore power to an electric water heater until the tank is completely full and air has been purged from the hot water lines. Dry firing a heating element can ruin it in minutes.
Step by Step: How to Flush a Tank Style Water Heater
If the unit is safely shut down and cooled, you are ready to flush it. Read through the full sequence before you begin so there are no surprises. The exact valve layout may vary by brand, but the basic process is the same across most residential tanks.
Step 1: Attach the hose to the drain valve
The drain valve is usually near the bottom of the tank. Attach your garden hose securely and route the other end to a safe discharge point. A basement floor drain is ideal. A utility sink can work if gravity and hose routing allow good flow. Outdoors is sometimes possible, but remember that draining may release warm water and sediment, so avoid delicate landscaping, walkways, or places where water could cause erosion or icing.
Check the hose connection before opening anything. A loose connection can send dirty water across the floor fast. Place towels around the base of the tank if you are working in a finished or tight space. A little preparation here can save cleanup later.
Step 2: Open a hot water faucet to vent the system
With the cold water supply closed and the hose attached, open a nearby hot water faucet in the home. This breaks the vacuum and allows the tank to drain. You do not need to open every fixture in the house. One hot side faucet is usually enough to vent the system for this task.
If the faucet sputters or groans later during refill, that is normal. Air is moving through the lines. You will deal with that once the flush is complete and the tank is full again.
Step 3: Open the drain valve and start draining
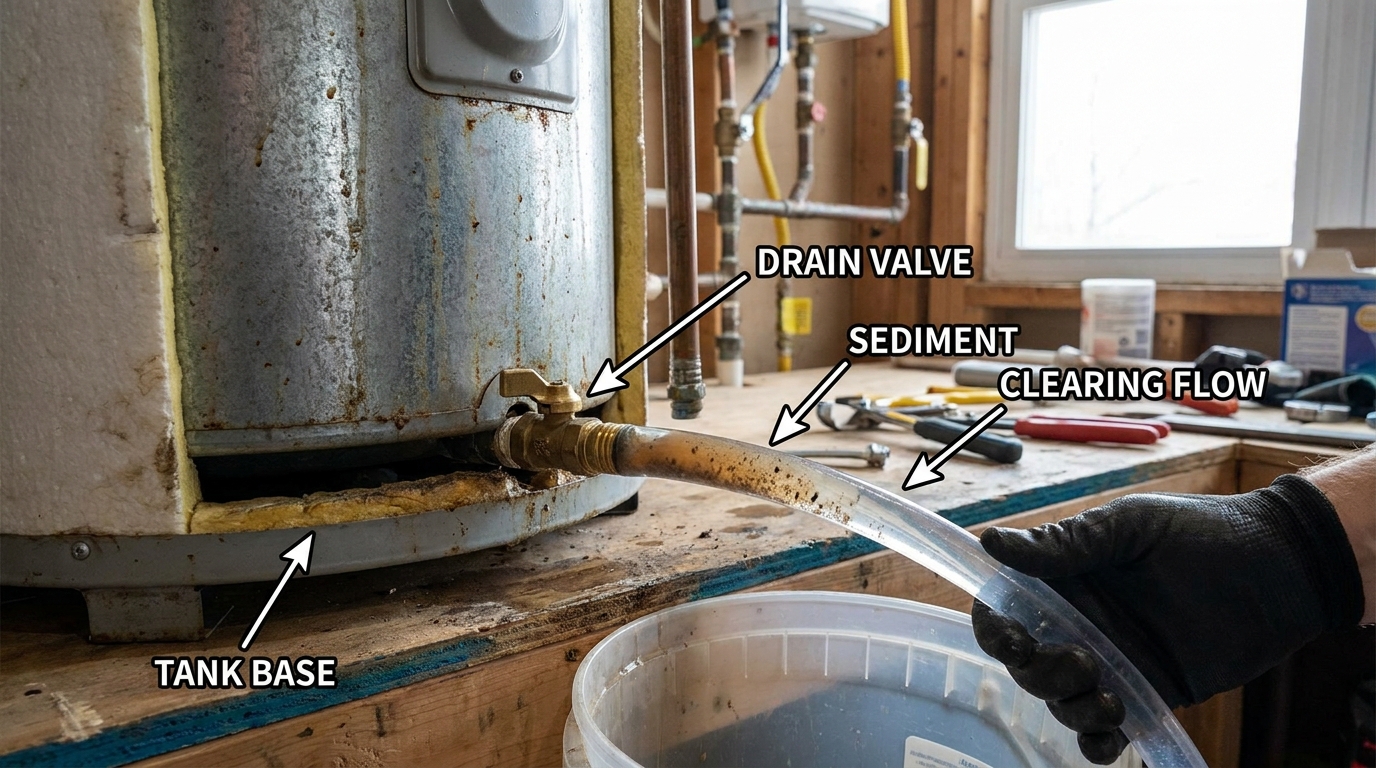
Slowly open the drain valve at the bottom of the tank. Water should begin flowing through the hose. At first, it may look cloudy or carry visible particles if sediment is present. Let the tank drain and watch the flow. If it starts strong and then slows, that may simply be part of the normal process, but it can also mean sediment is beginning to clog the valve opening.
If the heater has been maintained regularly, you may only need to drain until the water runs clear. In many homes, this clears out loose sediment effectively. If there is heavy buildup, you may need a longer drain and more than one cycle.
Step 4: Use a partial flush or repeat cycles if needed
Not every tank flush is a one and done event. If the drain water starts dirty and then clears only slightly, close the drain valve, briefly reopen the cold water supply to stir remaining sediment, then close the supply and drain again. This refill and drain cycle can help loosen material sitting at the bottom of the tank. The goal is not to blast the tank recklessly. The goal is to suspend and carry out as much sediment as practical.
If the drain valve barely trickles, sediment may be clogging the opening. In that case, a partial flush may be the safest approach for a homeowner. Some manufacturers also recommend specific cleaning accessories or procedures for stubborn buildup. If the valve is blocked solid, do not start poking random tools into a hot water tank fitting unless the manual supports that method and you know what you are doing. Older plastic valves can break, and a broken drain valve turns a maintenance task into a repair call.
Step 5: Close the drain valve and refill the tank
Once the water is running reasonably clear, close the drain valve securely but do not overtighten it. Remove the hose if you want to inspect the valve area for leakage as the tank refills. Reopen the cold water supply and allow the tank to fill completely. Keep that hot water faucet open while the tank fills so trapped air can escape from the lines.
When the open faucet begins running with a steady stream of water instead of sputtering air, the tank and piping are close to fully purged. You may need to open additional hot water taps briefly to clear air from other branches. This is normal after draining a water heater.
Step 6: Restore power or gas only after the tank is full
This last step matters more than many homeowners realize. For an electric water heater, do not turn the breaker back on until you are certain the tank is full and air has been purged. For a gas water heater, follow the manufacturer’s lighting or restart procedure exactly. Then give the tank time to heat and confirm that hot water service has returned normally.
Finally, inspect around the drain valve, supply connections, and relief valve discharge piping for leaks. A few careful minutes here can catch a problem before it becomes water damage.
How Often Should You Flush Your Water Heater?
For many households, once a year is a solid maintenance interval. That schedule lines up with what a number of manufacturers commonly suggest for standard tank style units under average conditions. Annual flushing is frequent enough to keep ordinary sediment buildup from getting out of hand and simple enough that most homeowners can remember to do it.
However, water quality changes the picture. If your home has hard water, mineral rich well water, or a history of scale on fixtures, every six months may be the better schedule. The same is true for larger households with heavy hot water use, because more water moving through the system often means more sediment entering and settling in the tank. In those homes, waiting a full year can let too much buildup accumulate.
There is also value in paying attention to symptoms instead of relying only on the calendar. If the heater starts making popping or rumbling sounds, hot water runs out sooner than it used to, or drain water looks very dirty during annual service, that is a sign you may need more frequent flushing going forward. Maintenance works best when it responds to actual conditions in the home.
What to Do If the Drain Valve Is Slow or Clogged
A slow or blocked drain valve is one of the most common frustrations during a water heater flush. Sediment often settles right where you are trying to drain from, and older units can have a lot of compacted material at the bottom. This does not always mean the tank is failing, but it does mean you need to work carefully.
Start with the least aggressive solution. Try short drain and refill cycles to disturb the sediment. Sometimes simply opening and closing the cold water supply while the drain valve is open can create enough movement inside the tank to help loosen material. If the flow improves, continue flushing until the water clears.
If the valve still clogs repeatedly, stop before applying too much force. Plastic drain valves can crack, and even metal valves can begin to leak if they are old or damaged. At that point, a plumber may need to remove or replace the valve, or use a professional method to clear the blockage. This is especially true if the tank is older and you suspect corrosion around the threaded opening.
One practical truth about neglected water heaters is that maintenance becomes less predictable the longer it has been skipped. A unit that has never been flushed in many years may release heavy sediment, clog the drain immediately, or reveal existing valve weakness. That is not a reason to avoid maintenance forever. It is a reason to proceed with realistic expectations and avoid forcing old parts.
Beyond Flushing: The Other Maintenance Checks That Matter
Flushing gets most of the attention, but it is not the whole maintenance picture. A water heater has several parts that deserve periodic inspection if you want to extend tank life and reduce the chance of failure. These checks are simple in concept, though some may be better handled by a pro depending on your comfort level.
Check for leaks at fittings and around the base
Look closely at the cold water inlet, hot water outlet, drain valve, and any visible threaded fittings. Small leaks often show up first as mineral staining, rust marks, or moisture beads rather than obvious dripping. Catching these early can save flooring, drywall, and insulation around the tank.
Also inspect the area around the base of the heater. Water on the floor is not always coming from the tank itself. It could be from a nearby pipe, the relief valve discharge, or condensation in some installations. Still, any unexplained moisture deserves attention.
Inspect the temperature pressure relief valve
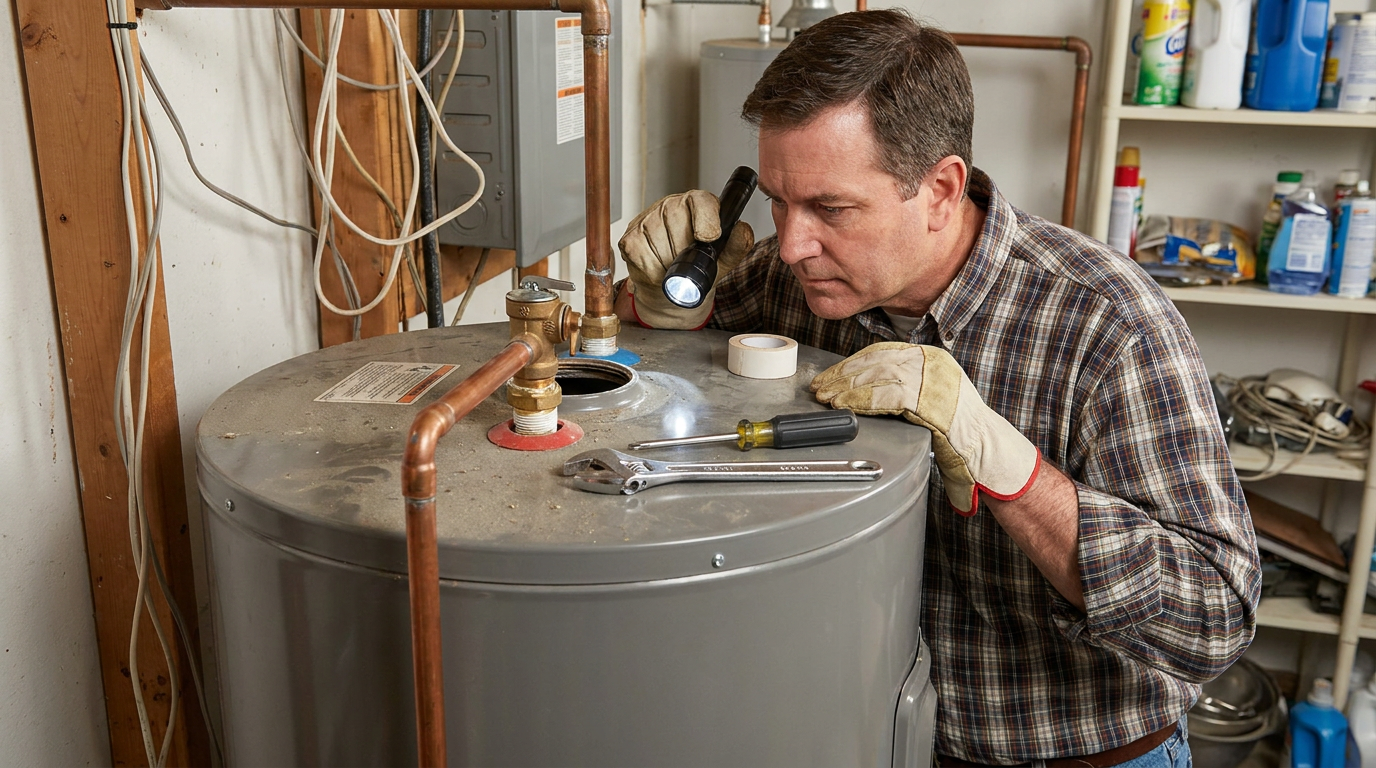
The temperature pressure relief valve, often called the T and P valve, is a key safety device. Its job is to open if pressure or temperature rises beyond safe limits. Homeowners should not ignore it just because it appears quiet. Follow the owner’s manual for inspection and testing guidance, because procedures can vary and the discharge piping must be installed correctly to handle hot water safely.
If the relief valve leaks constantly, do not assume the valve itself is the only problem. Excessive pressure, thermal expansion issues, or faulty temperature control can also cause discharge. Replacing the valve without addressing the root cause is not good maintenance. It is guesswork.
Inspect the anode rod
The anode rod is one of the most important and least understood parts of a tank water heater. It is a sacrificial metal rod designed to corrode before the steel tank does. In plain terms, it protects the tank from rusting from the inside. If the anode rod is badly depleted and never replaced, the tank loses a major layer of corrosion defense.
Signs of an anode issue can include discolored water, odor in some cases, or simply a tank reaching midlife without ever having the rod checked. Inspection intervals vary by manufacturer and water conditions, so use the manual as your guide. Some rods are straightforward to access. Others are tight, seized, or difficult to remove without the right tools and clearance.
If you are comfortable with plumbing work and your setup allows it, anode rod inspection is a worthwhile maintenance step. If not, ask a plumber to include it during periodic service. Replacing a worn anode rod is usually much cheaper than replacing a water heater years earlier than necessary.
Confirm a sensible temperature setting
Water that is too hot wastes energy and increases scald risk. Water that is too cool can reduce comfort and, in some cases, create sanitation concerns. Many homeowners do not know what their water heater is actually set to. Checking the setting against the manufacturer’s recommendations is part of practical maintenance.
The exact target depends on the home, the fixture setup, and local guidance, but many households do well around 120 degrees Fahrenheit. If you adjust temperature settings, do it thoughtfully and allow time for the system to stabilize before judging the result.
Special Notes for Heat Pump Water Heaters
Heat pump water heaters are becoming more common, especially in homes focused on efficiency upgrades. They can be a strong option for reducing energy use, but homeowners should understand that their maintenance routine is not identical to a standard electric resistance tank. If your unit uses heat pump technology, read the manual carefully instead of assuming every water heater follows the same playbook.
These units typically require routine air filter cleaning so airflow remains strong and efficient. A dirty filter can reduce performance and make the system work harder. Heat pump models also produce condensate, which must drain properly through a line or condensate pump. If that line clogs, backs up, or is routed poorly, water damage or operating problems can follow.
Some heat pump water heaters still have a storage tank that may need flushing for sediment control, depending on the model and water quality. That means you may be doing both tank maintenance and heat pump specific care. It is one more reason to keep the owner documentation handy and follow the actual unit requirements rather than generic advice.
Common Misconceptions Homeowners Should Ignore
One misconception is that if hot water still comes out, the heater must be fine. In reality, sediment can quietly reduce efficiency and capacity long before the unit stops working. You may still have hot water, just less of it and at a higher operating cost.
Another misconception is that flushing means the tank must be fully emptied every single time. In practice, the purpose is sediment removal. A targeted flush that gets the water running clear may be all that is needed. The process can involve partial drains and repeated cycles rather than one dramatic full emptying.
A third misconception is that a new water heater does not need maintenance. New tanks benefit from regular flushing, leak checks, and eventual anode rod inspection just like older ones. Waiting until there is a visible problem usually means you are already behind on care.
The last one worth stressing is that every water heater is maintained the same way. That is simply not true. Tank, tankless, and heat pump models have different service needs, and manufacturer instructions matter. Good maintenance starts with identifying the equipment correctly.
When It Is Time to Call a Professional
There is no prize for forcing a DIY repair past your comfort level. Water heater maintenance is helpful because it prevents bigger issues, not because it proves you can solve every plumbing problem alone. Certain signs mean it is time to bring in a licensed plumber.
- If the drain valve is clogged and will not clear without force.
- If the drain valve, relief valve, or supply fittings leak after service.
- If the water heater will not refill properly or hot water pressure changes dramatically.
- If you smell gas, have trouble relighting a gas unit, or are unsure about gas controls.
- If the tank shows active rust, severe corrosion, or water around the base that appears to come from the tank body.
- If the anode rod is seized and you cannot remove it safely.
- If the heater is making severe noises, tripping breakers, or showing error codes.
There is also a practical age factor. If a tank is near the end of its expected lifespan and has multiple issues, it may be smarter to discuss replacement instead of investing time in repeated minor fixes. A professional can help you judge whether maintenance is still worthwhile or whether the tank is telling you it is done.
How Maintenance Helps Efficiency and Utility Costs
Water heating is a major energy use in most homes, so small performance losses add up. A tank with sediment buildup has to work harder to heat water through that insulating layer at the bottom. That longer runtime costs money month after month, even if the loss is gradual enough that you do not notice it right away.
Routine flushing, sensible temperature settings, and attention to component condition all support better efficiency. They also help preserve comfort. A clean tank recovers more effectively, delivers more of its rated capacity, and places less strain on heating components. That means fewer surprises during busy mornings or back to back showers.
For homeowners already thinking about larger efficiency upgrades, water heater maintenance is a good first move. It costs very little compared with replacement and gives you a clearer picture of how the existing unit is performing. If you eventually upgrade to a high efficiency model, such as a heat pump water heater, good maintenance habits still carry over.
A Simple Maintenance Schedule to Follow
Homeowners often skip maintenance because they imagine it needs a complicated system. It does not. What matters most is consistency. Pick a reminder on your calendar and treat the water heater like any other important mechanical equipment in the house.
- Every month or two, glance at the area around the tank for leaks, rust marks, or moisture.
- Once a year, flush a standard tank style water heater if your water quality is average.
- Every six months, flush if you have hard water, well water, or heavy hot water use.
- Periodically inspect the relief valve and related discharge piping according to the manual.
- Check anode rod condition at the interval recommended by the manufacturer.
- For heat pump water heaters, clean filters and inspect the condensate line routinely.
This kind of schedule is not difficult, but it is effective. The best maintenance plans are the ones homeowners will actually keep doing.
Final Thoughts
Flushing and maintaining your water heater is one of those jobs that pays off quietly. You may not get a dramatic before and after moment, but you are reducing sediment, improving efficiency, protecting components, and giving the unit a better chance at a longer life. That is practical homeownership. It is not flashy, but it works.
The key is to approach the task with patience and respect for the equipment. Shut it down properly, let it cool, drain it safely, and refill it completely before restoring operation. Then go a little further by checking for leaks, paying attention to the relief valve, and not ignoring the anode rod. Those extra steps are what separate a quick drain from real maintenance.
If your water heater has been neglected for years, start carefully and be realistic. You may find heavy sediment, a stubborn valve, or signs that professional service is the smarter route. That is fine. Good maintenance is not about doing everything yourself no matter what. It is about understanding what the system needs and acting before small issues become expensive ones.
Done on a regular schedule, this is one of the simplest ways to keep hot water reliable in your home. A little time, a hose, and a careful process can go a long way.



No Comment! Be the first one.