



How to Repair Cracked Concrete: A Step-by-Step Guide for Homeowners
Concrete cracks show up in almost every home sooner or later. You see them in driveways, patios, sidewalks, garage floors, basement slabs, and sometimes foundation walls. Some are small and mostly cosmetic, while others let in water, worsen through winter, or point to movement that needs closer attention. The important thing is not to panic and not to grab the first filler on the shelf. A durable repair starts with understanding what kind of crack you have and choosing a method that fits the job.
Table Of Content
- Why Concrete Cracks in the First Place
- How to Tell Whether You Can Repair It Yourself
- Common Crack Types and the Right Repair Approach
- Tools, Materials, and Safety Gear You Will Need
- Step 1: Inspect and Mark the Full Length of the Crack
- Step 2: Prepare the Crack Properly
- Step 3: Choose the Right Filler for the Location
- Step 4: Fill the Crack Carefully and Completely
- Step 5: Let It Cure Before Traffic or Weather Exposure
- Special Advice for Driveways, Patios, Sidewalks, and Garage Floors
- When to Use Epoxy and When Not To
- Mistakes That Cause Concrete Repairs to Fail
- How to Prevent More Cracks After the Repair
- When to Call a Professional
- Final Thoughts
For most homeowners, concrete repair is manageable if the crack is non structural, stable, and accessible. The work is straightforward, but it depends heavily on proper preparation. If you skip cleaning, use the wrong repair material, or seal over a crack that is still moving too much, the repair often fails early. That is why practical concrete repair is less about speed and more about matching material, prep, and placement to actual site conditions.
This guide focuses on hands on techniques homeowners can use to repair cracked concrete safely and effectively. It covers what the crack may mean, how to tell when a repair is suitable for DIY, what tools and materials to gather, and how to complete the repair step by step. It also explains when a crack should be evaluated by a professional before you touch it. Done properly, a small repair now can prevent bigger water damage, spalling, and repeat patching later.
Not every concrete crack is a structural emergency, but every crack deserves the right repair method. The goal is not just to fill the opening. The goal is to keep out water, support the surface, and avoid setting yourself up for another failure next season.
Why Concrete Cracks in the First Place
Concrete is strong in compression, but it is not immune to movement, shrinkage, moisture changes, freeze thaw stress, and loading. Many slab cracks form because concrete shrinks slightly as it cures. These shrinkage cracks are often narrow and stable, especially in flatwork such as patios and garage floors. They may look bad, but they are not always a sign of structural failure. Even so, they can still allow water to enter, and that matters in climates where freezing expands trapped moisture.
Other cracks come from settlement or movement below the slab. If the soil under a walkway, driveway, or basement slab shifts, the concrete above it can crack and sometimes become uneven. Tree roots, drainage problems, erosion, poor base preparation, and repeated heavy loads can all contribute. In those cases, filling the crack helps appearance and slows water intrusion, but the root cause may still be present.
Temperature changes are another common factor. Concrete expands and contracts as conditions change, especially outdoors. If control joints were spaced poorly, cut too late, or omitted in key places, cracks may form where the concrete chooses to relieve stress on its own. Those cracks can often be repaired, but the long term result depends on whether the slab keeps moving through the seasons.
Water is often what turns a minor crack into a more expensive repair. Once moisture gets into a crack, it can freeze, expand, and break down the surrounding edges. Over time, that can lead to spalling, scaling, and a wider opening that traps more water. In reinforced concrete, water and chlorides can also contribute to corrosion. So even a small crack that looks harmless can become a maintenance issue if left open too long.
How to Tell Whether You Can Repair It Yourself
The first question is not how to fill the crack. The first question is whether the crack is appropriate for a homeowner repair at all. A narrow, stable crack in a driveway, patio, sidewalk, or garage floor is usually a good DIY candidate. A dormant crack with no height difference from one side to the other and no ongoing water problem is often suitable for cleaning and sealing.
You should slow down and look more carefully if the crack is widening, changing, or showing displacement. If one side of the slab sits higher than the other, that tells you there has been movement. If the crack leaks water through a basement wall or floor, that suggests moisture pressure or drainage trouble. If a foundation crack keeps reopening after earlier repairs, the issue is probably bigger than the patch.
Load bearing and foundation elements deserve extra caution. A wall crack in concrete foundation work is different from a hairline slab crack in a patio. Some foundation cracks can be monitored and sealed, but active or changing cracks may need professional evaluation first. Good repair starts with evaluation. Patching without addressing movement, drainage, settlement, or structural stress usually leads to a repeat failure.
As a practical rule, homeowners should consider getting expert help if the crack is wide, keeps returning, leaks, has noticeable offset, appears in a structural wall, or is part of a slab that is sinking or heaving. DIY repair is best used where the concrete is basically sound and the job is maintenance, not structural correction.
Common Crack Types and the Right Repair Approach
One of the biggest mistakes in concrete repair is assuming any filler will work for any crack. It will not. The repair material has to fit the crack width, location, moisture exposure, and whether movement is expected. In practical terms, most homeowners will be choosing between a flexible sealant and a rigid patch or bonding material.
For exterior slabs and joints that move with weather, a flexible polyurethane sealant is often the best choice. It stretches with normal expansion and contraction, keeps water out, and holds up better than a brittle filler in moving cracks. This makes it a smart option for driveways, sidewalks, patios, and other exterior surfaces exposed to rain and freezing conditions.
For some surface repairs where the crack edges are chipped or the opening needs rebuilding, a concrete patching compound may be appropriate. These products are often used on horizontal surfaces where appearance matters and the patch needs to feather or rebuild shallow damage around the crack. Product directions matter here because some are meant for very thin repairs while others need a minimum thickness.
Epoxy systems are different. They are used when structural bonding is the goal, not simple movement accommodation. On a true structural crack, epoxy can bond the concrete back together, but this is not the same thing as sealing a moving exterior slab crack. Using a rigid epoxy in a crack that continues to move can lead to failure elsewhere. If you suspect structural movement, do not guess. Get that assessed before choosing a product.
- Use a flexible polyurethane sealant for non structural exterior cracks or joints that may move.
- Use a concrete patching product when you need to rebuild chipped edges or repair shallow surface damage around a crack.
- Use structural epoxy only when the repair goal is bonding and the crack is appropriate for that method.
- Do not treat waterproofing products and structural bonding products as interchangeable.
Tools, Materials, and Safety Gear You Will Need
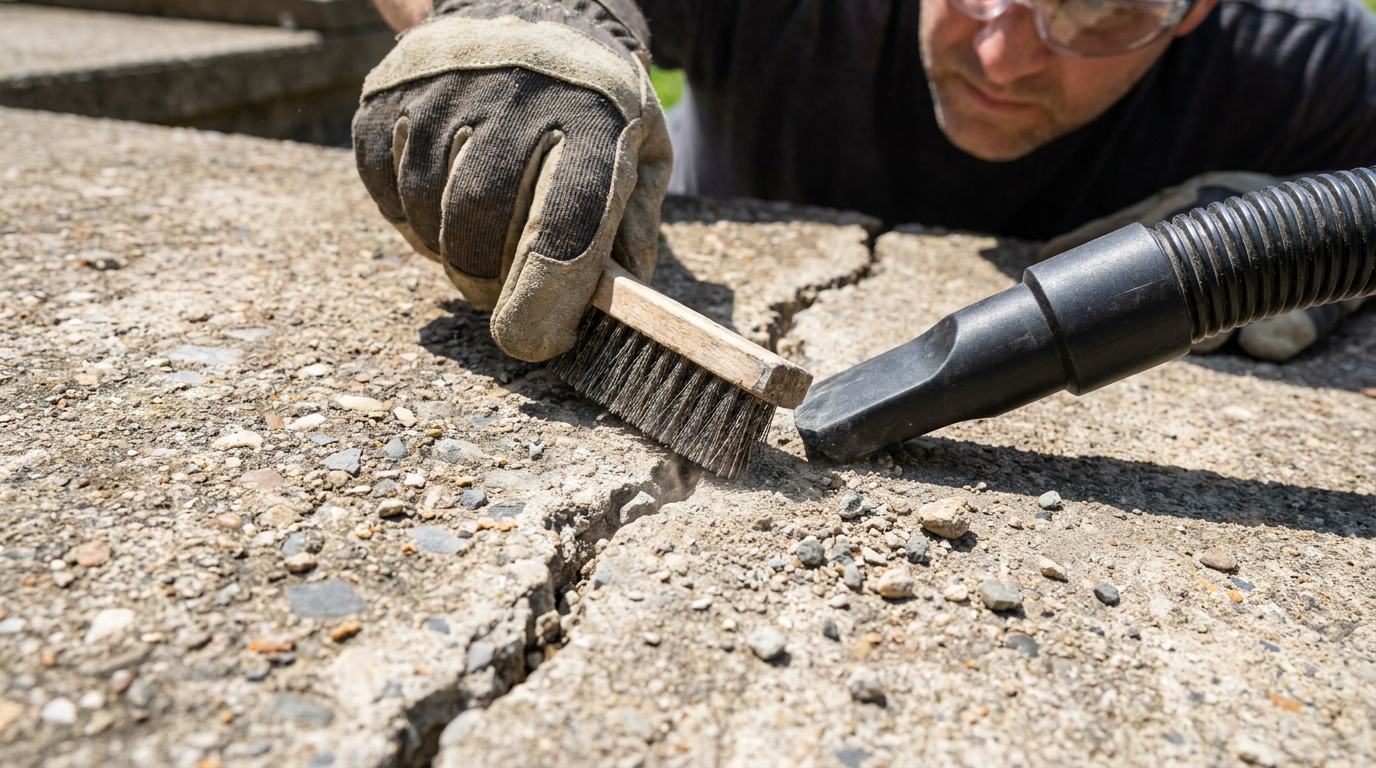
Most straightforward concrete crack repairs do not require specialized contractor equipment, but they do require the right setup. You will likely need a wire brush, cold chisel, hammer, shop vacuum, utility knife, caulk gun, margin trowel, bucket, and clean rags. Depending on the product and crack condition, you may also need a grinder or crack chaser, though many homeowner repairs can be done with hand tools and careful prep.
Material choice depends on the crack. For a flexible exterior repair, a polyurethane concrete crack sealant is usually the best starting point. For chipped surfaces or shallow patching, use a concrete repair mortar or patching compound rated for the surface and depth involved. Some products are made for horizontal repairs, others for vertical surfaces, and some can tolerate damp conditions while others require a dry substrate. Read the label before opening anything.
Safety matters more than many homeowners realize. Chiseling, grinding, drilling, or cutting concrete can create respirable crystalline silica dust, which is a serious hazard. If you have to disturb concrete mechanically, control dust as much as possible. Wet methods and local vacuum collection help. At a minimum, wear eye protection, durable gloves, and appropriate respiratory protection if dust is generated. Do not treat concrete dust as harmless cleanup.
Good work conditions matter too. Try to repair concrete when temperatures are within the product’s recommended range and no rain is expected during application and initial cure. Extremely hot, cold, or wet conditions can ruin adhesion and finish quality. Repairing in the wrong weather often looks fine for a few days and then fails once the surface cycles through heat, moisture, and use.
Step 1: Inspect and Mark the Full Length of the Crack
Start by cleaning the surface lightly so you can see the crack clearly. Follow it from end to end and look for changes in width, branching, edge damage, and any height difference between sides. Mark the visible length with chalk if needed. Homeowners often stop where the crack seems to disappear, but small continuation lines can carry moisture farther than expected.
Check the surrounding slab as well. Look for low spots that hold water, failed joints nearby, signs of spalling, and any evidence that the crack has been patched before. If the crack sits in an area that repeatedly gets wet, you may need to address drainage or runoff after the repair. A good sealant helps, but standing water is hard on any patch.
If this is a foundation or basement crack, inspect inside and outside if possible. Note any dampness, staining, efflorescence, or seasonal leakage. If the crack appears active or part of a larger movement pattern, stop and get it evaluated. A repair is only as good as the diagnosis behind it.
Step 2: Prepare the Crack Properly
Surface preparation is where durable repairs are won or lost. The crack must be free of dirt, dust, loose concrete, old filler, and weak edges. Start with a wire brush and vacuum to remove surface contamination. For repairs that require a wider profile, open the crack as directed by the product. Some common repair systems recommend opening the crack to at least one quarter inch with vertical or slightly beveled edges so the material can bond properly and fill the space with enough body to last.
If you need to chip or grind the crack, work carefully and control dust. Do not make the crack wider than necessary, but do remove weak material that would break away later. The goal is to create sound concrete edges, not just a cleaner looking gap. Vacuum thoroughly when done. Dust left behind is one of the most common reasons crack fillers fail to bond.
After cleaning, check for moisture. Some products tolerate damp concrete, while others need a dry surface. Standing water should always be removed. If the crack is actively weeping water, a standard homeowner patch may not hold, and that points to a moisture problem that needs a more specific solution.
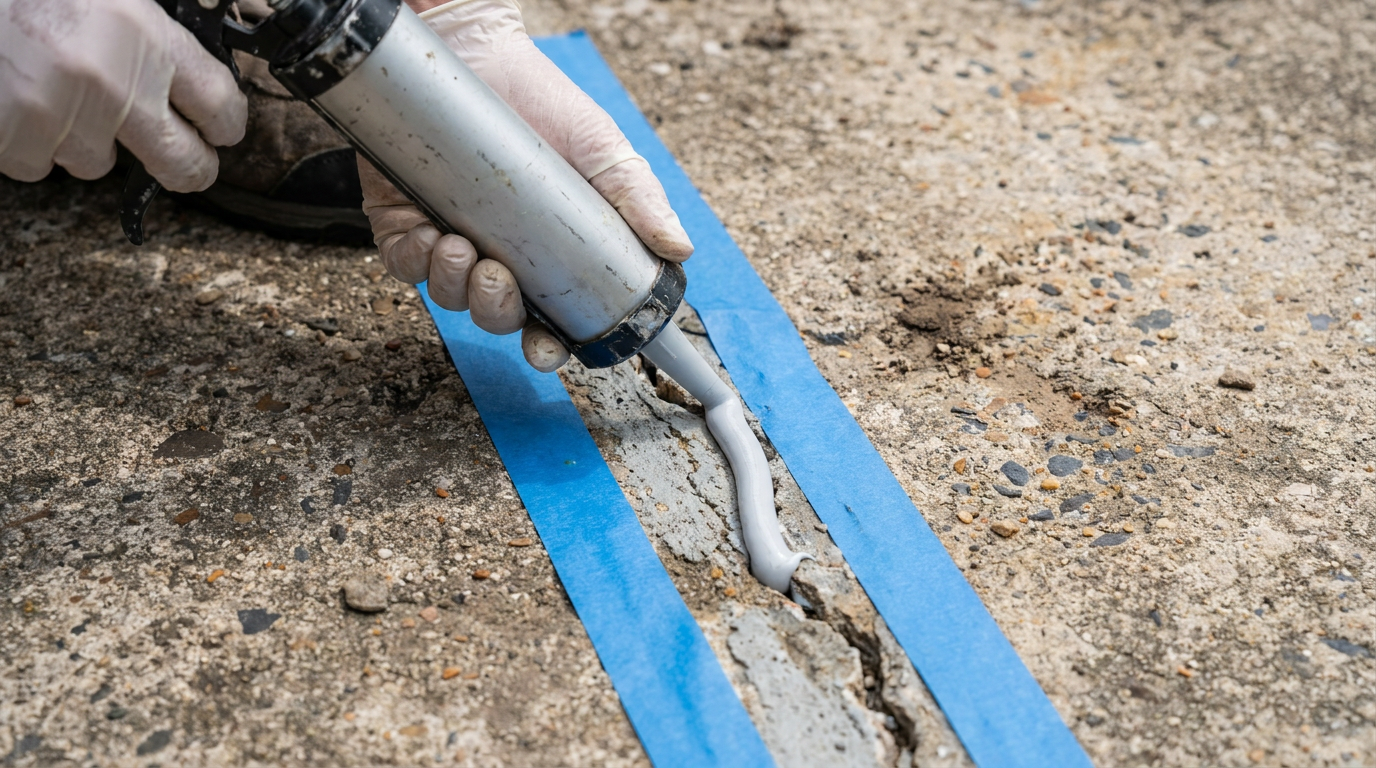
If you want cleaner lines for visible areas, apply masking tape along both sides of the crack before filling. This is especially useful for caulk type sealants on patios, sidewalks, and driveways where appearance matters. Neat application does not just look better. It also helps you maintain a consistent bead width.
Step 3: Choose the Right Filler for the Location
At this stage, do not choose based on convenience alone. Exterior slabs and walkways usually benefit from a flexible product because movement is expected. A polyurethane sealant is designed to move with the crack rather than fight it. That makes it especially useful in freeze thaw climates where rigid repairs tend to reopen.
Interior garage floors and basement slabs may also use flexible sealants, patching compounds, or epoxies depending on whether the crack moves, whether moisture is present, and whether the goal is sealing, rebuilding, or bonding. For a stable, narrow surface crack in a garage slab, a suitable concrete repair product can work well. For a structural bonding repair, epoxy is a different category and should be used only when appropriate to the crack and with careful adherence to instructions.
If the crack is deep and wide, some systems use backer rod before sealant so you do not waste material and so the sealant maintains the right shape. Follow the product guidance. Good crack repair is surprisingly product specific. The more movement and moisture exposure the crack sees, the more important it is to use a system intended for those conditions.
Step 4: Fill the Crack Carefully and Completely
Once the crack is prepped and the product is selected, apply the material steadily rather than rushing. For tube applied sealants, cut the nozzle to suit the crack width and use a caulk gun to place the material deep into the opening. Move slowly enough that the crack fills fully rather than bridging at the surface. Air pockets and shallow fills reduce the life of the repair.
Tool the sealant if the product calls for it. A smooth, properly shaped bead sheds water better and bonds more evenly along the crack walls. If you are using tape, remove it before the material skins over. This leaves a cleaner edge and saves a lot of scraping later.
For patching compounds, press the material firmly into the prepared crack and damaged edges with a margin trowel. Build in layers if the manufacturer recommends it. Some products should not be overfilled too heavily in one pass because shrinkage or weak curing can occur. The repair should be compact, bonded, and finished to suit the surface, not simply spread over the top.
If the area will remain visible, take time to blend the finish with the surrounding slab. Matching old concrete perfectly is difficult, but a neat repair generally looks better and lasts longer than a rough one. Keep in mind that many products cure a slightly different color than the slab around them. Durability matters first, but careful finishing still makes a difference.
Step 5: Let It Cure Before Traffic or Weather Exposure
Homeowners often do the hard part correctly and then ruin the repair by using the area too soon. Every product has a cure window, and that window changes with temperature and humidity. Protect the repair from foot traffic, vehicle traffic, rain, irrigation, and washing until it has cured as directed. A repair that gets disturbed early may skin over and still fail underneath.
Cold weather slows cure, and extreme heat can shorten working time. If you are repairing outdoor concrete, plan around the weather forecast. A dry day with moderate temperatures is ideal. In cooler regions, it is smart to complete crack repairs before repeated freeze thaw cycling begins. Water entering a fresh or incomplete repair can lead to quick edge breakdown in winter.
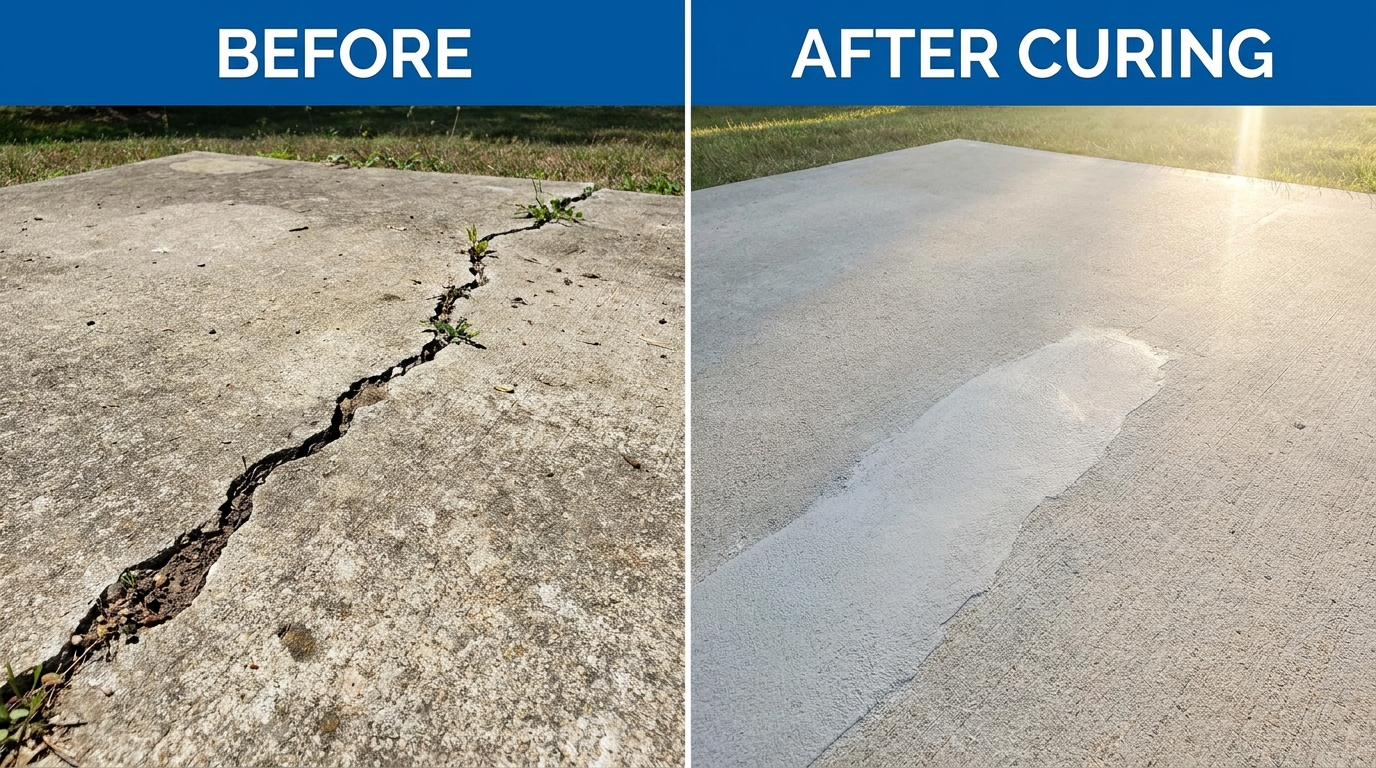
After curing, inspect the finished repair. The material should remain well bonded, slightly recessed or flush as intended, and free of obvious gaps. If you see shrinkage, incomplete fill, or pull away from the crack walls, correct that early before the surface starts taking water again.
Special Advice for Driveways, Patios, Sidewalks, and Garage Floors
Driveways deal with water, deicing salts, sun exposure, and vehicle loads, so material choice matters. A flexible sealant is often a better long term choice for non structural driveway cracks than a rigid filler that cannot tolerate seasonal movement. If the slab is also settling or rocking under traffic, sealing the crack helps but does not solve the underlying support issue.
Patios and sidewalks tend to show cosmetic flaws more clearly, especially around seating areas and entry paths. Neat preparation and masking tape can make these repairs look much more professional. Because these surfaces are often exposed to rain and winter weather, keeping water out is a real durability issue, not just an appearance issue.
Garage floors add another layer because oil, dust, tire abrasion, and occasional moisture can affect bond performance. Clean these cracks thoroughly and remove contaminants before repair. Some garage floor repairs are later coated, but coating should never be used as a substitute for actually repairing the crack first. If the crack telegraphs movement, the coating will likely show that movement again.
Basement slabs are different from foundation walls. A slab crack in a basement floor may be a simple shrinkage crack, but if moisture comes through it regularly, investigate drainage, vapor issues, and whether hydrostatic pressure is involved. Filling the crack can help, but moisture problems usually need broader attention if you want a lasting outcome.
When to Use Epoxy and When Not To
Epoxy gets mentioned often in concrete repair, and that leads many homeowners to assume it is the strongest answer for every crack. It is not. Epoxy is rigid and used for bonding where structural repair is the goal. In the right setting, it can restore continuity across a crack. In the wrong setting, especially an exterior crack that continues to move, it can fail or transfer stress elsewhere.
That is why repair purpose matters. If you need a crack to stay waterproof while accommodating movement, a flexible sealant is usually the right category. If a structural engineer or repair specialist has determined that a crack is suitable for epoxy bonding, then epoxy may be the right approach. Those are two different jobs and they should not be confused.
Homeowners should be cautious about using rigid materials simply because they sound stronger. In concrete repair, stronger is not always better. Compatibility with movement, moisture, temperature, and substrate condition is what determines whether the repair lasts.
Mistakes That Cause Concrete Repairs to Fail
The most common failure is poor preparation. If the crack still contains dust, old loose material, or deteriorated edges, even a good product may not bond for long. The second common failure is using the wrong material for the crack type. A rigid filler in a moving exterior crack often opens back up after one season. A cosmetic patch over an active moisture crack rarely solves the real issue.
Another mistake is filling only the surface. If the material bridges over the top without fully contacting the crack walls, it can separate early. Applying in bad weather is another preventable problem. Rain, standing water, excessive heat, freezing temperatures, and direct sun on hot concrete all make proper placement harder.
Many homeowners also overlook the cause of the crack. If downspouts discharge beside the slab, grading sends water back toward the house, or the base under a walkway is washing out, the crack repair is fighting a losing battle. Good maintenance around the slab often matters just as much as the filler inside it.
- Skipping thorough cleaning and dust removal
- Using a generic filler instead of a product matched to movement and exposure
- Repairing over active water leakage without addressing moisture conditions
- Allowing traffic on the repair before full cure
- Ignoring drainage, settlement, or freeze thaw conditions that caused the crack
How to Prevent More Cracks After the Repair
You cannot stop all concrete cracking, but you can reduce the conditions that make it worse. Start with water management. Keep downspouts, sump discharges, and irrigation from dumping water beside slabs and walks. Make sure the ground slopes away where practical. Standing water and repeated saturation are hard on concrete, especially in cold climates.
Keep control joints and expansion joints in working condition. These are the areas meant to absorb movement. If they fail and fill with debris, concrete often cracks elsewhere. Sealing joints where appropriate and keeping them clean is part of long term slab maintenance.
Watch repaired cracks through the seasons. If the repair stays tight and the slab remains level, that is a good sign. If the crack widens, returns quickly, or develops offset, the problem may be deeper than surface maintenance. Early observation gives you time to respond before a minor issue becomes a trip hazard or water problem.
In freeze thaw regions, repairing before winter and keeping water out of cracks is one of the best preventive steps you can take. Water that freezes in a crack expands and stresses the surrounding concrete. That repeated action can turn a manageable repair into larger surface damage over time.
When to Call a Professional
There is no shame in drawing the line when the crack points to something more serious. Call a professional if the crack is wide, leaking, offset, recurring after past repairs, or part of a slab or foundation that is moving. Foundation cracks, retaining structures, load bearing elements, and areas with ongoing moisture intrusion deserve a more careful assessment than a simple surface patch.
You should also consider expert help if you are not sure whether the crack is structural or if the repair requires injection equipment or specialized moisture control. Professional evaluation is especially valuable when the visible crack may be just a symptom of settlement, poor drainage, soil pressure, or corrosion. A patch can hide evidence temporarily, but it cannot fix a structural cause.
A good contractor or engineer should explain what the crack likely means, whether movement is active, and what repair method actually fits the condition. That is worth a lot more than a fast patch that looks good for a month and fails in the first hard weather cycle.
Final Thoughts
Repairing cracked concrete is one of those home maintenance tasks that rewards careful, practical work. Most homeowner repairs succeed not because the product was expensive, but because the crack was inspected honestly, prepared thoroughly, and filled with a material that matched real conditions. If the crack is stable and non structural, there is a good chance you can handle it yourself and get a durable result.
The key is to avoid the two extremes that cause trouble. Do not ignore every crack as purely cosmetic, and do not assume every crack is a structural emergency. Look at width, movement, moisture, offset, and location. Then choose the right repair approach based on what the concrete is actually doing.
If you take the time to clean properly, control dust, use a suitable filler, and protect the repair while it cures, you can keep water out, improve appearance, and extend the life of the slab. That is what good concrete maintenance is really about. It is not chasing a perfect surface. It is preserving sound concrete before a small defect becomes a bigger job.


No Comment! Be the first one.