



A Comprehensive Guide to Building Your Own Balcony
Building a balcony safely requires treating it as a complete exterior structure with several systems that must work together: a structural frame sized to carry occupancy loads and tie properly into the house, a waterproofing system that sheds water away from the wall and off the walking surface, code-compliant guardrails that resist real forces, and a permit process that documents structural review and inspection. Because a balcony is elevated and exposed on all sides to rain, snow, and freeze-thaw cycles, hidden problems such as water intrusion, corroded fasteners, and weak connections cause far more failures than simple overloading. A well-built balcony also depends on choosing suitable framing materials, whether wood, steel, or concrete, and on consistent maintenance after construction. Skipping any one of these elements, especially waterproofing or guardrail anchorage, is what turns a straightforward project into a costly and potentially dangerous repair down the road.
Table Of Content
- Why Balcony Construction Deserves Extra Respect
- Start with the Right Questions Before You Design Anything
- Understanding the Main Balcony Types
- Cantilevered Balconies
- Post-Supported Balconies
- Permits, Codes, and Why Local Review Matters
- Designing for Loads, Deflection, and Real Use
- Choosing Materials for Structure and Finish
- Wood Framing
- Steel Framing
- Concrete Balconies
- Waterproofing Is Where Good Balcony Projects Separate from Bad Ones
- Step by Step Balcony Construction Process
- 1. Confirm Feasibility and Get the Structure Reviewed
- 2. Prepare Permit Documents
- 3. Set Up Safe Access and Fall Protection
- 4. Build or Reinforce the Primary Support System
- 5. Install Substrate, Slope, and Waterproofing Layers
- 6. Install Guards and Edge Protection
- 7. Complete Surface Finishes and Drainage Details
- 8. Schedule Final Inspection and Document the Work
- Common Mistakes That Cause Trouble Later
- What It Costs and What Actually Drives the Price
- When DIY Makes Sense and When to Bring in Professionals
- Inspection Checklist Before You Sign Off
- Maintenance After the Balcony Is Built
- Final Thoughts on Building a Balcony the Right Way
Many homeowners think of a balcony as a smaller version of a deck, but that comparison leads people in the wrong direction. A balcony is often elevated, tied directly into the house structure, and exposed on all sides to rain, snow, freeze thaw cycles, and temperature swings. If the design or waterproofing is handled poorly, the damage usually starts where you cannot see it, inside connections, behind cladding, below surface finishes, or around guardrail penetrations.
This guide breaks the process down into practical steps so you can understand what is involved before materials arrive on site. Whether you plan to do part of the work yourself or hire a contractor, you need a clear picture of structure, permits, drainage, code compliance, and maintenance. If you approach the project with realistic expectations and respect for the details, you will be far more likely to end up with a balcony that is safe, durable, and worth the money.
Important practical point: balcony rules are not universal. In Canada especially, the applicable requirements depend on the province, territory, and municipality. Confirm the current code and permit expectations with your local authority before you start design or demolition.
Why Balcony Construction Deserves Extra Respect
Balconies fail for reasons that are often preventable. In many cases, the issue is not simply too much weight from people standing on the surface. Research and field investigations repeatedly point to water intrusion, hidden corrosion, weak connections, poor flashing, failed membranes, and neglected maintenance as the true cause of deterioration. A balcony may look solid from below and still have serious problems developing where metal meets moisture or where the assembly meets the wall.
That is why practical balcony work always has to consider more than framing. The structural system, the waterproofing system, the edge protection, and the tie-in to the building all have to work together. If one part is weak, the whole balcony becomes vulnerable. A good builder treats the balcony as a complete exterior assembly, not a platform with railings added at the end.
There is also a life safety issue that should not be understated. Balcony failures can be catastrophic, and even minor installation mistakes can create a serious fall hazard. During construction, the risk is immediate because workers are often exposed to open edges. On occupied homes, any looseness in the guardrail or surface breakdown in the floor assembly needs prompt attention rather than cosmetic patching.
Start with the Right Questions Before You Design Anything
The best balcony projects begin with a simple planning phase. Before you sketch size or choose railings, ask what the balcony is meant to do. Is it for two chairs and a small table, or will it be a family gathering space? Is it attached to a second floor bedroom, a primary living area, or a multi unit exterior wall? Is appearance the priority, or do you need the most durable and lowest maintenance system possible?
You also need to ask what your house can realistically support. A balcony transfers loads into the existing structure, and older homes may not be ready for that without reinforcement. Wall framing, rim joists, floor structure, foundation capacity, and exterior cladding type all affect the design. The cost and complexity can change fast once you open the wall and see what is really there.
At this stage, think about access, drainage, privacy, sunlight, snow accumulation, and what is located below the balcony. If the balcony is above a door, window, patio, or finished area, water management becomes even more important. If the underside is visible from the yard, you may also care more about how beams, posts, brackets, and soffit details look once the work is complete.
Understanding the Main Balcony Types
Cantilevered Balconies
A cantilevered balcony projects out from the building without visible posts below, which gives it a clean and modern look. Structurally, this usually means floor framing or steel members extend back into the building and carry the balcony load through the main structure. It can be an efficient design, but it requires careful engineering because the loads and movement at the connection point are significant.
The challenge with cantilevered balconies is not only strength. These assemblies often create a difficult interface for insulation, air sealing, and waterproofing. If the structural members pass through the building envelope, that area can become a source of air leakage, thermal bridging, condensation, and long term moisture trouble if detailing is weak.
For a homeowner, the key takeaway is simple. A cantilevered balcony may look cleaner, but it is rarely the easier choice. It often needs more design work, more careful coordination, and more attention to envelope detailing than a post-supported option.
Post-Supported Balconies
A post-supported balcony uses beams and vertical posts to transfer much of the load down to footings below. This system may not look as sleek, but it is often easier to understand, easier to build, and easier to reinforce or inspect later. In many residential projects, it is also a more forgiving approach when working with an existing home.
That does not mean it is automatically simple. The footings must be sized correctly, frost depth has to be respected where applicable, and the connection between posts, beams, joists, and the house still needs to be designed properly. The balcony should not be treated like a freestanding porch unless it is actually engineered and detailed that way.
For many homeowners, a post-supported balcony offers a practical balance of cost, constructability, and long term serviceability. It may also reduce the demand on the house structure compared with a pure cantilever, which can make permit approval and field construction more straightforward.
Permits, Codes, and Why Local Review Matters
One of the most common mistakes in balcony construction is assuming the project is too small to matter to the building department. In reality, balcony work often triggers permit review because it involves structural members, footings, guards, exterior envelope penetrations, and life safety features. Even repair work may require permits if structural parts are being replaced or if existing conditions must be upgraded to current standards.
Code requirements vary depending on where you live, what kind of building you have, and which code edition your local authority has adopted. In Canada, the National Building Code is a model code, but provinces, territories, and municipalities determine what actually applies. In the United States, builders often work from versions of the IRC or IBC, but local amendments can still change the details.
Instead of chasing one universal rule, focus on the concepts that appear consistently across North American practice. The balcony must support its design loads. The guard must have the correct height, opening limits, and resistance to applied loads. The assembly must handle weather exposure and protect the building from water intrusion. Those are the broad principles, and the exact numbers should come from your local authority or design professional.
It is also worth remembering that permits protect you. They force a review of structural assumptions and create a record that the work was inspected. If you ever sell the home, documented compliant work is far easier to stand behind than an unpermitted balcony that looks fine but raises questions during inspection.
Designing for Loads, Deflection, and Real Use
Balconies need to be designed for human occupancy loads, which means the structure has to do more than just avoid collapse. It should feel solid underfoot, resist excessive bounce or deflection, and provide a stable base for the guard system. A balcony that moves too much may create discomfort for users and stress waterproofing layers, finish materials, and connection points over time.
Guardrails deserve special attention because they are part of the safety system, not an accessory. A loose guard or poorly anchored post can turn a code issue into an injury risk very quickly. Local rules usually address guard height, permitted openings, and resistance to force. Those requirements are not decorative details. They are based on real life fall hazards and crowd loading conditions. Done well, a guardrail can also become a genuine architectural statement rather than a purely functional afterthought — Kingsgate Luxury Homes paired sculptural wrought iron balcony railings with a mansard-roofed limestone facade on a recent custom build, and it is worth seeing how safety and elegance were resolved together on that project: 107 Yongehurst Rd, Richmond Hill.
Plan the balcony around realistic use, not minimal use. Even if you picture only two people standing outside with coffee, future occupants may gather, store planters, move furniture, or lean hard on the perimeter. Good design accounts for ordinary misuse and changing patterns of use over the life of the building.
Choosing Materials for Structure and Finish
Wood Framing
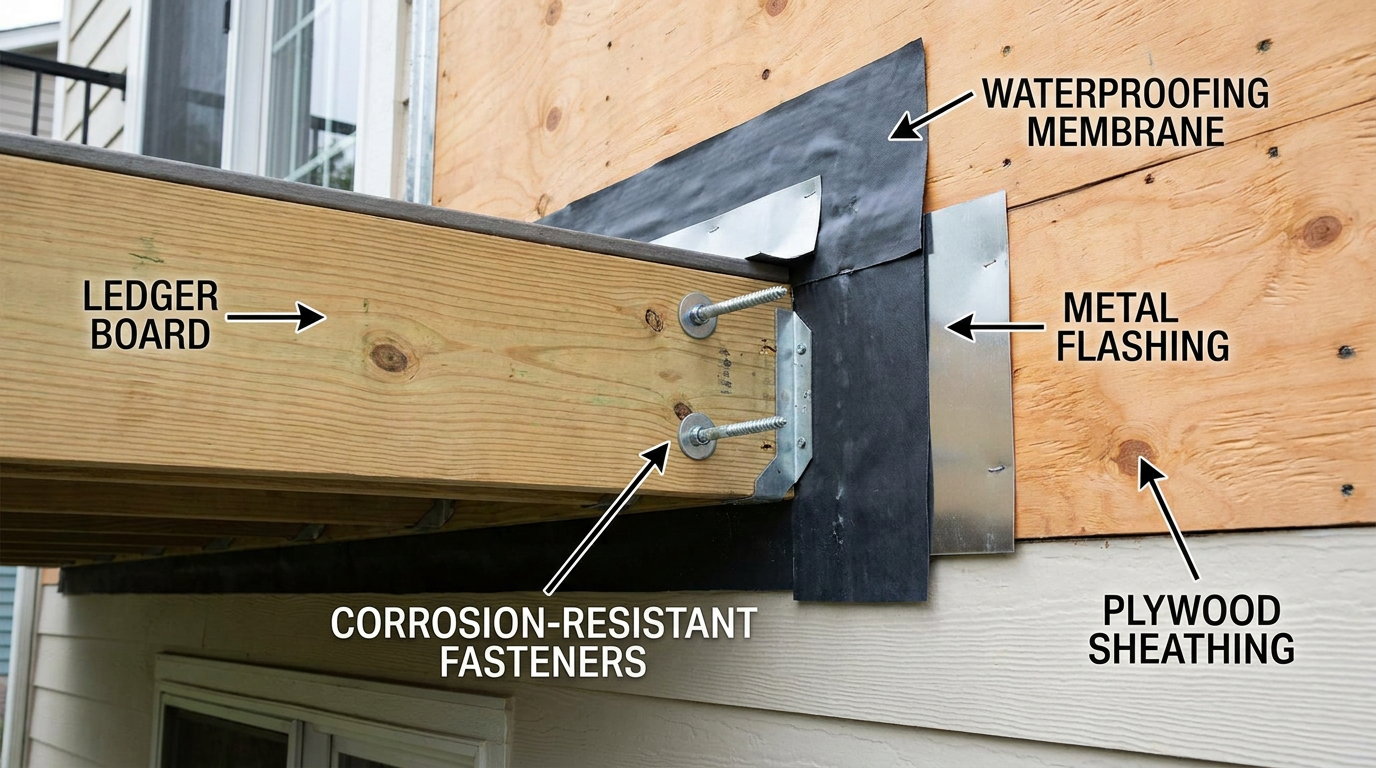
Wood is common in residential balcony construction because it is familiar, accessible, and comparatively economical. Pressure treated framing can perform well if it is properly detailed, fastened with compatible corrosion resistant hardware, and protected from chronic moisture exposure. The weak point is not the wood itself so much as the places where water can sit, enter end grain, or remain trapped around fasteners and connectors.
Wood balconies demand disciplined flashing and drainage. If the top surface allows water to sit against framing or wick into joints, decay can begin long before the owner notices. Maintenance also matters because coatings, sealants, and exposed finish materials age under sun and weather.
Steel Framing
Steel can provide high strength with relatively slender members, which can be useful when design wants a lighter appearance or longer spans. It is common in some custom residential projects and in multifamily work. The tradeoff is that steel must be protected against corrosion, and connection detailing needs to be handled very carefully where steel meets other materials or passes through the building envelope.
In cold or coastal climates, the corrosion question becomes even more important. Surface treatment, coating systems, drainage detail, and inspection access should all be considered at the design stage. Steel is excellent when properly protected, but neglect at the connection points can shorten the life of the assembly.
Concrete Balconies
Concrete balconies are often associated with larger buildings, but the practical lessons apply broadly. Water infiltration and reinforcement corrosion are among the most common causes of deterioration in concrete balcony systems. Once water reaches steel reinforcement and corrosion begins, cracking, spalling, and progressive damage can follow.
For homeowners, the lesson is simple. Concrete is not maintenance free just because it feels solid. Surface slope, crack control, drainage, edge detailing, and waterproofing all matter. Cosmetic patching alone does not solve hidden moisture or corrosion issues, and that is why professional evaluation is often needed when a concrete balcony shows rust staining, cracking, or surface loss.
Waterproofing Is Where Good Balcony Projects Separate from Bad Ones
If there is one area that deserves extra time and budget, it is waterproofing. Many balcony failures begin at the surface or at the wall connection where water finds a route into the assembly. Once that happens, moisture can attack wood framing, corrode fasteners, damage sheathing, stain interior finishes, and weaken the area where the balcony depends on the building for support.
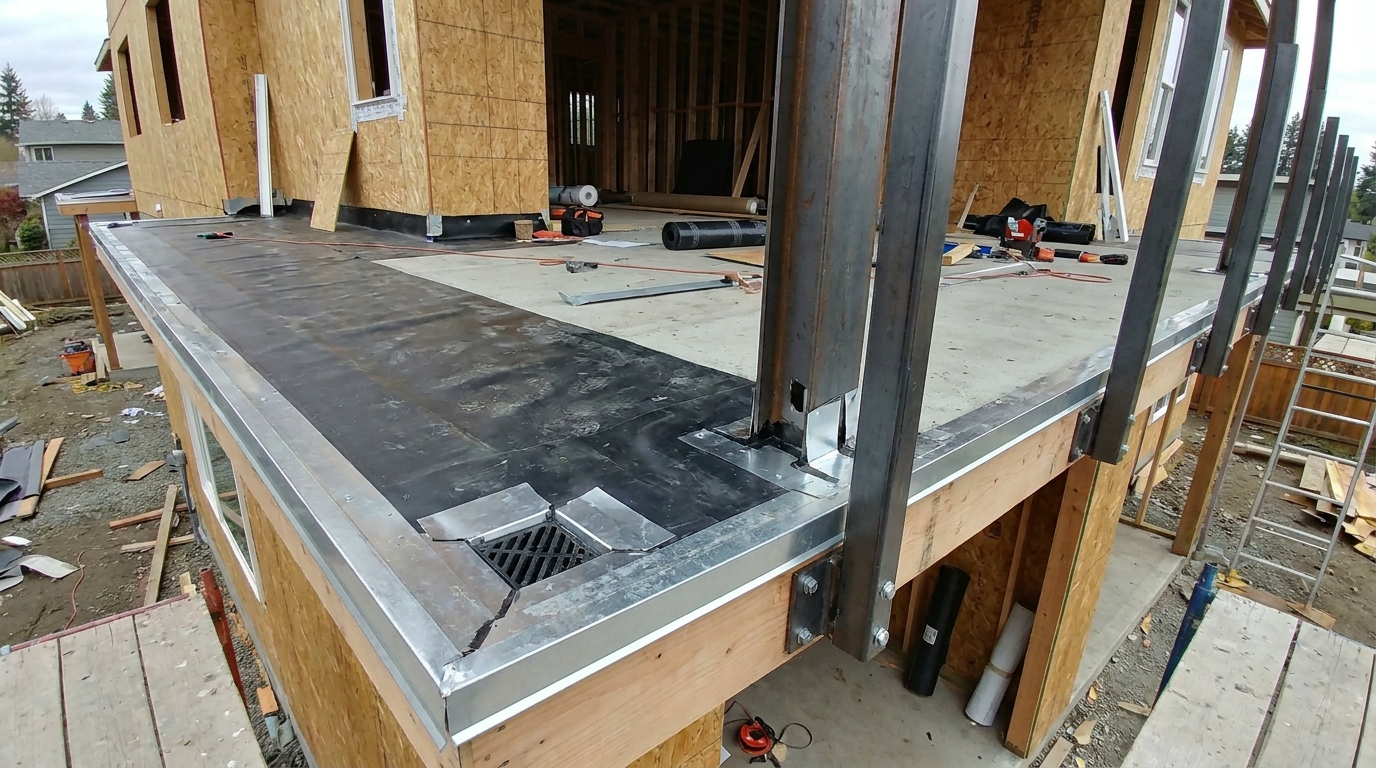
A balcony needs a clear drainage strategy. Water should move away from the wall, across the surface, and off the edge or into a proper drain detail without ponding. The walking surface should usually have a controlled slope. Flashings must direct water outward, and membranes have to be continuous, durable, and compatible with adjacent materials.
Do not underestimate edge details and penetrations. Railing posts, door thresholds, cladding transitions, and surface finish terminations are common failure points. Every screw, anchor, and seam should be considered part of the water management system. If a contractor talks only about framing and guard installation but says very little about membrane transitions, drainage plane continuity, or flashing sequence, that is a warning sign.
In wood and hybrid building systems, guidance increasingly emphasizes integrating balconies with the building enclosure. That means considering air barrier continuity, water shedding, drainage cavity function, and thermal performance together rather than treating them as separate trades. From a practical standpoint, this is where many callbacks come from, because one overlooked transition can let water into the wall for years.
Step by Step Balcony Construction Process
1. Confirm Feasibility and Get the Structure Reviewed
Start by confirming that the existing home can support the new balcony. That may involve opening small sections of interior or exterior finishes, checking joist direction, verifying bearing conditions, and reviewing foundation or footing capacity if posts are planned. For anything beyond a very simple case, professional design input is money well spent.
This is also the moment to settle the basic layout. Determine size, projection, access door location, relationship to windows, privacy concerns, and whether columns or braces will affect the yard below. Good planning now prevents awkward compromises later when the framing crew is waiting.
2. Prepare Permit Documents
Your permit package may need site information, framing plans, connection details, footing sizes, guard details, and cross sections showing waterproofing and attachment points. Some jurisdictions will want stamped drawings for elevated structures or for work affecting the primary structure. Be ready for revisions if reviewers want clearer load paths or better envelope details.
This step can feel slow, but it often catches the issues that would have become expensive in the field. A permit review is much cheaper than rebuilding a failed wall connection after siding and finishes are back on.
3. Set Up Safe Access and Fall Protection
Balcony work creates open edge exposure early in the job. If workers are exposed to a fall hazard, proper guardrails or other required fall protection methods must be used according to the local safety rules. In Ontario guidance, for example, balcony edge fall protection is required when workers may be exposed to a fall of 2.4 metres or more.
For homeowners doing limited work themselves, this is one of the clearest boundaries between enthusiasm and risk. Ladders, temporary planks, and improvised barriers are not a professional safety plan. If the work is elevated and edge protection is not in place, stop and correct that before anything else happens.
4. Build or Reinforce the Primary Support System
This stage includes installing cantilever members, ledger related structure where approved, beams, posts, brackets, and footings depending on the design. Every connection matters. Fastener type, spacing, embedment, and corrosion resistance are not minor details because the balcony depends on them every day of its life.
If the balcony ties into an existing framed wall, take extra time to inspect for hidden damage before closing anything up. It is common to discover past water intrusion around old doors or poorly flashed areas. Repairing that now is far better than burying a known weakness behind a new balcony assembly.
5. Install Substrate, Slope, and Waterproofing Layers
Once the structural base is in place, create the correct substrate for the finished walking surface. That may involve sheathing, a sloped topping, a membrane system, drainage mat layers, or other components depending on the assembly. The important point is that the balcony should not rely on luck to shed water.
Membrane transitions should be deliberate and inspected before finish layers hide them. Pay close attention at doors, upturned edges, wall flashings, scuppers, drains, and post penetrations. If a detail feels hard to seal, that usually means it needs to be redesigned rather than patched with more sealant.
6. Install Guards and Edge Protection
Guard installation should follow the approved design, especially at post anchorage points. A guard that is merely screwed into finish material or weak edge framing is not acceptable. The support blocking and fastening need to be designed to resist the loads a guard will see when people lean, push, or fall against it.
Check alignment and stiffness as the system goes in. A guard can be level and still be weak. If there is visible movement under normal pressure, investigate immediately instead of assuming the finish pieces will somehow tighten it up later.
7. Complete Surface Finishes and Drainage Details
The finish layer might be exposed membrane, tile over a designed assembly, wood or composite walking boards, concrete topping, or another approved system. Whatever the material, it has to support drainage rather than trap moisture. Avoid details that block water at the threshold or direct runoff back toward the wall.
At this point, edges, drip details, and underside appearance should also be reviewed. Water that clings to the underside of a balcony can stain materials below and contribute to premature wear. Good edge design helps break water cleanly away from the structure.
8. Schedule Final Inspection and Document the Work
Before the balcony is put into full use, complete the final inspection process required by your authority. Save plans, permit records, product data, inspection notes, and photos of hidden conditions such as blocking, flashing, and membrane layers. Those records are valuable for future maintenance, repairs, and resale.
Documentation also helps if a later contractor needs to service the assembly without damaging it. Knowing where membranes turn up, where reinforcement exists, and how rail posts were anchored can prevent a lot of accidental damage during later modifications.
Common Mistakes That Cause Trouble Later
The most expensive balcony problems usually start with a few predictable errors. One is treating the balcony like a simple deck and using familiar deck habits where a more careful exterior assembly is required. Another is focusing on visible finishes while neglecting hidden connections, flashing, and waterproofing.
Improper fastener selection is another major issue. Treated wood, exterior exposure, and mixed metals can create corrosion problems if hardware is not compatible. The wrong screws or connectors may hold for a while and then lose capacity as corrosion advances. By the time movement appears, the damage may already be extensive.
Guardrail installation is also frequently mishandled. People often spend heavily on attractive rail panels and very little time on the supporting structure. What matters most is the anchorage and load path back into solid framing or structural material. Appearance is secondary to rigidity and proper resistance.
Then there is the classic waterproofing mistake, relying on sealant as the main defense. Sealant has a role, but it is not a substitute for proper slope, flashing, membrane continuity, and drainage. If your design depends on beads of caulk to keep bulk water out year after year, the design needs work.
What It Costs and What Actually Drives the Price
Balcony costs vary widely because the visible platform is only part of the job. The real cost drivers include structural engineering, permit preparation, demolition, footing work, difficult access, envelope repairs, waterproofing systems, guard selection, finish materials, and inspection coordination. The moment a project affects existing walls or requires significant waterproof detailing, the budget tends to move up quickly.
Cantilevered designs often cost more than homeowners expect because they can require deeper structural intervention and more careful thermal and moisture detailing. Post-supported balconies may look simpler, but they still involve excavation, concrete, and finish coordination below. High end railings, tile systems, and concealed drainage details can also push the budget far beyond the basic framing cost.
A practical way to budget is to separate the project into categories rather than focusing on a single square foot number. Consider structural support, envelope integration, waterproofing, railings, finishes, and professional services as distinct cost items. That gives you a clearer understanding of where savings are realistic and where cutting corners will likely create future repairs.
When DIY Makes Sense and When to Bring in Professionals
Some parts of balcony construction may be suitable for experienced DIY builders, especially finish work, selective demolition, painting, or some non structural trim details. The challenge is that a balcony combines several areas where mistakes have serious consequences. Structural attachment, guard design, waterproofing transitions, and elevated work safety are not forgiving categories.
If you are changing the house structure, adding a cantilever, installing new footings, or building anything elevated enough to create real fall exposure, professional involvement is strongly recommended. A structural designer, qualified contractor, or envelope specialist can identify issues that are easy to miss from online tutorials or product brochures. In many jurisdictions, that professional input is not only wise but required.
Even if you intend to self-manage the work, think like a project manager and hire expertise where the risk is concentrated. Paying for engineering and a clear waterproofing plan can save far more than it costs. The cheapest balcony is often the one that does not need major repair a few winters later.
Inspection Checklist Before You Sign Off
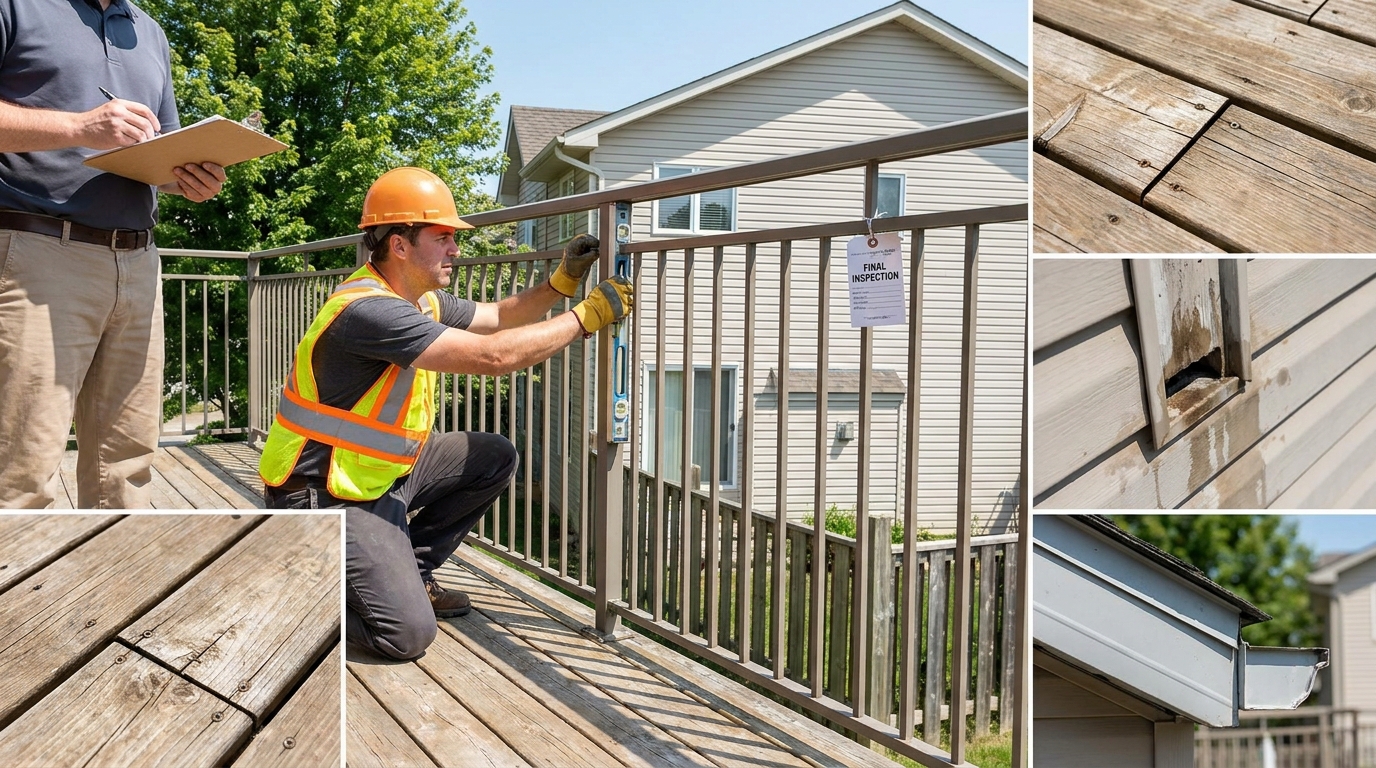
Before calling the project finished, walk through it carefully with the mindset of a future inspector. You are looking for strength, water control, finish durability, and clean workmanship. Small clues now often point to larger hidden issues.
- Check guard rigidity. The guard should feel solid, properly aligned, and securely anchored without noticeable looseness under firm pressure.
- Verify drainage. Water should have a clear path away from the wall and off the balcony without ponding at low spots.
- Inspect flashing transitions. Look closely at wall intersections, threshold details, edges, and any surface penetrations.
- Confirm corrosion protection. Hardware, connectors, and exposed metals should be appropriate for the environment and compatible with adjacent materials.
- Review surface condition. The walking surface should be even, sound, and free from soft spots, cracking, or poor adhesion.
- Look underneath. The underside can reveal leaks, staining, bad fastener placement, or poor edge drainage long before the top surface does.
- Match the work to the approved plans. Field substitutions should be reviewed, not assumed acceptable.
Condition indicators matter in ongoing ownership as well. In residential settings, rigid rust free railings and a sound slab or floor surface are basic signs that the balcony is being maintained properly. If railings are rusting, loose, or movement is visible, treat that as a repair issue rather than a cosmetic annoyance.
Maintenance After the Balcony Is Built
A balcony is exposed every day, so maintenance should be expected from the beginning. Keep the surface clean, clear drains and scuppers, remove debris that traps moisture, and inspect the wall connection and guard anchors regularly. Snow and ice management should be done carefully so membranes and finishes are not damaged by aggressive tools or deicing products that are incompatible with the assembly.
For wood balconies, watch coatings, joints, and fastener areas closely. For steel, inspect for paint breakdown, rust, or trapped water at joints. For concrete, monitor for cracking, staining, and spalling. The important thing is to treat early signs seriously because balcony deterioration often starts small and then accelerates once moisture gets established in the assembly.
Set a simple routine. Look at the balcony every season, especially after heavy rains or freeze thaw periods. If anything changes, movement, stains, cracks, rust, loose railings, or persistent ponding, investigate the cause rather than waiting for a larger repair cycle.
Final Thoughts on Building a Balcony the Right Way
A well built balcony can be a great addition to a home. It creates usable outdoor space, improves views, and can raise the value and enjoyment of the property. But it only works as a long term asset if it is designed and built as a serious exterior structure rather than a decorative add on.
The practical path is clear. Confirm local code and permit requirements early. Choose a structural approach that fits the existing building. Invest in proper waterproofing and drainage. Treat guard installation as life safety work. Respect construction stage fall protection. Inspect the hidden details before finishes cover them. Maintain the balcony once it is in service.
If you keep those fundamentals in view, you will avoid most of the common problems that lead to callbacks, leaks, and unsafe conditions. Good balcony construction is not about flashy details. It is about disciplined workmanship, sound structure, and careful water management from the first drawing to the final inspection.



No Comment! Be the first one.