


How to Effectively Soundproof Your Walls: A Step-by-Step Guide for a Quieter Home
Noise problems inside a house are rarely caused by one thing. You might hear voices from the next room, television noise through a shared wall, traffic from outside, or the constant distraction of a home office set up beside a busy living area. Many homeowners look for a quick fix, but real wall soundproofing usually comes from combining a few proven methods in the right order. If you understand what sound is doing and where it is slipping through, you can make solid improvements without hiring a specialist for every step.
Table Of Content
- Start by Understanding the Type of Noise You Have
- What Actually Works in DIY Wall Soundproofing
- Step 1: Inspect the Wall and Set a Realistic Goal
- Step 2: Seal Air Gaps and Leakage Paths First
- Best places to check for sound leaks
- Step 3: Improve Weak Points Around Doors and Windows
- Step 4: Add Insulation the Right Way
- Step 5: Add Mass with Another Layer of Drywall
- Step 6: Use Damping Compound Between Drywall Layers
- Step 7: Decouple the Drywall from the Framing
- Resilient channel and clip installation reminders
- Step 8: Consider Mass-Loaded Vinyl Carefully
- Step 9: Finish the Wall Without Undoing Your Work
- Common DIY Mistakes That Waste Money
- Recommended Upgrade Paths by Budget and Room Type
- How to Measure Success After the Work Is Done
- Should You Use Acoustic Calculators or Design Tools
- Final Thoughts: Build the Wall as a System
The practical truth is that most wall soundproofing comes down to four ideas: seal air leaks, add mass, reduce vibration transfer, and support the wall cavity with insulation. Those principles matter far more than any miracle product claim. A better wall assembly works because it blocks airborne sound, limits structural vibration, and closes off the weak points that let noise bypass the wall entirely.
This guide is written for homeowners who want a realistic, do-it-yourself path to a quieter room. It covers bedrooms, nurseries, studios, media rooms, and home offices, but the same principles apply almost anywhere in the house. Some projects are simple weekend upgrades, while others involve opening the wall and rebuilding part of it. The key is knowing which level of work fits your budget, your room, and the kind of noise you are trying to stop.
Before you start, it helps to set expectations. No wall can make a typical house completely silent, especially when sound also travels through ceilings, floors, ducts, doors, and windows. Still, even moderate improvements can make a room feel much calmer and more usable. That matters whether you are trying to sleep better, work without distraction, or keep music practice from bothering the rest of the family.
Good soundproofing is a system, not a single material. The biggest gains usually come from combining airtight sealing, added mass, decoupling, and careful installation.
When builders and manufacturers compare wall performance, they often refer to STC, which stands for Sound Transmission Class. It is a standard rating used to compare how well a wall assembly reduces airborne sound such as speech, TV audio, or music. A higher STC generally means better sound isolation, but it is important to remember that laboratory ratings do not always match what happens in a real house. Flanking paths, electrical boxes, poor sealing, and installation errors can all reduce performance.
That is why this article stays focused on practical field conditions rather than perfect test lab results. You will learn what usually works, what often gets oversold, and how to avoid spending money on products that improve room echo but do very little to stop sound from getting through the wall. If your goal is less noise transfer, the wall assembly and the details around it matter most.
Start by Understanding the Type of Noise You Have
One of the biggest mistakes homeowners make is treating all sound problems the same way. In reality, wall soundproofing mainly deals with airborne noise. This includes talking, barking dogs, television, gaming audio, and music. Airborne sound moves through the air, hits the wall, turns into vibration, and then passes into the next room unless the wall assembly is designed to resist it.
Impact noise is different. Footsteps from the room above, a treadmill on an upper floor, or chairs scraping across a floor are impact problems. Those are often better measured by IIC, or Impact Insulation Class, and they are usually addressed through floor and ceiling work rather than just wall upgrades. If your main problem is noise from above, wall soundproofing alone may not solve it.
There is also the issue of flanking transmission, which is where sound goes around the wall instead of straight through it. This is extremely common in homes. Sound can travel through outlet boxes, duct chases, attic spaces, floor framing, hollow-core doors, and even gaps behind baseboards. You may think a wall is weak when the real problem is that sound is bypassing it through a nearby opening.
For that reason, the first step in any successful project is diagnosis. Stand in the room while the noise source is active and listen near outlets, corners, windows, and door trim. If the sound changes noticeably at one point, that is a clue. A practical soundproofing plan starts with finding those weak points before you buy materials.
What Actually Works in DIY Wall Soundproofing
Homeowners are often sold foam tiles, decorative acoustic panels, and thin peel-and-stick products as if they can soundproof a wall on their own. In most cases, they cannot. Foam and fabric panels are mostly sound absorption products. They reduce echo and reverberation inside a room, which can make the room feel calmer, but they do little to stop sound from passing through a typical wall assembly.
To reduce transmission through a wall, you usually need some combination of mass, damping, decoupling, and airtight sealing. Mass means making the wall heavier so sound has a harder time moving it. Damping means reducing vibration energy between layers. Decoupling means interrupting the direct mechanical path between drywall and framing. Airtight sealing matters because even a small crack can let sound leak through and undermine the rest of the work.
Insulation also plays a role, but it is often misunderstood. Mineral wool and fiberglass batts help by absorbing sound energy inside the stud cavity and reducing resonance. That is useful, but insulation alone does not fully soundproof a wall if the wall faces are still light, tightly connected to the framing, and full of leaks. Think of insulation as a supporting part of the assembly, not the whole answer.
If you remember one thing, remember this: the best DIY results usually come from a layered approach. Seal the leaks first. Then improve weak points such as outlets, windows, and doors. Add mass where practical. If you are opening the wall or replacing drywall, use the chance to decouple the surface and insulate the cavity correctly.
Step 1: Inspect the Wall and Set a Realistic Goal
Before tearing anything apart, decide what success means for your room. A bedroom next to a bathroom may only need speech privacy and less plumbing noise. A home office may need enough isolation to make video calls comfortable. A music room or podcast setup needs a much more serious assembly. Your goal affects how far you should go and how much money you should put into the wall.
Walk the entire wall and note everything that interrupts it. Electrical outlets, switches, return grilles, windows, trim joints, floor gaps, and shared penetrations all matter. If the wall connects to an attic, basement, or crawlspace path, check those areas too. A perfectly upgraded wall surface will still disappoint if sound is slipping around it through an easy path nearby.
This is also the time to check the existing wall build. Is it a standard 2×4 stud wall with one layer of drywall on each side. Is there any insulation in the cavity. Are there back-to-back outlets between rooms. If you know what you have, it becomes much easier to choose the most effective upgrade instead of guessing.
If the room is already finished and you do not want major demolition, focus on lower-impact improvements first. If you are remodeling anyway, that is the ideal time to do deeper work such as resilient channel, isolation clips, new insulation, or a double layer of drywall. Soundproofing is always easiest when the wall is already open.
Step 2: Seal Air Gaps and Leakage Paths First
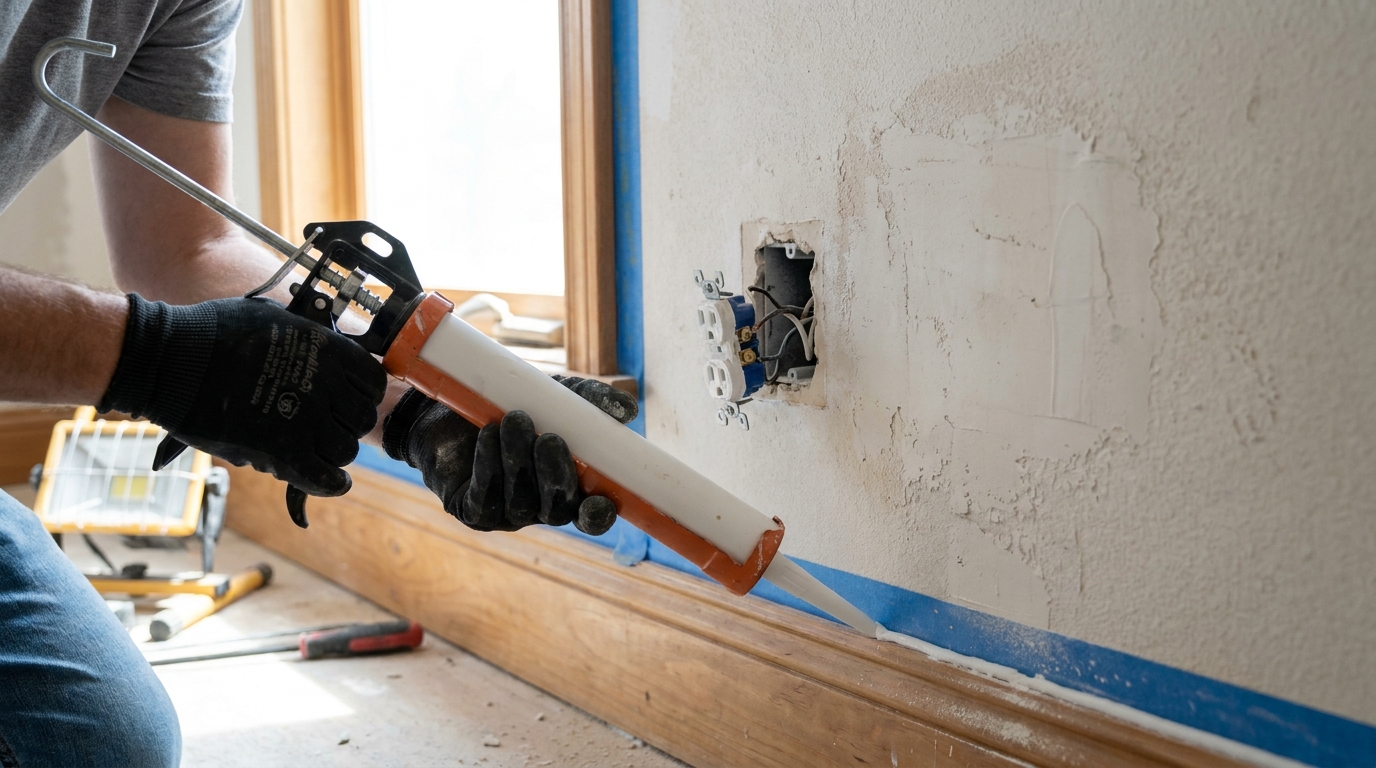
This is the least glamorous part of soundproofing, but it is often the best value. Sound rides through air, and walls fail where air can move through cracks. Small gaps at baseboards, wall edges, trim lines, and utility penetrations can let noise bypass the wall assembly. Sealing these openings will not make a thin wall high performance, but it can noticeably reduce leakage and improve the value of every later upgrade.
Use a quality acoustic sealant or flexible acoustical caulk around the perimeter of the wall where drywall meets the floor, ceiling, and adjacent walls. Caulk around window and door casings where gaps exist. Remove cover plates and seal around electrical box edges if there are visible openings. For outlets and switches on shared walls, putty pads or properly sealed boxes can help reduce sound leakage through those penetrations.
Pay close attention to back-to-back outlets, which are common weak points on shared bedroom or office walls. If you can hear through the outlet when the cover is off, that is a clear sign of a direct leakage path. Sealing around the box and adding putty pads is a practical improvement. If the wall is open, relocating one of the boxes or staggering them is even better.
At the same time, look beyond the wall itself. A hollow-core interior door beside the wall can leak more sound than the wall surface. A loose return air grille can create a direct path between rooms. A badly sealed window can undermine all your effort on an exterior wall. Soundproofing works best when you treat the room as a whole assembly, not just one surface.
Best places to check for sound leaks
- Along baseboards and shoe molding
- At inside corners and ceiling lines
- Around outlet and switch boxes
- At window and door trim joints
- Where pipes, cables, or ducts pass through the wall
- Behind large wall-mounted fixtures or cabinets
Step 3: Improve Weak Points Around Doors and Windows
Many homeowners blame a wall when the real problem is the opening in the wall. Doors and windows are usually much weaker acoustically than a well-built wall assembly. If you skip them, your project may never deliver the result you expect. That is especially true in bedrooms, offices, and exterior-facing rooms where outside noise is part of the problem.
For doors, start with weatherstripping around the jamb and a proper door sweep at the bottom. If the room has a hollow-core door, replacing it with a solid-core unit can make a noticeable difference. The heavier door provides more mass, and when it seals better around the edges, airborne sound has fewer easy paths to follow. That single upgrade often matters more than homeowners expect.
For windows, seal gaps around the frame and trim first. Heavy curtains may help soften interior reflections, but they are not a substitute for proper sealing or better glazing. If outside traffic noise is the main issue, an interior window insert or a higher-performance replacement window may be needed for major improvement. Still, careful caulking and weatherstripping are worth doing first because they are affordable and often close obvious leaks.
Once weak points are addressed, the wall upgrades you make will have a better chance to perform. Think of it this way: there is no point building a stronger wall while leaving an easy opening right beside it. The room is only as quiet as its weakest path.
Step 4: Add Insulation the Right Way
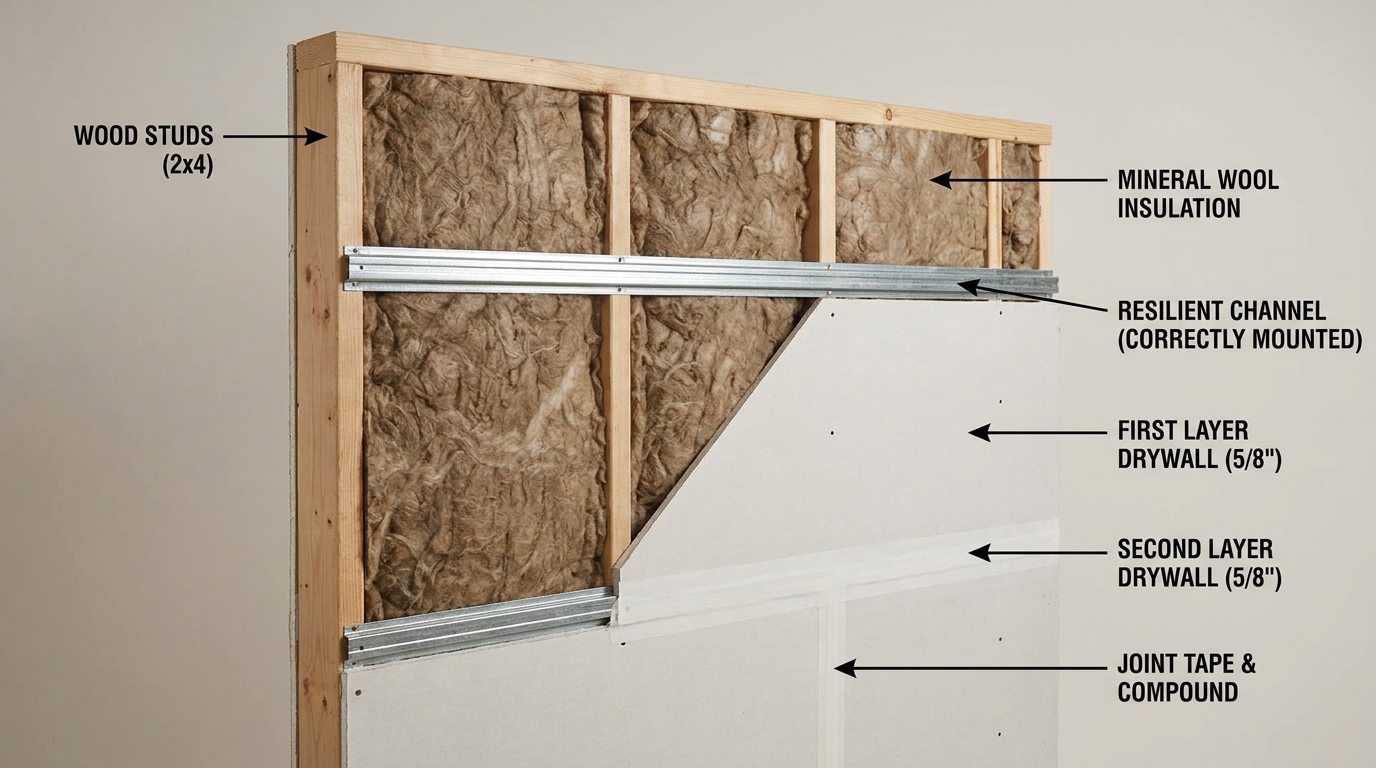
If the wall is open, filling the stud cavity is one of the smartest things you can do. The two common DIY choices are fiberglass batts and mineral wool. Both can improve the acoustic behavior of the cavity by reducing resonance and absorbing some sound energy. Mineral wool is often preferred for sound control because it is denser and fits snugly, but fiberglass is still helpful if installed correctly.
The important point is not to oversell what insulation can do by itself. A wall with insulation but only one thin drywall layer and plenty of air leaks can still perform poorly. Insulation supports the assembly, but it does not replace the need for mass and airtight finishing. This is one of the most common misconceptions in DIY soundproofing.
Install batts so they fully fill the cavity without being compressed more than necessary. Gaps, folds, and sloppy cuts reduce effectiveness. Work around wiring and plumbing carefully so the cavity remains as continuous as possible. If you leave open voids behind boxes or at odd framing intersections, those spots can become weak acoustic pockets.
If you are choosing between materials, mineral wool is often the stronger acoustic option for interior sound control walls, especially in bedrooms or offices. It is also easier to friction-fit in many stud bays. That said, either material is far better than an empty cavity when paired with the rest of a proper soundproofing strategy.
Step 5: Add Mass with Another Layer of Drywall
One of the most reliable DIY upgrades is simply adding more mass to the wall. In practical terms, that usually means installing an additional layer of drywall. A second layer makes the wall harder to vibrate, which helps reduce airborne sound transmission. It is not fancy, but it is proven and often more effective than thinner specialty products used alone.
For the best result, stagger seams so they do not line up with the joints in the existing layer. Apply the new layer carefully and keep perimeter gaps small but intentional, then seal those edges with acoustic sealant before trim goes back on. Good seam treatment matters because a heavy wall with poor air sealing can still leak noise through the joints.
Some homeowners ask about using thicker drywall instead of two layers. Thickness can help, but a layered system often performs better, especially when combined with damping compound between sheets. Two layers also give you more options for controlling vibration and improving the wall as an assembly rather than just making a single sheet slightly heavier.
This is one of the best options when you want a meaningful upgrade without fully reframing the wall. It does reduce room dimensions slightly and requires finish work at trim, outlets, and casing, but for many DIY projects that tradeoff is well worth it.
Step 6: Use Damping Compound Between Drywall Layers
Damping compounds are designed to reduce vibration transfer between rigid layers. In a wall assembly, they are commonly applied between two sheets of drywall. This helps convert some of the sound energy into a small amount of heat rather than allowing it to pass through the wall as vibration. In practical terms, it can improve the performance of a double-drywall system without adding much complexity to the framing.
This approach works best when combined with the basics already covered: sealed gaps, cavity insulation, and good installation technique. It is not a stand-alone fix for a leaky or poorly built wall. Still, for homeowners already planning to add a second drywall layer, it can be a smart upgrade because it improves the layered system instead of relying on one material to do everything.
Follow the product instructions carefully and do not substitute random adhesives. Sound control products are tested as part of specific assemblies, and changing materials casually can undermine the result. This is one area where careful reading and patient installation matter more than speed.
In a bedroom, office, or media room where speech and TV noise are the main issue, damping compound paired with double drywall often delivers a practical improvement that homeowners can hear right away. It is a good middle-ground step between basic sealing and more advanced decoupling methods.
Step 7: Decouple the Drywall from the Framing
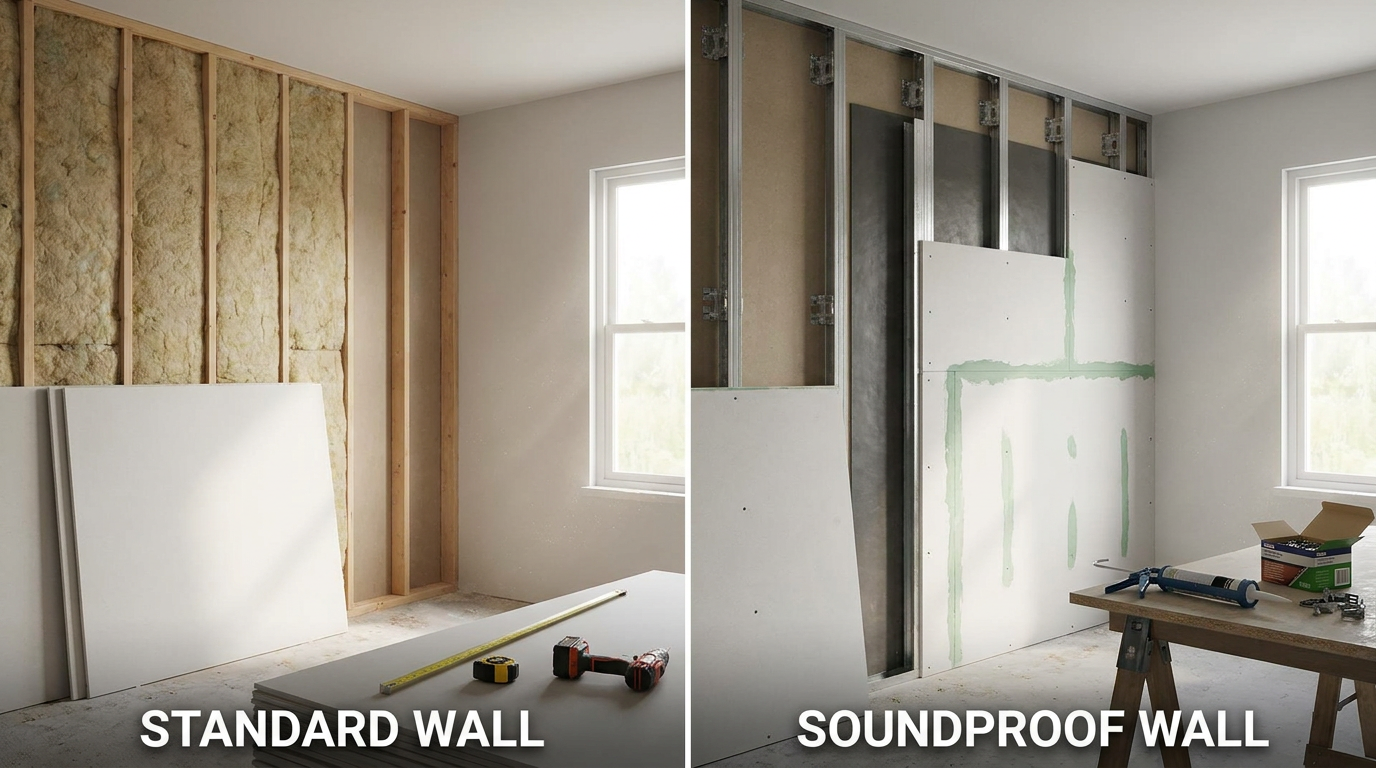
If you want a stronger jump in performance and the wall is open or being rebuilt, decoupling is one of the most effective strategies available. In a basic wall, drywall is screwed directly to the studs, which gives vibration a straight path through the assembly. Decoupling interrupts that path by separating the finished surface from the framing to some degree.
The most common DIY-friendly methods are resilient channel and sound isolation clips with hat channel. Both create a flexible connection between the studs and the drywall. That flexibility helps reduce vibration transfer, which can improve airborne sound isolation significantly when the system is built correctly. Tested wall assemblies often show meaningful STC gains when resilient channel is used with insulation and proper drywall layers.
The warning here is simple: installation errors can ruin the benefit. If screws are driven in a way that short-circuits the channel into the studs where they should not, the decoupling effect is compromised. Channels must be oriented and spaced correctly, and drywall fasteners must go only where the system requires. Sloppy work defeats the point.
For many homeowners, resilient channel is a reasonable step during a remodel because it offers a better result than direct-attached drywall without requiring a completely separate wall. Isolation clips and hat channel are often considered a more robust system, though usually at a higher cost. Either way, decoupling is most valuable when you are serious about reducing voices, TV sound, or music through a shared wall.
Resilient channel and clip installation reminders
- Read the manufacturer layout instructions before starting
- Keep channels continuous and properly spaced
- Do not let drywall screws bridge the decoupling layer into studs where they should not
- Use acoustic sealant at the perimeter after drywall installation
- Coordinate outlet box extensions and trim details ahead of time
Step 8: Consider Mass-Loaded Vinyl Carefully
Mass-loaded vinyl, often called MLV, gets a lot of attention in soundproofing discussions. It is a dense flexible barrier that can add mass without taking up much space, and it may be useful in certain wall assemblies. But it is not a magic fix by itself, and that point needs to be clear. If a wall still leaks air and remains rigidly connected with minimal mass on the faces, MLV alone will not transform it.
Where MLV can help is as one layer within a larger system, especially when space is tight and you need additional mass. It is often paired with drywall, sealant, and insulation rather than used as the only upgrade. Because it can be expensive for the performance it delivers in some residential applications, homeowners should compare it against simply adding another drywall layer or investing in decoupling.
In many cases, a well-sealed double-drywall assembly with insulation gives a better value than relying on MLV as the star product. That does not make MLV useless. It just means you should treat it as one tool, not the whole strategy. The same rule applies across soundproofing: avoid paying premium prices for a product that is being asked to do the work of an entire wall system.
If you are considering it, plan the full assembly on paper first. Think about thickness, outlet extensions, trim impacts, and whether your budget would be better spent on clips, channel, or another drywall layer. Sound control decisions are easier when you compare complete systems instead of single products.
Step 9: Finish the Wall Without Undoing Your Work
It is surprisingly easy to lose performance during the final stage of the project. A wall may be insulated, sealed, and upgraded with extra drywall, only to be compromised by unsealed edges, poorly fitted box extensions, or trim installed in a way that opens gaps again. Finish work matters in soundproofing more than many people realize.
After the final drywall layer is installed, seal the perimeter with acoustic sealant before reinstalling trim. Be careful around electrical boxes and use proper extenders where wall thickness has increased. If trim leaves gaps, caulk them neatly. The goal is not just a good appearance. The goal is maintaining airtight continuity so the wall performs the way it was built to perform.
Mounting heavy shelving, televisions, or wall accessories should also be planned carefully on decoupled walls. You do not want to create rigid bridges or damage the assembly with careless fastening. In high-performance rooms, even small shortcuts during the finish stage can reduce the benefit you paid and worked for.
This is where patience pays off. Soundproofing improvements often come from details that no one sees after the room is painted. Good workmanship behind the finish is what separates a wall that only looks upgraded from one that actually sounds better.
Common DIY Mistakes That Waste Money
The first common mistake is confusing sound absorption with sound isolation. Acoustic foam panels, rugs, and fabric wall hangings may reduce echo inside a room, which can improve clarity and comfort, but they usually do very little to stop sound passing through a wall. They are useful for room acoustics, not as primary wall soundproofing tools.
The second mistake is relying on insulation alone. Filling a cavity helps, but if the drywall stays light, the studs stay directly connected, and the gaps stay open, the wall will still pass sound more easily than most homeowners expect. Insulation supports the assembly, but it does not replace mass, decoupling, and sealing.
The third mistake is trusting ratings without considering real-world flanking paths. A wall assembly may have an impressive STC in lab testing, but that number does not automatically transfer to your house. Back-to-back outlets, a leaky door, a duct chase, or poor installation can pull the actual result down. Ratings are useful for comparison, not guarantees.
The fourth mistake is incorrect resilient channel installation. If the channel is bridged by screws into studs, installed backwards, or interrupted carelessly, the decoupling effect can be lost. This is one reason some homeowners say resilient channel does not work. It can work very well, but only when installed exactly as intended.
Recommended Upgrade Paths by Budget and Room Type
For a low-cost improvement in a bedroom or office, focus on sealing gaps, treating outlets, weatherstripping the door, and adding a door sweep. If outside noise is part of the issue, seal the window trim and frame carefully. This level of work will not rebuild the wall, but it often cuts the most obvious leakage and makes the room feel noticeably calmer.
For a mid-range project, add cavity insulation if the wall is open and install a second layer of drywall with acoustic sealant at the perimeter. If budget allows, include a damping compound between drywall layers. This is a strong value package for homeowners who want better speech privacy or less TV noise through a shared wall.
For a higher-performance DIY remodel, open the wall, insulate it well, use resilient channel or isolation clips, and finish with double drywall and sealed edges. Address the door and nearby flanking paths at the same time. This is the kind of whole-assembly approach that works best for home offices, media rooms, and hobby studios where meaningful isolation matters.
Your best choice depends on access and expectations. If the wall is already open for renovation, do the deeper work now. If the room is finished and you only need moderate improvement, start with sealing and weak-point upgrades before deciding whether the wall needs to be built out further.
How to Measure Success After the Work Is Done
Most homeowners do not need specialized lab equipment to tell whether a project helped. Use the room during the times when noise used to bother you and compare the experience directly. Can you understand speech from the next room less clearly. Does television noise sound more muffled. Is your office call quality better because distractions feel farther away. Those are meaningful results.
You can also run a simple before-and-after test with a speaker, a fixed sound source, and a smartphone decibel app, as long as you keep placement and volume consistent. This will not replace professional testing, but it can help you compare relative change. Even modest reductions matter, especially in daily use over long periods.
Remember that soundproofing improvements are often incremental. OSHA notes that even small reductions in noise can meaningfully reduce annoyance and overall exposure. In a home, that can mean better sleep, more privacy, easier concentration, and less tension between rooms. You do not need perfection for the upgrade to be worthwhile.
If the result still falls short, revisit flanking paths before assuming the wall assembly failed. Often the remaining problem is at the door, window, ceiling line, or an unseen utility route. The wall may be performing better than you think while another path continues to leak sound around it.
Should You Use Acoustic Calculators or Design Tools
For homeowners planning a larger renovation, digital acoustic tools are becoming more useful. One example from the research world is NRC Canada’s soundPATHS application, which predicts direct and flanking transmission using current building code methodology. Most DIY users will not need advanced modeling for a single bedroom wall, but the trend matters because it supports a more accurate, assembly-based way of thinking.
The practical lesson is that soundproofing is no longer just about picking a product off a shelf. More guidance now focuses on the whole path sound takes through a building. That is a good thing for homeowners because it encourages better decisions. Instead of asking which product is best, you start asking which full assembly solves the problem in your specific room.
If you are planning a home studio, a multigenerational living setup, or a major basement conversion, it may be worth reviewing tested wall assemblies from major manufacturers before buying materials. Their catalogs often show combinations of studs, insulation, channels, clips, and drywall layers that have been tested together. That gives you a more reliable starting point than marketing claims built around one product.
For most rooms, though, the basics still win. Seal the gaps. Add mass. Decouple where practical. Insulate the cavity. Finish carefully. That simple sequence remains the most dependable DIY approach.
Final Thoughts: Build the Wall as a System
If you want to soundproof your walls effectively, think like a builder rather than a shopper. Start with the easiest leakage points because they are often the weakest links. Then improve the wall assembly in layers, using mass, damping, insulation, and decoupling where they make sense. This approach is more reliable than chasing one heavily advertised product and expecting it to solve everything on its own.
For most homeowners, the best return comes from combining methods rather than overdoing just one. Sealing and door upgrades might be enough for a basic bedroom privacy problem. A home office may benefit from double drywall and damping. A studio or media room usually needs the deeper assembly approach with decoupling, careful detailing, and stronger attention to flanking paths.
Good soundproofing is not mysterious. It is mostly careful construction, airtight detailing, and realistic expectations. If you respect the system and take the time to do the work cleanly, you can make a room meaningfully quieter and more comfortable without turning it into a full commercial project.
That is the practical goal. Not marketing silence, but a real improvement you can live with every day. When the wall is built and sealed properly, the difference is not just measurable. It is something you notice the first time the house feels calmer on the other side of the room.



No Comment! Be the first one.