



How to Inspect Your Water Tank for Optimal Performance
Your water tank works quietly in the background, which is exactly why it can be easy to ignore. As long as hot water shows up when you turn the tap, most homeowners assume everything is fine. In reality, a tank can lose efficiency, collect sediment, develop slow leaks, or show early signs of corrosion long before it fails completely. A simple inspection routine helps you catch those issues early, protect your equipment, and avoid the kind of repair bill that always seems to arrive at the wrong time.
Table Of Content
- Why regular water tank inspections matter
- Know what kind of tank you have before you begin
- Safety first before any inspection
- Your step by step water tank inspection checklist
- Step 1: Inspect the area around the tank
- Step 2: Check the exterior of the tank for corrosion and damage
- Step 3: Look closely at the pipes and fittings
- Step 4: Inspect the temperature and pressure relief valve area
- Step 5: Watch for sediment clues
- Step 6: Flush the tank if appropriate for your model and comfort level
- Step 7: Check the thermostat setting and overheating risk
- Step 8: Evaluate insulation and standby heat loss
- Step 9: If you have a heat pump water heater, inspect the filter and condensate line
- Step 10: Listen to your hot water performance throughout the house
- What homeowners can do themselves and what should be left to a professional
- How often should you inspect your water tank?
- Warning signs you should never ignore
- The sustainability case for routine tank maintenance
- A simple maintenance rhythm you can keep
- Final thoughts
There is also a sustainability angle that deserves more attention. Water heating can account for roughly 14 percent to 25 percent of household energy use, which means your tank is not just a plumbing appliance. It is an energy appliance too. When it is maintained properly, it can use less energy, waste less water, and last longer. Those are practical benefits for your budget, but they also support a lower impact home without requiring a dramatic renovation.
This guide focuses on a homeowner friendly inspection process for a typical residential storage water heater or hot water tank. It covers what you can look for yourself, how to recognize common warning signs, and when it is wise to bring in a qualified technician. The goal is not to turn you into a plumber. It is to help you become more observant, more confident, and better able to protect one of the most important systems in your home.
If your home has a standard electric tank, a gas storage water heater, or a heat pump water heater with a storage tank, many of the visual inspection principles are the same. The details of servicing can vary, especially with combustion components, anode rods, and certain valves, so it is important to know your unit type and to refer to the manufacturer manual. A thoughtful inspection starts with awareness, not guesswork.
Routine tank inspections are one of the simplest ways to prevent waste, improve efficiency, and extend equipment life. Small issues are almost always easier to address before they become visible damage or a complete shutdown.
Why regular water tank inspections matter
Many homeowners wait until they see a puddle or lose hot water entirely before they think about maintenance. Unfortunately, by that point the problem may have already progressed from minor wear to significant damage. A slow drip can ruin flooring, encourage mold, or damage nearby materials. Sediment buildup can force your tank to work harder, shorten heating efficiency, and reduce the amount of usable hot water available for showers, laundry, and cleaning.
Inspection is really about pattern recognition. You are not looking for dramatic failure so much as subtle change. A tank that suddenly makes rumbling noises, a discharge pipe that looks out of place, a bit of rust near a fitting, or a utility room floor that feels slightly damp can all point to larger issues. The earlier you notice them, the more options you typically have.
Regular checks also support better long term planning. If you know your tank is aging, collecting sediment, or becoming less consistent, you can prepare for repair or replacement on your own timeline. That is especially useful today, when more households are considering efficient options such as heat pump water heaters. The U.S. Department of Energy finalized updated water heater efficiency standards in 2024, reinforcing a broad shift toward lower energy, lower operating cost equipment. Good inspection habits help you get the most from whatever system you have now while making smarter decisions about what comes next.
Know what kind of tank you have before you begin
Before inspecting anything, take a moment to confirm what you are working with. Most homes will have one of three common categories. The first is a conventional electric storage water heater. The second is a gas storage water heater, which includes combustion and venting components that deserve special caution. The third is a heat pump water heater, which uses electricity but also moves heat from surrounding air and usually includes an air filter and condensate drain that need periodic attention.
Your manufacturer manual is worth finding before you start. It will show the location of key parts such as the thermostat, drain valve, shutoff controls, temperature and pressure relief valve, and any maintenance recommendations specific to your model. Manuals often include annual service suggestions, flushing instructions, and warning labels that can help you distinguish what is appropriate for a homeowner from what should be left to a professional.
If you cannot find the manual, look for the model number on the tank label and search the manufacturer website. This small step can save time and reduce the risk of making assumptions. It also gives you a clearer understanding of the expected service life of your tank and whether replacement parts are still readily available.
Safety first before any inspection
A water tank stores hot water under pressure, so safety matters. Before touching valves, panels, or fittings, make sure the area is stable and dry. If you notice active leaking, a strong gas smell, scorching, damaged wiring, or signs of overheating, stop and contact a professional right away. Inspection is useful, but it should never push you into unsafe troubleshooting.
For a routine visual check, gather a flashlight, paper towel or cloth, your phone for photos, and a notebook or maintenance app where you can record what you see. Wear shoes with good grip and make sure the floor is not slippery. If the tank is in a tight basement corner or dark utility closet, improve the lighting before you begin. A calm, visible work area reduces mistakes.
It also helps to know where the basic controls are located. Find the cold water shutoff valve, the power shutoff if it is electric, or the gas shutoff if it is a gas unit. Locate the temperature and pressure relief valve and the discharge pipe connected to it. You do not necessarily need to operate these during a simple inspection, but you should know where they are and whether they appear intact and unobstructed.
Your step by step water tank inspection checklist
The most effective inspection process is simple and repeatable. Rather than trying to do everything at once, move from the outside environment to the tank body, then to safety components, performance clues, and efficiency details. That sequence makes it easier to notice change over time and easier to document what you find. If you repeat this every few months, the process becomes quick and intuitive.
Step 1: Inspect the area around the tank
Start with the space around the water tank itself. Look at the floor, nearby walls, and any drain pan beneath the unit. You are checking for moisture, rust stains, mineral deposits, peeling finishes, warped baseboards, or a musty smell that could indicate slow leakage. In many homes, early signs of trouble show up around the tank before they show up on the tank body.
A drain pan should be clean, empty, and positioned to catch leaks if the tank develops one. If the pan contains water, even a small amount, that deserves attention. The source could be a fitting, a relief valve, condensation from a nearby line, or the tank itself. Wipe the area dry and monitor it again after a few hours or the next day to see whether moisture returns.
Take a wider view too. Clutter around the tank can hide leaks and limit ventilation or service access. Keeping the surrounding area tidy is not just about appearance. It makes ongoing inspection easier and reduces the chance that a small problem remains unnoticed for months.
Step 2: Check the exterior of the tank for corrosion and damage
Next, examine the tank body from top to bottom. Use a flashlight and look carefully for rust, bubbling paint, streaking, damp patches, dents, or corrosion around seams. Pay close attention to the top of the tank, where supply lines and fittings connect, because minor leaks often begin there. Even a small amount of corrosion can indicate persistent moisture.
If you see rust on an external fitting, that does not automatically mean the tank has failed. Sometimes the issue is limited to a connection or valve. However, if corrosion appears to be coming from the tank body itself, especially along the lower half or around welded seams, it is a stronger sign that professional evaluation is needed soon. Tanks rarely repair well once the main vessel is compromised.
Touch suspected areas with a dry cloth or paper towel. A damp result gives you a clearer signal than appearance alone. You can also take dated photos to compare over time. This is especially helpful if you are monitoring a minor issue while waiting for a plumber or deciding whether to schedule replacement before a seasonal rush.
Step 3: Look closely at the pipes and fittings
The tank is only one part of the system. Inspect the cold water inlet, hot water outlet, shutoff valve, unions, and nearby pipe joints for signs of moisture or white mineral buildup. Those crusty deposits often suggest a slow seep rather than a dramatic leak. Over time, even a small seep can waste water, contribute to corrosion, and reduce pressure or performance.
If your home has hard water, mineral scale can build up more quickly around fittings and valves. This does not always mean immediate danger, but it does mean the system is working in a more demanding environment. Hard water often accelerates sediment buildup inside the tank too, which makes regular flushing and observation even more valuable.
Check insulation on any exposed hot water pipes as well. Missing or damaged pipe insulation allows heat loss before hot water reaches the tap. Replacing simple pipe insulation is one of the easiest low cost improvements you can make after an inspection, and it supports both comfort and energy efficiency.
Step 4: Inspect the temperature and pressure relief valve area
The temperature and pressure relief valve, often called the T and P valve, is one of the most important safety components on a storage water heater. Its job is to release pressure if temperature or pressure becomes unsafe. U.S. and Canadian guidance consistently emphasize that a properly installed relief valve is a core safety requirement for storage type water heaters.
Look for the valve on the upper side or top section of the tank, depending on the model. It should have a discharge pipe attached and directed downward to a safe termination point. The pipe should not be capped, blocked, kinked, or visibly damaged. The area around the valve should be dry. If you notice drips, corrosion, or staining at the valve or on the end of the discharge line, that is not something to ignore.
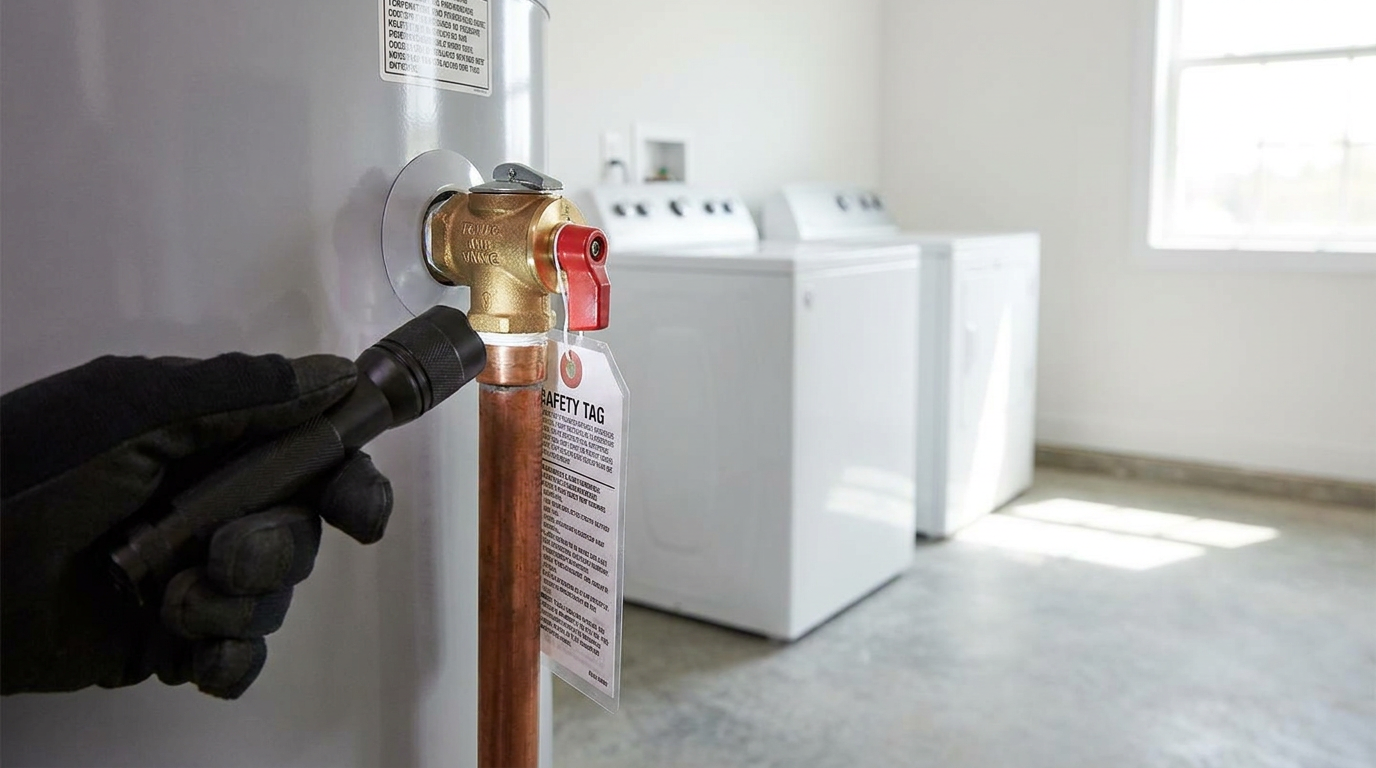
A dripping relief valve is sometimes dismissed as normal, but it can indicate overpressure, overheating, or valve failure. Because this component is directly tied to safety, diagnosis and replacement are best handled by a qualified technician. As a homeowner, your role is to confirm that the valve and discharge piping are present, unobstructed, and not showing warning signs.
Step 5: Watch for sediment clues
Sediment is one of the most common reasons a tank loses performance over time. Minerals in the water settle at the bottom of the tank, where they can harden into a layer that interferes with heating. Department of Energy guidance notes that storage water heaters should be drained and flushed periodically to remove sediment, and ENERGY STAR materials note that buildup in aging tanks can reduce capacity.
The challenge is that you cannot always see sediment directly from outside the tank. Instead, you look for clues. Rumbling or popping noises during heating can point to mineral buildup at the bottom of the tank. Slower recovery after multiple showers, less hot water than you used to have, or cloudy water during draining can also suggest sediment accumulation.
If your tank has become noticeably noisier, it is worth taking seriously. Noise often means the burner or heating element is working harder than necessary because heat is moving through a layer of sediment first. That extra strain affects both energy use and wear over time.
Step 6: Flush the tank if appropriate for your model and comfort level
Flushing a standard tank style water heater can be a useful homeowner maintenance task, but only if you are comfortable following the manufacturer guidance and the tank is in generally sound condition. If the unit is very old, heavily corroded, or has not been flushed in many years, it may be wiser to ask a professional to handle it. In some cases, disturbing built up sediment in a neglected tank can reveal hidden weakness.
For many standard storage tanks, the general process involves turning off the power or setting a gas unit to pilot according to the manual, allowing water to cool as needed, attaching a hose to the drain valve, directing it safely to a floor drain or outside location, and draining some or all of the tank until the water runs clearer. The exact steps vary by model, which is why the manual matters. The point of flushing is not speed. It is controlled sediment removal.
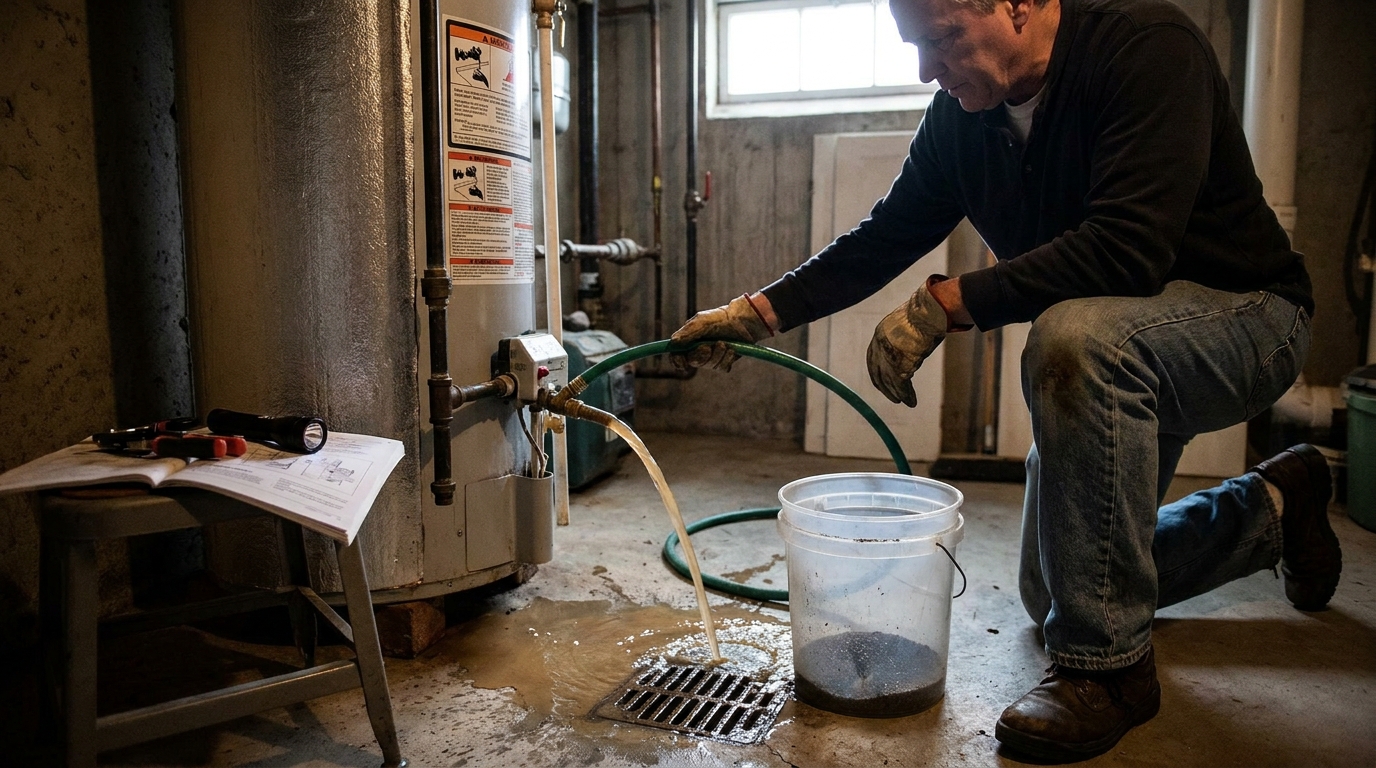
During flushing, look at the drain water. If it appears cloudy or contains visible particles, that confirms sediment was present. If flow from the drain valve is weak or blocked, the tank may need professional service. Annual flushing is a common recommendation, though local water quality can shift the ideal timing. Homes with hard water may benefit from closer observation and more regular maintenance.
Step 7: Check the thermostat setting and overheating risk
Efficiency is not only about equipment condition. It is also about settings. A thermostat set too high can increase standby heat loss, raise utility costs, and create scalding risk. If your manufacturer and household needs allow, many homes perform well around 120 degrees Fahrenheit, though you should always confirm what is appropriate for your system and anyone in the home with special health or sanitation needs.
If water feels excessively hot at the tap, or if you hear frequent cycling, review the set point. An overheating tank can waste energy and place more stress on internal components. It may also contribute to relief valve discharge if pressure and temperature rise beyond normal conditions. In a sustainability focused home, a sensible thermostat setting is one of the simplest ways to reduce impact without reducing comfort.
Some newer systems include digital controls or app based alerts. If your tank offers those features, use them. Automatic notifications for leaks, unusual energy use, or maintenance intervals can help homeowners stay ahead of issues instead of relying entirely on memory.
Step 8: Evaluate insulation and standby heat loss
Once the core inspection is done, look at insulation. If your tank is located in an unconditioned space, heat can be lost while water sits between uses. Some tanks come with solid built in insulation, while older units may benefit from an insulation blanket designed for water heaters. This is not appropriate for every model or every component, so manufacturer guidance matters here as well. Controls, labels, and safety devices should never be covered improperly.
Pipe insulation is often the easier upgrade. Insulating the first several feet of hot water piping can help reduce heat loss and shorten the wait for hot water at nearby fixtures. That means less energy spent reheating water and less water wasted while waiting for hot water to arrive. Small improvements like these fit the larger principle that sustainable homes are usually shaped by a series of practical choices.
If your inspection reveals drafts, cold air exposure, or missing insulation near the tank area, note those conditions too. Sometimes tank inefficiency is partly a room condition problem rather than purely an appliance problem.
Step 9: If you have a heat pump water heater, inspect the filter and condensate line
Heat pump water heaters deserve a slightly different inspection routine. In addition to the basic checks for leaks, corrosion, and relief valve condition, these units typically include an air filter and a condensate line. ENERGY STAR commonly recommends cleaning the filter every 6 to 12 months and cleaning the condensate line yearly, though local dust levels and manufacturer instructions should guide your exact schedule.
A dirty filter can reduce airflow and make the unit less efficient. Over time, that affects both performance and energy savings. During your inspection, remove and examine the filter if your model allows it, then clean or replace it according to instructions. Also look at the condensate drain path to make sure it is clear, secure, and not causing moisture problems around the unit.
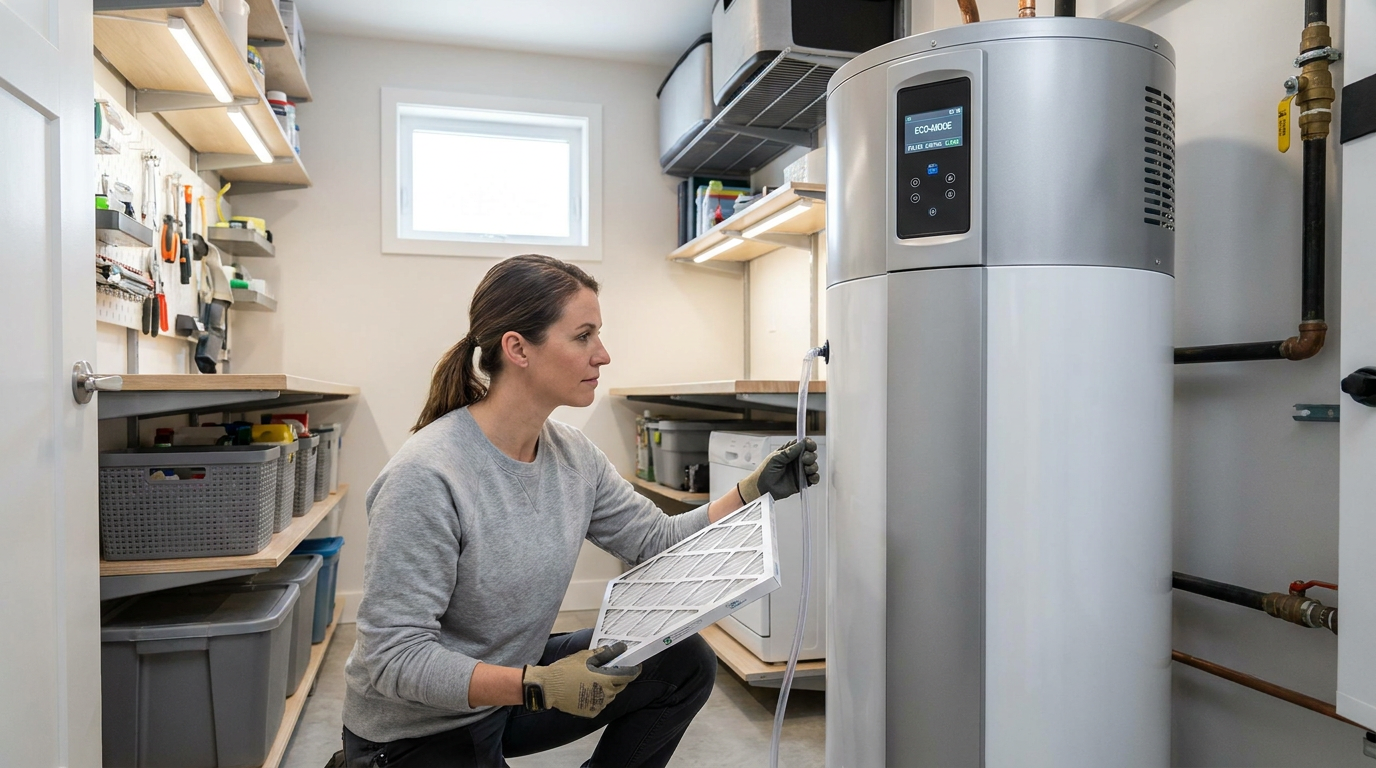
Because heat pump water heaters are becoming more common, especially as efficiency standards evolve, it is helpful to build these checks into your routine early. They are not difficult tasks, but they are different from what many homeowners expect if they grew up with a conventional tank. The benefit is that a little attention goes a long way toward preserving efficiency.
Step 10: Listen to your hot water performance throughout the house
An inspection should not end in the utility room. Pay attention to how hot water behaves at taps, showers, and appliances. Inconsistent temperature, shorter hot water duration, delayed heating recovery, or discolored water can all point back to the tank. This kind of performance monitoring matters because not every issue is visible from the outside.
If your tank still produces hot water but less than it used to, do not assume that is normal aging you have to live with. Reduced capacity may reflect sediment, a failing heating element, thermostat issues, scale, or other service needs. The common misconception is that the tank is fine until it stops working entirely. In reality, reduced efficiency and reduced comfort often arrive much earlier.
Try to connect household symptoms to your inspection notes. If morning showers run out faster and the tank has started rumbling, those clues reinforce each other. If hot water seems erratic and you also noticed relief valve discharge, that points to a different level of urgency. Good maintenance is often about connecting details.
What homeowners can do themselves and what should be left to a professional
One of the best ways to approach tank maintenance is to separate observation from technical repair. Homeowners are generally well positioned to perform visual inspections, keep the area clean, check for corrosion or moisture, monitor performance changes, review thermostat settings, and in some cases perform routine flushing or basic filter cleaning. These tasks require attentiveness more than specialized skill.
Professional service is the better choice for anything involving combustion, gas lines, electrical faults, relief valve replacement, anode rod inspection or replacement, persistent leaks, code compliance issues, or unclear safety concerns. The anode rod, for example, plays a major role in reducing internal tank corrosion, but checking or replacing it often requires tools, access, and judgment that are better handled by a technician. The same is true if your tank shows repeated relief valve discharge or evidence of overheating.
There is no loss in calling for help early. In fact, that is often the most practical choice. A calm inspection routine gives you better information to share with a professional, which can lead to faster diagnosis and more targeted repairs.
How often should you inspect your water tank?
A brief visual inspection every one to three months is reasonable for many homes, especially if the tank is located somewhere you can access easily. This does not need to be a major event. It can take just a few minutes to look for leaks, corrosion, unusual moisture, and changes in the drain pan or discharge piping. Frequent short checks are often more useful than one annual deep dive done in a rush.
Plan a more thorough review at least once a year. That is a good time to look at flushing needs, insulation, performance trends, filter cleaning for heat pump units, and notes from the past year. If your water is hard, your tank is older, or your system has shown minor issues before, more frequent detailed checks may be worth the effort.
Seasonal timing can help too. Many homeowners choose early fall or late spring, when utility rooms are easier to access and service scheduling is less urgent than during winter emergencies. The best schedule, however, is the one you will actually follow.
Warning signs you should never ignore
Some issues move beyond routine maintenance and call for prompt action. If you see water actively leaking from the tank body, significant rust around seams, burn marks, electrical damage, or repeated relief valve discharge, contact a qualified technician. If you smell gas near a gas unit, leave the area and follow local safety guidance immediately. These are not monitor and wait situations.
Brown or rusty hot water, sudden loss of hot water, loud persistent banging or rumbling, and visible corrosion at critical fittings also deserve prompt evaluation. While not every symptom means the tank has reached end of life, each one suggests that normal performance has been disrupted. The earlier you respond, the better your chance of avoiding water damage or a complete system failure.
It is also wise to pay attention to age. If your tank is approaching or beyond its expected lifespan, recurring maintenance issues may be telling you that replacement is the more economical path. Inspection helps you make that decision thoughtfully rather than under pressure from an emergency leak.
The sustainability case for routine tank maintenance
Sustainable home care is not always about adding new technology. Sometimes it is about helping existing systems work the way they were meant to. A well maintained tank wastes less energy, reduces unnecessary water loss, and tends to last longer. That means fewer premature replacements, fewer avoidable service calls, and a more measured use of materials over the life of your home.
This is an important mindset shift. Maintenance is often framed as a chore, but in many cases it is a conservation practice. When inadequate maintenance leads to inefficiency or early equipment failure, the cost is not just financial. It also includes wasted energy, wasted water, and additional manufacturing demand for replacement equipment.
As more households consider efficient upgrades, especially heat pump water heaters, regular inspection becomes part of a smarter transition. You care for what you have today while gathering the knowledge to choose wisely tomorrow. That is a balanced approach to sustainability: practical, informed, and rooted in everyday decisions.
A simple maintenance rhythm you can keep
If you want a routine that feels manageable, think in layers. Every month or two, perform a quick visual inspection of the tank, the floor, the fittings, and the relief valve area. Once a year, complete a deeper review that includes flushing if appropriate, checking insulation, reviewing performance, and cleaning the filter or condensate line on a heat pump unit. Keep a note of the tank age, model number, and any changes you observe over time.
You do not need a complex system to stay organized. A photo folder on your phone, a calendar reminder, and a short checklist are often enough. The real value comes from consistency. When you know what your tank normally looks and sounds like, unusual changes become much easier to catch.
And if your inspection raises concerns you do not fully understand, that is still a successful outcome. It means the routine did its job. It gave you an earlier chance to respond before a minor issue became a major one.
Final thoughts
Inspecting your water tank is one of those home maintenance habits that offers an unusually good return on a small amount of effort. A few careful observations can help you identify leaks, sediment buildup, corrosion, poor settings, and safety concerns long before they turn into serious disruption. For homeowners who want a more resilient, efficient home, this is one of the clearest places to start.
The best part is that the process does not require perfection. It just requires attention. By knowing your tank type, checking the surrounding area, watching the relief valve and piping, staying alert to sediment clues, and involving a professional when needed, you create a maintenance rhythm that protects both your comfort and your budget.
In a home that is trying to use water and energy more thoughtfully, small habits matter. A regular water tank inspection is one of them. It is practical, preventative, and quietly powerful in exactly the way good home maintenance should be.



No Comment! Be the first one.