



How to Install a Wooden Fence: A Step-by-Step Guide for Homeowners
A wooden fence is one of the most practical outdoor upgrades a homeowner can take on. It can add privacy, define property lines, improve security for kids and pets, and give a yard a more finished look. It is also one of those projects that seems simple from a distance but depends heavily on doing the unglamorous parts right. The visible boards matter, but the layout, post depth, drainage, and material choices are what decide whether the fence still looks good in ten years.
Table Of Content
- Start With Rules, Boundaries, and Safety
- Plan the Fence Layout Before You Buy Materials
- Choose Materials That Match Ground Contact and Weather Exposure
- Tools and Materials You Will Likely Need
- Mark Corners, Ends, and Gate Openings First
- Dig Post Holes to the Right Depth and Diameter
- Set the Corner and End Posts First
- Run String Lines and Install the Intermediate Posts
- Allow Time for Posts to Stabilize Before Loading Them
- Install Rails Carefully and Keep the Structure Consistent
- Attach Pickets or Panels Without Letting Them Touch the Ground
- Build and Brace Gates Better Than You Think You Need To
- Common Mistakes That Cause Fence Problems Later
- Practical Tips for Sloped Yards, Wet Soil, and Challenging Sites
- Finish the Fence for Appearance and Longevity
- Maintenance That Keeps a Wooden Fence Looking Straight and Sound
- Is a DIY Wooden Fence Worth It?
- Final Step-by-Step Recap
If you are a beginner, the good news is that a wood fence is very manageable when approached in a careful order. The bad news is that most fence failures start early, usually before the first panel or picket goes up. Posts get set in the wrong place, holes are too shallow, property lines are assumed instead of verified, or untreated wood ends up where it should never be. This guide is built to help you avoid those mistakes and move through the job in a straightforward, practical way.
The main principle to keep in mind is simple. The posts determine the life of the fence. If the posts are correctly located, deep enough for your conditions, plumb, and made from the right material for ground contact, the rest of the work becomes much easier. If the posts are off, every rail and picket you attach afterward will only lock those problems in place.
This article walks through the full process, from planning and permits to final assembly and maintenance. It also covers the common pitfalls homeowners run into, especially around utility locates, property lines, frost heave, drainage, and gate framing. If you want a fence that stays straight, drains properly, and holds up through weather cycles, start here and take your time.
Start With Rules, Boundaries, and Safety
Before you buy lumber or rent an auger, confirm that you are allowed to build the fence you have in mind. Fence rules vary by municipality, neighborhood, and special jurisdiction. Height limits, setback rules, visibility restrictions near driveways, and front yard fence limits are all common. In some areas, shared boundary fences may involve neighbor rights or cost-sharing rules, so it is worth understanding the local requirements before you put a post in the ground.
Do not assume that the existing fence line, landscaping edge, or mowing pattern marks the legal property boundary. Property lines should be confirmed using your survey, lot plan, boundary markers, or local records if needed. If there is any doubt, getting the line verified is far cheaper than moving a completed fence later. It also helps prevent the kind of neighbor dispute that turns a simple yard project into a long headache.
Equally important is underground safety. Always request utility locates before digging. This is not an optional extra. Gas, electrical, communications, and water infrastructure may be buried in places that are not obvious from the surface. Digging without locates risks injury, service disruption, expensive repairs, and in many places a direct violation of excavation safety requirements.
Good fence projects start with paperwork, measurements, and calls you make before the shovel ever hits the ground. That may not feel exciting, but it is what protects the project from serious mistakes.
It is also a good idea to talk to your neighbor if the fence runs along a shared boundary. Even where consent is not strictly required, early communication helps avoid misunderstandings about placement, style, finished side orientation, and construction access. A ten-minute conversation before the project starts can save a lot of frustration later.
Plan the Fence Layout Before You Buy Materials
Once the legal and safety basics are covered, move to layout. Measure the total fence run carefully and decide exactly where the corners, ends, transitions, and gates will go. A simple sketch on paper is enough, but it should include dimensions, post locations, gate width, and any slope in the yard. If the ground changes elevation, note that now because it affects how you build the sections.
Most beginners do better when they divide the project into short, manageable runs. A long backyard fence may look like one continuous line, but in practice it is made up of corners, end posts, line posts, and at least one opening. Thinking in these smaller segments makes measuring more accurate and helps you calculate materials with fewer surprises.
Decide early whether you are building from individual rails and pickets or using preassembled fence panels. Panels are faster, but they are less forgiving on uneven ground and require more precise post spacing. Building stick by stick takes longer, but it gives you much more flexibility on slopes and minor measurement variations. For beginners, that flexibility often makes custom-built sections easier to manage than trying to force factory panel dimensions into a yard that is not perfectly flat.
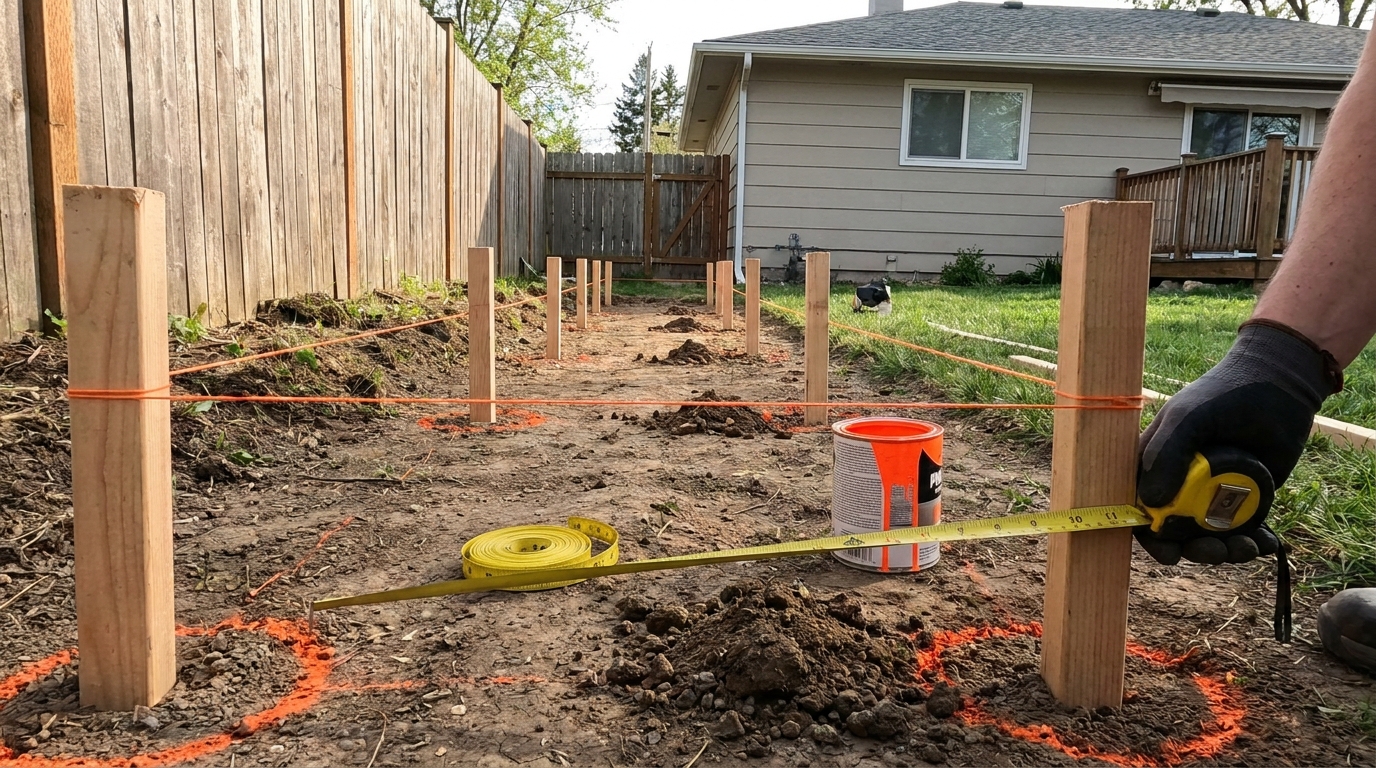
Mark the fence line with stakes and string. The string line does two jobs. It shows you the visual path of the fence, and it gives you a reference for setting posts in a straight line later. This is where you notice practical conflicts such as tree roots, utility markers, drainage swales, retaining walls, or a gate swinging into a slope or walkway.
At this stage, calculate material quantities with some realism. Add a little waste allowance for cutoffs, warped boards, and mistakes. Count posts, rails, pickets, concrete or other footing material, gravel if you are using it at the base, fasteners rated for treated lumber, gate hardware, and finish products if you plan to stain or seal. Do not forget to account for extra material for gates, because gates need stronger framing than ordinary sections.
Choose Materials That Match Ground Contact and Weather Exposure
For a long-lasting fence, material selection is not just about appearance. Posts and any component that comes near soil or persistent moisture need to be suitable for that exposure. Pressure-treated lumber rated for ground contact is the standard choice for posts in most residential fence builds. Naturally decay-resistant species can also work in some cases, but untreated lumber buried in soil is a short-life decision no matter how solid it looks on day one.
Boards and pickets above grade still need durability, but the most important treatment requirement is at the posts. Many homeowners assume that concrete alone protects wood, but concrete does not fix the wrong lumber choice. If the wood is not suitable for ground contact, trapping it in a wet environment can actually speed up failure instead of preventing it.
It also helps to think about moisture at the bottom of the fence. Keep fence boards off the soil. A small clearance reduces water wicking, slows decay, and helps prevent the lower edges from sitting in wet leaves, mulch, or snow. That gap also improves maintenance because you can trim grass and clear debris without constantly striking the boards.
If your fence connects near the house, garage, or another structure, consider fire safety as well as moisture. In some areas, guidance recommends a noncombustible section or gate near buildings, especially where wildfire exposure is a concern. Even if wildfire risk is low, keeping debris away from the fence base and avoiding soil contact improves durability and reduces the chance of hidden rot.
Tools and Materials You Will Likely Need
Every project varies a bit, but most wooden fence installations use the same basic tool set. Getting organized before you start saves time and keeps the layout accurate. You do not need a truckload of specialty gear, but you do need the right tools for measuring, digging, leveling, fastening, and cutting.
- Measuring tape, stakes, and mason string
- Marking paint or flags
- Post hole digger, shovel, or power auger
- Level and speed square
- Circular saw or miter saw
- Drill and impact driver
- Exterior-rated screws or nails compatible with treated wood
- Pressure-treated posts and rails
- Pickets or fence boards
- Concrete mix and gravel if part of your footing method
- Gate hardware, hinges, latch, and bracing material if installing a gate
- Wood sealer or stain for cut ends and final finishing if desired
Have a wheelbarrow, tamper, and garden hose nearby as well. Fence work involves a lot of back and forth, and anything that keeps the site organized helps you stay consistent. That matters more than people think. Straight fences are usually the product of steady, repetitive accuracy rather than one big act of carpentry.
Mark Corners, Ends, and Gate Openings First
The installation sequence should begin with the fixed points of the fence. Set your corner locations, end points, and gate openings first on the layout line. These are the positions that determine everything else. Intermediate line posts are easier to place once these anchors are established and checked.
Measure gate openings carefully and leave room for hardware and clearance. A common mistake is framing the opening to the exact gate width with no allowance for hinges, latch spacing, or seasonal wood movement. That creates a gate that binds or sags quickly. It is much easier to plan the opening correctly now than to cut apart a finished section later.
Stand back and sight down the string line from several angles before digging. This is your last easy chance to correct the route. Make sure the fence path does not crowd trees that may push against it later, block drainage, or land awkwardly against steps, patios, or utility boxes. Practical fit matters just as much as the tape measure.
Dig Post Holes to the Right Depth and Diameter
Once the layout is confirmed and locates are complete, dig the post holes. Depth matters more than many homeowners expect. A shallow post may seem solid at first, especially after concrete is poured, but freeze-thaw cycles and lateral loads from wind and gates will expose weak footing depth over time. Local frost conditions should guide how deep you need to go, because frost heave can lift or tilt poorly set posts.
The hole diameter needs attention too. A hole that is too narrow makes it difficult to position the post, add base material, and place concrete properly. A hole that is oversized uses extra material and can complicate alignment if you are not careful. Follow a consistent hole size for the post dimensions you are using and stay disciplined from one hole to the next.
As you dig, keep the spoils separated from the fence line and avoid loosening the area more than necessary. A tidy work zone makes post setting easier and gives you a better sense of grade changes. If you hit roots or rocky ground, do not simply shift the hole casually without checking the spacing and line. Small deviations add up quickly and can throw off an entire run.
In wet or poorly drained soil, take extra care with base conditions. Water sitting at the bottom of a hole is a sign that drainage and soil type need more thought. Even good pressure-treated posts last longer when the overall installation allows moisture to move away rather than collect around the wood.
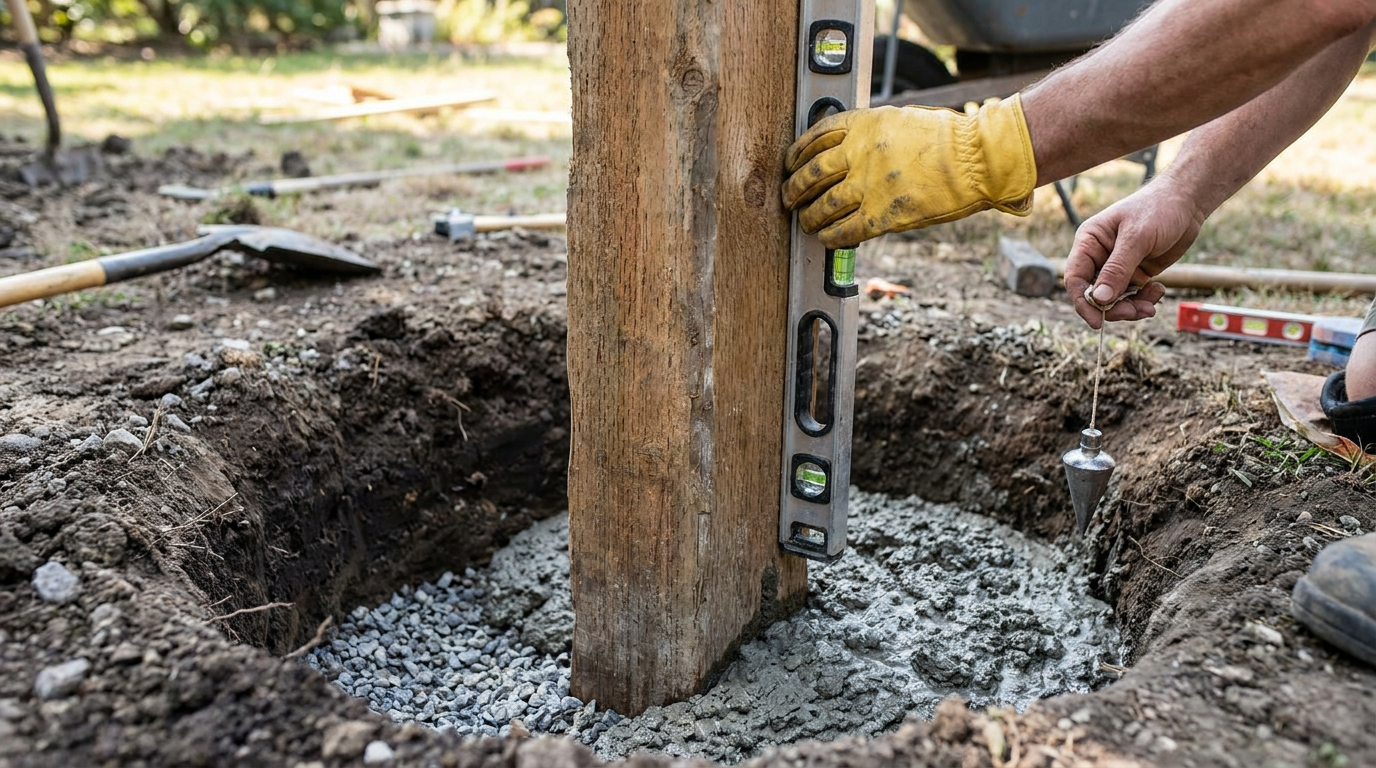
Set the Corner and End Posts First
Corner and end posts are the backbone of the layout. Set these first, because they establish the exact line and height references for the remaining posts. Place the post in the hole, check that it is aligned to the string, and use a level on adjacent faces to make sure it is plumb. Brace it temporarily so it cannot shift while the footing material sets.
Take your time here. Many first-time builders rush through the first few posts because they want visible progress. That is backward thinking. The earliest posts are the ones worth the most patience, because any error at the corners gets repeated through the entire fence line.
If you are using concrete, mix and place it according to the product instructions and local best practice for your site conditions. Keep the post position fixed while you fill and check plumb more than once as the hole is being completed. It does not take much pressure from the mix or the bracing to move a post out of line by enough to create headaches later.
Make sure the tops of your corner and end posts are set at a planned height. Some builders cut all posts to final height before installation, while others leave them long and trim after everything is in place. For beginners, trimming later often works better because it gives you room to adjust and then snap a clean level or consistent grade line once the full run is established.
Run String Lines and Install the Intermediate Posts
After the corner and end posts are stable, run a tight string line between them. This is the simplest and most reliable way to keep the fence straight. The intermediate line posts should be positioned to that reference, not to guesswork and not by eye alone. Even a slight wobble in the line becomes obvious once rails and pickets are attached.
Measure the spacing carefully based on your panel width or rail layout. Stay consistent. Uneven spacing causes trouble in several ways. It can force awkward cuts, create weak rail connections, and make a fence look homemade in the wrong sense of the word. If one bay ends up short, redistribute the spacing before setting concrete rather than trying to hide the problem at the end.
Each post should be checked for plumb and height as it is set. Do not assume that one correct face means the whole post is good. Use the level on two adjacent faces and compare the post to the string line. It is repetitive work, but this is exactly where fence quality is built.
If your yard slopes, decide whether the fence will follow the grade smoothly or step down in level sections. A racked fence follows the slope. A stepped fence uses level rails or panels that drop at intervals. Either can work, but the choice must be made during layout and post setting, not improvised once boards are being attached.
Allow Time for Posts to Stabilize Before Loading Them
One common mistake is moving too fast from post setting to rail installation. Posts need time to stabilize based on the footing method and weather conditions. Loading them too early by pulling rails into place or hanging a gate can introduce movement that is hard to correct afterward. A straight post can become a leaning post very quickly if the builder treats it like finished structure before it is ready.
Use this waiting period productively. Stage your rails and pickets, sort the straightest boards for the most visible sections, pre-cut pieces if your layout is repetitive, and check your top line plan. It is also a good time to treat cut ends if you are using a preservative or finish system that requires attention to exposed wood fibers.
Install Rails Carefully and Keep the Structure Consistent
With the posts ready, install the horizontal rails. These tie the structure together and create the attachment points for pickets or boards. Typical privacy fences use two or three rails depending on height and design, with taller fences generally benefiting from the extra support of a middle rail.
Keep the rail placement consistent from bay to bay. Measure down from the top or up from the ground line using the same method on every section. If your yard slopes, be especially careful that the rails reflect your chosen layout strategy rather than drifting into an uneven compromise. A fence can have beautiful boards and still look wrong if the rails reveal inconsistent planning.
Fasteners matter here. Use corrosion-resistant hardware rated for use with pressure-treated lumber. Standard interior screws or inappropriate nails can corrode prematurely and stain the wood or weaken the connection. The fence lives outside full time, so every connector needs to be selected for moisture exposure.
As you work, sight down the rail line periodically. This is your chance to catch bows, dips, or a post that moved slightly out of position before all the pickets go on. Minor adjustment now is easy. Once dozens of boards are fastened in place, the fence becomes much harder to correct.
Attach Pickets or Panels Without Letting Them Touch the Ground
The last highly visible stage is attaching pickets, boards, or preassembled panels. If you are using individual pickets, start from a consistent reference point and use a spacer or story pole to keep the gaps uniform. If you are building a privacy fence with no gaps, still check each board as you go because lumber width and straightness vary more than people expect.
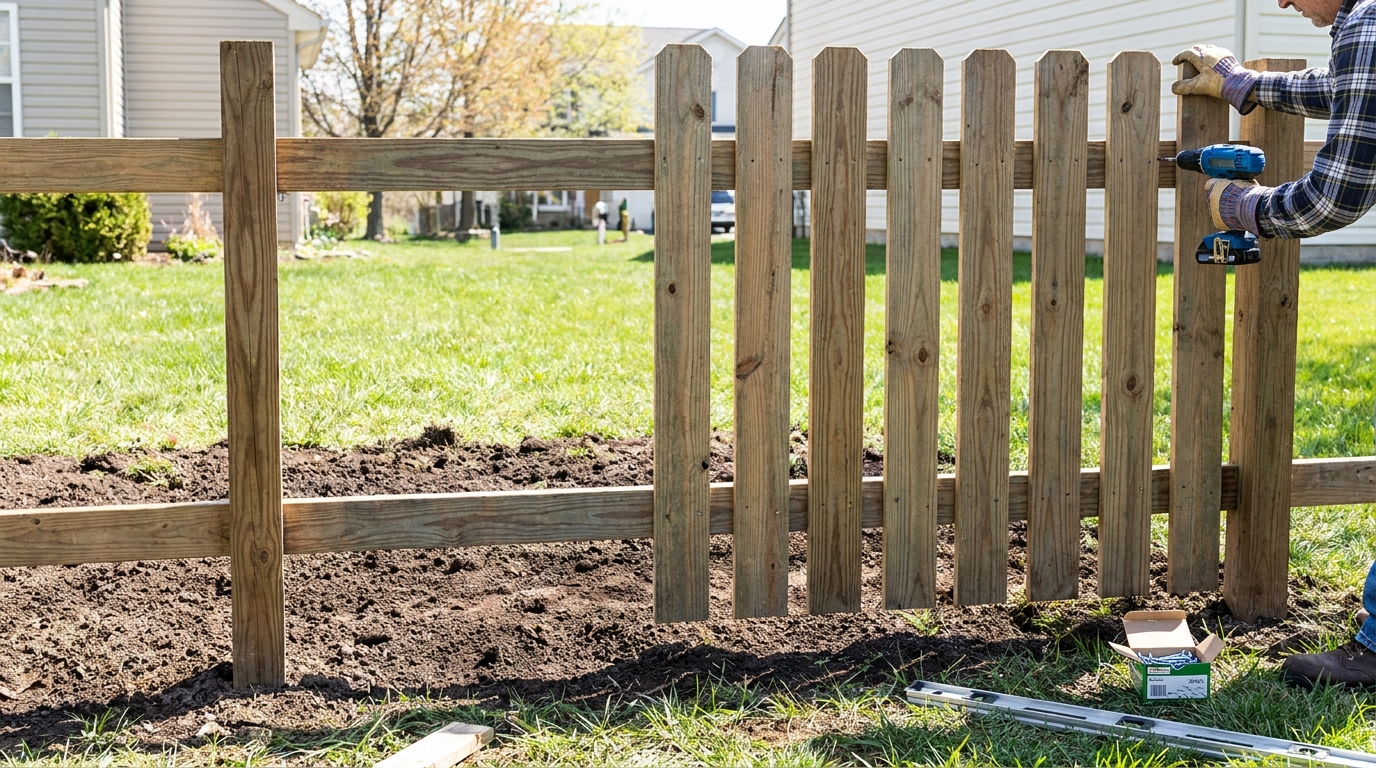
Most important, keep the bottom edge of the boards above soil level. This detail is easy to ignore during installation because flush-to-ground fences can look tidy at first. In practice, wood touching soil or sitting in mulch and leaf debris stays wetter for longer and fails faster. Leaving a deliberate gap is one of the simplest ways to make a wood fence last longer.
Check for alignment often across the top edge as well. Depending on the style, you may want a level top line, a stepped pattern, or a shaped top profile. Whatever the plan, use a string, guide board, or measured marks instead of trusting your eye over a long run. Small errors become obvious once the fence is complete and viewed from a distance.
If you are installing panels instead of individual boards, verify the opening dimensions one last time before fastening the panel permanently. Panels are less forgiving than loose pickets. If a panel feels forced into place, stop and identify why. Forcing it usually means the post spacing, plumb, or grade relationship is off.
Build and Brace Gates Better Than You Think You Need To
Gates are the part of a fence most likely to sag, rack, or drag over time. They move, they carry their own weight, and people use them every day. That means a gate should never be treated like just another panel with hinges. The gate opening posts should be especially solid, and the gate frame itself needs proper bracing.
A simple rectangular gate frame without diagonal bracing is asking for trouble. Over time, gravity pulls the latch side downward and twists the frame out of square. A well-braced gate resists that movement and stays easier to operate. Use sturdy hardware and check that the hinge side post is truly plumb before hanging anything.
Plan enough clearance under the gate for the actual conditions of the site. Think about snow, gravel, mulch, and grade changes over time. A gate that clears perfectly on a clean summer day may scrape badly once the driveway is regraded or the yard settles. A little foresight here makes daily use much better.
Common Mistakes That Cause Fence Problems Later
Most fence issues can be traced back to a handful of preventable mistakes. None of them are especially complicated, which is why they are so frustrating. Homeowners often know these things in theory but skip them because the yard looks simple and the project feels urgent. Fence work rewards patience more than speed.
- Skipping utility locates before digging. This is the most serious mistake because it creates safety and liability risks far beyond the fence itself.
- Assuming the property line without verification. A straight fence in the wrong place is still wrong.
- Using the wrong wood for posts. Ground-contact treatment matters, and concrete does not rescue untreated lumber buried in wet soil.
- Setting posts too shallow. Frost heave and wind loads will expose weak foundations sooner or later.
- Failing to use string lines. By-eye installation almost always drifts.
- Letting boards touch soil. It shortens the life of the fence and increases moisture-related decay.
- Rushing gate construction. Gates need stronger posts, better framing, and proper bracing.
- Ignoring drainage and debris buildup. Water and trapped organic material quietly damage wood over time.
It also helps to avoid overconfidence about permits and standard dimensions. Fence rules differ a lot from one place to another, and preassembled panels are not magic. A fence is part carpentry and part land-use compliance, and both sides matter if you want the project to stay trouble-free.
Practical Tips for Sloped Yards, Wet Soil, and Challenging Sites
Not every yard is a flat rectangle with easy digging. Slopes, roots, rocky ground, and damp areas all change how the project should be handled. The key is not to fight the site blindly. Let the conditions inform the design and pacing of the build.
On a sloped yard, a stepped fence can look clean and intentional if the drops happen at logical intervals. A racked fence can look smoother if the pickets and rails are designed to follow grade. What matters is consistency. A fence that partly steps and partly racks without a clear plan usually looks awkward because the lines do not agree with one another.
In wet soil, drainage details become more important than ever. Water that lingers around posts increases movement and accelerates deterioration. Pay attention to runoff patterns, low spots, and the grade around the base of the posts. You want water moving away from the structure, not ponding beside it.
If large roots are in the fence line, resist the temptation to cut major roots aggressively without understanding the effect on the tree. Sometimes the better solution is adjusting the fence path slightly within the limits of your layout and property conditions. A fence that saves an old tree and still stays on plan is a better outcome than a straight line bought at the cost of future tree decline or unstable ground.
Finish the Fence for Appearance and Longevity
Once the structure is complete, trim post tops if needed and clean up the work area. Remove excess soil, packaging, concrete residue, and debris from the base of the fence. A neat finish is not just cosmetic. It helps you inspect the lower edges clearly and reduces moisture trapped against the wood.
If you plan to stain or seal the fence, follow the product guidance about moisture content and curing time. Many homeowners rush to apply a finish too soon, especially on pressure-treated wood. The result is poor absorption, blotchy appearance, or finish failure. Let the wood reach the right condition before coating it.
Pay attention to cut ends, drilled holes, and exposed surfaces where treatment has been interrupted. These are often the first spots to weather unevenly. Thoughtful finishing work adds time at the end of the project, but it protects all the labor that came before it.
Maintenance That Keeps a Wooden Fence Looking Straight and Sound
A wooden fence is not a build-it-and-forget-it feature. It does not need constant attention, but it does benefit from routine checks. Walk the fence a few times a year and look for loose fasteners, impact damage, standing water, leaning posts, or bottom edges that are collecting mulch and leaves. Small maintenance tasks done early are much easier than structural repairs later.
Keep vegetation under control along the base of the fence. Shrubs and vines may look attractive at first, but they hold moisture, hide decay, and make inspection difficult. The same goes for piled soil, decorative stone packed against boards, and leaf buildup in corners. Wood lasts better when it can dry.
Watch the gate closely over time. If it starts to drag or the latch gets harder to align, treat that as early warning. Sometimes the fix is just hardware adjustment. Other times it signals movement at the post or frame that should be addressed before the gate damages itself further.
Is a DIY Wooden Fence Worth It?
For many homeowners, yes. A wooden fence is one of the better DIY projects because the process is repetitive, the tools are familiar, and the results are immediately useful. The project also teaches good habits that apply across outdoor construction, especially layout discipline, grade awareness, and respect for structural basics. You do not need to be a master carpenter to build a solid fence, but you do need to be methodical.
The place where beginners usually succeed or fail is not craftsmanship in the decorative sense. It is patience in the hidden parts. If you check the rules, verify the line, call for utility locates, choose proper ground-contact materials, dig to appropriate depth, and set the posts carefully, the rest of the fence is mostly steady assembly work. Skip those steps, and even a fence that looks good at the end of the weekend can start showing problems surprisingly fast.
That is the practical truth behind fence building. The straightest, strongest fences are usually the ones built by people willing to slow down at the beginning. If you approach the project in that spirit, a wood fence can be a very satisfying job with results you will appreciate every time you step into the yard.
Final Step-by-Step Recap
If you want the process condensed into a simple working order, this is the sequence to follow. Start by confirming local rules, checking the property line, and requesting utility locates. Mark corners, ends, and gate openings, then run string lines and verify the full route. Dig holes to suitable depth for your site conditions, set corner and end posts first, then use strings to place the intermediate posts accurately. After the posts are stable, install rails, attach pickets or panels while keeping the wood off the ground, then build and brace the gate with extra care. Finish by cleaning the site, applying protective treatment when appropriate, and keeping the fence base clear over time.
There is nothing mysterious about wooden fence installation. What makes it work is attention to the parts many people try to rush. Build from the ground up, respect the line, and treat the posts like the structural job they are. Do that, and your fence has a very good chance of looking better and lasting longer than one built in a hurry.


No Comment! Be the first one.