



Essential Masonry Maintenance Tips for Homeowners to Prevent Costly Repairs
Masonry has a reputation for strength, and that reputation is well earned. Brick, stone, and concrete block can last for generations when they are built well and maintained with some consistency. What many homeowners miss is that masonry is durable, not indestructible. It handles weather, time, and movement better than many materials, but once water gets into the system and stays there, damage can start quietly and spread faster than expected.
Table Of Content
- Why Masonry Maintenance Matters More Than Many Homeowners Realize
- The Main Enemies of Masonry: Moisture, Movement, and Deferred Repairs
- Your Best Maintenance Habit: Inspect Masonry Twice a Year
- What to Look for During a Masonry Inspection
- Common Warning Signs Homeowners Should Not Ignore
- Control Water First: The Most Important Masonry Maintenance Strategy
- Water Control Priorities for Homeowners
- How to Clean Masonry Without Damaging It
- Safe Cleaning Guidelines
- Understanding Mortar, Repointing, and Why Compatibility Matters
- Signs That Repointing May Be Needed
- Chimneys Need Their Own Maintenance Plan
- Vegetation, Landscaping, and Ground Contact Problems
- Foundation Cracks, Settlement, and When a Masonry Problem May Be Structural
- DIY Maintenance vs Professional Masonry Repair
- A Practical Seasonal Masonry Maintenance Routine
- Common Masonry Maintenance Mistakes to Avoid
- Final Thoughts: Long Lasting Masonry Depends on Steady, Practical Care
The good news is that most major masonry failures do not begin as major failures. They start small, with open mortar joints, overflowing gutters, cracked caulk, soil pitched toward the house, or a chimney crown that has started to wear out. A homeowner who catches those issues early can often prevent much bigger problems such as spalling brick, interior leaks, loose masonry units, or structural cracking. That is why practical maintenance matters more than dramatic repair work.
This guide focuses on what homeowners actually need to know. The core idea is simple. Masonry lasts longest when water is controlled, walls are allowed to dry naturally, and repairs use compatible materials. If you understand that principle, the rest of masonry care starts to make sense. You do not need to become a mason, but you do need to know what to look for, what to leave alone, and when to bring in the right professional.
In colder parts of North America, freeze thaw exposure is one of the biggest reasons masonry begins to fail. Water gets into brick, stone, or mortar, temperatures drop, and that moisture expands as it freezes. Over time, that repeated pressure can crack faces, loosen mortar, and break down the surface of the wall. In wetter climates, the damage may look different, but the root cause is often the same. Too much moisture is staying where it should not.
For homeowners, that means masonry maintenance is not mainly about making walls look clean. It is about keeping the assembly dry enough to stay sound. A wall with bright white staining, dark wet patches, cracked joints, or flaking brick is telling you something useful. If you pay attention to those warning signs and respond early, you can usually avoid a much more expensive repair later.
The most practical rule in masonry care is this: if you see damage on the surface, first look for the source of water before you focus on the cosmetic fix.
Why Masonry Maintenance Matters More Than Many Homeowners Realize
Masonry assemblies work as systems. The brick or stone you see from the outside is only part of the story. Mortar joints, flashing, weep paths, sealant joints, roof edges, chimney caps, grading, and drainage all affect how the wall performs. If one part stops doing its job, the masonry often shows the symptoms first. That is why the wall may look like the problem when the real issue is actually at the gutter, roofline, window perimeter, or ground below.
Many homeowners assume masonry is low maintenance because it does not peel like wood siding or need frequent repainting. That is partly true, but it can also create a false sense of security. Masonry often deteriorates slowly and quietly. Mortar erosion may take years to become obvious. Water can be entering behind the face of the wall long before interior staining appears. By the time bricks are cracking or bulging, the problem is usually no longer minor.
There is also an important difference between durability and forgiveness. Masonry is durable, but it is not always forgiving of poor repairs. Aggressive pressure washing, hard patch mortars, waterproof coatings that trap moisture, and caulking the wrong locations can all make matters worse. A lot of expensive masonry work comes from earlier work that was done with the wrong material or the wrong assumption.
That is especially true for older homes. Many older bricks and stones are softer and more vapor permeable than modern materials. They were designed to work with mortars that allow moisture to move out of the wall. If those joints are replaced with a much harder modern mortar, the wall may lose its natural balance. Instead of the mortar taking the wear, the brick itself starts to crack or spall. That is a repair mistake homeowners should work hard to avoid.
The Main Enemies of Masonry: Moisture, Movement, and Deferred Repairs
The biggest enemy of masonry is uncontrolled moisture. Rainwater from above, splash back from below, leaking irrigation, snow buildup, condensation, and plumbing or flashing leaks can all contribute. Masonry can absorb water, and under normal conditions it can also release that moisture by drying. Problems begin when water keeps entering faster than the wall can dry, or when a coating or dense repair traps moisture inside the assembly.
Freeze thaw cycling is especially hard on masonry in cold climates. Water absorbed into brick pores and mortar joints expands during freezing and contracts during thawing. That repeated cycle creates internal stress. You may first notice it as small face flakes on brick, sandy mortar at the joints, or stone edges starting to break down. Left alone, those early signs can develop into larger surface loss and instability.
Movement is another common factor. Some cracks come from normal building settlement. Others come from thermal movement, roof loading, lintel corrosion above windows, or moisture related expansion and contraction. Not every crack is structural, but cracks should never be dismissed automatically. The location, width, pattern, and whether it is changing over time all matter.
Deferred repairs are what turn a manageable maintenance issue into a project. A little open mortar joint may not look urgent, but it is an easy path for water entry. A downspout discharging beside the wall may seem harmless until the lower courses begin to show staining or efflorescence. When homeowners keep up with the small items, they usually preserve both the appearance and the structural life of the masonry.
Your Best Maintenance Habit: Inspect Masonry Twice a Year
The most useful thing a homeowner can do is perform a careful visual inspection at least twice a year, ideally in spring and fall. Spring inspections catch damage from winter moisture and freezing. Fall inspections help you correct drainage and sealing issues before cold weather returns. It also makes sense to take another look after severe storms, unusual rainfall, or a winter with repeated freeze thaw swings.
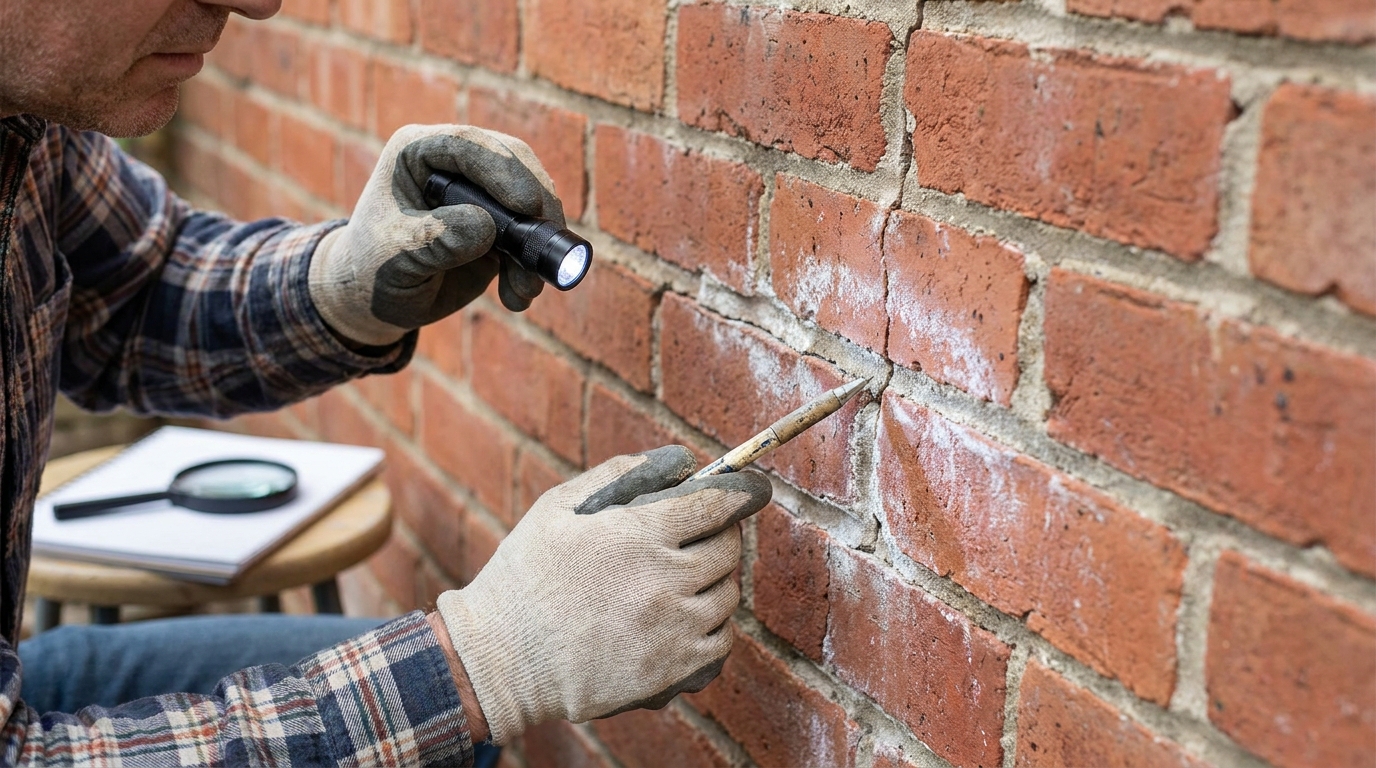
These inspections do not require special tools. A flashlight, a phone camera, binoculars for higher areas, and a notebook are enough for most houses. What matters is consistency. If you check the same walls, corners, chimney surfaces, and openings each season, you will start to notice change over time. That change is often what tells you whether a problem is stable or getting worse.
Start by stepping back and viewing the wall as a whole. Look for bulging areas, stepped cracking, stains below sills or roof edges, vegetation contact, and places where the wall stays dark after rain. Then move closer and inspect mortar joints, brick faces, stone edges, and sealant joints around windows, doors, vents, and service penetrations. Pay special attention to horizontal ledges where water can collect.
Take photographs during each inspection. A picture from this spring compared with one from last fall can be more useful than memory. It helps you see whether mortar loss is progressing, whether a crack is widening, or whether cleaning and drainage improvements solved the problem. Masonry changes slowly, which is exactly why records are worth keeping.
What to Look for During a Masonry Inspection
Some signs of trouble are obvious, but others are easy to miss. Missing mortar, loose bricks, or pieces of stone on the ground are clear warnings. More subtle clues include powdery white deposits, hairline cracks that step through joints, rust stains above openings, and dark areas that remain damp longer than the surrounding wall. You are not trying to diagnose everything on the spot. You are trying to identify conditions that deserve attention.
Efflorescence is one of the most misunderstood signs. It appears as a white, chalky or crystalline deposit on the masonry surface. Many people assume it is just dirt or surface staining, but it usually points to moisture moving through the wall and leaving salts behind as it evaporates. Brushing it off may improve the appearance for a while, but if it comes back, the important question is where the moisture is coming from.
Spalling is another key warning sign. Spalling means the face of the brick or stone is flaking, popping, or breaking away. This often happens after the material has absorbed water and then gone through freeze thaw cycles. Once the protective outer surface is compromised, moisture can enter even more easily, so the damage tends to accelerate if the source is not corrected.
Mortar deserves close attention because it is often the sacrificial element in the wall. That is a good thing. Mortar is supposed to take wear before the masonry units do. But when mortar joints become recessed, crumbly, cracked, or missing in spots, the wall loses a lot of its weather resistance. Repointing at the right time can protect the surrounding brick or stone and save much larger repair work later.
Common Warning Signs Homeowners Should Not Ignore
- Cracked, open, or missing mortar joints
- Efflorescence that keeps returning after dry brushing
- Spalled brick faces or flaking stone surfaces
- Bulging, leaning, or loose masonry units
- Step cracks near doors and windows
- Rust stains that may point to corroding steel lintels
- Staining below rooflines, sills, or copings
- Caulk failure around penetrations and openings
- Vegetation growing against or into the wall
- Water collecting at the foundation or splashing against lower brick courses
If you see one or two minor symptoms, the solution may be straightforward. If you see several symptoms in the same area, that usually means water has been at work for a while. In that case, resist the urge to simply patch the visible defect. The better approach is to track the likely path of water entry and solve that first.
Control Water First: The Most Important Masonry Maintenance Strategy
If there is one maintenance priority that matters more than any other, it is water management. Masonry can tolerate weather, but it does not perform well when water is constantly fed into the wall from failed drainage or poor detailing. Homeowners often focus on the face of the brick because that is what they can see, but a lot of successful masonry maintenance actually happens at the roof edge, around openings, and at grade.
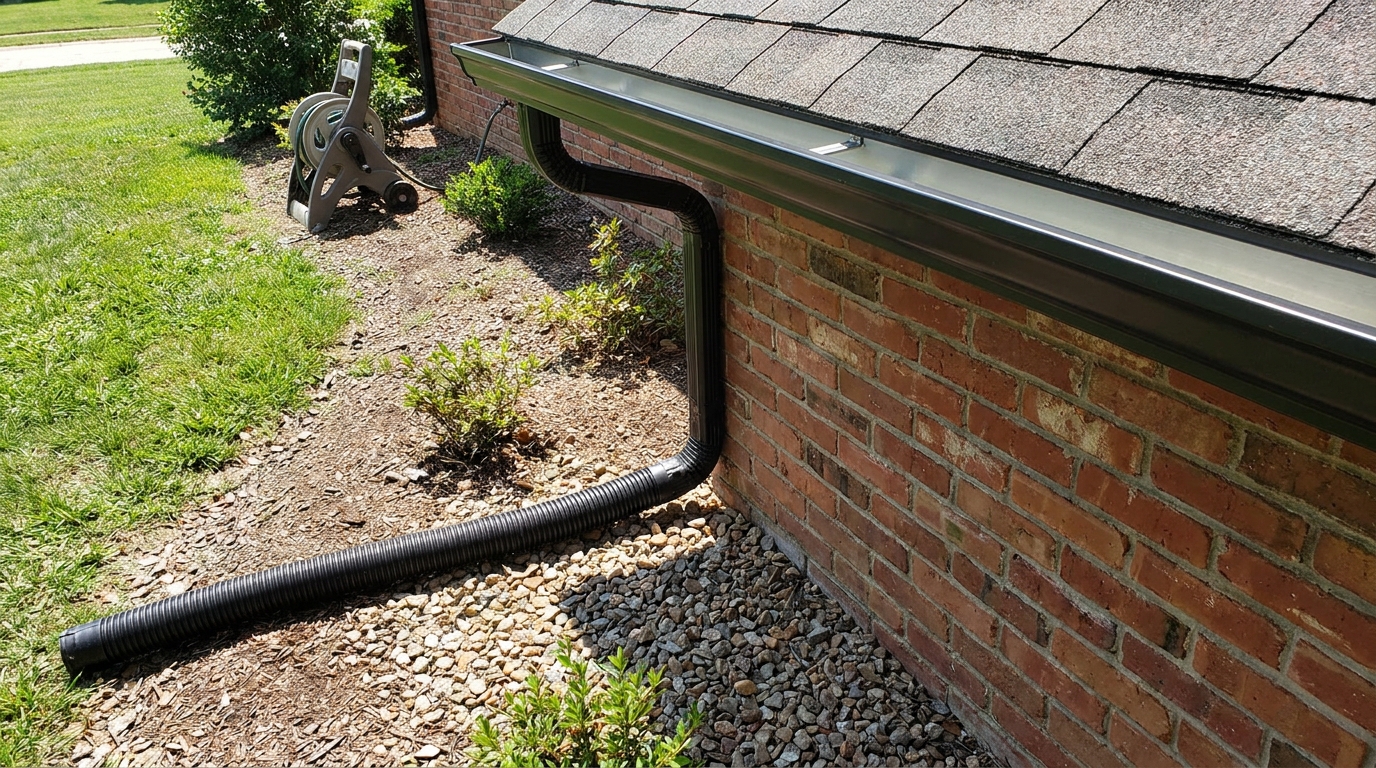
Start with gutters and downspouts. They should be clean, properly sloped, and free of leaks at seams and outlets. Downspouts should discharge well away from the foundation, not right beside the wall. Overflowing gutters can saturate the upper wall, while poor downspout discharge can keep the lower wall and footing area wet. Both conditions shorten masonry life.
Next, check grading around the house. Soil should slope away from the wall so water does not pond against the foundation or splash repeatedly onto lower masonry courses. Hard surfaces such as walkways and patios should also drain away from the structure. Where splash back is a problem, a simple drainage improvement can make a major difference over time.
Look carefully at flashing, copings, and horizontal transitions. These are common water entry points. Flashing should direct water out, not into the wall. If you see staining below windows, at roof to wall intersections, or beneath parapets and chimneys, there may be a flashing issue above. Sealant joints around penetrations also matter, but sealant is not a substitute for proper flashing. It is only part of the water management system.
Water Control Priorities for Homeowners
- Keep gutters clean and firmly attached.
- Repair leaking downspouts and extend discharge away from the house.
- Maintain soil grading so water drains away from masonry walls.
- Check flashing at roofs, chimneys, windows, and wall intersections.
- Replace failed caulk at penetrations where appropriate.
- Keep sprinklers from wetting brick or stone walls.
- Trim vegetation so masonry can dry after rain.
- Address standing water or recurring splash back near the base of walls.
Many masonry issues improve once water is controlled. Efflorescence often stops returning. Mortar stays drier and lasts longer. Freeze thaw stress drops because less water is available to freeze inside the wall. That is why moisture control is not just basic maintenance. It is the main way homeowners build resilience into the life of the masonry.
How to Clean Masonry Without Damaging It
Cleaning masonry seems simple, but it is one of the easiest places to do harm. A lot of damage comes from methods that are too aggressive for the material. High pressure washing can erode mortar joints, remove fired surfaces from brick, and drive water deeper into the wall. Harsh acids and abrasive blasting can permanently scar the surface and reduce the wall’s ability to resist weather. In many cases, the stain remains a smaller problem than the damage caused by trying to remove it.
The safest principle is to use the gentlest effective method. For light dirt, that may be nothing more than low pressure water, a soft natural or nylon brush, and patience. For dry efflorescence, dry brushing can sometimes remove the deposit without adding more moisture. If the wall has biological growth, identify why that area stays damp, because cleaning alone will not prevent the growth from returning.
Before using any specialty cleaner, confirm that it is appropriate for the specific masonry type. Brick, limestone, sandstone, concrete block, and manufactured stone can all react differently. Test a small, inconspicuous area first and let it dry fully before deciding whether the result is acceptable. What looks clean while wet may leave etching, color change, or streaking after it dries.
Historic or older masonry deserves extra caution. Surface texture, original fired faces, and aged mortar can be more vulnerable than homeowners expect. If the wall is important architecturally or the staining is severe, it is usually better to get guidance from a masonry contractor with preservation experience. Cleaning should preserve material, not strip it away.
Safe Cleaning Guidelines
- Start with the mildest method that might work.
- Avoid high pressure washing unless a qualified professional confirms it is appropriate.
- Do not use harsh chemicals without checking compatibility with the masonry.
- Brush off efflorescence only when the surface is dry.
- Always address the moisture source if staining keeps coming back.
- Test cleaning products in a hidden area first.
Homeowners should also be cautious about sealers and coatings marketed as universal masonry protection. Some breathable water repellents can be appropriate in specific conditions, but many surface coatings trap moisture and create bigger problems later. A wall that cannot dry properly often deteriorates faster, not slower. If someone recommends sealing all your masonry, ask why, ask what product they plan to use, and ask how it affects vapor permeability.
Understanding Mortar, Repointing, and Why Compatibility Matters
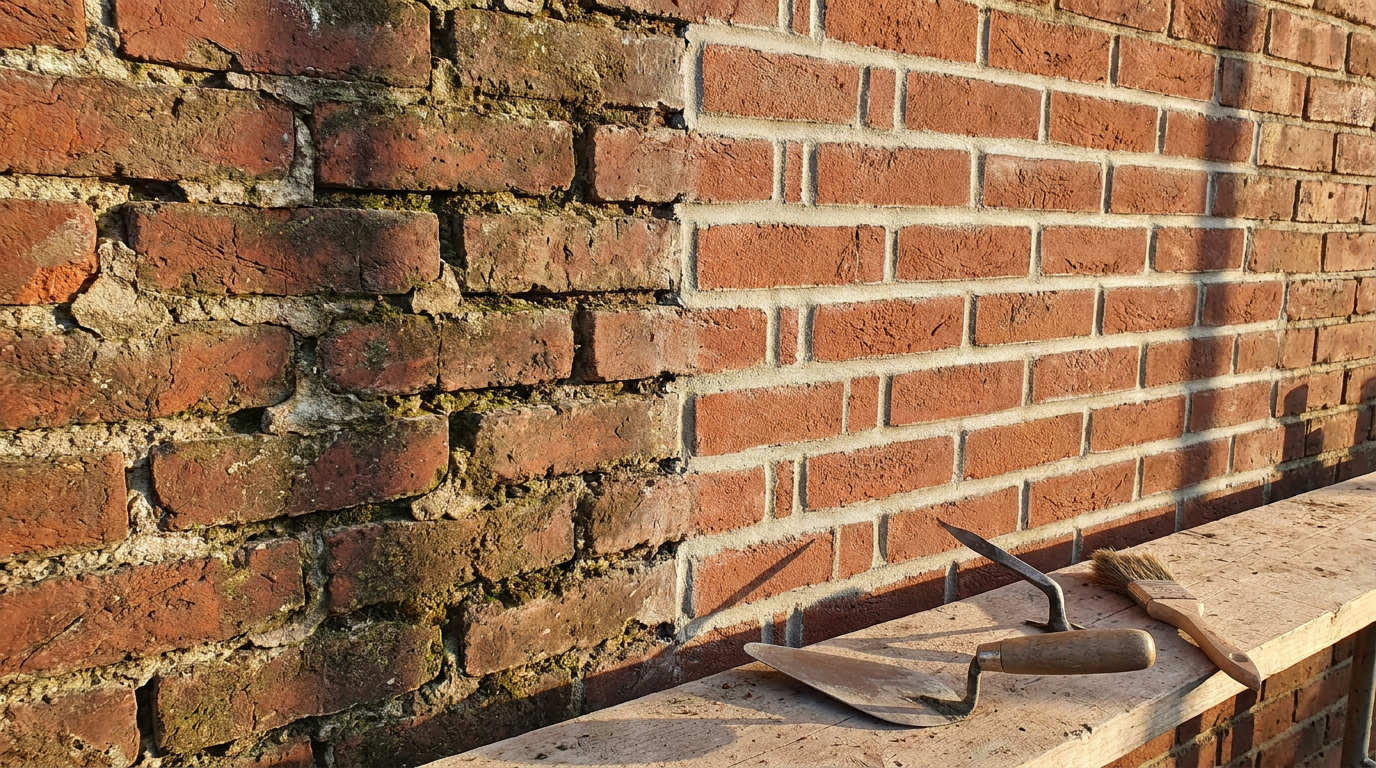
Mortar joints are often the first place masonry starts to show age. That does not mean the wall is failing. It means the wall is behaving as expected. Mortar is commonly designed to be more sacrificial than the units around it. When it begins to erode or crack, the correct response is usually repointing, which means removing deteriorated mortar and replacing it with new mortar that matches the original properties as closely as practical.
This is where many repair mistakes happen. Homeowners often assume stronger mortar means a better repair. In masonry, stronger is not automatically better. If the replacement mortar is harder, denser, or less vapor permeable than the original, it can force stress and moisture into the surrounding brick or stone. On older masonry, that can lead to cracking, spalling, and permanent damage to the units themselves.
Good repointing starts with diagnosis. The mason should look at the age and type of the building, the condition of the masonry units, and the likely characteristics of the original mortar. Deteriorated mortar is then removed carefully to an appropriate depth without damaging the edges of the masonry units. The new mortar should match not only in color and joint profile, but more importantly in strength, movement characteristics, and breathability.
Homeowners also hear the term tuckpointing used for almost any mortar repair. In everyday conversation, people often use it that way, but technically tuckpointing and repointing are not identical in all contexts. Repointing is the replacement of deteriorated mortar joints. Tuckpointing can also refer to a decorative finishing technique used to create the appearance of fine joints. For practical home maintenance, the important task is usually repointing.
Signs That Repointing May Be Needed
- Mortar is recessed significantly behind the face of the brick or stone.
- Joints are cracked, loose, sandy, or missing in areas.
- Water is getting into the wall through open joints.
- Efflorescence or dampness follows damaged joint lines.
- Mortar falls out when lightly touched in deteriorated spots.
Small localized repointing can sometimes address early wear, but broad joint failure usually means the repair should be planned carefully and done by a qualified mason. That is especially true on older homes, chimneys, and walls with soft brick or historic mortar. A poor repointing job can shorten the life of the wall even if it looks neat on day one.
Chimneys Need Their Own Maintenance Plan
Chimneys are some of the most exposed masonry elements on a house. They sit above the roofline, catch full weather on all sides, and often stay wetter and colder than the wall below. Because of that exposure, chimney masonry commonly deteriorates faster than nearby brickwork. Homeowners should inspect it regularly from the ground and have it examined more closely if they notice cracks, leaning, spalled brick, or debris on the roof or ground.
The most vulnerable areas are often the mortar joints, the crown at the top, the flashing where the chimney meets the roof, and the cap that keeps rain out of the flue. If the crown cracks, water can enter from above. If flashing fails, water can enter at the roofline and show up inside the attic or upper ceilings. If the cap is missing or damaged, repeated wetting accelerates freeze thaw wear.
Chimney repairs should not be delayed. Once moisture gets into a chimney and freezing weather hits, deterioration can move quickly. In severe cases, loose brick or stone can become a safety hazard. Repointing, crown repair, flashing repair, and selective rebuilding are common chimney maintenance tasks, but the right scope depends on how far deterioration has gone.
If your chimney serves a working fireplace, stove, or heating appliance, maintenance is also a safety issue, not just a durability issue. Water related deterioration can affect liners, joints, and the overall stability of the stack. A chimney that is neglected long enough can become both a leak source and a hazard above the roof.
Vegetation, Landscaping, and Ground Contact Problems
Plants look harmless against a masonry wall, but they can create several problems. Dense shrubs reduce airflow and slow drying after rain. Climbing vines can trap moisture against the surface and send tendrils into joints and cracks. Tree roots can influence drainage and, in some cases, contribute to movement near retaining walls or foundations. Keeping vegetation under control is a simple maintenance step that pays off.
Mulch, soil, and paving should also be monitored around the base of masonry. When grade builds up too high, the lower courses of brick or stone stay damp longer and are exposed to more splash back. If the wall includes weep holes, blocked or buried areas can interfere with drainage. Keep a visible gap between the ground treatment and the parts of the wall that need to dry.
Landscape irrigation is another overlooked source of moisture. Sprinklers aimed at masonry may wet the wall every day during the growing season. That repeated wetting increases staining, biological growth, mortar wear, and freeze thaw risk when the weather turns cold. Redirect heads or change the irrigation pattern so the wall is not treated like lawn.
Good landscaping works with the wall, not against it. Airflow, drainage, and clear inspection access all matter. If you cannot see the lower part of the masonry because plants are too close, problems can go unnoticed for years.
Foundation Cracks, Settlement, and When a Masonry Problem May Be Structural
Not every crack is a structural emergency, but some cracking patterns deserve prompt attention. Hairline shrinkage cracks in mortar may be minor, while stair step cracks, widening diagonal cracks, or bulging sections of wall can point to movement that needs a professional evaluation. Cracks near corners, doors, and windows are especially worth tracking because those locations concentrate stress.
One practical step is to measure and document cracks over time. Take clear photos with a reference such as a ruler and note the date. If a crack remains unchanged through seasons, it may be stable. If it lengthens, widens, or is accompanied by sticking doors, sloped floors, or new interior cracks, the issue is likely bigger than surface repair alone.
Bulging or leaning masonry should be treated seriously. Those conditions can indicate moisture damage, corrosion of embedded steel, foundation movement, or loss of bond within the wall. A wall that is out of plane is not a DIY repair. It needs a qualified masonry or structural assessment to determine the cause and the safe solution.
Homeowners should also understand the difference between veneer and solid masonry. Brick veneer is an outer layer tied to a structural backup wall. Solid masonry is structural masonry through its thickness. Both can suffer moisture and joint problems, but the repair approach may differ because the wall construction differs. That is another reason diagnosis matters before repair work begins.
DIY Maintenance vs Professional Masonry Repair
There are useful maintenance tasks most homeowners can handle. Seasonal inspections, gutter cleaning, grading correction, vegetation trimming, dry brushing minor efflorescence, and monitoring cracks all fall into that category. These tasks are practical, low risk, and often enough to prevent more serious deterioration from getting started.
Repairs are different. Once a wall has loose units, active leaks, significant mortar loss, spalling brick, flashing problems, chimney deterioration, or signs of movement, professional input becomes important. Masonry repair is not just about applying material where something looks damaged. The repair has to fit the original wall’s behavior. Done well, it restores performance. Done poorly, it can trap water and transfer stress in damaging ways.
If you hire a contractor, ask direct questions. What is causing the deterioration. How will the water source be addressed. What mortar will be used and why. How will surrounding masonry be protected during removal and cleaning. Have they worked on this type and age of masonry before. A good contractor should be comfortable answering those questions in plain language.
Be cautious of simple sales pitches that jump immediately to coating the wall, grinding and refilling every joint without analysis, or pressure washing as a default solution. Good masonry work starts with understanding the assembly and the moisture path. Diagnosis before intervention is the right standard.
A Practical Seasonal Masonry Maintenance Routine
The best maintenance plan is the one you will actually follow. For most homeowners, a simple seasonal routine is enough. In spring, inspect for winter damage such as spalling, cracked mortar, chimney wear, and staining from ice or overflow. Clean gutters, verify downspout discharge, and look for new efflorescence or damp areas. In summer, trim vegetation, confirm sprinklers are not hitting the wall, and schedule any mortar or flashing repairs while conditions are favorable.
In fall, clear leaves from drainage systems again and inspect caulk and flashing before freezing weather arrives. Make sure soil still slopes away from the house and that downspout extensions are in place. In winter, watch for ice buildup at roof edges, unusual wetting patterns, and signs that snowmelt is repeatedly running down masonry surfaces. You may not do repairs in winter, but you can identify issues that should be addressed as soon as conditions allow.
Recordkeeping is part of the routine. Keep a folder with dated photos, contractor notes, and any repair details, especially mortar type and locations repointed. That information becomes valuable the next time you evaluate the wall or bring in a professional. Good records make maintenance more efficient and help avoid repeating mistakes.
Climate patterns are becoming less predictable in many regions, with heavier rain events, higher humidity, and different freeze thaw exposure than owners may have seen in the past. That makes routine maintenance even more important. What used to be enough drainage or drying may no longer be enough in a wetter or more variable climate. Small annual checks are one of the simplest forms of climate resilience a homeowner can practice.
Common Masonry Maintenance Mistakes to Avoid
One of the most common mistakes is treating the visible symptom while ignoring the cause. Cleaning efflorescence without fixing the water source, patching a crack without addressing movement, or repointing a small area while a leaking gutter continues to soak the wall will only buy time. Surface improvement is not the same as solving the problem.
Another frequent mistake is using materials that are too hard or too impermeable. Dense mortars, non breathable coatings, and generic sealers can all interfere with how a masonry wall manages moisture. The wall may look better for a season, but the trapped moisture often shows up later as spalling, staining, or accelerated joint failure.
Aggressive cleaning is also high on the list. Pressure washing, abrasive blasting, and strong acids can shorten the life of masonry dramatically. Homeowners often do this while trying to improve appearance for resale or after noticing stains. The better approach is to clean gently and conservatively, and to accept that some aging is normal while structural integrity is preserved.
Finally, many people wait too long to call for help because masonry damage progresses slowly. Slow damage still adds up. If your wall is showing recurring moisture symptoms, significant mortar loss, or visible movement, getting a skilled opinion early is usually cheaper than waiting until rebuilding becomes necessary.
Final Thoughts: Long Lasting Masonry Depends on Steady, Practical Care
Masonry rewards homeowners who pay attention. You do not need constant intervention, and you do not need to overreact to every small mark or hairline crack. What you do need is a routine built around observation, moisture control, conservative cleaning, and compatible repairs. Those basics protect both the appearance and the service life of the wall.
If you remember only a few things, remember these. Water is usually the main problem. Mortar is supposed to wear before the brick or stone does. Harder repair materials are not automatically better. And the gentlest effective maintenance approach is usually the safest one. Those principles apply whether you are caring for a chimney, a brick veneer wall, a stone foundation, or an older solid masonry house.
Homeowners who inspect twice a year, keep drainage working, maintain clear drying conditions, and act early on mortar and flashing issues are doing the right work. It is not flashy maintenance, but it is the kind that prevents expensive structural and cosmetic failures. In masonry, steady practical care almost always beats delayed major repair.
That is what good maintenance looks like behind the walls and out in plain sight. Catch the small defects. Respect the materials. Let the wall dry. Keep water moving away from the structure. If you do that consistently, your masonry has every chance to stay sound, safe, and good looking for many years to come.



No Comment! Be the first one.