



How to Perform an Air Sealing Check for Your Home: A Step-by-Step Guide
Air sealing can sound technical at first, but the basic idea is refreshingly simple. Your home loses comfort and energy whenever outside air slips in through small gaps and conditioned air escapes through the same openings. That invisible movement can make rooms feel drafty in winter, stuffy in summer, and more expensive to heat or cool all year long. A thoughtful air sealing check helps you spot those weak points, understand which ones matter most, and decide what you can safely fix yourself.
Table Of Content
- Why an Air Sealing Check Is Worth Doing
- What an Air Sealing Check Actually Includes
- Before You Start: Safety, Timing, and a Simple Tool Kit
- Step 1: Inspect the Home Room by Room
- Pay Attention to Seasonal Clues
- Step 2: Check the Biggest Leakage Zones First
- Attic and Top Floor Areas
- Basement, Crawlspace, and Rim Joists
- Ducts and Mechanical Penetrations
- Step 3: Prioritize What to Seal First
- Step 4: Match the Right Sealing Material to the Right Gap
- Where Homeowners Should Pause
- Step 5: Seal the Accessible Leaks Methodically
- Step 6: Verify the Results
- How Air Sealing Fits With Insulation, Ventilation, and Whole Home Performance
- When to Bring in a Professional
- A Realistic Air Sealing Plan for Most Homeowners
- Final Thoughts
This matters because air leakage is not a minor detail in home performance. The U.S. Department of Energy says reducing drafts may save roughly 5% to 30% per year in energy use, while Natural Resources Canada notes that air leakage can account for about 25% of heat loss in a typical home. Those numbers help explain why air leakage control is often treated as a first priority rather than a finishing touch. In practical terms, it is one of the most accessible ways to make a home feel more comfortable without committing to a full renovation.
Just as important, air sealing supports sustainability in a way that feels achievable. You do not need to overhaul your entire house in a weekend. A careful inspection followed by a few well chosen fixes can reduce unnecessary energy waste, improve temperature consistency, and help your heating and cooling system work a little less hard. Over time, that means lower resource use, lower bills, and often a calmer indoor environment.
This guide walks you through a homeowner friendly process built around four steps: inspect, prioritize, seal, and verify. Along the way, we will also look at where air leaks typically hide, which materials are best for different gaps, and why ventilation and indoor air quality should always stay part of the conversation. The goal is not perfection. The goal is to help you take control of your home’s energy efficiency in a practical, informed, and steady way.
Why an Air Sealing Check Is Worth Doing
Homes work as systems. Walls, windows, the attic, the basement, ductwork, insulation, and ventilation all affect one another. When there are gaps in the building envelope, air does more than create a draft near a window. It can also carry moisture into attics or wall cavities, move dust and outdoor pollutants inside, create uneven temperatures between rooms, and undermine the performance of insulation. Insulation slows heat flow, but it does not stop moving air. That is why air sealing and insulation should be understood as partners rather than substitutes.
For many homeowners, comfort is the first sign that something is off. Maybe the upstairs is always colder in January, the floor near the exterior wall feels chilly, or the room over the garage never seems to settle at the right temperature. Sometimes you notice dust gathering near trim lines, or curtains shifting slightly on a windy day even when the windows are closed. These clues often point to leakage pathways that are worth investigating.
There is also a durability case for taking air leakage seriously. Uncontrolled airflow can carry moisture into colder parts of the building, where condensation may form over time. That can affect wood framing, insulation performance, and general building health. A more airtight envelope, when paired with appropriate ventilation, gives you better control over where air moves and how your home handles moisture.
Key takeaway: Air sealing is one of the lowest cost, highest impact home performance upgrades because it addresses comfort, efficiency, and durability at the same time.
Finally, an air sealing check can help you spend your time and money more wisely. Instead of guessing, you can identify the biggest leakage zones first. In many homes, the most important leaks are not the ones you immediately see in living spaces. They are often in attics, basements, rim joists, utility penetrations, and duct connections. A methodical check helps you move beyond surface level fixes and make better decisions.
What an Air Sealing Check Actually Includes
An air sealing check is not one single test. It is a practical inspection process. You look for visible gaps, feel for air movement, document likely leak points, and decide which areas are safe and accessible to seal yourself. If you want a more precise measurement later, you can bring in a professional for a blower door test, which is the standard method used to measure airtightness and locate hidden leakage paths.
That distinction matters because many homeowners assume they need special equipment before they begin. In reality, you can learn a great deal with simple observation and a few basic tools. A flashlight, notepad, tissue paper, incense stick or smoke pencil, painter’s tape, and a phone camera are often enough for an initial assessment. If conditions are right, your body can be one of the best sensors in the house. Drafts are easier to notice on a cold or windy day, or when there is a strong difference between indoor and outdoor temperatures.
ENERGY STAR and other home performance resources tend to recommend a simple workflow. First inspect the home and note where leaks are likely. Then prioritize the biggest problem areas. After that, seal the safe and accessible leaks using the correct material for each location. Finally, verify your work through another walkthrough, observation during weather changes, or a professional test if you want confirmation.
Before You Start: Safety, Timing, and a Simple Tool Kit
Before you begin your inspection, it helps to choose a day when leaks will be easier to detect. Cold weather is ideal because incoming air often feels obvious around windows, doors, attic hatches, and floor edges. Windy days can be especially revealing. Summer can still work, particularly if your air conditioner is running and the indoor temperature is noticeably different from the outdoors, but winter generally provides stronger clues.
Safety comes first, especially if you plan to inspect attics, crawlspaces, mechanical rooms, or unfinished basements. Wear closed toe shoes, gloves, and a dust mask if insulation or old building materials are present. Use a stable ladder and good lighting. Be cautious around electrical wiring, recessed lights, combustion appliances, and any area where pests, mold, or damaged materials may be present. If something looks unsafe, stop and call a professional.
Your starter kit does not need to be elaborate. A flashlight helps reveal cracks and penetrations. Tissue paper or a light ribbon can move in a draft and show air direction. A smoke pencil or incense stick can make airflow visible, though you should never use open flame near insulation, gas appliances, or questionable areas. A notepad or phone lets you create a room by room record. Painter’s tape is useful for marking leak spots you want to come back to later.
One more important note before you tighten anything. Air sealing should be done with awareness of ventilation, indoor air quality, and radon. A leakier house is not better, but an extremely tight house without proper ventilation can create stale air, moisture issues, or increased radon concerns in some regions. If your home already has humidity problems, condensation on windows, combustion equipment issues, or a radon history, it is wise to plan upgrades carefully and consider testing or professional guidance.
Step 1: Inspect the Home Room by Room
The first step is to inspect with patience rather than rush toward products. Start inside the main living areas, then move outward to transitional spaces like attics, basements, garages, and utility zones. Follow the perimeter of each room and pay close attention wherever two materials meet. Air leaks often show up at joints, seams, cutouts, and penetrations, not just in wide visible cracks.
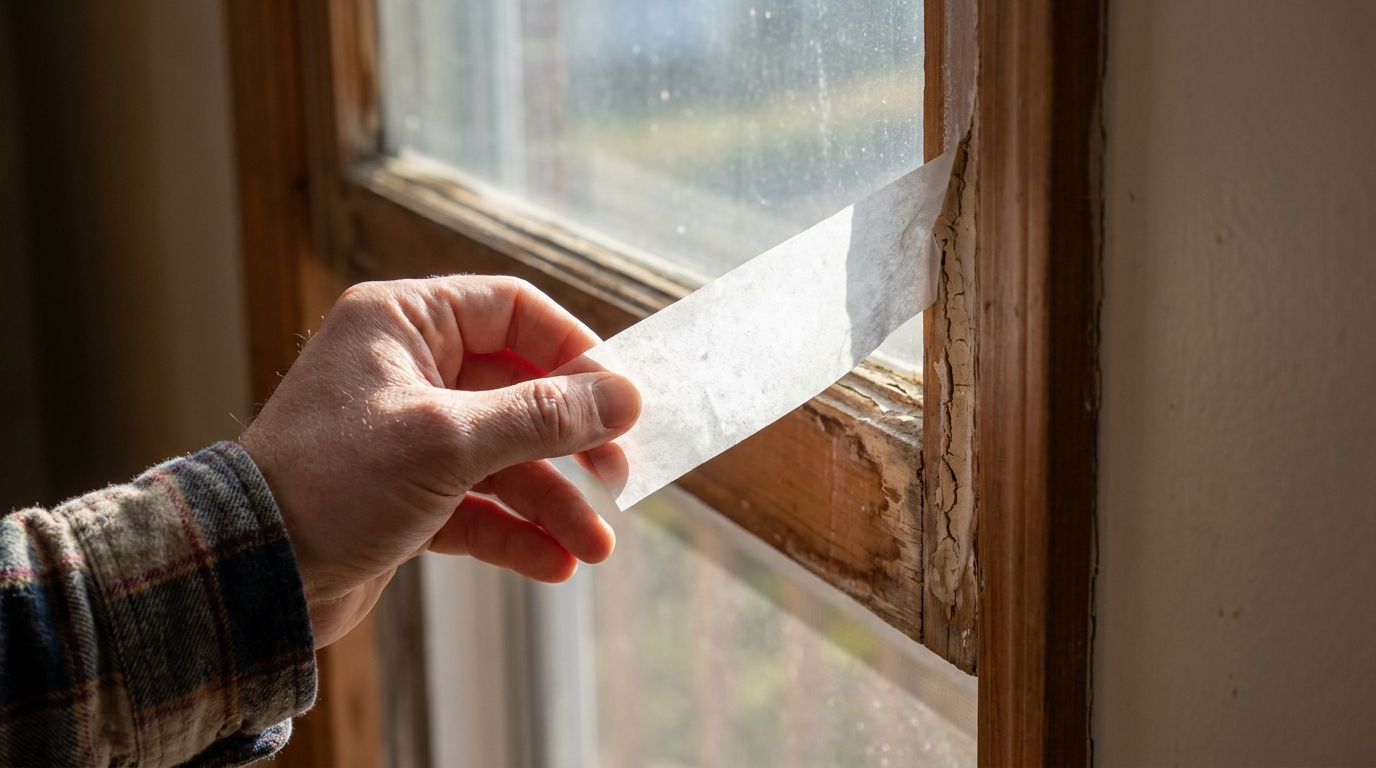
Begin with windows and doors. Feel around the sash, frame, trim, and threshold. Look for cracked caulk on the exterior side and worn weatherstripping on operable parts. If you hold a strip of tissue near the edges on a windy day, you may see it flutter where air is coming through.
Next, move to baseboards, crown lines, and electrical penetrations on exterior walls. Outlets and switch plates on outside walls can leak more than people expect, particularly in older homes. You may also find gaps where trim meets drywall, where flooring meets the wall, or where pipes pass under sinks and through cabinets. Plumbing and wiring holes are classic air pathways because they connect conditioned spaces to wall cavities, basements, crawlspaces, or attics.
As you inspect, document what you find instead of trying to fix everything immediately. Note the location, approximate size of the gap, whether it feels drafty, and what materials are present. A simple rating system can help. For example, you might mark each leak as low, medium, or high priority based on how strong the draft feels, how accessible the area is, and whether it appears to connect to the outdoors or to an unconditioned space.
Pay Attention to Seasonal Clues
Visible draft detection is useful, but everyday clues can tell you just as much. If a room always needs a space heater, if one part of the floor is colder than the rest, or if dust darkens along carpeting near baseboards, note it. Dirty insulation in attics can also be a sign of air movement because airborne dust gets filtered and deposited where air passes through. These are not random quirks of old houses. They are often signals of predictable leakage paths.
You should also notice patterns in your heating and cooling behavior. If the thermostat seems reasonable but some rooms still swing in temperature, leakage may be part of the issue. Air sealing will not solve every comfort problem, since duct balancing and insulation matter too, but the inspection gives you a clearer starting point.
Step 2: Check the Biggest Leakage Zones First
Once you have done a general walk through, shift your attention to the areas that tend to matter most. In many homes, the largest leakage zones are the attic and the basement. This is not a coincidence. Warm air rises, creating a natural stack effect that pulls air in low and pushes it out high. That means gaps near the top of the house and near the bottom often work together, drawing conditioned air out and outdoor air in.
If you have limited time, do not spend all of it on tiny cosmetic cracks in living areas while ignoring larger hidden openings above and below. A methodical inspection of the attic floor, basement ceiling, rim joists, and major service penetrations usually delivers a better payoff. Even if some of those repairs are not immediate DIY projects, identifying them helps you prioritize correctly.
Attic and Top Floor Areas
The attic is one of the most important places to inspect because many leakage paths from the house below terminate there. Look around attic hatches, pull down stairs, plumbing vent penetrations, wiring penetrations, recessed light fixtures, bath fan housings, duct penetrations, chimney chases, and partition wall tops. Anywhere the ceiling plane has been cut or interrupted is worth a closer look.
If insulation is present, gently move it aside in a few places to see the air barrier beneath. You may find open gaps around electrical boxes, plumbing stacks, or framing joints. This is also where misconceptions show up clearly. A thick layer of insulation does not necessarily mean the space is well sealed. Air can still move through or around insulation and carry heat and moisture with it.
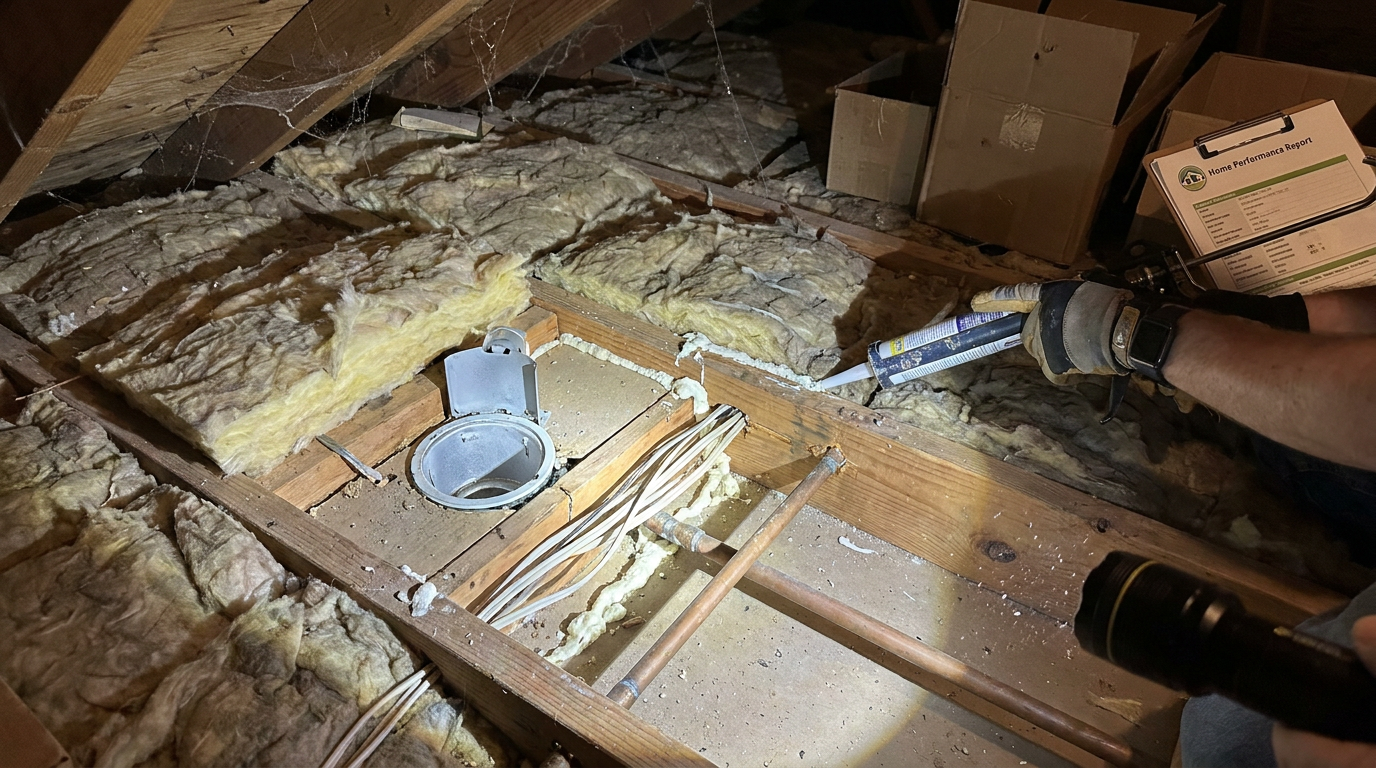
Be especially careful around recessed lights and chimneys. Not every fixture is safe to cover or seal in the same way, and heat producing elements require clearances. If you are unsure whether a component is insulation contact rated or whether a chimney penetration needs specialized fire safe treatment, that is a good place to pause and seek professional advice.
Basement, Crawlspace, and Rim Joists
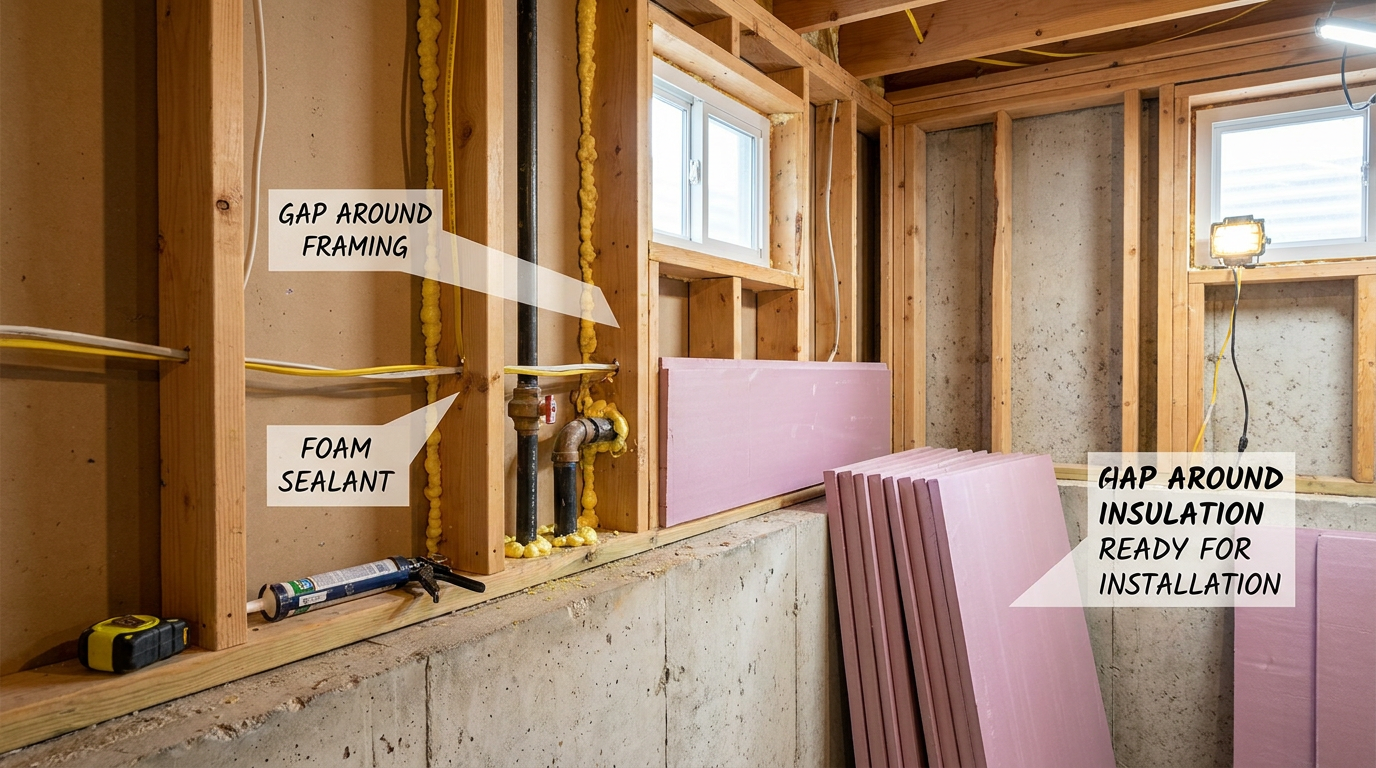
At the lower level of the house, inspect where the framing meets the foundation. The rim joist area is a frequent leakage point because it contains many small seams and often sits near penetrations for utilities. Look for visible cracks, holes around pipes and wires, and any place where daylight, dust trails, or movement suggest airflow. In unfinished basements, these areas are often easy to access and can be surprisingly impactful.
Also check the top of foundation walls, sill plates, hatch doors, crawlspace access points, and penetrations for hose bibs, cable lines, dryer vents, and other services. If your home has a garage connection, examine the shared wall and any doors between the spaces. The goal is not only to reduce drafts but also to limit pathways for pollutants or odors entering from attached garages or damp utility areas.
Ducts and Mechanical Penetrations
If ducts run through unconditioned spaces such as attics, crawlspaces, or garages, inspect their joints and connections. Leaky ducts can waste conditioned air directly and also affect pressure balance in the home. Do not rely on common cloth duct tape for lasting repairs. Use HVAC rated foil tape or mastic where appropriate. This is one of the most common misconceptions in home maintenance. The right material matters if you want the repair to hold up.
Check around exhaust fans, vent boots, furnace flues, water line entries, and any area where equipment connects to the envelope. Mechanical penetrations often involve different materials meeting in awkward shapes, which creates ideal conditions for leakage. Some are easy DIY fixes. Others require caution because of heat, combustion, or code considerations.
Step 3: Prioritize What to Seal First
After the inspection, take a step back before opening any tubes or cans. The smartest approach is to prioritize by impact, safety, and accessibility. In other words, focus on leaks that are large, connected to unconditioned spaces, and straightforward to address safely. That usually means weatherstripping obvious door leaks, caulking trim gaps, sealing plumbing or wiring penetrations, and tackling accessible attic or basement bypasses that do not involve heat producing or combustion related hazards.
You do not need to chase every hairline crack. In many homes, a handful of larger leakage paths drive a significant share of the problem. A drafty attic hatch, a gap under an exterior door, open plumbing penetrations under sinks, and unsealed rim joist joints can often outperform a dozen cosmetic touchups in low impact areas. Think of the process as triage rather than perfectionism.
It can help to sort your findings into three groups.
- DIY now: low risk, accessible leaks such as door weatherstripping, small trim gaps, window caulk repairs, outlet gaskets on exterior walls, or simple pipe penetrations.
- DIY with care: attic or basement areas that require ladders, protective gear, specialized products, or extra research before sealing.
- Professional review: large hidden leaks, combustion zones, chimney and flue areas, complex duct sealing, moisture damaged areas, mold concerns, or homes that may need ventilation adjustments after tightening.
This kind of prioritization keeps the project calm and practical. It also aligns with the broader whole home performance approach encouraged by current energy efficiency programs and incentive structures in both the United States and Canada.
Step 4: Match the Right Sealing Material to the Right Gap
One of the keys to a successful air sealing check is understanding that there is no single universal product. The best seal depends on the size of the gap, whether the area moves, what materials meet there, and whether the opening needs to be operable in the future. Using the wrong material may fail quickly or create maintenance issues later.
Caulk is generally best for narrow, non moving gaps around trim, stationary window and door frames, and small cracks where two materials meet. It works well when the gap is modest and unlikely to shift significantly over time. Exterior grade products are useful outdoors, while paintable interior products can help indoors where appearance matters.
Weatherstripping is used where a component must continue to open and close, such as doors, operable windows, and attic hatches. Compression strips, door sweeps, and adhesive backed products can all be effective when selected carefully and installed on clean surfaces. If a door still rattles or daylight shows at the threshold, weatherstripping is often the right first move.
Expanding spray foam is useful for larger gaps around plumbing, wiring, and framing intersections, especially in basements, attics, and utility areas. It can be very effective, but it expands, so restraint matters. Overfilling can create a mess or put pressure on surrounding materials. Low expansion versions are often preferred around windows and doors to avoid distorting the frame.
Rigid blocking plus sealant may be appropriate for bigger openings, such as oversized bypasses in attics or open framing cavities around chases. In those cases, a backing material such as rigid foam board can cover the opening, with edges sealed using foam or caulk. This creates a more durable patch than trying to bridge a wide hole with sealant alone.
HVAC mastic or rated foil tape is best for duct joints and seams. This is important because ordinary duct tape is not a reliable universal air sealing solution, despite its name. HVAC systems deserve products designed for temperature changes and long term adhesion.
Where Homeowners Should Pause
There are a few areas where DIY air sealing is not the best first move without more knowledge. Chimneys, gas flues, combustion appliance zones, and some recessed lighting assemblies may require fire resistant materials, proper clearances, or code specific details. Similarly, if you discover substantial moisture staining, rot, mold, or signs of pest activity, the priority shifts from sealing to diagnosis and repair.
If your home is already relatively tight, or if you are planning a broad package of upgrades including insulation and window improvements, it may be worth speaking with an energy auditor before doing extensive sealing. Tightening the envelope can improve efficiency significantly, but it should not come at the expense of healthy ventilation.
Step 5: Seal the Accessible Leaks Methodically
When you are ready to begin sealing, work in a sequence that keeps the project manageable. Many homeowners do best by choosing one category at a time, such as all exterior doors first, then all accessible plumbing penetrations, then the attic hatch, then selected basement leaks. Completing one clear zone at a time gives you visible progress and reduces the chance of starting too many partial repairs.
Clean surfaces before applying caulk or weatherstripping. Dust, old peeling sealant, and moisture can reduce adhesion. Cut caulk tips conservatively so you can apply a neat bead rather than flooding the gap. Tool the bead where appropriate for full contact and a cleaner finish. With weatherstripping, close the door or window gently afterward to check that the fit is snug without making operation difficult.
For spray foam, read the product instructions and wear gloves. Small amounts go a long way. Let the foam cure fully before trimming any excess. In hidden utility spaces, appearance matters less than continuity. The goal is a complete air barrier, not a perfect decorative finish.
Take photos before and after. That may seem like a minor habit, but it is helpful in several ways. It lets you confirm what was done, keep track of materials used, and revisit areas later if comfort issues persist. It can also be useful if you pursue rebates, tax credits, or broader retrofit planning, since many programs increasingly emphasize documented home performance improvements.
Step 6: Verify the Results
Verification is where a lot of DIY projects fall short. Homeowners often assume the work is finished once the product is installed, but the final step is making sure the seal is actually doing its job. Return to the areas you repaired on another cold or windy day. Use your hand, tissue, or smoke pencil again. Check whether the draft is gone, reduced, or unchanged. If it is unchanged, there may be a hidden pathway nearby that still needs attention.
You can also monitor indirect signs over the following weeks. Does the room feel more even in temperature. Is the floor less cold. Does the furnace or air conditioner seem to cycle differently. While these observations are not as precise as an energy test, they are meaningful indicators that your efforts are improving real world comfort.
If you want stronger confirmation, consider a professional blower door test. This test depressurizes the home with a calibrated fan and helps measure overall airtightness while making leakage paths easier to detect. It is the best option if you are planning larger upgrades, pursuing incentives, or simply want a baseline and post work comparison. A blower door test can reveal hidden leaks that are difficult to diagnose visually, especially in larger or more complex homes.
Professional verification can be especially valuable if you have completed significant sealing, added insulation, or suspect your home may need ventilation adjustments afterward.
How Air Sealing Fits With Insulation, Ventilation, and Whole Home Performance
One of the most important misconceptions to clear up is that air sealing and insulation are interchangeable. They are not. Air sealing stops uncontrolled air movement. Insulation slows heat transfer. A house with good insulation but poor air sealing can still feel uncomfortable and waste energy because moving air bypasses much of the insulation’s benefit. By contrast, a tightly sealed house with little insulation may reduce drafts but still lose heat too quickly through the building assemblies. The strongest results come when both elements are addressed thoughtfully.
Ventilation is the other half of the equation. As homes become less leaky, it becomes more important to make sure fresh air and moisture control happen intentionally rather than accidentally. That may mean checking existing bath fans, kitchen exhaust, whole house ventilation systems, or humidity levels after upgrades. In some homes, especially those in radon prone areas, testing should also be part of the planning process. Better control is the goal, not simply less airflow at any cost.
This is why current retrofit guidance increasingly focuses on whole home performance. Instead of treating each improvement as isolated, the idea is to consider how the building envelope, HVAC system, insulation, moisture conditions, and ventilation work together. For homeowners, this perspective can actually make decisions simpler. It shifts the question from, “What product should I buy first?” to, “What does my home need most, and how do these upgrades support one another?”
When to Bring in a Professional
A DIY air sealing check is valuable on its own, but there are times when professional help makes sense. If your home has persistent condensation, mold, ice damming, comfort issues that remain after basic sealing, or signs of combustion safety concerns, a trained energy auditor or qualified contractor can help identify root causes. The same is true if you are planning insulation upgrades in the attic or basement, since sealing is often best done before insulation is added or replaced.
Professional help may also be worthwhile if your house has complicated architecture, inaccessible cavities, or very high energy bills that do not match the home’s size and age. Blower door testing, infrared imaging, and whole home assessments can uncover patterns that are difficult to see from a visual inspection alone. For some large scale retrofit projects, advanced methods such as aerosol envelope sealing are gaining attention. DOE has reported significant leakage reductions in certain retrofit settings, but these are not DIY techniques and are generally used in more specialized circumstances.
There is also a financial reason to ask questions before beginning larger projects. Rebate programs, tax credits, and retrofit incentives increasingly include air sealing and insulation as eligible measures. Program rules vary, but some require audits, documentation, or approved contractors. If you suspect you may want to pursue incentives, check local and national guidance before buying materials or scheduling major work.
A Realistic Air Sealing Plan for Most Homeowners
If all of this feels like a lot, the good news is that it does not have to happen at once. A useful approach is to break the work into manageable phases. In the first phase, complete your inspection and record the strongest draft locations. In the second phase, handle quick wins such as door weatherstripping, obvious caulk failures, and simple utility penetrations. In the third phase, plan one deeper area such as the attic hatch and top floor ceiling penetrations or the basement rim joists. In the fourth phase, evaluate whether an energy audit or blower door test would help guide the next steps.
This gradual strategy is often the most sustainable one in every sense of the word. It avoids rushed decisions, lets you learn as you go, and gives your household time to notice the comfort difference. It also respects the reality that homeowners balance energy goals with budgets, schedules, and other maintenance priorities. Practical progress is more valuable than an ideal plan that never begins.
As you work through the process, keep your focus on outcomes rather than perfection. You are trying to reduce unnecessary air leakage, improve comfort, and create a healthier, more efficient home. Even modest improvements can make daily life noticeably better. A front hall that no longer feels windy, a bedroom that stays more stable overnight, or a furnace that runs less often are meaningful results.
Final Thoughts
Performing an air sealing check is one of the clearest examples of sustainability becoming practical. It is not abstract, and it does not require a complete lifestyle overhaul. It starts with paying attention to how your home feels, learning where air tends to move, and making a few informed corrections. For many households, that is enough to unlock better comfort, lower energy waste, and a stronger sense of control over the home’s performance.
The most effective mindset is steady and observant. Inspect carefully. Prioritize the biggest leakage zones. Seal accessible areas with the right materials. Verify what changed. Then decide whether a professional assessment would help with the next layer of improvements. This simple workflow is the reason air sealing remains one of the most recommended first steps in home energy upgrades.
Done thoughtfully, air sealing is not about making your home sealed off from the world. It is about making it work better. You keep the conditioned air where you want it, reduce the drafts and moisture movement you do not want, and support a home that is more comfortable, more efficient, and better prepared for the seasons ahead.


No Comment! Be the first one.