


How to Properly Install Door Weatherstripping for a More Energy-Efficient Home
If your home feels chilly near the front door in winter, dusty during windy weather, or slightly harder to keep comfortable year round, the problem may not be your heating or cooling system. In many homes, a surprising amount of conditioned air slips out through small gaps around exterior doors. Those openings may seem minor, but together they can affect comfort, energy use, and even moisture control. One of the simplest ways to address that issue is to install door weatherstripping properly.
Table Of Content
- Why door weatherstripping matters in an energy-efficient home
- How to tell if your door needs new weatherstripping
- Understanding the main types of door weatherstripping
- Tools and materials you may need
- Step 1: Prepare the door and confirm it is worth sealing
- Step 2: Measure the top, sides, and bottom separately
- Step 3: Choose the right weatherstripping for your door condition
- Step 4: Install weatherstripping on the top and sides
- Step 5: Install or replace the door sweep
- Step 6: Test the finished seal carefully
- Common mistakes beginners should avoid
- How weatherstripping fits into whole-home air sealing
- Maintenance tips for long-lasting performance
- When to call a professional
- A small project that supports comfort, savings, and smarter home performance
For homeowners who want a practical and affordable energy upgrade, weatherstripping is often an excellent place to begin. ENERGY STAR notes that sealing air leaks and adding insulation can save an average of 15 percent on heating and cooling costs, and simple measures such as weatherstripping doors are part of that upgrade path. Natural Resources Canada also treats weatherstripping and caulking as core air sealing measures within the building envelope, which is the outer shell that separates indoor living space from outdoor weather.
The key, however, is doing the job well. Weatherstripping is not just a strip of material placed anywhere around a door. Product choice, door condition, alignment, measurement, and installation technique all affect whether the finished seal actually works. A door that is overcompressed may be difficult to close, while a poorly fitted sweep may drag or leave gaps that still allow air movement under the slab.
This guide takes a beginner-friendly approach to the process. You will learn how to inspect your door, how to choose between common weatherstripping types, what tools you need, and how to install top, side, and bottom seals for a more airtight and comfortable home. You will also see where weatherstripping fits into the larger picture of home energy efficiency, because while it is a high-value DIY project, it works best as part of a thoughtful whole-home air sealing strategy.
Why door weatherstripping matters in an energy-efficient home
Weatherstripping helps control infiltration and exfiltration, which are simply the movement of outdoor air into the house and indoor air out of the house through leaks. Around an exterior door, those leaks often show up as drafts, cold spots near entryways, rattling during windy days, dust accumulation, and temperature swings in nearby rooms. In heating-dominant climates, warm indoor air escaping through gaps can also carry moisture into colder parts of the assembly, which can contribute to condensation concerns over time.
From a green building perspective, weatherstripping is a small but meaningful maintenance task because it supports the performance of the building envelope. The air barrier of a house is not one single material. It is a continuous system made up of many parts that are connected and sealed using caulking, tape, gaskets, and weatherstripping. When a door edge leaks, that continuity breaks down, and your HVAC system has to work harder to maintain comfortable indoor conditions.
There is also an important comfort benefit that often matters just as much as utility savings. Many people notice a draft long before they notice higher monthly energy bills. A properly sealed door can make an entry hall, mudroom, or adjacent living room feel calmer and more stable. In that sense, weatherstripping is not just about efficiency. It is also about creating a home that feels more settled and resilient in changing weather.
Practical takeaway: Door weatherstripping is one of the most accessible energy-efficiency upgrades because it is relatively low cost, low complexity, and immediately noticeable when done well.
It is also worth keeping expectations realistic. ENERGY STAR points out that hidden air leaks across a home can add up to an opening the size of an open window, and the largest leakage areas are often in attics and basements rather than around one door. So while sealing a door is a smart DIY step, it should be seen as one part of a broader air sealing approach rather than a complete solution to every draft problem.
How to tell if your door needs new weatherstripping
Before buying materials, spend a little time assessing the door itself. This step matters because a well-chosen weatherstrip cannot compensate for a door that is badly warped, loose in the frame, or out of alignment. Natural Resources Canada advises that if doors do not fit snugly, homeowners should first repair or replace the door, frame, hardware, gaskets, and weatherstripping as needed rather than relying on sealant alone.
Start with a visual inspection. Look closely at the top and side edges of the door where the slab meets the frame. If you can see daylight around the perimeter when the door is closed, you almost certainly have leakage. Also check for cracked or compressed existing weatherstripping, peeling corners, missing sections, or hardened materials that no longer spring back after pressure is removed.
Next, look for indirect signs of leakage. ENERGY STAR notes that visible gaps, drafts, dust, pests, odors, and peeling paint around trim can all indicate air movement. In older homes, a door may have multiple generations of repair attempts, including foam tape layered over older strips, uneven sweeps, or improvised threshold fixes. Those details usually suggest it is time for a cleaner, more systematic upgrade.
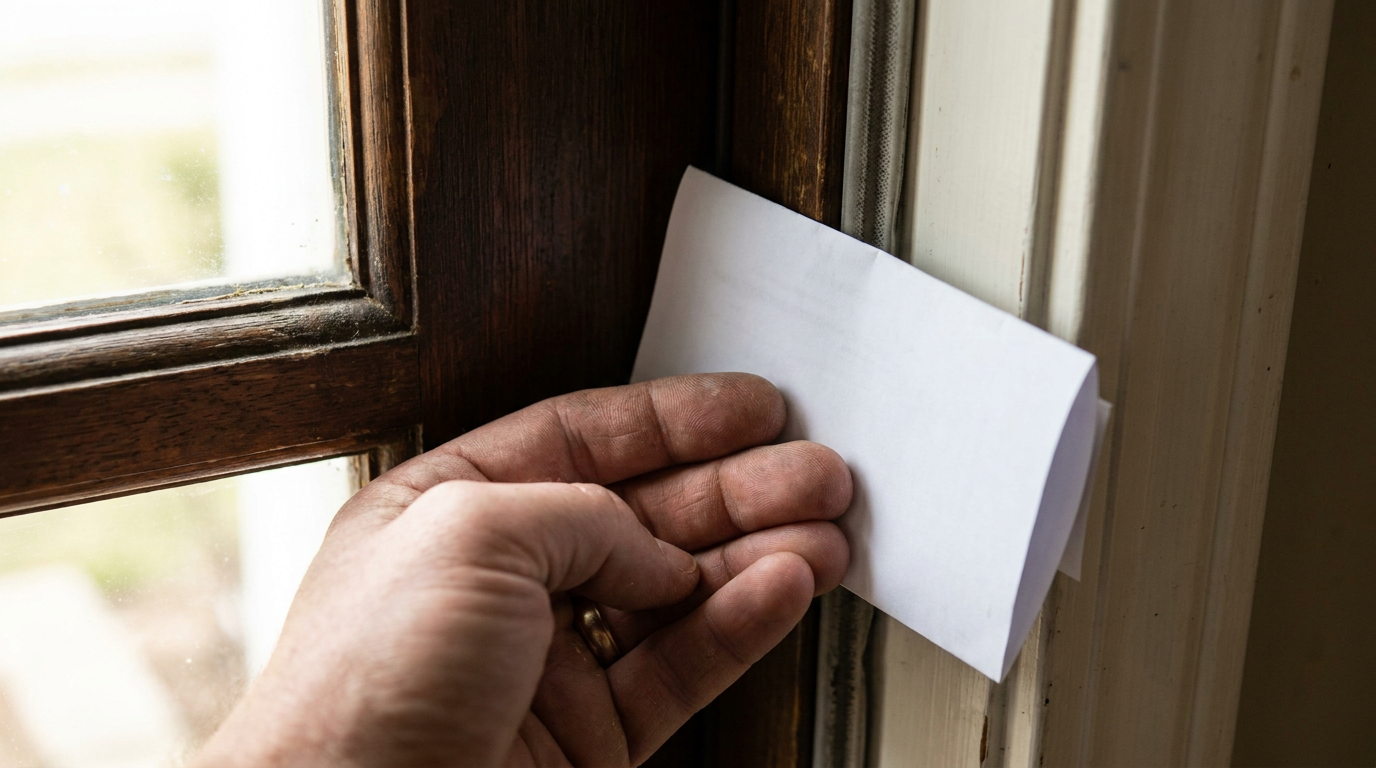
A simple paper test is especially useful for beginners. Close the door on a strip of paper and try to pull it out. If it slides out very easily without resistance, the seal may be too loose at that location. Repeat the test at several points along the top, latch side, hinge side, and bottom. You may find that one area seals well while another leaks, which tells you the issue may involve seasonal door adjustment or uneven compression.
You can also perform a light test. At night, have one person stand inside while another shines a flashlight around the exterior perimeter of the closed door, or use interior light to check for visible slivers from inside. A draft test with the back of your hand on a windy day can help as well, though moving air from exhaust fans or pressure differences inside the house can complicate what you feel. If you want a more complete understanding of your home’s airtightness, a professional energy audit with blower door testing can identify leakage patterns across the whole envelope.
Understanding the main types of door weatherstripping
One of the most common misconceptions is that any weatherstripping product will work on any exterior door. In reality, different materials are designed for different gap sizes, door conditions, and mounting methods. NRCan lists several common categories, including closed-cell foam, ribbed closed-cell rubber, tubular stripping, spring vinyl, spring metal, magnetic strips, door sweeps, full thresholds, and spring-loaded options.
For the top and sides of many exterior doors, NRCan recommends a good-quality V-shaped vinyl weatherstrip. This style is often a strong choice because it flexes and maintains contact with the door even when seasonal humidity changes cause slight warping or movement. It can create a durable compression seal without requiring excessive force to close the door when installed properly.
Foam weatherstripping is easy to find and easy to use, but it is not always the most durable option for frequently used exterior doors. It can work for light-duty applications or temporary fixes, yet it tends to compress and wear out sooner than higher-quality vinyl or rubber products. For a front or back entry that opens multiple times each day, a more robust material often delivers better long-term performance.
Tubular rubber or vinyl stripping creates a rounded compression seal and can work well where gaps are slightly larger or where a resilient seal is needed. Some versions attach with adhesive backing, while others mount mechanically with fasteners. The exact fit matters, because too small a tube may not seal consistently, while too large a tube can make the door difficult to latch.
Spring metal or spring vinyl products are more traditional and can be very durable, but they require more careful shaping and installation. They are often better suited to experienced DIYers or to situations where a period-appropriate detail is desired on an older house. These products rely on spring tension to maintain contact, which means precision matters.
Magnetic weatherstripping is commonly seen on some insulated steel doors. It works similarly to a refrigerator seal and can be highly effective when compatible with the door system. However, it is not a universal retrofit option for every door type. If you already have a magnetic seal, replacement parts often need to match the existing manufacturer’s profile.
The bottom of the door is a separate condition altogether. This is where door sweeps, thresholds, and automatic or spring-loaded bottom seals come into play. A sweep attaches to the bottom of the door slab and brushes or compresses lightly against the threshold. A threshold forms the sill element under the door and may include an adjustable profile to improve contact. In some assemblies, both work together to control air leakage, rain splash, and insect entry.
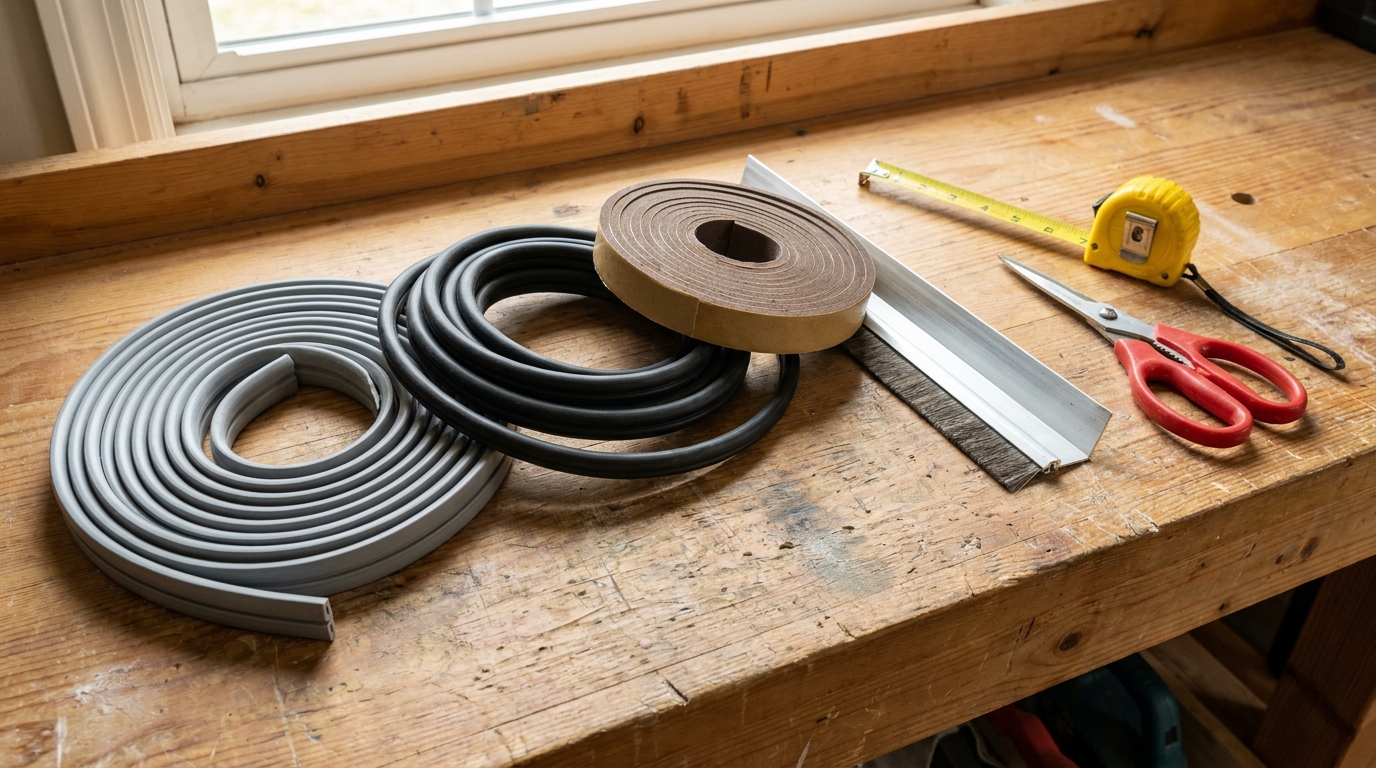
As a general rule, beginners often get the best results by thinking in two parts. Use a durable compression-style strip such as V-shaped vinyl on the top and sides, then use a properly fitted sweep or bottom seal for the gap underneath. That approach is usually easier to troubleshoot and more reliable than trying to force one product to solve every edge condition.
Tools and materials you may need
This is a relatively simple project, and many households already have most of the basic tools. Still, gathering everything before you begin helps the installation go more smoothly and reduces the temptation to rush the measuring stage. Depending on the product you choose, your exact tool list may vary slightly.
- Measuring tape
- Pencil or fine marker
- Scissors or utility knife
- Screwdriver or drill with bits
- Cleaning cloths
- Mild household cleaner
- Putty knife or scraper for old adhesive
- Replacement weatherstripping for top and sides
- Door sweep or bottom seal if needed
- Replacement screws or fasteners if included by the manufacturer
Some installations may also benefit from a level, a small hacksaw if trimming metal-backed strips, and exterior-grade caulk if you discover leakage around the casing or trim rather than the moving door edge itself. That said, it is wise to distinguish between weatherstripping the operable parts of the door and caulking the fixed joints around the frame. Both matter, but they solve different problems.
Step 1: Prepare the door and confirm it is worth sealing
Open and close the door several times before removing anything. Notice whether it sticks, swings open on its own, rubs at the threshold, or latches loosely. If the latch barely catches, the strike plate may need adjustment. If the slab visibly sags or scrapes, hinge tightening or frame repairs should come first. New weatherstripping on a misaligned door often produces frustration because the underlying issue remains unresolved.
Once the basic operation seems sound, remove the old weatherstripping. Peel adhesive-backed materials away slowly and use a putty knife to lift stubborn edges without damaging painted surfaces. If mechanical fasteners are present, remove them carefully and keep one sample piece if you want to compare size or profile at the store. Clean away dirt, loose paint, and adhesive residue so the new material can sit flat and seal evenly.
This cleaning stage may feel minor, but it has a large effect on final performance. Adhesive-backed products need a dry, dust-free surface to bond well, and even nail-on or screw-on systems should sit against a smooth mounting area. Let the surface dry fully before moving on. If the jamb has deteriorated wood, severe cracks, or moisture damage, address those conditions first so the installation has a stable base.
Step 2: Measure the top, sides, and bottom separately
Measure each section of the door frame individually rather than assuming opposite sides are identical. In older homes, slight variations are common, and cutting all pieces to one standard length can leave an avoidable gap. Measure the hinge side, latch side, and head jamb. Then measure the door bottom and threshold area if you are replacing the sweep.
When buying weatherstripping, it is usually wise to allow a little extra length for trimming. Precise cuts matter, especially at the top corners where side pieces meet the head piece. A neat fit helps maintain continuous contact and gives the installation a cleaner, more professional result. If the product instructions recommend a particular cut style, such as straight butt joints or angled corners, follow the manufacturer’s method.
At the bottom, do not guess at the gap size. Close the door and inspect the space between the slab and threshold along the full width. A gap may be tighter at one end than the other, which can point to a threshold adjustment issue or slight door sag. Understanding that variation before you buy the sweep helps you avoid selecting a profile that is too aggressive or too shallow.
Step 3: Choose the right weatherstripping for your door condition
At this stage, match the product to the actual problem you observed. If your top and side gaps are modest and the door is in generally good condition, a quality V-shaped vinyl strip is often the most beginner-friendly and durable choice. If the gaps are slightly larger or irregular, a tubular compression product may perform better. If you are working with an older specialty door, spring metal or manufacturer-specific seals may be more appropriate.
For the bottom seal, choose a sweep that is compatible with your threshold and door style. Some sweeps use flexible fins, others use brush-style contacts, and some attach to the inside face, bottom edge, or both. If your threshold is damaged, badly worn, or no longer supports a seal, replacing or adjusting the threshold may be just as important as installing the sweep itself.
Avoid the assumption that thicker always means better. Overcompression can make the door hard to close and may shorten the life of the material. The goal is firm, continuous contact, not excessive pressure. A well-installed moderate seal usually performs better than an oversized strip forced into place.
Step 4: Install weatherstripping on the top and sides
Installation details vary by product, so always check the manufacturer’s instructions first. That said, the general principle is consistent. You want the weatherstripping placed so it contacts the door evenly when closed, creating a gentle compression seal along the jamb and head without twisting or bunching.
If you are using adhesive-backed V-strip or similar material, start with one side jamb. Cut the strip to length, dry-fit it first, and make sure the flexible portion will press against the door in the intended direction. Peel back a small section of backing at the top, align carefully, and press it into place. Continue gradually rather than removing the entire backing at once, which makes repositioning harder.
After one side is installed, close the door gently to test compression. If the seal folds awkwardly or the door resists closure too early, adjust before continuing. Then install the opposite side and finally the top piece. At the corners, maintain continuity without leaving open joints. A small gap at a corner can undermine the otherwise good performance of the entire perimeter seal.
If you are using mechanically fastened weatherstripping, hold the strip in position and attach it loosely at first. Close the door to check fit, then make final adjustments before tightening all fasteners. This step is especially important with spring metal, spring vinyl, or rigid carrier systems, because the exact angle and position determine how well the seal performs.
Take your time on the latch side. This edge often sees the most compression and the most wear because it is where the door is pulled tight when latched. A seal that is slightly too proud on the latch side can create resistance and lead people in the household to slam the door, which shortens the life of both the hardware and the weatherstripping.
Step 5: Install or replace the door sweep
The bottom of the door is often the most noticeable source of drafts, especially in colder climates or on doors that open directly to the exterior. Because this edge also interacts with the threshold, the seal has to be effective without dragging too heavily. A correctly fitted door sweep should lightly contact the threshold across the full width of the door.
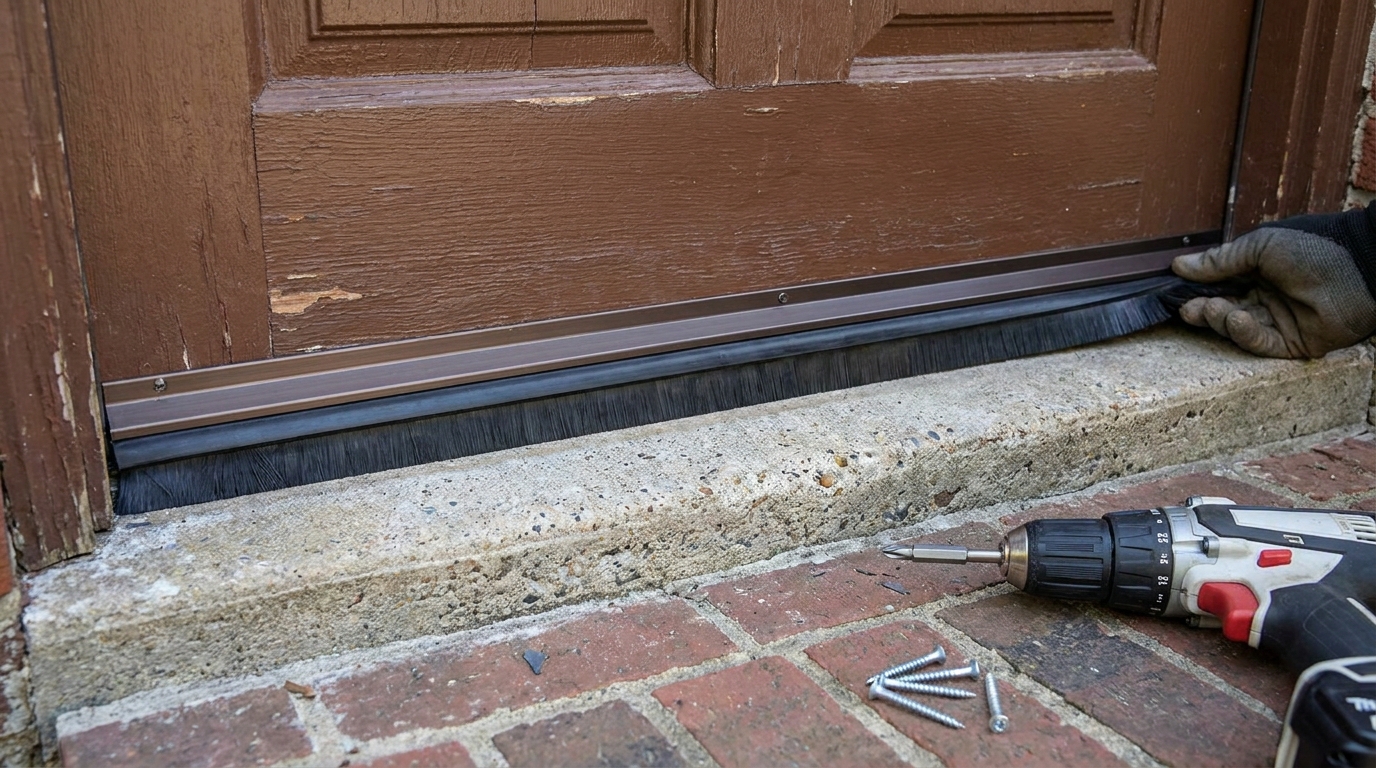
Remove the old sweep if present and clean the bottom edge of the slab. Cut the new sweep to match the door width according to the manufacturer’s instructions. If it is a metal-backed sweep, you may need a hacksaw for the carrier and scissors or a utility knife for the flexible insert. Align the sweep so it contacts the threshold evenly, then fasten it loosely at first.
Open and close the door several times while checking resistance. If the sweep drags hard, adjust it upward slightly. If you can still see light or feel air movement below, lower or reposition it. The right fit is usually a light but consistent contact that seals without making operation difficult. On some doors, especially those with adjustable thresholds, a small threshold adjustment after sweep installation delivers the best result.
If the threshold itself is worn, cracked, or uneven, replacing the sweep alone may not solve the problem. In that case, consider whether a new threshold or threshold cap is necessary. Because water management also matters at this location, choose products designed for exterior conditions rather than improvising with interior-only materials.
Step 6: Test the finished seal carefully
Once all components are installed, test the door in a methodical way. Open and close it from both sides. Make sure the latch engages fully and that the handle operation feels normal. The door should not require force to shut. A smooth close with gentle, even resistance is a good sign that the weatherstripping is working as intended.
Repeat the paper test around the perimeter. You should feel more resistance than before, but not so much that the paper tears immediately at every point. Perform the light test again, especially at the top corners and bottom edge. These are common locations for missed gaps. On a windy day, place your hand near the jamb and threshold to see whether drafts have improved.
If one area still leaks, resist the temptation to simply add more material over top. Instead, diagnose the reason. The strip may be the wrong profile for that gap, the door may need hinge or strike adjustment, or the threshold may be uneven. Thoughtful correction almost always performs better than layering products until the assembly becomes bulky and unreliable.
Common mistakes beginners should avoid
The first common mistake is skipping the assessment stage. If the frame is loose, the hinges are sagging, or the threshold is damaged, weatherstripping alone will not fully solve the issue. The second mistake is choosing product based only on price or convenience rather than gap type and door condition. Exterior entry doors see frequent use and deserve durable materials.
Another frequent problem is poor surface preparation. Adhesive strips applied to dusty or damp surfaces tend to fail prematurely. Uneven cuts at corners can also create small leakage paths that are easy to miss at first. And perhaps most commonly, homeowners install a seal that is too thick, assuming a tighter fit must be better. In reality, overcompression can reduce performance, increase wear, and make the door frustrating to use.
It is also easy to confuse trim leaks with door edge leaks. If you still feel drafts after weatherstripping the moving parts, inspect the interior and exterior trim. Air may be coming through gaps between the frame and wall assembly rather than around the slab itself. In that case, careful air sealing with appropriate caulk or low-expansion foam may be the missing step.
How weatherstripping fits into whole-home air sealing
Door weatherstripping is one of the best examples of a small project with a meaningful payoff. Still, it is most effective when viewed in the context of the whole building envelope. Homes lose energy through many pathways, including attic penetrations, basement rim joists, plumbing and wiring openings, duct leaks, and poorly sealed windows. If your house remains drafty after this project, the next step may be a broader energy assessment rather than additional door products.
That broader perspective aligns with current home-performance thinking. More homeowners are now interested in airtightness not just for energy savings, but also for resilience, comfort, quieter interiors, and better moisture control. Rebates, utility programs, and weatherization assistance in some regions may support first-step projects like weatherstripping while also encouraging larger improvements over time.
If you are planning other upgrades, such as insulation, a heat pump, or window replacement, think of weatherstripping as foundational maintenance. It helps your existing systems perform better and gives future investments a stronger starting point. Even if you later pursue blower door testing or larger envelope work, a well-sealed entry door remains part of that continuous air barrier strategy.
Maintenance tips for long-lasting performance
Once installed, weatherstripping benefits from occasional inspection. Check it at the start of heating season and again before the warmest months if you use air conditioning regularly. Look for flattening, tearing, detachment, or dirt buildup that may affect contact. A quick wipe with a damp cloth can help keep some materials functioning smoothly.
Pay attention to seasonal changes. Wood doors can expand and contract with humidity, and even well-built doors may need minor hardware adjustments from time to time. If a seal that worked beautifully in autumn feels too tight in midsummer, the issue may not be installation failure. Small strike plate or hinge adjustments can restore balanced compression without replacing the weatherstripping.
Door sweeps also deserve regular attention because they are exposed to abrasion, dirt, moisture, and repeated movement across the threshold. If a sweep becomes torn or bent, replacing it promptly helps preserve the gains you made. In many homes, bottom seals wear faster than top and side strips simply because they experience more friction and contact.
When to call a professional
Most homeowners can handle basic weatherstripping successfully, but there are situations where professional help makes sense. If the door frame is visibly out of square, the threshold has water damage, the slab is warped, or the latch alignment is significantly off, a carpenter or door specialist may be able to correct the root problem more efficiently. The same is true if your entry system includes sidelights, multipoint locking hardware, or specialty seals that need manufacturer-specific parts.
You may also want a professional energy assessment if your home has persistent comfort issues in multiple rooms. A blower door test can reveal whether the entry door is a major contributor or just one visible symptom of broader leakage. That information can help you prioritize the next improvements in a more strategic and cost-effective way.
A small project that supports comfort, savings, and smarter home performance
Installing door weatherstripping is a refreshingly practical home upgrade. It does not require a large budget, advanced tools, or a full renovation plan to deliver noticeable benefits. When done with care, it can reduce drafts, improve comfort, support lower energy use, and help your building envelope perform the way it was meant to. It is the kind of maintenance task that feels modest on paper but meaningful in daily life.
The most important lesson is that installation quality matters as much as product choice. Assess the door first, choose materials that suit the actual gaps, install the top and side seals with even compression, and treat the bottom edge as its own sealing condition. Test the result, make small adjustments, and remember that weatherstripping works best as part of a larger approach to airtightness.
In that sense, door weatherstripping is more than a draft fix. It is an approachable step toward a more energy-efficient home that feels calmer, better protected, and easier to live in through every season. For many households, that is exactly what sustainable home improvement should look like: practical, effective, and well within reach.


No Comment! Be the first one.