


Essential Steps to Winterize Your Pipes and Prevent Freezing
Winterizing your pipes is one of those jobs that does not look urgent until the day it suddenly is. A frozen line can turn into a burst pipe, and once that happens, the cost is not just the pipe itself. You may be dealing with soaked drywall, damaged flooring, mold risk, ruined insulation, and days or weeks of cleanup. For most homeowners, a few hours of preventive work in fall and early winter is far cheaper and easier than repairing water damage in January.
Table Of Content
- Why pipes freeze in the first place
- Which pipes are most at risk
- Step 1: Walk the house and inspect every vulnerable plumbing area
- What to write down during the inspection
- Step 2: Gather the right winterizing materials
- Step 3: Insulate exposed pipes properly
- When heat cable makes sense
- Step 4: Seal drafts around plumbing penetrations
- Step 5: Winterize outdoor faucets, hose bibs, and exterior water lines
- Irrigation lines and other exterior systems
- Step 6: Keep indoor temperatures stable
- Step 7: Open cabinet doors where pipes are exposed to cold walls
- Step 8: Let faucets drip during severe cold when needed
- Step 9: Know where your main water shutoff valve is before there is a problem
- Step 10: Prepare differently if you will be away from home
- Common mistakes to avoid
- What to do if you suspect a pipe is already frozen
- When a bigger fix is worth it
- A practical winter pipe checklist for homeowners
- Final thoughts
The basic idea is simple. Pipes freeze when they are exposed to low temperatures long enough for the water inside to turn to ice. Water expands as it freezes, and that expansion can create pressure that causes a pipe to split, sometimes in a spot far from the visible ice blockage. That is why a pipe can seem fine until it thaws and suddenly starts leaking behind a wall or over a finished basement.
Official guidance across North America stays pretty consistent on this point. Public Safety Canada, the American Red Cross, FEMA, and other authorities all push the same practical steps. Keep vulnerable plumbing warmer, reduce cold air exposure, drain or protect outdoor lines, and maintain some water movement in high-risk conditions. If you are looking for a clear homeowner plan without the guesswork, that is what this guide covers.
This article walks through the process step by step. You will learn how to identify the pipes most likely to freeze, what supplies to get, how to insulate exposed lines, how to shut down outdoor plumbing properly, and what to do when severe cold is coming. You will also see the common mistakes that cause trouble, including leaving hoses attached, dropping the thermostat too low, and trying to thaw pipes with unsafe heat sources.
Why this matters: Insurance industry data has long shown that winter storms and burst pipes create major losses, and some recent public guidance notes that average frozen-pipe claims can exceed $30,000. Prevention is usually inexpensive. Cleanup rarely is.
Why pipes freeze in the first place
A lot of people assume pipes only freeze when outdoor temperatures drop well below zero for long stretches. In practice, it often takes less than that. A pipe running through an exterior wall, drafty crawl space, garage, attic, or under an uninsulated sink cabinet can freeze even when the rest of the house feels reasonably warm. The weak point is not your comfort level in the living room. It is the temperature around the pipe itself.
Another thing homeowners miss is that freezing does not always damage the pipe right where you expect. The ice creates a blockage, and pressure can build in the line between that blockage and a closed faucet. That pressure can cause the pipe to fail at a joint, fitting, or slightly weaker section somewhere else. So when people say a pipe burst because the ice expanded, that is true in a general sense, but the actual break can happen away from the frozen section.
Homes in mild climates are not immune either. In fact, they can be more vulnerable during unusual cold snaps because the building was never designed with deep winter protection in mind. Less insulation, more exposed lines, and homeowners who are not used to winter prep can combine into a bad situation quickly. That is one reason winter readiness messaging now reaches well beyond traditional cold-weather regions.
Which pipes are most at risk
Before you buy anything or start wrapping lines, you need to know where the problem spots usually are. The pipes most likely to freeze are generally the ones in places that are unheated, poorly insulated, exposed to drafts, or close to the building exterior. That includes basements, crawl spaces, attics, garages, utility rooms, exterior walls, and the plumbing under kitchen and bathroom sinks located against outside walls.
Outdoor plumbing is another major risk area. Hose bibs, sillcocks, outdoor faucets, irrigation lines, and any branch piping feeding exterior fixtures all need attention before hard freezes arrive. Even if the visible spigot is outside, the actual danger may be inside the wall cavity where the pipe transitions through the house. A hose left attached can hold water in place and increase the odds of freeze damage.
If you have had frozen pipes before, start there. Houses often repeat the same problems because the underlying conditions never changed. A line in a crawl space that froze two winters ago is still a high-risk line until it is insulated, draft-protected, heated, rerouted, or otherwise improved.
Step 1: Walk the house and inspect every vulnerable plumbing area
Your first real job is a full inspection. Go room by room and then into the utility spaces most people ignore. Check basements, crawl spaces, attics, garages, under sinks, around water heaters, near washing machine hookups, and anywhere plumbing runs along an exterior wall. Bring a flashlight and take notes because once you start seeing exposed lines and drafts, it is easy to forget which spots need work.
Look for pipes with little or no insulation, gaps around pipe penetrations, cracked caulk, missing weatherstripping, open foundation vents that should not be open in winter, and signs of previous trouble such as water stains or patched wall sections. Pay close attention to places where cold outside air can travel directly onto a line. Even a small gap where a pipe passes through framing can create a cold-air path that lowers the local temperature enough to cause freezing.
Do not stop at visible supply lines. Check valves, elbows, tees, shutoffs, meter areas, and short sections near outside walls. Fittings and valves are often harder to insulate neatly, and they can become cold spots if left exposed. If your home has a well system or water treatment equipment in an unheated part of the house, that equipment should be part of the inspection too.
What to write down during the inspection
A simple list will make the next steps easier. Note the pipe material if you can, the location, whether the pipe is exposed or inside a cabinet, how close it is to an exterior wall, and whether you feel cold air nearby. Also record whether there is already insulation in place and whether it is intact or damaged. This is not overkill. It helps you buy the right materials once and deal with the highest-risk areas first.
Step 2: Gather the right winterizing materials
Most pipe winterizing jobs do not require expensive tools. For many homes, the core supplies are foam pipe insulation sleeves, fiberglass wrap for awkward shapes, tape rated for insulation seams, weatherstripping, caulk or spray foam for draft sealing, and insulated outdoor faucet covers where appropriate. If you have a persistent freezing problem in a specific location, you may also need a UL-listed heat cable or heat tape approved for your pipe type and installation condition.
Pipe insulation sleeves are usually the easiest place to start because they are inexpensive, widely available, and straightforward to install. They work best on exposed straight runs and help slow heat loss from the water line. They are not magic by themselves in extreme cold, but they make a real difference when combined with draft sealing and stable indoor heat.
If you plan to use heat tape or heat cable, read the manufacturer instructions carefully before you buy. Not every product is suitable for every pipe material or insulation type. Improper installation can create a fire risk or damage the pipe. This is one area where following the label matters more than improvising.
Step 3: Insulate exposed pipes properly
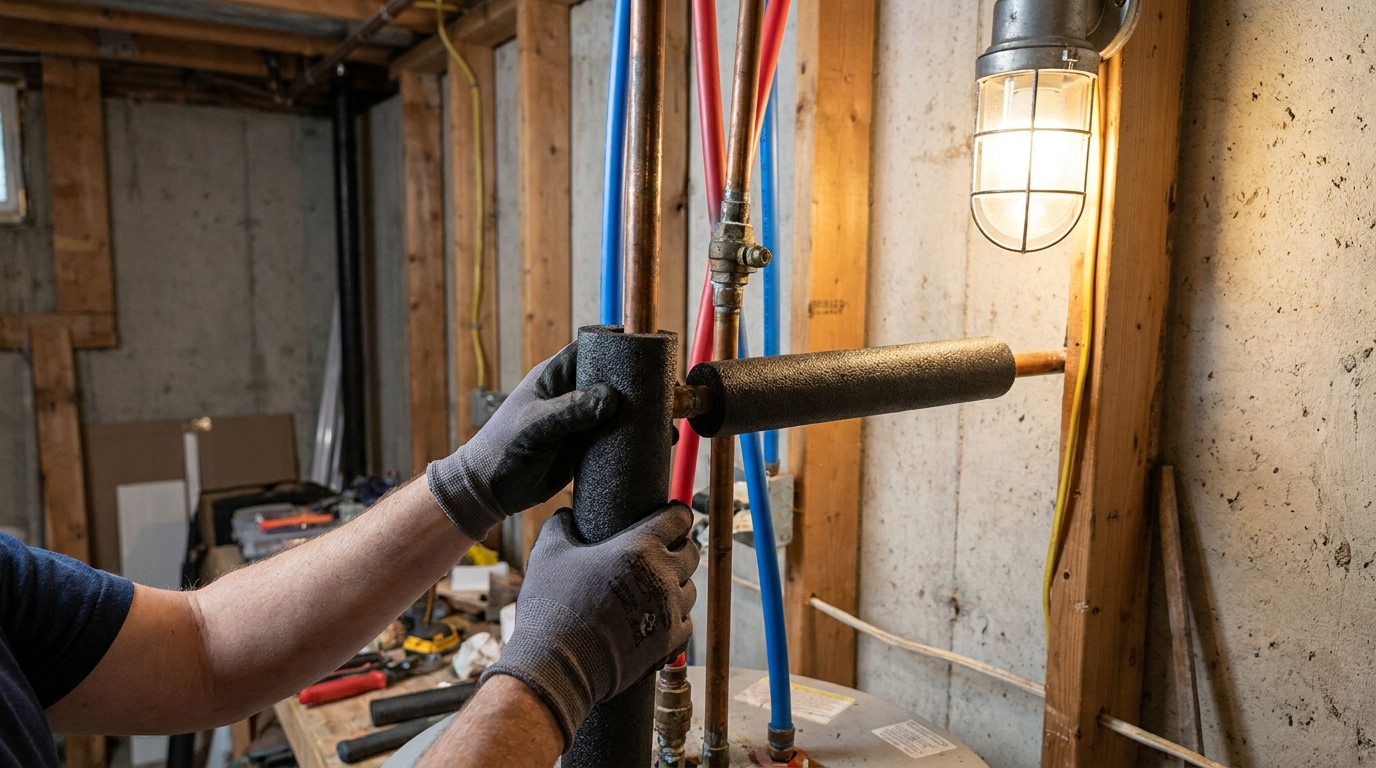
Once you have identified the vulnerable lines, start insulating the exposed supply pipes first. Focus on unheated spaces and areas with a history of freezing. Foam sleeves should fit snugly around the pipe, with seams closed according to the product instructions. Cut them cleanly around hangers, valves, and turns so there are no major gaps where cold air can reach the pipe.
Do not treat insulation as decoration. Loose, poorly fitted sleeves with open seams and exposed fittings leave weak points. If the pipe changes direction or passes through a cramped area, use shorter pieces, insulation tape, or wrap material so the coverage remains continuous. The idea is to reduce heat loss across the full vulnerable section, not just the easiest straight pieces.
Pay special attention to pipes near exterior foundation walls, rim joists, garage ceilings, and crawl-space entries. These areas often stay colder than the rest of the structure. If the pipe sits right against a cold surface or in the path of air leakage, insulation on the pipe alone may not be enough. In those cases, combine pipe insulation with basic building-envelope improvements like air sealing and adding insulation to the surrounding space.
When heat cable makes sense
Heat cable is not necessary for every home, but it can be a practical fix for lines that remain vulnerable even after insulating and sealing drafts. This often comes up in crawl spaces, well houses, garages, and older homes with awkward pipe routing. Use only listed products, follow spacing and overlap instructions exactly, and make sure the cable is approved for the pipe material and environmental conditions. If you are unsure, bring in a licensed plumber or electrician rather than guessing.
Step 4: Seal drafts around plumbing penetrations
If cold air can reach the pipe, the pipe can still freeze. That is why draft sealing matters almost as much as insulation. Look for openings where pipes pass through walls, floors, sill plates, cabinets, or framing. Small gaps can usually be sealed with caulk. Larger openings may need spray foam designed for that purpose.
This step often gives homeowners the best return for the time spent. A pipe in a basement might technically be indoors, but if outside air is washing across it through an unsealed penetration, the pipe is living in outdoor conditions. Seal the route that the cold air is taking. In older homes, you may find several such openings around utility entries, under sinks, behind tubs, and around laundry hookups.
Be careful not to block ventilation that a combustion appliance requires, and do not spray foam into places where it could interfere with equipment operation or future service access. If a pipe penetration is near a furnace, boiler, or water heater venting component, use appropriate materials and keep safety clearances in mind. When in doubt, get a contractor to look at it.
Step 5: Winterize outdoor faucets, hose bibs, and exterior water lines
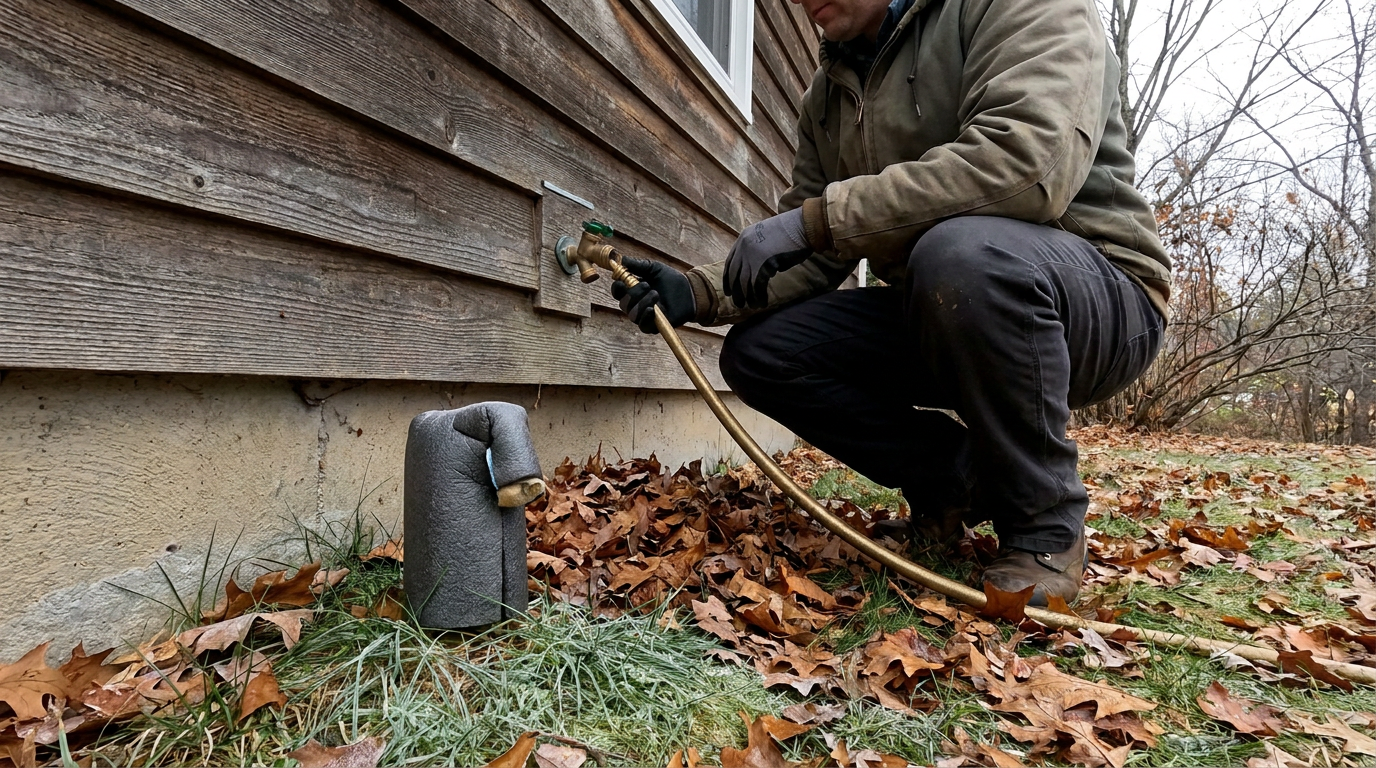
Outdoor plumbing causes a lot of preventable winter damage. The process here is simple, but it needs to be done thoroughly. Disconnect all garden hoses first. A hose left attached can trap water in the faucet assembly and prevent proper draining, which raises the risk of freeze damage inside the faucet body and the connected line.
After removing hoses, shut off the interior supply valve feeding each outdoor faucet if your home has one. Then open the outdoor faucet to drain the remaining water. If there is a bleeder cap on the interior shutoff assembly, use it according to the valve design so trapped water can escape from the line. Once drained, leave the outside faucet open or in the recommended position for your setup so any residual water has room rather than pressure.
If you have frost-proof hose bibs, do not assume you are done automatically. They reduce risk, but they only work properly when hoses are removed and the line can drain. If the house has old standard sillcocks with no interior shutoff, that is worth upgrading when practical. It is not the only winterization step, but it is a durable improvement.
Irrigation lines and other exterior systems
If you have a lawn irrigation system, backflow preventer, pool supply line, outdoor kitchen sink, detached garage plumbing, or seasonal exterior fixture, winterization may involve more than just a faucet shutoff. Irrigation systems often need to be professionally blown out or drained according to manufacturer and climate requirements. Exterior branch lines that serve infrequently used spaces should be reviewed before hard freezes start, especially if they have frozen before.
Step 6: Keep indoor temperatures stable
A common mistake is trying to save money by letting the house temperature drop too much at night or while away. Stable heat is one of the most reliable forms of pipe protection. The Red Cross advises leaving a home heated to at least 55 degrees Fahrenheit when away during cold weather. That advice is practical because the goal is not your comfort while gone. It is making sure hidden plumbing areas do not drift into freezing conditions.
In occupied homes, avoid dramatic thermostat setbacks during severe cold. The savings are usually minor compared with the risk if a vulnerable area cools off too much. Garages, additions, laundry rooms, and rooms over unheated spaces deserve extra attention because they may not track the main living area temperature well.
If there are water supply lines in the garage, keep the garage door closed as much as possible during cold weather. This is a simple step, but it makes a difference. Every unnecessary opening lets a large volume of cold air into a space that is often already one of the weakest thermal zones in the house.
Step 7: Open cabinet doors where pipes are exposed to cold walls
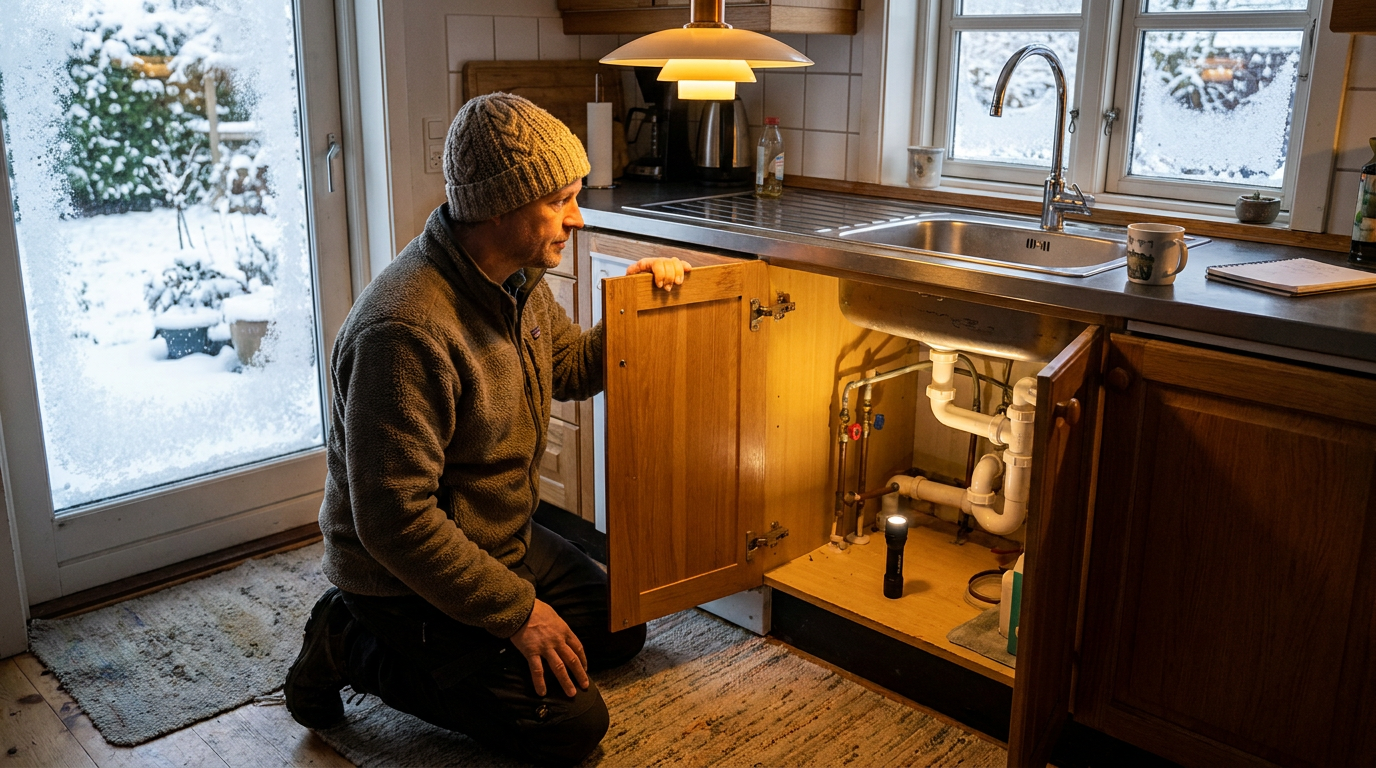
Kitchen and bathroom sinks on exterior walls are frequent trouble spots. The plumbing may be inside the house, but the cabinet can stay much colder than the room, especially if the wall cavity lacks insulation or there is a draft behind the cabinet. Opening the cabinet doors during a cold snap allows warmer room air to circulate around the pipes.
This is one of the easiest protective steps, and it is repeatedly recommended for a reason. You are not fixing the underlying insulation issue by doing it, but you are giving the pipes access to the heat you are already paying for. If you have small children or pets and cleaning supplies are stored under the sink, move those items somewhere secure before leaving cabinets open.
You should also use the cabinet area as a clue. If opening the doors makes a big temperature difference or you repeatedly worry about those pipes, there is probably an air leakage or insulation problem worth addressing permanently when the weather is better.
Step 8: Let faucets drip during severe cold when needed
Running water is harder to freeze than standing water. During extreme cold, especially when a known vulnerable pipe is involved, letting a faucet connected to that line run at a trickle can help prevent freezing. This is not something you have to do every winter day, and it is not a substitute for insulation and proper preparation. It is a short-term protective measure for high-risk conditions.
Public Safety Canada and the American Red Cross both recommend this approach during severe cold or winter storms. The key is to think strategically. If one bathroom branch or kitchen line has the greatest freeze risk, use that line rather than randomly dripping every faucet in the house. Both hot and cold supply paths matter, but many recommendations focus on a small cold-water trickle.
Some homeowners resist this because they dislike the idea of wasting water. That is understandable, but compare a controlled trickle for a limited period with tens of thousands of dollars in damage from a burst pipe. Used sparingly and only during high-risk cold spells, it is a practical tool.
Step 9: Know where your main water shutoff valve is before there is a problem
This step is not exactly winterization, but it belongs in every winter pipe plan because things still go wrong sometimes. If a pipe bursts, the main water shutoff is what stops a bad day from becoming a disaster. Every adult in the household should know where that valve is, how it operates, and whether it requires a tool to turn.
Do not assume you will figure it out under pressure while water is spraying into a wall cavity or across the basement floor. Find it now, clear access to it, and test your understanding before winter is at its worst. If the valve is badly corroded, stiff, leaking, or hidden behind storage, deal with that before you need it in an emergency.
It also helps to know where branch shutoffs are located for toilets, sinks, washing machines, and outdoor spigots. In some cases, isolating a smaller part of the system is enough to control a problem while keeping the rest of the house in service.
Step 10: Prepare differently if you will be away from home
Vacant houses are at much higher risk because small problems can continue unnoticed for days. If you are leaving during winter, never shut the heat off completely unless the entire plumbing system has been professionally drained and winterized for vacancy. For most homeowners, the safer choice is to keep the home heated to at least 55 degrees Fahrenheit, shut off and drain outdoor faucets, open interior cabinet doors at vulnerable sinks, and consider shutting off the main water supply if someone can monitor the property and the heating system remains protected.
If you do shut off the main supply before leaving, remember that this choice has implications for appliances, boilers, fire sprinkler systems, and other connected equipment. Do not make that move casually. The right approach depends on the building systems you have and how long you will be gone.
For longer absences, ask a trusted neighbor, family member, or property manager to check the home during cold weather. They should verify that the heat is on, look for signs of leaks, and listen for unusual water sounds. Smart leak detectors and low-temperature sensors can add another layer of protection, but they work best as backup, not as a replacement for basic winter prep.
Common mistakes to avoid
Most winter pipe failures are not caused by a total lack of effort. They happen because someone did part of the job and assumed that was enough. The biggest mistake is insulating the pipe but ignoring the draft that is chilling it. The second is protecting indoor lines while forgetting the outdoor faucet or attached hose. The third is trusting a deep thermostat setback in very cold weather.
Another serious mistake is trying to thaw a frozen pipe with an open flame, blowtorch, propane heater, or any fuel-burning device used too close to building materials. This is unsafe and can start a fire or damage the pipe further. Safer thawing methods include gentle heat from a hair dryer, portable space heater used carefully according to instructions, heating pad, or warm towels, but only when the pipe is accessible and the area is dry and safe. If the frozen section is inside a wall, near insulation, or you are not sure where it is, call a plumber.
People also underestimate how often occupied homes still suffer frozen pipes. Being home does not protect the line in the crawl space. If the problem area is not being heated, insulated, or checked, the house can be full of people and still develop a frozen pipe behind the scenes.
- Do not leave hoses attached to outdoor faucets in winter.
- Do not assume a mild-climate home is safe during an unusual cold snap.
- Do not lower the thermostat too far to save a little on heating.
- Do not ignore garage, crawl-space, attic, and cabinet plumbing.
- Do not use open flames to thaw frozen pipes.
- Do not wait until the first storm warning to figure out where your shutoff valve is.
What to do if you suspect a pipe is already frozen
If you turn on a faucet and get only a trickle, or no water at all, a pipe may already be frozen. Start by checking whether the issue affects one fixture, one room, or the whole house. That helps narrow down where the frozen section may be. Look in the most likely places first, such as under sinks on exterior walls, basements, crawl spaces, and near outdoor plumbing runs.
If you can locate the frozen section and it is exposed, you can try warming it gradually with safe heat. Keep the faucet open so water can flow as the ice begins to melt. Work from the faucet end back toward the frozen area if possible. Stop immediately if you see any sign of leakage because the pipe may have already split.
If you cannot find the frozen section, if the pipe is hidden inside a wall or ceiling, if there is any electrical hazard, or if you are dealing with multiple frozen areas, call a licensed plumber. Also be ready to shut off the main water when the line thaws, because that is often when a hidden crack reveals itself.
When a bigger fix is worth it
Some houses have recurring pipe-freeze problems because the plumbing route was poor from the start. A line that runs through an unconditioned crawl space, an attic corner, or an exterior wall with limited insulation may need more than seasonal patchwork. In those cases, a permanent solution could mean rerouting the pipe through conditioned space, adding insulation to the surrounding building assembly, upgrading the outdoor faucet to a frost-proof model, or installing a properly controlled heat cable system.
Those upgrades cost more upfront than a handful of foam sleeves, but there is a point where repeating the same seasonal worry stops making sense. If a line has frozen more than once, or if access is difficult and the damage potential is high, talk to a plumber about a durable fix. Good building practice is about reducing weak points, not living with them indefinitely.
A practical winter pipe checklist for homeowners
If you want the short version to work from each fall, use this checklist before the coldest weather arrives. Start with an inspection of all vulnerable plumbing locations. Insulate exposed supply lines, especially in basements, crawl spaces, garages, attics, and utility spaces. Seal drafts where pipes pass through walls, floors, and cabinets. Remove and store garden hoses, shut off interior supply valves to outdoor spigots, and drain exterior lines where possible.
After that, confirm that the home heating system can maintain a steady indoor temperature and that no room or zone is being left too cold. Identify sink cabinets on exterior walls and be ready to open them during severe cold. Learn the location of the main water shutoff valve and verify that access is clear. When an extreme cold spell is forecast, close the garage door, open vulnerable cabinets, and consider running a small trickle of water through known problem lines.
If you are leaving home, keep the heat at a safe minimum rather than switching it off and arrange for someone to check the property. None of these steps are complicated by themselves. The value comes from doing all of them together, because pipe freezing is usually the result of several small vulnerabilities lining up at once.
Final thoughts
Winterizing your pipes is not glamorous work, but it is solid home maintenance. It protects the parts of the house that nobody thinks about until they fail. More important, it protects your time, your money, and the building itself. When water gets loose inside a house, it does not take long for a simple plumbing problem to become a construction problem too.
The good news is that most of the effective steps are straightforward. Inspect the vulnerable areas, insulate exposed lines, seal the drafts that chill them, drain and shut down outdoor plumbing, keep indoor temperatures stable, and be ready with simple protective measures during extreme cold. If you have recurring trouble spots, treat them seriously and consider a more permanent fix.
That is the practical way to approach winter pipe protection. Do the basic work before the cold arrives, avoid the common mistakes, and know how to respond if a line starts to freeze anyway. A little preparation now is still the cheapest plumbing repair you can make.

No Comment! Be the first one.