



How to Conduct Load-Bearing Checks in Your Home: A Practical Homeowner Guide
If you are planning a renovation, noticing cracks, or simply trying to understand how your house is put together, learning how to conduct basic load-bearing checks is a smart place to start. Homeowners do not need to calculate structural capacity on their own, and they should not try to replace engineering judgment with a few tools and online tips. What they can do is perform a careful first pass, identify likely load paths, spot signs of movement, and gather clear information before calling in a professional.
Table Of Content
- What load-bearing really means in a house
- Why load-bearing checks matter before renovations or repairs
- Start with the right mindset and basic tools
- Step 1: Read the house as a system, not as isolated rooms
- Step 2: Check the basement or crawlspace first
- Step 3: Identify joist direction and wall orientation
- Step 4: Look for stacked walls and continuous load paths
- Step 5: Inspect for visible warning signs of movement or distress
- Step 6: Measure, document, and compare conditions
- Step 7: Learn the common causes of structural movement
- Misconceptions that lead homeowners in the wrong direction
- When a wall is probably suspicious enough to leave alone
- When to call a structural engineer or qualified building professional
- How permits and inspections fit into load-bearing work
- A practical homeowner checklist for first-pass load-bearing checks
- Expert tips that make homeowner inspections more useful
- Final thoughts: inspect carefully, but know where the line is
That distinction matters. A house carries weight through a connected system of foundations, floors, walls, roofs, columns, and beams. In Canada, these are the structural elements that resist dead loads and live loads, and changes to them are usually controlled through permits and inspections. A simple wall removal can quickly become structural work if that wall is transferring load from above, and that is where mistakes get expensive.
This guide is built around practical field observation. You will learn how to read the clues your house gives you, how to inspect visible framing, how to compare conditions from one level to another, and how to document what you see. You will also learn the limits of a homeowner inspection, because the goal is not confidence for its own sake. The goal is a safer house and better decisions.
Important: A homeowner load-bearing check is a screening process, not a structural certification. If you are uncertain about a wall, beam, post, floor sag, or foundation movement, stop short of demolition and get qualified advice.
What load-bearing really means in a house
A load-bearing element carries weight from one part of the building down to another part that can support it. In simple terms, the roof pushes down on rafters or trusses, those loads transfer into walls or beams, those walls or beams transfer into posts or foundation walls, and everything eventually lands on footings and soil. If any part of that path is weakened, cut, moved, or overloaded without proper design, the whole system can be affected.
Many homeowners think of load-bearing only in terms of interior walls, but that is too narrow. Foundations, floor systems, roof systems, columns, beams, lintels over openings, and even certain short wall sections can all be part of the load path. A non-bearing partition may simply divide space, while a bearing wall may be doing critical structural work even if it looks like any other wall once drywall is up.
Modern homes also complicate the picture. Open-concept layouts often concentrate loads at perimeter walls, posts, or hidden beams. Engineered wood products, structural insulated panels, and manufactured framing systems can change what is visible and what is not. That means there are useful clues homeowners can follow, but there is no single shortcut that works in every house.
Why load-bearing checks matter before renovations or repairs
The most common time homeowners think about load-bearing checks is before removing a wall. That is understandable, but it is not the only reason to inspect. A house that has developed sloping floors, sticky doors, widening cracks, or separated trim may be showing signs that the structure is moving. Those symptoms are not always a major failure, but they should never be dismissed without context.
There is also a legal and practical side. In many Canadian jurisdictions, structural changes require permits, and municipalities often inspect structural framing at set stages of the work. Local rules can vary by province, territory, and municipality, so it is important to confirm what applies where you live. The current National Building Code of Canada publication cycle is 2025, but local adoption and enforcement still happen jurisdiction by jurisdiction.
A good load-bearing check helps you ask better questions. Instead of saying, “I want to open this room up,” you can say, “This wall runs perpendicular to the joists, aligns with a beam in the basement, and shows a stacked load path from roof to foundation. I need professional review before touching it.” That is the kind of practical observation that saves time, money, and risk.
Start with the right mindset and basic tools
Before you inspect anything, set your expectations properly. You are not trying to prove that an element is safe under all loads. You are trying to identify likely structural roles, obvious warning signs, and situations where expert input is necessary. That means patience matters more than confidence, and careful notes matter more than guesswork.
You do not need specialized equipment for a first pass. A flashlight, tape measure, a quality level, a stud finder, a notebook, painter’s tape, and your phone camera will go a long way. If you have access to original plans or renovation drawings, keep them nearby, but remember that as-built conditions sometimes differ from plans, especially in older homes or homes with undocumented renovations.
Dress for the space you are entering. Basements, crawlspaces, attics, and utility rooms can be dusty, cramped, or poorly lit. Good shoes, gloves, and eye protection are sensible if you will be working near exposed framing or insulation. If there is any sign of electrical hazards, moisture damage, mold, or unsafe access, stop and bring in the right professional instead of forcing your way through the inspection.
Step 1: Read the house as a system, not as isolated rooms
The biggest mistake homeowners make is judging a wall by the room they are standing in. Structural load paths do not care about room names or design plans. A wall that seems minor on the main floor may be carrying floor loads from above or roof loads from the attic. The first step is to think vertically and trace how weight likely moves from the top of the house down to the foundation.
Walk through each level of the home and look for alignment. Does an upper floor wall sit directly over a main floor wall? Does a main floor wall line up with a basement beam, post, or foundation wall? Do multiple framing elements seem to stack on top of one another from roof to basement? When loads line up vertically, there is a good chance you are looking at an intentional load path rather than a random partition.
Also pay attention to the shape and age of the house. Simple rectangular houses often have clearer framing patterns than homes with additions, vaulted ceilings, split levels, or heavily renovated interiors. Every offset, bump-out, or long unsupported span deserves extra caution because these areas often rely on hidden beams, engineered members, or concentrated load points.
Step 2: Check the basement or crawlspace first
If your home has a basement or crawlspace, start there. This is often the most useful place to understand the primary structural layout because the framing is more exposed. Joists, beams, support posts, and foundation walls can reveal how the house is carrying loads above. In many homes, this is the clearest place to separate likely bearing elements from simple partitions.
Look up at the floor joists. Note which direction they run and where they stop or overlap. A wall above that runs perpendicular to the joists has a higher chance of being load-bearing, especially if those joists bear on a beam or wall directly beneath. A wall that runs parallel to the joists may be non-bearing, but do not assume that automatically because it may still support point loads, short joist spans, or framing changes.
Find the main beam if there is one. In many houses, this will run roughly down the middle and be supported by posts or columns. Then look for posts transferring load to footings or thicker bearing points below. If a wall above aligns with this beam line or post line, that is a strong clue that it plays a structural role.
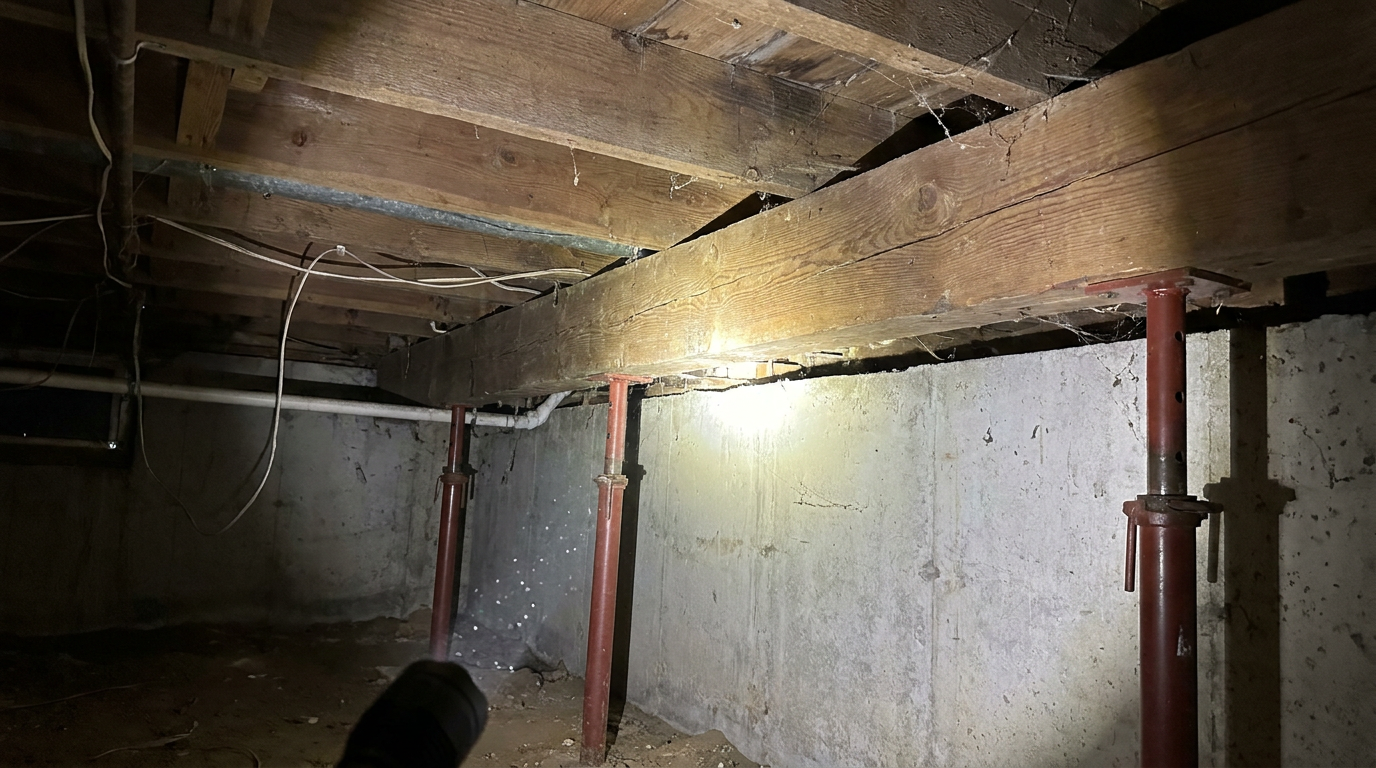
Pay attention to foundation walls as well. Exterior foundation walls are usually part of the main load path, but interior foundation walls or thickened support lines can be important too. In houses with additions, you may see old exterior walls now buried inside the footprint, and these sometimes continue to carry loads in ways that are not obvious from the finished rooms above.
If the basement ceiling is finished, you may not see enough to draw conclusions. In that case, look for utility penetrations, soffits, dropped ceiling sections, or access openings that suggest where beams are hidden. A finished basement does not prevent an inspection, but it does reduce what a homeowner can confirm visually.
Step 3: Identify joist direction and wall orientation
Once you know the joist direction, you can begin comparing it to the walls on the floor above. In basic framing, joists span between supports. A wall that runs perpendicular to those joists often receives some of that load. This is one of the oldest and most practical field clues, but it only works when you use it as one clue among several.
For example, if you are considering removing a wall between a kitchen and dining room, go below that area and see how the joists run. If they cross over the wall line and appear to land on it, that wall deserves caution. If the joists run parallel and uninterrupted past it, the wall may be non-bearing, but you still need to look for other clues such as beams, posts, doubled joists, or loads from above.
Do not rely on a hollow sound, stud finder reading, or wall thickness alone. Homeowners often assume that a solid-feeling wall is bearing and a lighter wall is not. That is not reliable. Structural function depends on how the framing connects above, below, and around that wall, not how it sounds when tapped.
Step 4: Look for stacked walls and continuous load paths
Load-bearing elements often stack in some consistent way. A second floor wall may sit over a first floor wall, which sits over a basement beam or foundation support. That kind of alignment is one of the clearest signs that the house was designed to carry weight through that line. Stand in doorways, use a tape measure from reference points, and compare wall locations from level to level.
Sometimes the stacking is not exact because framing can offset loads through beams or headers. That is why this step is about patterns, not certainty. If a wall above appears to stop over a wide opening below, there may be a concealed beam carrying the load. If you see a bulkhead, thicker ceiling area, or boxed-down section in the room below, it may be hiding the structural member doing that work.
Roofs matter too. In attic spaces, visible trusses or rafters can tell you whether loads are being pushed onto exterior walls only or whether there are interior bearing lines. Older houses with site-built roofs often have more varied bearing conditions than newer truss roofs, where loads are more clearly designed into a system. Either way, roof framing should be treated carefully because changes there affect both gravity loads and lateral stability.
Step 5: Inspect for visible warning signs of movement or distress
Knowing where loads likely travel is only half the job. The other half is looking for signs that the structure may be moving or struggling. Many homes show minor cosmetic cracks over time, and not every crack means danger. What matters most is the pattern, the location, and whether the condition is changing.
Start with the floors. A floor that feels bouncy, visibly sags, or slopes noticeably in one direction deserves attention. Some older homes have floors that are not perfectly level, and that alone is not unusual. What raises concern is a floor that appears to have changed, a localized dip near a support line, or a slope that comes with other signs such as cracking or sticking doors.
Next, inspect drywall and plaster, especially around doors, windows, and ceiling corners. Cracks radiating from the corners of openings can be normal shrinkage in some cases, but they can also indicate movement when paired with frame distortion or widening over time. Look for separated trim, nail pops, gaps at crown moulding, and uneven reveals around door casings.
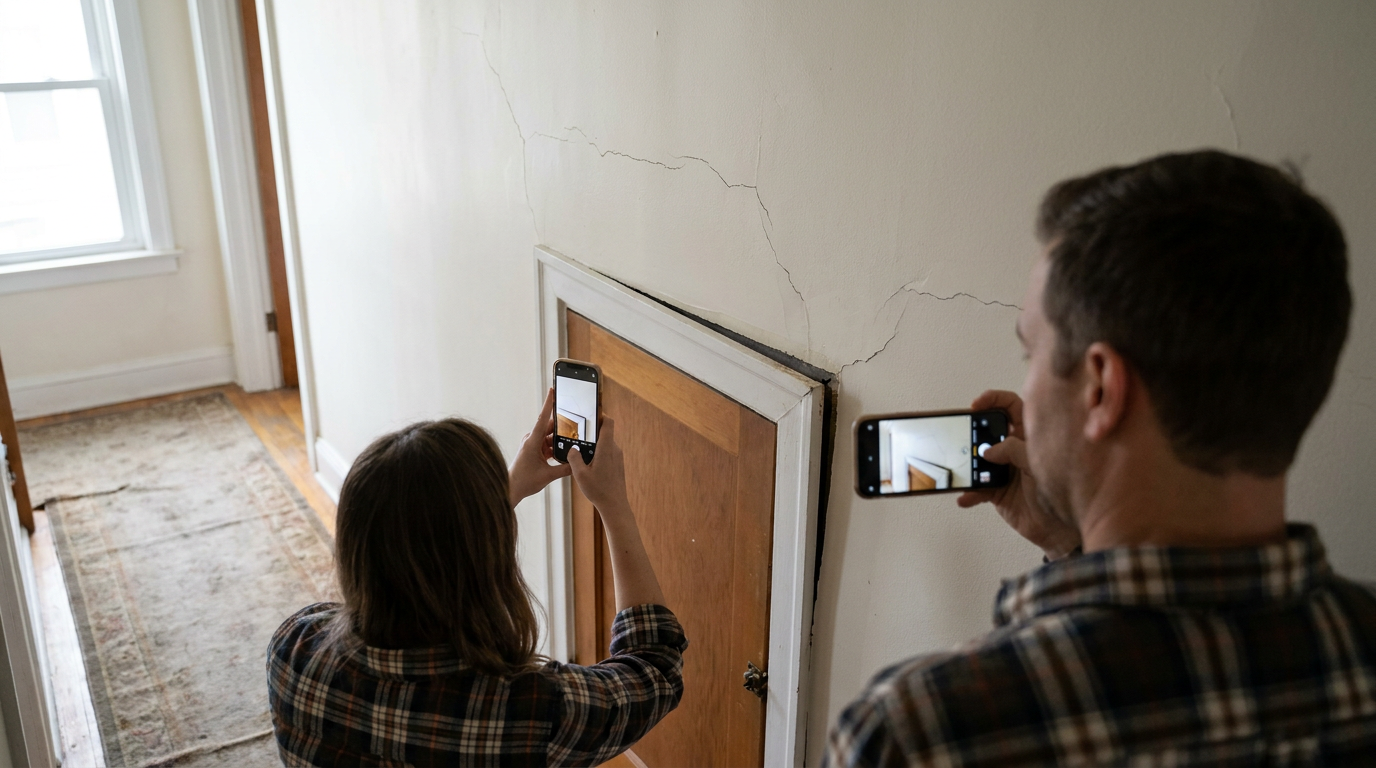
Doors and windows tell their own story. If they suddenly begin sticking, rubbing, or failing to latch, the surrounding framing may be shifting. A single seasonal issue is not always structural, especially in humid climates, but repeated changes or a cluster of problems in one area can point to movement that deserves follow-up.
In the basement, inspect concrete walls and slabs for cracks, bowing, moisture entry, or displacement. National research in Canada has long emphasized that all foundations move to some degree, but differential settlement is the kind of movement most associated with damage. In practice, that means you should pay more attention to uneven movement patterns than to the mere existence of one crack.
Step 6: Measure, document, and compare conditions
A careful homeowner can add real value by documenting what is actually happening. Memory is unreliable, especially with gradual issues like settlement or floor slope. Clear photos, dated notes, and basic measurements make it much easier for a structural engineer, contractor, or inspector to understand whether a problem is static, seasonal, or actively worsening.
Use a long level to check floors in several rooms, especially near suspect walls, large openings, and stair transitions. Measure the gap under the level at the low side and write it down with the exact location. You are not trying to create a survey-grade report. You are creating a practical record that shows whether a floor dips a quarter inch in six feet or something much more significant.
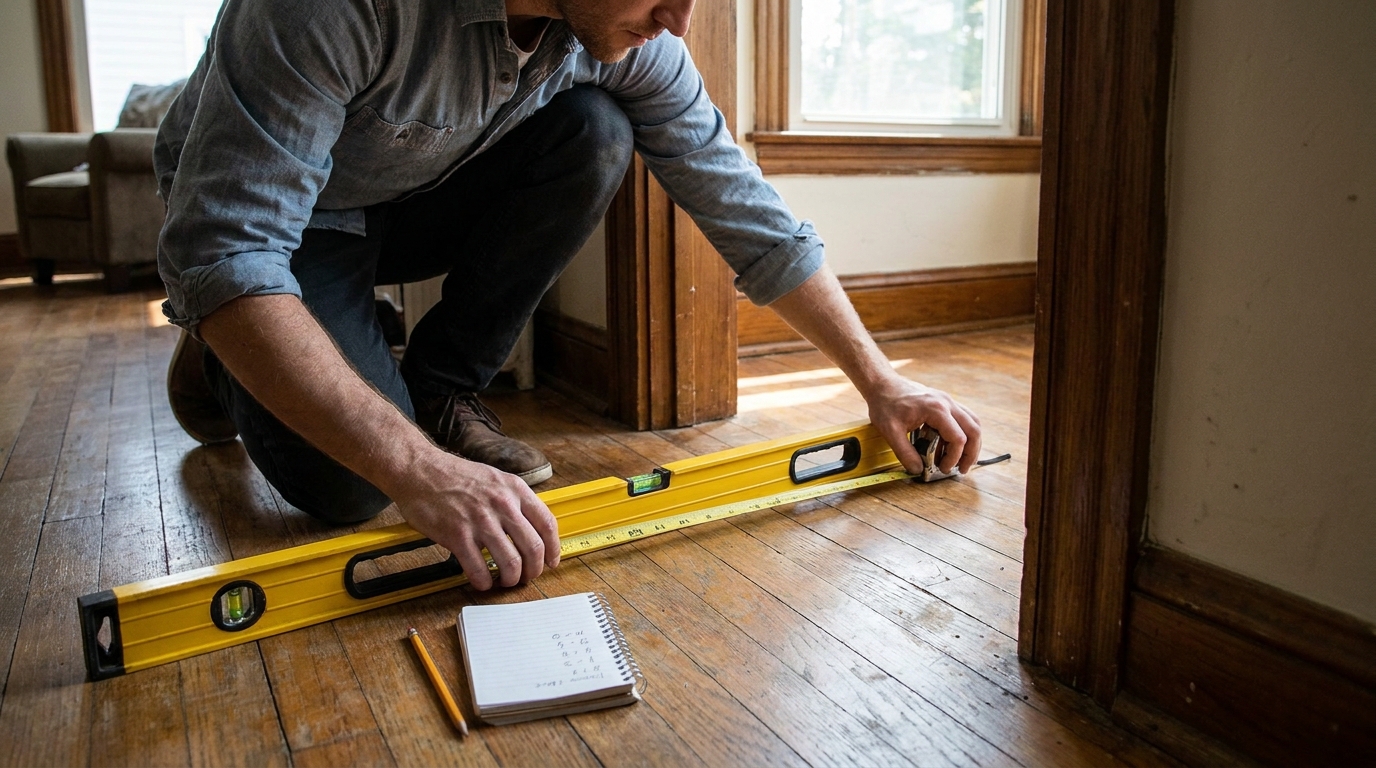
Photograph cracks with a reference, such as a ruler or coin, and note the date. Painter’s tape with a written date nearby can help identify whether a crack is growing. Do the same for gaps at trim, visible beam deflection, or post movement in the basement. If you repeat this process every few months, you can often tell whether the issue is stable or active.
Compare the same area across levels. If there is a crack over a first floor doorway, look directly below it in the basement and directly above it on the second floor or attic if accessible. Structural problems often leave connected clues. A good inspection is not just about seeing damage, but about understanding whether multiple symptoms line up with a probable load path.
Step 7: Learn the common causes of structural movement
When homeowners notice movement, they often assume the house is either completely fine or about to fail. In reality, structural movement usually sits somewhere in between, and the cause matters. Soil conditions are a major factor. Shrink and swell behaviour, frost heave, changing moisture content, and local differences in soil compressibility can all affect how foundations move.
Changing loads also matter. A new addition, a removed wall, heavy finish upgrades, or an improperly supported beam can shift stress in ways the original structure was not intended to carry. Water is another major driver. Poor drainage, clogged gutters, downspouts discharging too close to the house, or grading that directs water toward the foundation can contribute to movement over time.
In practical terms, you do not need to diagnose soil mechanics to understand the warning signs. What you need to know is that movement is often progressive and pattern-based. Cracks that widen season to season, recurring door alignment issues, or a floor that continues to dip are not things to explain away with guesswork. They are reasons to stop, document, and get professional review.
Misconceptions that lead homeowners in the wrong direction
One common misconception is that any wall near the middle of the house must be load-bearing. Sometimes that is true, but many central walls are just partitions. The real question is whether the wall forms part of a load path based on framing direction, support lines below, and loads above. Location by itself is not enough.
Another misconception is that if a basement wall is concrete, everything above it must be simple and non-structural. Concrete foundations tell you where major loads likely end up, but they do not tell you which upper walls are bearing, how beams are hidden, or whether previous renovations changed the original system. Houses are rarely that simple once they have been altered over time.
Homeowners also tend to underestimate how structural an open-concept remodel can be. Removing a wall may require a beam, posts, bearing pads, and load transfer details all the way down to the foundation. In some cases, the new load concentration can even require additional design below. That is why visual screening is useful, but beam sizing and replacement design are professional tasks.
When a wall is probably suspicious enough to leave alone
If a wall runs perpendicular to joists, lines up with supports below, has another wall or roof load above it, and sits near visible signs of movement, treat it as suspect until proven otherwise. The same applies if the wall sits under a ridge line, under a large bathroom or masonry chimney, or under an area where joists change direction. These conditions do not guarantee the wall is bearing, but they are strong reasons not to cut first and ask questions later.
Be especially cautious with short wall segments beside openings, columns that seem decorative, and bulkheads that may hide beams. Some of the most important structural elements in a house are not full-length walls at all. A short post or header support can be carrying concentrated loads that are easy to overlook during demolition planning.
If previous owners renovated the home, the risk goes up. Hidden beams, altered supports, improperly removed walls, and patched-over framing changes are common enough that any uncertain condition deserves extra care. Where there is renovation history but limited documentation, a professional assessment is often the fastest way to avoid compounding an old mistake.
When to call a structural engineer or qualified building professional
There is a point where homeowner observation has done its job and should go no further. If you plan to remove or alter any wall, beam, post, or major opening that may be load-bearing, bring in a structural engineer or another qualified professional as required by your jurisdiction. That is not overkill. It is standard good practice.
You should also call for help if you see active or worsening cracks, noticeable floor sag, bowed foundation walls, new sticking doors throughout one area, signs of differential settlement, water-related foundation movement, or any structural member that appears cut, split, rotted, or inadequately supported. These are not finish carpentry concerns. They are building stability concerns.
Some work also triggers permit requirements, inspections, or engineered drawings even when the problem seems straightforward. In Ontario and many other Canadian jurisdictions, structural alterations and certain foundation work require formal review. The exact rules vary locally, so always check with your municipality before starting demolition, underpinning, beam replacement, or framing changes.
Practical rule: If your next step involves removing, cutting, notching, relocating, or replacing something that might carry weight, stop and verify the permit and engineering requirements first.
How permits and inspections fit into load-bearing work
Permits are not just paperwork. They create a process for reviewing structural changes before they are hidden behind finishes again. For homeowners, that can feel inconvenient, but it is one of the few safeguards that helps catch undersized beams, missing supports, poor connections, or unapproved structural changes that might otherwise remain hidden for years.
Municipal inspections commonly include framing stages for structural work. That means the work may need to remain exposed long enough for an inspector to verify that it matches the approved plan. If engineered drawings are required, the professional may also need to review specific site conditions or provide stamped details that the contractor must follow.
This is particularly important with newer engineered structural products. Many manufactured systems come with load tables, installation requirements, and code evaluations that guide proper use. That does not make them DIY design tools. It simply means modern structural work is often more documented than older field-built systems, and those documents should be part of the decision process.
A practical homeowner checklist for first-pass load-bearing checks
If you want a simple working process, move through the house in a consistent order. Start below, then go up. First inspect the basement or crawlspace, identify joist direction, locate beams and posts, and note any support lines. Then compare those support lines to walls on the main floor and upper floors.
- Walk the exterior and interior to look for obvious settlement clues, roof sag, foundation cracks, and drainage issues.
- Inspect the basement or crawlspace for joists, beams, posts, support walls, and any signs of deflection or improvised repairs.
- Map joist direction and compare it to wall orientation above.
- Check whether walls stack from one level to another or align with beams, columns, or foundation supports.
- Look for distress signs such as sloped floors, cracked finishes, sticking doors, separated trim, or movement around openings.
- Measure and photograph conditions so you can compare them over time.
- Pause before any alteration and confirm permit and professional review requirements locally.
This checklist is not meant to replace engineering. It is meant to keep you organized and reduce the chance of overlooking an important clue. In structural work, a calm and methodical process usually beats quick confidence.
Expert tips that make homeowner inspections more useful
The best homeowner inspections are humble, consistent, and well documented. One useful habit is to sketch a simple floor plan as you inspect, even if it is rough. Mark joist direction, suspected bearing lines, cracks, slopes, and any unusual framing you can see. This gives professionals a faster way to understand what you observed.
Another good tip is to inspect during different seasons if the issue seems moisture-related. Some movement patterns are more obvious after freeze-thaw cycles, wet periods, or hot dry stretches, depending on local soil and drainage conditions. Seasonal notes help distinguish one-time settling from recurring movement that may point to a larger issue.
Finally, keep structural records. If you get drawings, inspections, engineering letters, or photos of opened-up framing during a renovation, save them in one place. Homes increasingly go through accessibility upgrades, open-plan remodels, and service retrofits over time. Good records make future work safer because the next decision does not have to start from zero.
Final thoughts: inspect carefully, but know where the line is
Conducting load-bearing checks in your home is about understanding the building you live in and catching problems early. A homeowner can learn a lot by tracing joists, reading support lines, inspecting the basement, watching for signs of movement, and documenting conditions clearly. Those observations are valuable because they help you avoid reckless demolition and help professionals solve problems faster when they arrive.
What a homeowner cannot do through visual inspection alone is guarantee structural capacity, confirm every hidden member, or safely design a replacement beam. That is where engineering and code compliance come in. The most responsible approach is a combination of old-school field observation and modern documentation, followed by professional validation whenever structural change is on the table.
If you remember one thing, let it be this: load-bearing checks are for recognition, not assumption. Learn the clues, respect the risks, and call for expert help before you alter anything that might be carrying your house.



No Comment! Be the first one.