



Exterior insulation is one of those building upgrades that sounds technical at first, but the idea behind it is simple. Instead of relying only on insulation between wall studs, you add insulation on the outside of the wall so the house gets a more continuous thermal layer. That matters because wood framing, plates, headers, and other parts of the wall carry heat much more easily than insulation does, which means a wall can perform worse in real life than its labeled insulation value suggests.
Table Of Content
- What Exterior Insulation Really Is
- Why Exterior Insulation Matters in Real Houses
- How Exterior Insulation Reduces Thermal Bridging
- Main Benefits Homeowners Notice First
- Common Materials Used for Exterior Insulation
- Rigid Foam Insulation
- Mineral Wool Boards
- Wood-Fibre Systems
- Exterior Insulation Is a System, Not a Single Product
- When Exterior Insulation Makes the Most Sense
- Practical Installation Sequence That Works
- Window and Door Details Matter More Than Most People Expect
- Why Rainscreen Space and Drainage Are So Important
- Moisture Control and Condensation Risk
- DIY or Professional Installation?
- Common Mistakes to Avoid
- Cost Factors and Return on the Upgrade
- Exterior Insulation Trends Worth Watching
- Final Thoughts
For homeowners, this usually comes down to a few practical goals. You want a house that feels more comfortable, costs less to heat and cool, and holds up better over time. For contractors and serious DIY renovators, exterior insulation is also a smart way to improve wall performance without giving up interior floor area. When done correctly, it can reduce thermal bridging, support better moisture control, and make the whole wall assembly more durable.
This is especially relevant during re-siding projects, major exterior repairs, or full wall upgrades. If the cladding is already coming off, the exterior side is often the easiest place to improve insulation continuously. Natural Resources Canada notes that, in many retrofit cases, the added material cost of exterior insulation is often only a small share of the total exterior renovation cost, which is one reason this upgrade gets serious attention in energy improvements.
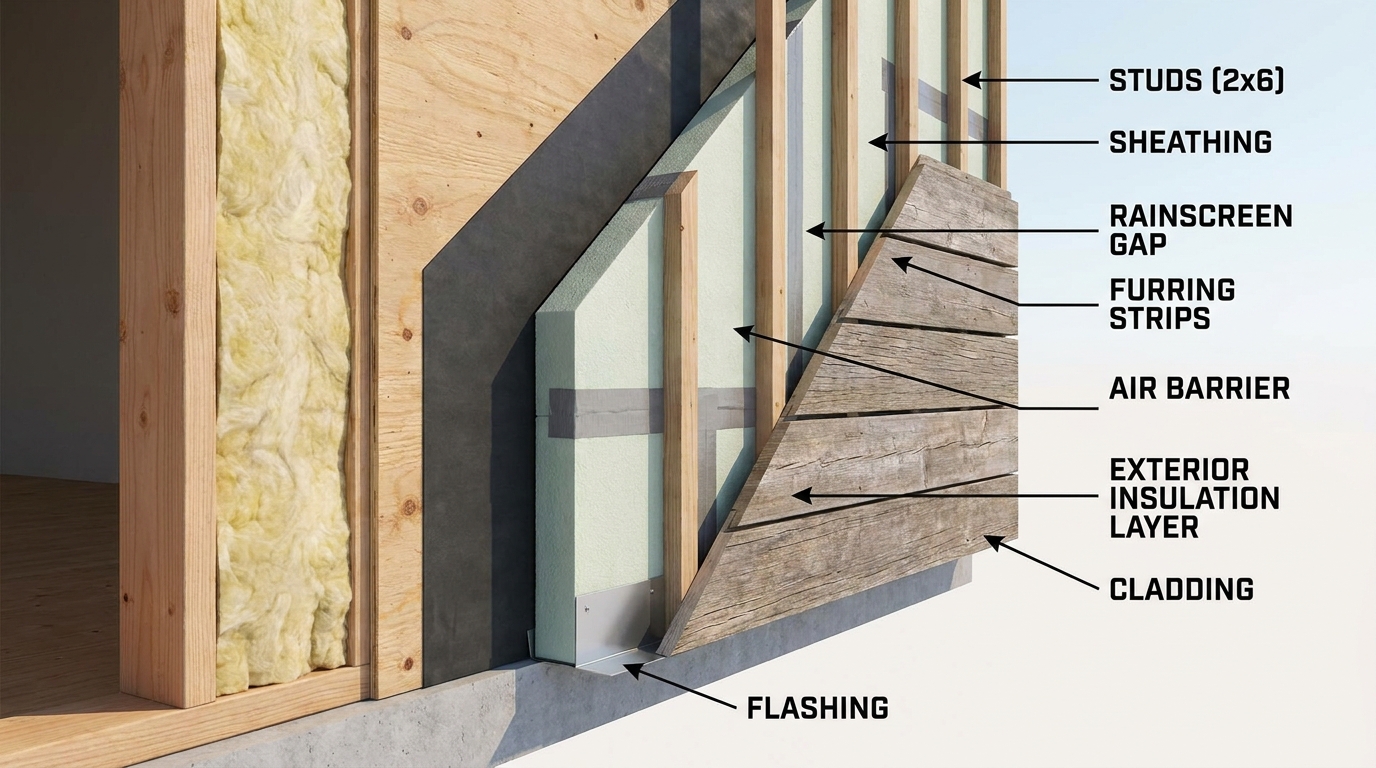
The key point is that exterior insulation is not just an extra layer you tack on and forget. It is part of a wall system that includes the sheathing, air barrier, water-resistive barrier, flashing, cladding attachment, and drainage path. If those pieces work together, the result can be a quieter, tighter, more efficient home. If they are treated as separate tasks, performance problems tend to show up later around windows, moisture, and attachment details.
In this guide, we will look at what exterior insulation actually does, where it makes the biggest difference, what materials are commonly used, and how to approach installation in a practical way. Whether you are planning a professional project or trying to understand the process before talking to a contractor, this is the part that matters most: how the wall really goes together behind the finish materials.
What Exterior Insulation Really Is
Exterior insulation is insulation installed on the outside of the structural wall assembly, usually over the sheathing and behind the exterior cladding. In building science terms, it is often called continuous insulation because it runs across the wall surface instead of stopping at each stud cavity. That continuity is the whole reason it performs so well. A standard framed wall has many repeated pieces of wood that interrupt the insulation layer, and each one becomes a small pathway for heat flow.
When people hear the term insulation, they often think only in terms of R value listed on a package. The problem is that a wall does not perform as one uninterrupted blanket of insulation. It performs as a combination of insulation, framing, sheathing, fasteners, openings, and cladding supports. Research and code guidance in both the United States and Canada consistently point out that the whole-wall effective R value is lower than the nominal insulation rating because thermal bridges carry heat through the assembly.
Exterior insulation addresses that weakness by covering the framing from the outside. Instead of the studs being exposed directly to outdoor temperatures through the cladding layer, they sit behind a continuous thermal layer. That does not eliminate every thermal bridge, especially where fasteners and structural attachments are involved, but it can reduce heat loss enough to make a noticeable difference in performance and comfort.
There is also a second benefit that does not get talked about enough. Exterior insulation can keep the structural sheathing warmer during cold weather. That matters because cold sheathing is where condensation risk increases inside a wall. When the sheathing stays warmer, the chance of moisture condensing within the assembly can drop, provided the wall is designed correctly for the climate and vapor conditions.
Why Exterior Insulation Matters in Real Houses
The biggest practical reason people add exterior insulation is energy efficiency. Heat moves from warm areas to cold areas, and walls are part of that path. If a wall loses less heat in winter and gains less heat in summer, the heating and cooling system does less work. That can lower utility costs, but the more immediate benefit for many homeowners is comfort. Rooms near exterior walls often feel less drafty and more stable in temperature after a continuous insulation upgrade.
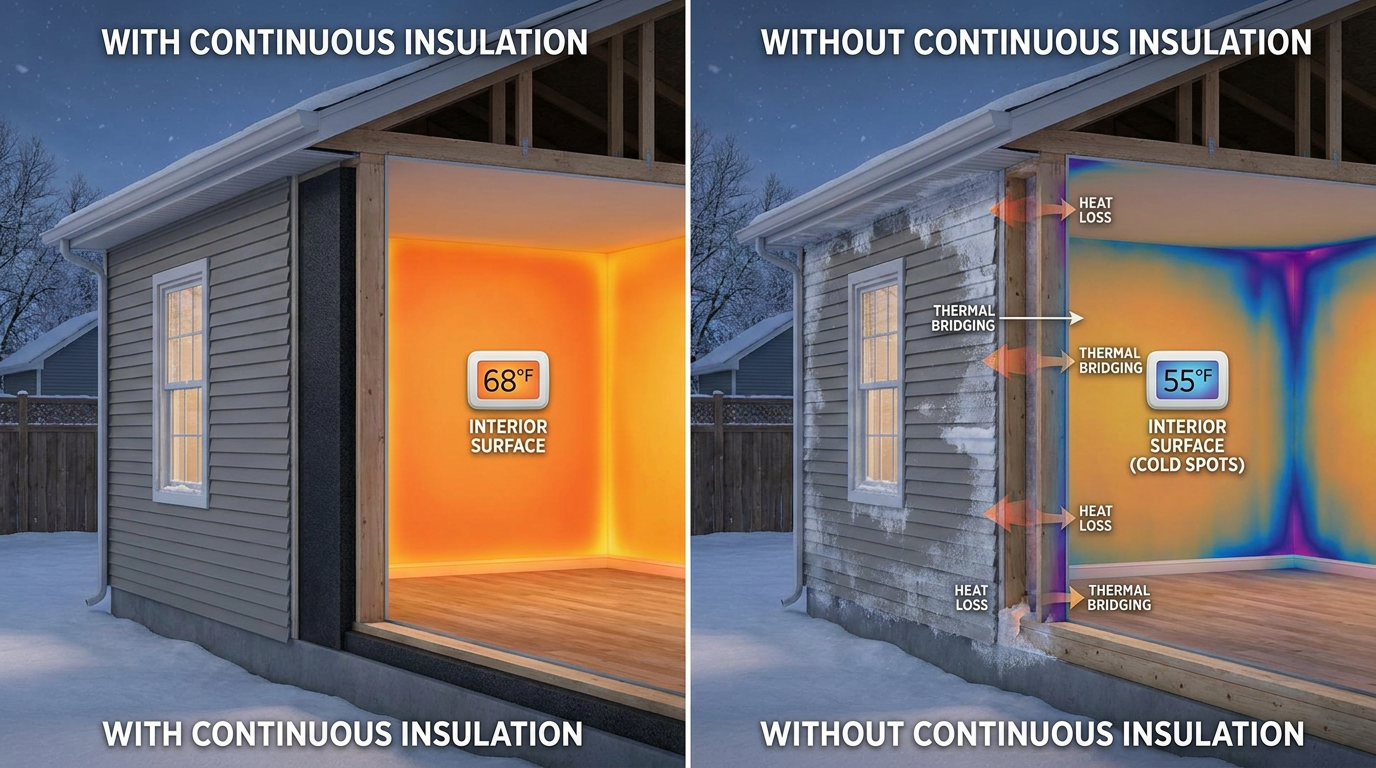
Comfort is not just about indoor air temperature. It is also about surface temperature. If the inside face of an exterior wall stays warmer in winter, you feel more comfortable even at the same thermostat setting. That is because your body loses less heat to cold surfaces by radiation. Homes with underperforming wall assemblies often have that familiar problem where the room reads an acceptable temperature, but it still feels chilly near the perimeter. Exterior insulation helps correct that.
Air leakage is another part of the story. The U.S. Department of Energy notes that air leakage can account for 30 percent or more of heating and cooling costs. Exterior insulation itself is not the air barrier, at least not automatically, but these projects often go hand in hand with better air sealing because the wall is being opened up and re-detailed from the outside. When the insulation layer is combined with a properly continuous air barrier, the wall performs far better than insulation alone.
Durability is the other practical benefit. Better control of heat, air, and moisture usually means the wall is under less stress over time. Warm, wet, trapped conditions are where many building failures start. If the sheathing stays warmer, flashings are properly integrated, and water has a clear drainage path behind the cladding, the wall has a much better chance of drying and lasting. That is not flashy marketing language. It is just good construction.
For retrofits, exterior insulation is often one of the few ways to make a major improvement without gutting the inside of the house. You can keep interior finishes intact, avoid shrinking room dimensions, and still upgrade the wall significantly. This is why re-siding work is such a good opportunity. Once the siding is off, much of the access challenge is already solved.
How Exterior Insulation Reduces Thermal Bridging
Thermal bridging is one of the most important ideas to understand here. In a typical wood-framed wall, the cavity insulation may fill every space between studs, but the studs themselves are much less resistant to heat flow. The same is true for top and bottom plates, headers above openings, rim areas, and some cladding attachments. Every one of those parts creates a more conductive pathway through the wall.
If you only insulate the cavities, the wall still has repeated strips of lower performance running all the way through it. This is why a wall with a respectable cavity insulation rating can still deliver disappointing real-world performance. Exterior insulation helps by laying a thermal layer across those framing members. Instead of the outside temperature reaching the stud line so easily, it has to pass through that exterior insulation first.
The effect becomes more obvious in cold climates and high-performance homes. Standards such as Passive House rely heavily on reducing thermal bridges because small repeated losses add up across the entire building shell. A wall does not need to be built to Passive House standards to benefit from this principle. Even a moderate thickness of well-installed exterior insulation can improve whole-wall performance more than people expect when they are used to thinking only in cavity R values.
That does not mean thickness is the only answer. As insulation gets thicker, attachment design, window placement, flashing transitions, and cladding support all become more demanding. Good projects balance the energy benefit with practical constructability. The right amount depends on climate, budget, code requirements, and the rest of the wall assembly.
Main Benefits Homeowners Notice First
Homeowners usually notice three things first after a successful exterior insulation project: improved comfort, lower drafts, and steadier indoor temperatures. Those changes tend to show up before anyone studies utility bills in detail. Bedrooms along north walls often feel less cold. Living spaces near large window openings can feel less uneven. Floors and wall surfaces near the perimeter may feel less chilly during winter weather.
The second noticeable benefit is often sound. While exterior insulation is not primarily a soundproofing system, some materials and wall assemblies can reduce exterior noise when combined with better cladding and air sealing details. The improvement depends on the material and wall design, but tighter and more layered wall assemblies often sound better than leaky, lightly insulated ones.
There is also a visual and maintenance opportunity. If a home already needs new siding, trim, or flashing repairs, exterior insulation allows those upgrades to happen while improving performance at the same time. From a project planning standpoint, that is efficient. You are not just paying to make the house look better. You are taking the chance to improve what is behind the siding while the wall is open.
Finally, there is long-term value. Buyers and appraisers may not always see the full technical picture, but well-documented energy and envelope upgrades tend to support a home’s overall quality. More importantly, the owner gets the benefit every season the house is occupied. Good insulation is one of the few upgrades that works quietly every day without needing attention.
Common Materials Used for Exterior Insulation
There is no single exterior insulation product that fits every house. The best choice depends on climate, fire considerations, drying potential, cladding type, cost, thickness requirements, and local code expectations. The most common categories in residential work are rigid foam boards, mineral wool boards, and some newer wood-fibre based systems. Each has strengths and tradeoffs.
Rigid Foam Insulation
Rigid foam is common because it is widely available, relatively lightweight, and offers good thermal performance per inch. Different foam types have different moisture, vapor, and environmental characteristics, so they should not be treated as interchangeable. In many practical projects, foam boards are chosen because they help achieve target R values without creating excessive wall thickness. They are familiar to many crews, but the detailing around seams, penetrations, and fire requirements still matters.
Mineral Wool Boards
Mineral wool exterior insulation is valued for its fire resistance, vapor permeability, and ability to tolerate moisture exposure during construction better than some alternatives. It is often used in wall assemblies where drying potential is a design priority. Because it is more vapor open, it can fit well in assemblies intended to dry outward, though the rest of the wall still needs to be designed carefully. It can also be a good choice where noncombustibility or acoustic performance is part of the goal.
Wood-Fibre Systems
Wood-fibre insulation has gained attention in some high-performance and lower-carbon construction circles. These systems can be vapor permeable and are often considered where embodied carbon is part of the decision. That said, they require proper climate-specific detailing and are not just a drop-in replacement for every wall. Availability, cost, thickness, and regional familiarity can also affect whether they make sense for a typical residential project.
Material selection should never be based on R value alone. Moisture behavior, attachment method, cladding support, local code, and installer experience all matter. A slightly less impressive product on paper can be the better choice if it fits the climate and can be installed correctly by the crew doing the work.
Exterior Insulation Is a System, Not a Single Product
One of the most common misunderstandings is thinking that exterior insulation alone makes a wall high performing. It does not. A good wall needs a clear and continuous approach to water control, air control, thermal control, and appropriate vapor control. If one layer is strong and the others are poorly handled, the wall can still fail.
The water-resistive barrier has to connect properly at windows, doors, penetrations, and transitions. The air barrier has to be continuous across the wall and tied into adjacent assemblies such as the roof and foundation. The insulation has to be installed without major gaps or compression. The cladding needs a way to drain and dry, which is why rainscreen space or drainage detailing becomes more important as walls get tighter and better insulated.
This is where experienced installers earn their keep. There is a big difference between fastening boards to a wall and building a reliable assembly. Good work happens in the transitions, not in the easy field areas. Corners, openings, service penetrations, deck attachments, roof intersections, and base flashings are where long-term performance is decided.
Exterior insulation works best when it is treated as one part of a complete wall assembly, not as a standalone energy upgrade.
When Exterior Insulation Makes the Most Sense
New construction is an obvious time to use exterior insulation because the wall can be designed around it from the start. Window placement, cladding attachment, trim details, and flashing sequences can all be coordinated before work begins. That usually makes the process cleaner and more predictable.
Retrofits can be even more compelling, especially when the house already needs new siding. If the cladding is in poor condition, the added cost of insulation may be a relatively modest part of the total project. This is one of the strongest practical cases for exterior insulation because you are solving multiple problems at once. You upgrade appearance, improve weather protection, and increase thermal performance while the wall is already open.
It also makes sense when a home has persistent comfort complaints near exterior walls, high heating costs, or walls with little cavity depth. Older homes often have framing layouts and insulation levels that simply do not meet current expectations for comfort and energy use. Exterior insulation can improve these homes substantially without forcing a complete interior renovation.
That said, not every house is a simple candidate. Historic trim, lot-line constraints, roof overhang depth, window extension details, and foundation alignment can all affect whether the upgrade is straightforward or complicated. The best approach is to look at the whole exterior package, not just the insulation boards.
Practical Installation Sequence That Works
Every manufacturer and wall design has its own details, but the general sequence in residential work tends to follow a consistent logic. The substrate has to be sound. The control layers have to be continuous. Openings have to be flashed correctly. The insulation has to be attached in a way that supports the cladding and respects drainage. Skipping steps to save time usually creates problems that are expensive to fix later.
- Assess the existing wall. Before adding anything, confirm the sheathing, framing, and existing conditions are dry, sound, and suitable for retrofit. There is no point covering rot, water damage, or structural problems.
- Establish the control layers. Decide where the air barrier and water-resistive barrier will be and make sure that choice is carried across the entire wall. In some assemblies they may be separate materials, and in others one layer may do both jobs.
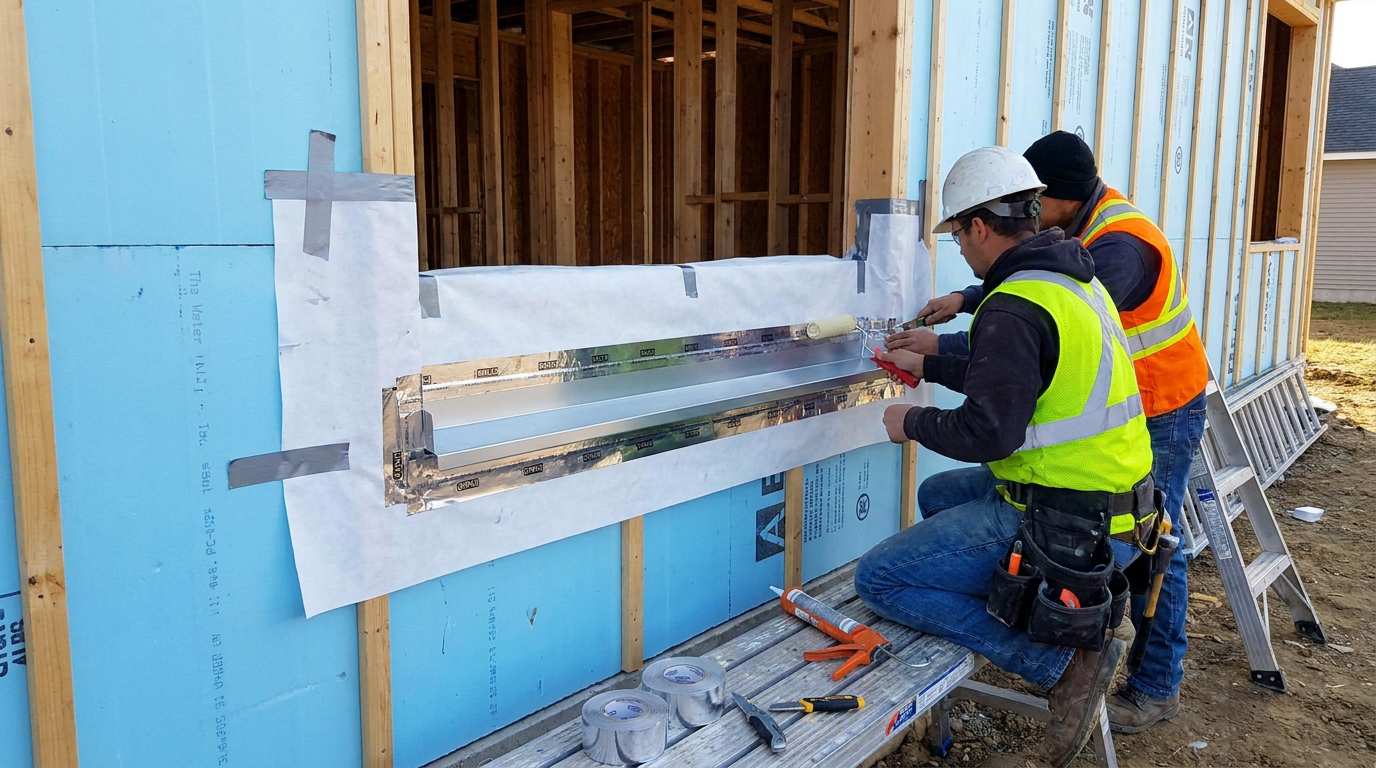
- Prepare and flash openings. Windows and doors should be integrated with sill flashings, jamb treatments, head flashings, and proper shingled layering so water drains outward.
- Install exterior insulation continuously. Boards should be fitted tightly, joints managed according to the system design, and penetrations sealed where required.
- Add furring or attachment components. Many cladding systems need furring strips or engineered attachment methods to create a drainage gap and a secure fastening base.
- Install cladding with drainage in mind. The final exterior should not trap water. Bottom and top ventilation details, flashings, and clear drainage paths matter.
On paper that sounds simple. In practice, each step needs care. The field area of the wall is usually easy. The transitions are where crews need to slow down and make sure every layer connects in the right order.
Window and Door Details Matter More Than Most People Expect
If there is one area where exterior insulation projects succeed or fail visibly, it is around windows and doors. These openings interrupt every control layer in the wall. They interrupt the water-resistive barrier, the air barrier, the insulation layer, and the cladding plane. If flashing is weak or sequencing is wrong, water usually finds the mistake.
When exterior insulation adds thickness to the wall, windows may end up deeper relative to the finished cladding plane. That changes trim details, sill extensions, head flashing geometry, and how the opening ties back to the drainage plane. In some projects the windows remain in their original location. In others they are moved outward to align better with the insulation layer. Both approaches can work, but they need different detailing.
The main rule is simple: always give water a path out. Sill areas need proper support and drainage logic. Head flashings need to direct water over, not behind, the assembly. Side flashings need to tie cleanly into the water-resistive barrier. Tapes and membranes should be part of a tested or well-established sequence, not improvised on site.
This is one reason professionals often caution DIY renovators against underestimating the project. Installing large flat insulation boards is not usually the hard part. Building durable opening details that can survive years of weather exposure is where craft and planning really count.
Why Rainscreen Space and Drainage Are So Important
As wall systems get tighter and more insulated, they often need better drying and drainage strategy outside the water-resistive barrier. A rainscreen gap, usually created with furring strips or specialized drainage products, gives incidental water a path to drain and allows some airflow behind the cladding. That can improve durability and reduce the chance of trapped moisture.
Not every wall in every climate uses the exact same rainscreen approach, but the principle is widely accepted: cladding should not be expected to stop all water. Siding and trim leak small amounts of water under real weather conditions. The wall behind them needs to manage that water safely. Exterior insulation changes the location and thickness of layers, so the drainage strategy has to be thought through carefully.
As insulation thickness increases, cladding attachment also becomes more demanding. Long fasteners, compression management, furring alignment, and structural load paths matter more. This is one reason thick exterior insulation is not simply a matter of buying longer screws. The attachment method has to keep the cladding stable over time while preserving drainage and limiting unnecessary thermal bridging.
Moisture Control and Condensation Risk
Cold climate wall design always comes back to moisture. Interior air carries water vapor, and if that vapor reaches a surface cold enough for condensation, the wall can accumulate moisture where you cannot see it. Exterior insulation helps by keeping the sheathing warmer, which can lower that condensation risk. That is a real benefit, but it only works properly when the assembly is designed for the local climate.
Different climate zones have different needs. The ratio between cavity insulation and exterior insulation can matter because it affects how warm the sheathing stays in winter. Guidance from Natural Resources Canada addresses these insulation ratios specifically, along with condensation control and drying potential. In plain terms, too little exterior insulation in a cold climate may not warm the sheathing enough to achieve the moisture-control benefit you are counting on.
Vapor control also needs a realistic approach. Exterior insulation does not automatically eliminate the need to think about vapor movement. Some wall systems are intentionally more vapor open to allow drying. Others rely more on controlling inward and outward vapor drives with specific materials. The right answer depends on climate, occupancy, wall composition, and the location of other control layers.
This is why copying a wall detail from another region can be risky. A wall that works well in a mild marine climate may behave very differently in a cold inland climate with long heating seasons. The building science has to match the weather the house actually lives in.
DIY or Professional Installation?
Some exterior insulation projects are within reach for capable DIY renovators, but the level of difficulty depends on the house and the scope. A small addition, detached garage, or straightforward wall section with simple openings is very different from a full-house retrofit with multiple roof lines, porches, decks, and aging windows. The more transitions and penetrations there are, the more experience the work demands.
A strong DIY candidate usually has solid carpentry skills, understands flashing basics, can follow manufacturer details carefully, and is realistic about planning time. The work also requires safe scaffolding or access equipment, careful material handling, and patience. Exterior wall work is exposed to weather and sequencing matters, so this is not a project to rush through in spare evenings without a clear plan.
Professional installation is usually the safer route when the project involves thick insulation, complex cladding support, significant window work, code compliance questions, or moisture-damaged walls that may need repair. Good installers do more than work quickly. They understand how to keep the control layers continuous while adapting to real-world site conditions that rarely match the drawings perfectly.
If you hire the work out, ask detailed questions. Where is the primary air barrier? How will window openings be flashed? Will there be a rainscreen gap? How is the cladding being attached through the insulation? What happens at the base of the wall and the roof intersections? A contractor who can answer those clearly is usually thinking about the wall as a system.
Common Mistakes to Avoid
- Assuming insulation alone solves air leakage. Without a continuous air barrier, the wall may still leak enough air to undermine performance.
- Ignoring window and door detailing. Poor flashing at openings is one of the fastest ways to create future water damage.
- Using nominal R value as the only decision point. Whole-wall performance depends on thermal bridges, fasteners, and installation quality.
- Skipping drainage planning behind cladding. Water needs a path out, especially in upgraded wall systems.
- Underestimating attachment requirements. Thicker insulation changes how cladding loads are carried back to the structure.
- Applying one climate’s wall design to another. Moisture and condensation risk are climate specific.
- Covering existing damage. Rotten sheathing, leaks, and structural problems should be fixed before the wall is built out.
These are not minor details. Most envelope failures come from skipped transitions, weak sequencing, or overconfidence around water management. The wall has to be built with the expectation that weather will test every joint eventually.
Cost Factors and Return on the Upgrade
The cost of exterior insulation varies widely depending on material choice, thickness, scaffolding needs, trim extensions, window modifications, and the type of new cladding being installed. Labor can rise quickly when the house has many corners, roof intersections, or detailed trim elements. That is normal. Simple wall areas are cheap. Complicated geometry is not.
Still, the economics can make sense, especially when the project is bundled with re-siding. If the siding is already being replaced, some setup and labor costs are shared with work that needed to happen anyway. That is why exterior insulation often looks better financially as part of a larger exterior renovation than as a standalone job done purely for energy savings.
The return is not only in utility bills. Better comfort, fewer drafts, lower condensation risk, and a more durable exterior wall all have real value, even if they do not show up in a simple payback chart. Good building work often pays back through avoided problems as much as through direct energy savings.
Exterior Insulation Trends Worth Watching
Energy codes and high-performance programs increasingly emphasize continuous insulation and reduced thermal bridging in wall assemblies. That trend is not going away. As standards rise, cavity-only approaches often need help from better exterior layers to meet performance goals. This is one reason exterior insulation is showing up more often in both custom and mainstream residential work.
There is also more interest in retrofit-friendly wall systems, vapor-permeable exterior insulation options, and lower embodied carbon materials. Wood-fibre and mineral wool systems are part of that conversation, especially where drying potential and material footprint are design priorities. That does not mean traditional rigid foam is disappearing, but it does mean owners and builders now have more choices to compare.
Another trend is better attention to details that used to be treated as secondary. Attachment systems, thermal clips, rainscreen strategies, and integrated flashing packages are improving because the market now expects these walls to do more than just look finished. They are expected to perform measurably better.
Final Thoughts
Exterior insulation is one of the most practical ways to improve a home’s wall performance because it tackles a basic weakness in standard framed construction: thermal bridging through the structure itself. By adding insulation continuously over the wall, you reduce heat loss paths that cavity insulation cannot address on its own. The result can be better comfort, lower energy use, and improved moisture control when the wall is designed properly.
The important part is to approach it as a full assembly upgrade, not just an insulation purchase. Air barrier continuity, flashing, window detailing, drainage space, cladding attachment, and climate-appropriate moisture design all matter just as much as the insulation board you choose. The homes that benefit most are the ones where these details are treated seriously from the start.
For homeowners, the smartest time to consider exterior insulation is often when siding is already being replaced or the exterior is due for major work. For professionals and skilled DIY builders, the opportunity is to build a wall that performs in the real world, not just on a product label. That is the difference between a cosmetic exterior project and one that actually makes the house better behind the walls.
If you take one lesson from all of this, let it be this: continuous insulation works because walls work as systems. Get the system right, and exterior insulation can be one of the most worthwhile upgrades you make to a home.



No Comment! Be the first one.