



How to Build a Custom Closet System: A Step-by-Step DIY Guide for Beginners
A custom closet system is one of those projects that pays you back every day. You build it once, and then every morning gets easier because your clothes, shoes, bags, and storage bins finally have a place that makes sense. For a DIY enthusiast, it is also a very approachable carpentry job because it relies more on careful planning, straight cuts, solid fastening, and good layout than on advanced woodworking tricks. If you can measure accurately, use a drill, and keep things level, you can build a closet that looks clean and works hard.
Table Of Content
- Why a Custom Closet System Is a Good DIY Project
- Step 1: Measure the Closet Properly Before You Design Anything
- A simple measuring checklist
- Step 2: Choose the Right Type of Closet System
- Step 3: Plan a Layout That Matches Your Wardrobe
- A balanced beginner-friendly layout
- Step 4: Pick Materials That Match the Job
- Step 5: Gather Tools and Hardware Before Starting
- Basic tool and supply list
- Step 6: Deal With Safety and Code Basics Before Installation
- Step 7: Mark the Layout on the Wall
- Step 8: Cut and Prepare the Components
- Step 9: Assemble the Towers or Install the Track System
- Step 10: Anchor Everything Properly
- Step 11: Install Shelves, Rods, Drawers, and Accessories
- Step 12: Finish the Details So It Looks Intentional
- Common Mistakes to Avoid
- How Much Does a DIY Custom Closet Cost?
- How Long Does the Project Take?
- When to Call a Pro
- Final Thoughts
The biggest mistake people make is assuming a closet organizer is just a few shelves and a rod. In practice, a good custom closet system is really a storage plan built around your specific room, your wardrobe, and your wall structure. That means you need to think about depth, hanging space, shelf spacing, stud locations, door swing, lighting clearances, and the actual weight the system will carry. Get those parts right, and even a basic design can look custom and high-end.
This guide will walk through the process step by step, from measuring and design to cutting, assembly, installation, and finishing. The focus is on a manageable project for beginners, especially a reach-in closet or a small walk-in using plywood, melamine panels, or a simple wall-mounted track system. Along the way, we will cover practical details that matter in real houses, including obstructions, rod heights, wall anchoring, and why safety is part of the build, not an afterthought.
Practical rule: A closet system should be designed around what you own, not around a generic template. Count your hanging clothes, folded items, shoes, and bins before you buy a single board.
Many homeowners now use online planner tools from major brands to sketch layouts before building. That trend makes sense because visual planning reduces mistakes and helps beginners see if a closet really has enough room for rods, shelves, baskets, and doors. Even if you are building from scratch, the same planning logic applies. Measure first, draw second, buy materials third, and cut only when you are sure the layout works.
Why a Custom Closet System Is a Good DIY Project
Not every carpentry project is friendly to beginners. Cabinets require more precision, trim work shows every flaw, and structural framing leaves little room for error. Closet systems sit in a sweet spot. Most of the work involves repeated parts, square cuts, simple assembly, and fastening components to walls in a controlled indoor setting. You are not fighting the weather, and you are usually working with predictable materials and manageable piece sizes.
There is also a wide range of build options. At the simplest end, you can install a wall-mounted track and standard system with shelves and rods. In the middle, you can build plywood or melamine towers with shelves and add a hanging section between them. At the more finished end, you can create a built-in look with filler strips, trim, drawer boxes, and face panels. The bones of the project stay the same, so you can match the build to your skill level.
From a value standpoint, custom storage has both functional and visual appeal. A closet that works well reduces clutter in bedrooms and hallways, makes laundry easier to put away, and helps smaller homes feel more organized. It also adds a sense of quality because built-in storage makes a room feel thought through. That does not mean you need expensive materials. Clean lines, good spacing, and proper installation do most of the heavy lifting.
Step 1: Measure the Closet Properly Before You Design Anything
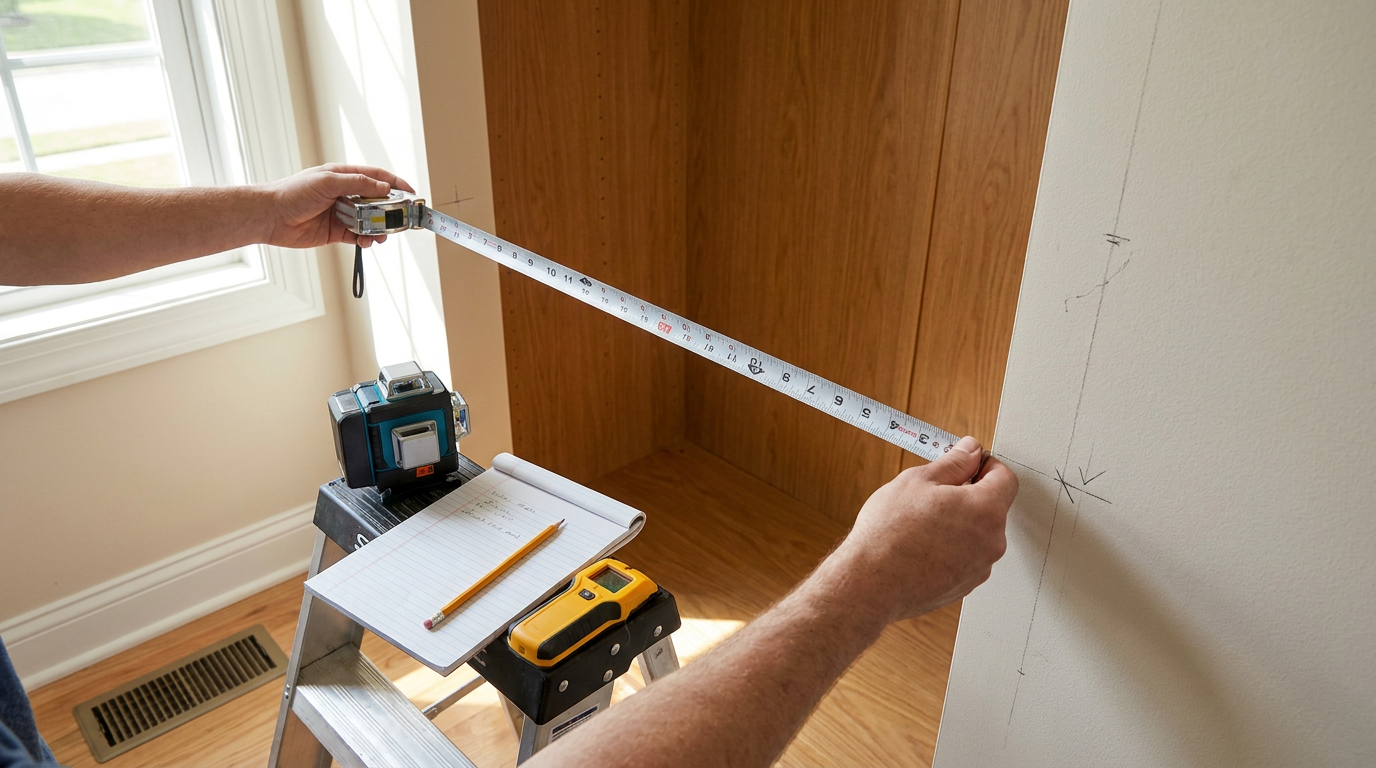
If there is one part of the project that deserves patience, it is measuring. Closet planning guidance from major storage brands emphasizes measuring height, width, and depth, while also accounting for recesses, pipes, radiators, sloped ceilings, trim, baseboards, and door clearance. That is sound advice whether you are buying a modular system or building your own. A closet that looks square at a glance is often out of plumb, out of level, or narrower at the back than the front.
Start by measuring the full width of the closet in at least three places: near the floor, at the middle, and near the top. Then measure the height at the left, center, and right side. Measure depth from the back wall to the inside face of the door opening or closet door track. If you have hinged doors, measure the swing and note where a shelf, drawer, or tower might interfere. If the closet has sliding doors, note the opening width because that can affect how large your components can be during installation.
Next, mark every obstruction. That includes electrical outlets, switches, vents, access panels, trim profiles, attic hatches, and lighting fixtures. Also check whether baseboards will prevent towers from sitting tight to the wall. In many closets, the simplest solution is to cut notches at the bottom rear of side panels or remove and replace a section of baseboard where a cabinet-style unit will sit.
Do not trust the existing shelf and rod heights to tell you what should go back in. Builders often install the cheapest standard arrangement they can. Your project should be based on what you actually need to store. Make a quick inventory of long hanging clothes, short hanging clothes, folded sweaters, shoes, bags, hats, and bins. That inventory will tell you more than any stock closet kit label ever will.
A simple measuring checklist
- Measure width at top, middle, and bottom.
- Measure height at left, center, and right.
- Measure usable depth, not just wall-to-wall depth.
- Mark stud locations with a stud finder and confirm carefully.
- Note door swing, trim thickness, outlets, vents, and lights.
- Write down the tallest and longest garments you need to hang.
One practical reference point for planning hanging space is garment length. Common wardrobe guidance suggests roughly 80 cm for shirts and blouses, around 120 cm for short dresses, around 190 cm for very long garments, and roughly 60 to 70 cm for hanging trousers. You do not need to copy those numbers exactly, but they are useful guardrails. If your hanging section is too short, clothes bunch up on the shelf below. If it is too tall, you waste space that could hold a second rod or extra shelving.
Step 2: Choose the Right Type of Closet System
There is no single best closet system. The right choice depends on your room, your budget, your tools, and how custom you want the final result to look. For beginners, the most manageable options are a wall-mounted modular system, a track-and-standard system, or a simple built-in style made from sheet goods. Each has tradeoffs, and it is worth being honest about your skill level before buying materials.
A wall-mounted track-and-standard system is the easiest to install and adjust. You anchor a horizontal rail or vertical standards to the wall, then hang brackets, shelves, rods, and accessories from that framework. These systems are forgiving because you can move components later if your needs change. They also work well in uneven spaces because the wall hardware defines the layout more than the floor does.
A tower-based system uses vertical side panels, fixed shelves, and a top shelf to create a cabinet-like structure. It can look more built-in and furniture-like, especially when you add trim or a finished toe kick. It usually takes more cutting and drilling, but it can still be very manageable if you keep the design simple and use prefinished melamine or plywood with edge banding.
Wire shelving is inexpensive and quick, but it is not for everyone. It can be practical in utility closets, kids’ closets, or laundry areas, though many homeowners prefer solid shelves because they look cleaner and support folded clothing better. A wood or melamine system generally gives the best blend of visual finish and functionality in a bedroom closet.
Common modular closet depths are often in the range of about 15 3/4 inches to 20 inches. That range works because it is deep enough for folded clothes, baskets, and many hanging applications without consuming too much floor space. For hanging rods in a reach-in closet, make sure garments will clear the back wall and the doors. A rod that is technically installed but too shallow for a coat hanger is not useful.
Step 3: Plan a Layout That Matches Your Wardrobe
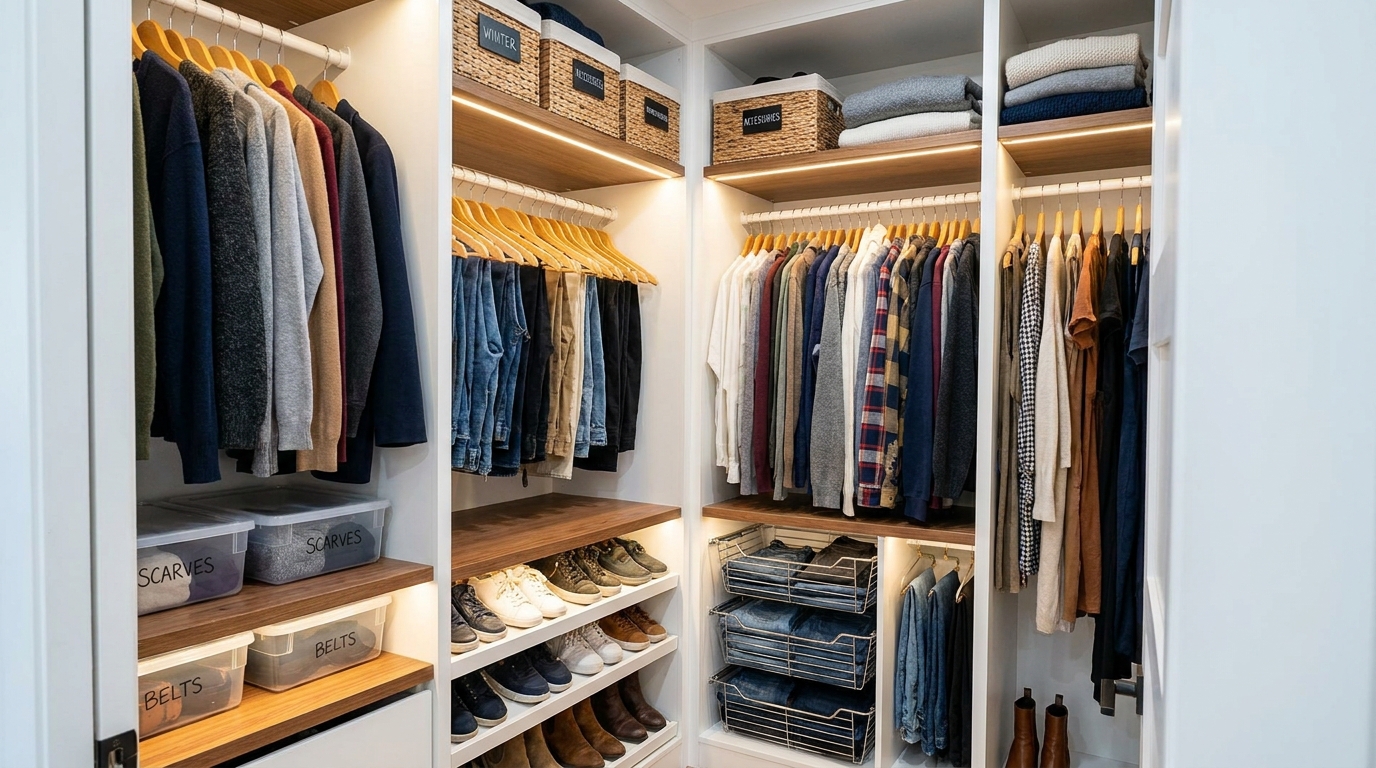
This is where the closet goes from an idea to a system. Instead of asking what looks good in a showroom, ask what you need every week. Most closets function best when they combine a few types of storage rather than leaning too heavily on one. Short hanging sections are efficient for shirts, jackets, and folded trousers. Long hanging sections are useful for dresses, coats, or garments you do not want to fold. Shelves handle sweaters, jeans, bins, and extra linens. Lower shelves or cubbies can carry shoes, while upper shelves are better for less-used seasonal items.
For many reach-in closets, a strong layout is one vertical tower of shelves on one side, a double-hang section in the middle or on the other side, and one full-width top shelf. That setup gives you a lot of storage without becoming complicated to build. If you need more folded storage, use two narrow towers instead of one. If you have many dresses or coats, keep one section full height and use single hanging there.
Think about access as much as capacity. Items you wear often should sit between shoulder and waist level whenever possible. Shoes can go lower. Seasonal bins can go high. If you are adding drawers, make sure they can open fully without hitting doors or another tower. If the closet opening is tight, baskets or bins on shelves may be easier than drawers.
It helps to sketch the wall to scale on paper. Draw the opening, ceiling height, and side walls. Then map out towers, rods, shelf spacing, and clearances. You can also use planner-based design tools for inspiration even if you will not buy that exact system. The reason these planning tools have become so popular is simple: they help people catch bad proportions before cutting material.
A balanced beginner-friendly layout
- Top shelf across the full width for storage bins and seasonal items
- Double hanging section for shirts, pants, and shorter garments
- One side tower with adjustable shelves for folded clothes
- Lower shoe shelves or cubbies near the floor
- Optional baskets for socks, belts, or accessories
Step 4: Pick Materials That Match the Job
The three most common choices are plywood, melamine-coated particleboard, and wire shelving components. Plywood is strong, holds screws well, and can be painted for a custom built-in look. Cabinet-grade plywood gives the nicest finish but costs more. Melamine is popular because it comes prefinished in clean white or wood-look surfaces, which saves painting time, though edges need banding and screw holding can be less forgiving if you overdrive fasteners.
If you want the easiest path to a polished result, prefinished melamine panels are hard to beat. If you want more durability and flexibility, plywood is a stronger long-term material, especially for shelves spanning wider openings. Wire systems are useful when budget and speed matter most, but they have a more utilitarian look.
For rods, use closet rod stock with proper brackets rated for the span and load. For shelves, avoid unsupported spans that are too wide for the material thickness. A 3/4-inch shelf is common, but even that can sag over time if the span is too long and the shelf is heavily loaded. If in doubt, shorten the span, add a center support, or use a thicker front edge to stiffen the shelf.
Your fasteners matter as much as the boards. Use the manufacturer hardware where required, but also choose quality screws sized for the material and wall structure. Drywall anchors have their place for light loads and specific hardware, but a closet system that carries clothing, shoes, and storage bins should be anchored to studs whenever possible. The wall structure should carry the load, not the drywall paper.
Step 5: Gather Tools and Hardware Before Starting
One reason closet projects stall is that people start cutting before they have all the parts. Make a list and stage everything first. The exact tools vary by system, but most builds need a tape measure, level, stud finder, drill or driver, saw, clamps, pencil, square, and safety gear. If you are cutting sheet goods, a circular saw with a straightedge guide is often enough, though a track saw or table saw makes cleaner and more repeatable cuts.
You will also want touch-up supplies if using prefinished materials. Edge banding, melamine repair markers, filler, caulk, and matching trim can take a closet from basic to finished. Have shims on hand too. Real walls are rarely straight, and a few simple shims can keep your towers plumb and your shelves level without forcing components into place.
Basic tool and supply list
- Tape measure
- 4-foot level or laser level
- Stud finder
- Drill and driver bits
- Circular saw, track saw, or miter saw depending on cuts
- Square and pencil
- Clamps
- Wall screws and appropriate anchors where specified
- Shelf pins, brackets, rods, and rod sockets
- Shims, edge banding, filler, and caulk
- Safety glasses and hearing protection
Step 6: Deal With Safety and Code Basics Before Installation
Closet projects may seem simple, but safety still matters. In North American homes, closet lighting has specific clearance concerns because clothes storage spaces can put combustible materials too close to a fixture. The residential code includes rules that limit where luminaires can be placed in clothes closets and how close they can be to shelves and hanging space. That means if your project involves replacing or relocating lighting, do not treat it casually. Check local rules and product instructions before touching the fixture layout.
For Canadian homeowners, the relevant framework is the National Building Code of Canada and local provincial or municipal requirements. A closet organizer itself is often a non-permitted interior project, but lighting changes, major wall modifications, or unusual anchoring conditions can trigger additional requirements. The practical takeaway is simple: if your project touches wiring, changes wall structure, or introduces a heavy freestanding storage unit, verify local expectations before you start.
Anchoring is another safety issue. Freestanding clothing storage can present tip-over hazards if it is not properly secured, which is one reason wall attachment and anti-tip hardware matter so much. Even if your design seems stable, a loaded drawer, a child climbing, or uneven flooring can change the forces on the unit. Wall-mounted systems and tall towers should be attached according to manufacturer instructions and to solid structure wherever possible.
Do not skip anchoring. A closet system is storage, but it is also a loaded structure. Clothes, shoes, and bins add up fast, and the wall framing is what keeps that weight where it belongs.
Step 7: Mark the Layout on the Wall
Before you install anything, transfer the plan to the closet walls. Mark stud locations clearly using painter’s tape or pencil lines that will be hidden later. Then mark the height of the top shelf, rod locations, the sides of each tower, and any horizontal rail if your system uses one. This is the moment to catch conflicts between the design and reality.
Use a level, not your eye. Floors can slope, ceilings can dip, and side walls can lean. If you build a tower square but place it on an out-of-level floor without shimming, your top shelf and rods can end up visibly off. In many cases, it makes sense to establish a level reference line around the closet and build from that line, shimming underneath where necessary.
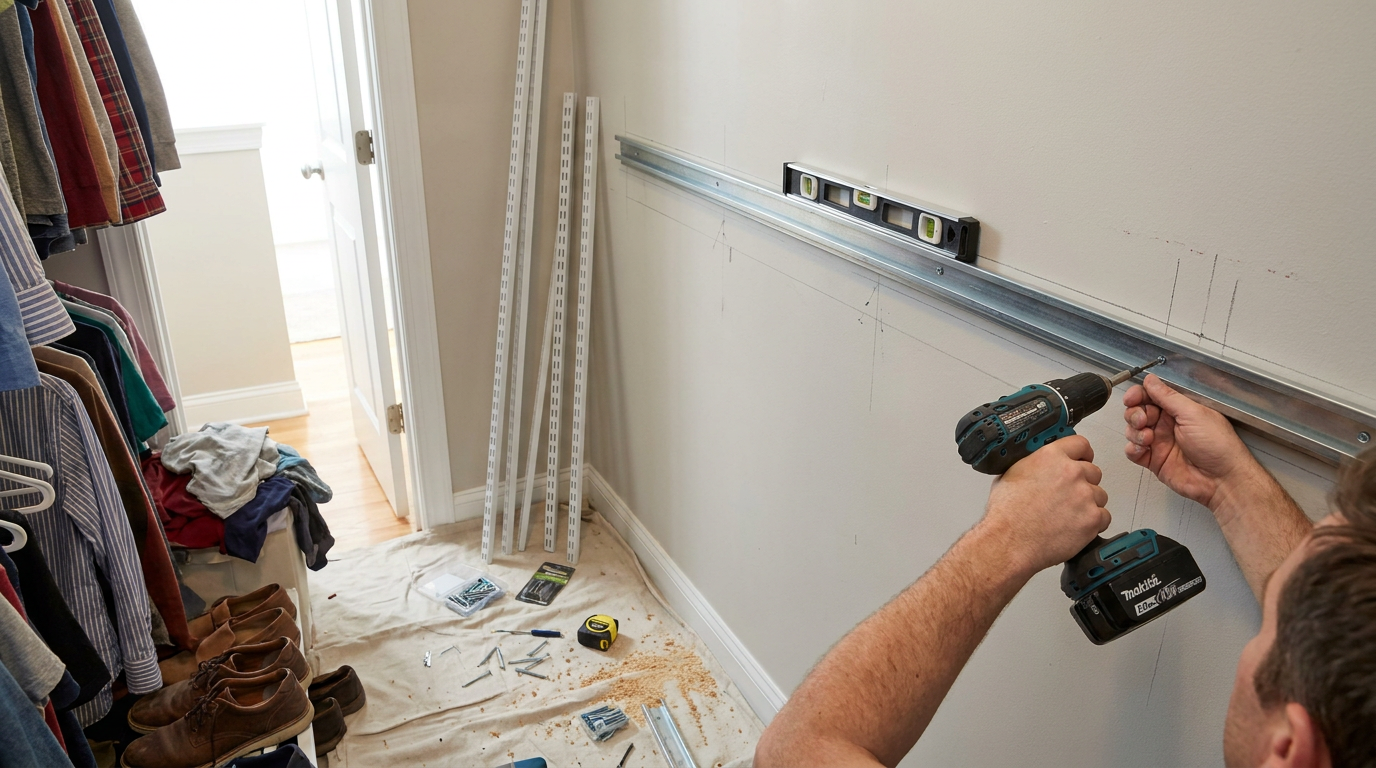
If you are installing vertical standards or tracks, place them over studs whenever possible. Practical installation guidance commonly recommends standards no more than 24 inches apart, though you should always follow the specific manufacturer requirements for your hardware. The reason is straightforward. Closet loads need frequent support points to keep shelves from sagging and brackets from overloading.
Step 8: Cut and Prepare the Components
Make your cuts carefully and label every part as you go. For a simple tower build, that usually means two side panels, several shelves, a top panel or stretcher, and possibly a bottom shelf or cleat. If using melamine, cut with a blade suited to finish materials and support the panel well to reduce chipping. If using plywood, think ahead about which edges will show and whether you want iron-on edge banding, solid wood edging, or paint-grade filler.
Dry-fit the parts on the floor before moving them into the closet. It is much easier to check shelf spacing, rod clearance, and overall proportions while the unit is accessible. Pre-drill where needed, especially near panel edges, and keep hardware locations consistent. If your shelves are adjustable, drill shelf-pin holes with a jig or guide so spacing stays uniform and neat.
This stage is also where beginners can build quality into the project. Sand rough edges, clean up chipped laminate, and remove pencil marks before assembly. A closet may be a utility space, but the better you treat the details, the more finished it will feel. Good workmanship in hidden spaces still matters.
Step 9: Assemble the Towers or Install the Track System
If your design uses towers, assemble them in the room if possible. Full-size units can be awkward to carry through narrow doors, and many closets do not leave much room to tilt a tall cabinet upright. Start with one side panel on a protected surface, attach fixed shelves or stretchers, then add the second side. Keep checking for square by measuring diagonals or using a framing square as you go.
For track-and-standard systems, begin with the top rail or the first vertical standard exactly level. Every other component follows that one. Fasten into studs whenever possible, then add the remaining standards according to the system spacing. Once the framework is in place, install shelf brackets, rods, and accessories in the planned positions.
Take your time here. Most installation problems come from rushing the first component. If the rail is off, the standards will be off. If the first tower is out of plumb, the top shelf and adjacent tower will show it. Slow, careful setup saves a lot of frustration later.
Step 10: Anchor Everything Properly
This is the structural heart of the project. A closet system should not merely stand in place. It should be positively attached to the wall framing so it can resist weight, movement, and accidental force. Use a stud finder to locate framing, then confirm with careful probing if necessary. Mark the centerline of each stud and drive screws into solid framing at the recommended locations.
For wall-mounted systems, that means securing rails or standards to studs wherever they line up. For cabinet-style towers, it usually means screwing through the back rail, top stretcher, or an interior cleat into the wall studs. If a tower falls between studs, you may need a ledger, a back panel strategy, or rated anchors where allowed by the system design. But whenever possible, choose a layout that lands major support points on framing.
Do not over-tighten fasteners and deform the panel or hardware. If the wall bows, use shims behind the fastening point so the unit stays straight instead of being pulled out of alignment. Trim excess shim material after fastening. This is standard carpentry work and makes a big difference in the final result.
Step 11: Install Shelves, Rods, Drawers, and Accessories
Once the main structure is secure, add the working parts. Install the top shelf first if it ties sections together. Then add hanging rods, shelf panels, baskets, and drawer components. Rod height should reflect what you actually store. Double hanging is efficient for shirts and shorter garments, while long hanging should be reserved for pieces that need the extra vertical space.
Keep in mind that rods need horizontal clearance too. Hangers should turn freely without scraping side panels or walls. Shoes need enough shelf depth to sit flat. Baskets should slide without catching. Every element in a closet does a small practical job, and if one is awkward to use, the whole system starts to feel less custom.
Accessory storage is often where a closet gets truly useful. A few labeled bins for scarves, belts, or off-season items can outperform expensive custom inserts if they are sized well and easy to reach. Do not overcomplicate the build. Practical storage beats fancy storage that is hard to use.
Step 12: Finish the Details So It Looks Intentional
The difference between a homemade closet and a finished custom closet is often in the last 10 percent. Fill exposed fastener holes if the system allows it. Add cover caps where appropriate. Apply edge banding cleanly. Caulk small gaps at walls if you are aiming for a built-in look. If there are visible spaces due to uneven walls, filler strips or trim can hide them and make the installation look much more deliberate.
If you used plywood, now is the time to prime and paint, or apply a clear finish if you want a natural wood look. If the closet floor is worn or unfinished under the old organizer, consider touching it up. A neat floor and fresh paint behind the system go a long way toward making the whole project feel complete.
Lighting also matters visually, but keep safety in mind. If the existing light is dim, consider safer fixture upgrades that maintain proper closet clearances. Good light makes the space easier to use and helps the closet feel like part of the room rather than a dark storage hole.
Common Mistakes to Avoid
A lot of closet problems come from assumptions. One common mistake is trusting drywall anchors as the main support for a heavily loaded system. Anchors can help in some situations, but studs are the preferred load path whenever possible. Another mistake is buying a system based on shelf count rather than garment needs. Too many shelves and not enough hanging can make a closet look organized but function poorly.
Another frequent issue is forgetting clearances. Drawers that hit doors, rods that crowd the back wall, and upper shelves placed so high they are hard to use all stem from poor planning. Builders and manufacturers use standard dimensions as starting points, but your room and wardrobe should drive the actual measurements.
There is also a misconception that a custom closet has to be fully handcrafted from raw lumber to look high-end. In reality, modular and semi-custom systems can produce a polished, built-in appearance with much less effort. What matters most is a layout that fits the space, a clean installation, and attention to finish details.
How Much Does a DIY Custom Closet Cost?
Costs vary widely depending on materials and complexity, but a simple DIY closet can be very affordable compared with professionally installed custom storage. A basic track-and-standard system may cost a few hundred dollars for a reach-in closet, especially if you already own tools. A melamine tower-based build with rods, baskets, and trim can move into the mid-hundreds. A plywood built-in with drawers and paint can cost more, though still often less than a custom closet company would charge.
The key cost drivers are material type, hardware quality, drawer components, and how finished you want the look to be. Plywood is usually pricier than particleboard-based systems. Drawers and specialty organizers increase cost fast. On the other hand, if you build around simple shelves and rods, you can get a strong result without overspending.
Do not forget the hidden costs of mistakes. Buying extra material because the first design did not fit, replacing chipped panels, or redoing a misaligned rail can erase any savings. Good planning is not just good workmanship. It is good budgeting.
How Long Does the Project Take?
For a beginner, a basic reach-in closet usually takes a weekend if the design is simple and materials are prefinished. Day one often covers clearing the closet, measuring, marking studs, cutting parts, and pre-assembling components. Day two usually covers installation, anchoring, rods, shelves, and cleanup. Painting or trim work can add another day or two depending on drying time and finish expectations.
The project goes faster if you use a modular kit and slower if you are building everything from sheet goods. The room condition also matters. Uneven walls, old trim, poor lighting, and missing studs where you want support can add time. That is normal. Real homes are rarely perfect, and practical carpentry means adjusting without losing the quality of the result.
When to Call a Pro
Most closet systems are well within DIY range, but some situations justify professional help. If you need electrical work for new lighting, if the wall condition is poor, if you suspect hidden plumbing or wiring where anchors need to go, or if you are working in a highly irregular space with expensive materials, bringing in a pro may save money in the long run. The same is true if you want custom drawer boxes or high-end built-in finishing and do not yet have the tools or experience.
There is no shame in mixing DIY and professional work. Many smart homeowners do the planning, demolition, painting, and simple assembly themselves, then hire out specialty pieces. The goal is not to do everything alone. The goal is to end up with a safe, durable closet that works.
Final Thoughts
Building a custom closet system is a very practical project because it solves a daily problem with straightforward carpentry. You do not need advanced joinery or a full shop. You need accurate measurements, a sensible design, stable materials, and a disciplined installation. When those pieces come together, even a small closet can feel dramatically better.
The best results come from respecting the basics. Measure everything, including obstructions and door clearance. Design for the clothes and items you actually own. Anchor to studs whenever possible. Keep shelves level, rods practical, and details clean. That is how a beginner build starts to look professional.
If you approach the project with patience and a realistic plan, a custom closet system is more than manageable. It is one of the better ways to improve both the function and feel of your home with your own hands. And unlike some DIY projects, the payoff does not hide behind the walls. You see it and use it every single day.


No Comment! Be the first one.