
How to Elegantly Install a Chandelier: A Step-by-Step Guide for a Safe and Stylish Upgrade
A chandelier has a singular way of changing the emotional temperature of a room. Even before it is switched on, it introduces ceremony, balance, and a sense of intention. In a dining room it can make everyday dinners feel composed and memorable. In an entryway it creates an arrival moment. In a bedroom or sitting room it adds softness, sculpture, and a refined point of focus that quietly shapes the entire interior.
Table Of Content
- Why a Chandelier Is More Than a Light Fixture
- Before You Begin: The Essential Safety and Design Checklist
- Tools and Materials You May Need
- Step 1: Choose the Right Chandelier for the Room
- Step 2: Verify Weight, Box Rating, and Ceiling Support
- Step 3: Turn Off Power and Confirm the Circuit Is De-Energized
- Step 4: Remove the Existing Fixture Carefully
- Step 5: Prepare the Mounting Hardware and Adjust the Hanging Height
- Step 6: Install or Confirm the Mounting Bracket
- Step 7: Make the Wiring Connections
- Step 8: Hang the Chandelier and Secure the Canopy
- Step 9: Level the Fixture and Refine the Composition
- Step 10: Add Lamps or Activate LED Components, Then Test
- How to Know When to Call an Electrician
- Common Mistakes That Undermine a Beautiful Installation
- Maintenance After Installation
- Design Notes for Different Rooms
- Dining Room
- Entryway
- Bedroom or Sitting Room
- Stairwell
- The Final Effect: Where Safety and Beauty Meet
Yet chandelier installation is not merely a decorative project. It is one of those rare home upgrades where beauty and building logic must meet perfectly. The fixture may look delicate, but its weight, wiring, support hardware, and hanging height all matter. The most elegant chandelier is never just the one with the prettiest silhouette. It is the one that is proportioned well, supported correctly, wired safely, and hung with enough care that it seems to belong to the architecture itself.
This guide is designed to make that process feel accessible without stripping away its seriousness. If you are comfortable with light electrical work, some chandelier installations can absolutely be handled as a thoughtful DIY project. If your home has older wiring, a fragile ceiling, a very heavy fixture, or a sloped or vaulted condition, it is wise to bring in a licensed electrician for the structural and electrical portion. The goal is not only to install a chandelier, but to do so in a way that feels graceful, secure, and lasting.
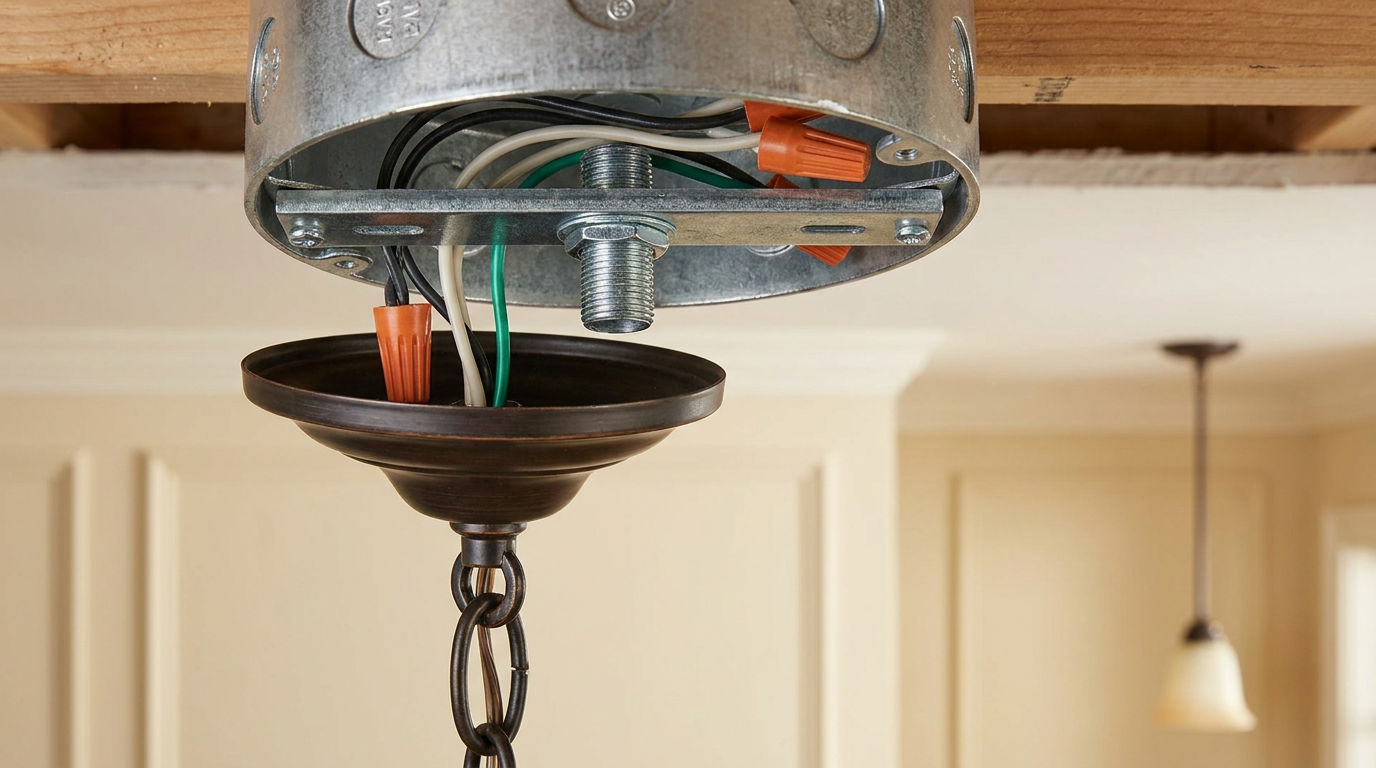
One principle matters above all: the canopy is decorative, not structural. It may hide the hardware beautifully, but it does not replace proper support. In Canada, a ceiling outlet box may support a luminaire weighing up to 23 kg, or 50 lb, when it is attached directly to the building structure or to a bar hanger. Heavier fixtures require independent support or a rated system. In practice, this means you should never assume an existing ceiling box is suitable simply because another light once hung there.
Why a Chandelier Is More Than a Light Fixture
Chandeliers occupy a special place in interior design because they perform two tasks at once. They provide illumination, but they also organize space visually. A good chandelier can define the center of a room, draw the eye upward, soften a tall ceiling, or add grandeur to a compact footprint. This dual role is why installation should never be approached as an afterthought. The placement, height, scale, and finish all contribute to whether the room feels resolved or unsettled.
There is also a wonderful accessibility in chandelier design today. You no longer need a formal mansion or double height salon to enjoy one. Modern chandeliers come in restrained linear forms, sculptural glass compositions, slim integrated LED rings, classic candle silhouettes, and mixed material statements that work beautifully in modest apartments and family homes. A chandelier can be extravagant, but it can also be quiet and architectural. The true luxury is not excess. It is appropriateness.
That sense of appropriateness begins long before installation day. It begins with understanding the room, the fixture, and the ceiling that will hold it. When these three elements are in harmony, the result feels effortless. When one is ignored, even the most expensive piece can appear awkward or unsafe.
Before You Begin: The Essential Safety and Design Checklist
The most useful way to approach chandelier installation is as a sequence of decisions. Choose the fixture. Verify its weight. Confirm the rating and condition of the ceiling box. Check how the box is attached to the structure. Review the wiring requirements and dimmer compatibility. Then move to hanging, leveling, and testing. This order is important because decorative excitement can tempt people to skip the structural questions, when in reality those are the questions that determine whether the project should proceed.
Many misconceptions surround chandelier installation. One of the most common is that if a fixture looks light, any ceiling box can hold it. Another is that the decorative chain somehow acts as sufficient support. A third is that if a previous owner installed a chandelier in the same location, everything must already be correct. None of these assumptions are reliable. Older installations may predate current practice, may have been improvised, or may simply have remained in place by luck rather than proper support.
Modern chandeliers also introduce another layer of complexity. Some use standard sockets and replaceable bulbs, while others include integrated LED modules, built in drivers, dimming electronics, or smart lighting compatibility. These fixtures must be treated as both decorative objects and electrical devices. UL 1598 remains the primary North American safety standard for luminaires, and UL 8750 applies to LED equipment used in lighting products. For homeowners, that means certified products and compatible controls matter. A beautiful chandelier that flickers, hums, or fails to dim properly will never feel luxurious.
Tools and Materials You May Need
Every chandelier differs slightly, but most installations call for a careful collection of basic tools and hardware. Read the manufacturer instructions before purchasing anything additional, as some fixtures arrive with specialty mounting components or integrated support systems. Organizing your tools in advance makes the work calmer and significantly safer, especially when you are on a ladder and holding parts overhead.
- Stepladder or platform ladder suited to your ceiling height
- Voltage tester or non contact tester
- Screwdrivers in multiple sizes
- Wire strippers and needle nose pliers
- Electrical tape and wire connectors if specified
- Stud finder or ceiling access tools if support must be upgraded
- Mounting bracket, bar hanger, or rated support box if needed
- Measuring tape
- Work gloves and safety glasses
- Assistant to help lift and stabilize the fixture
Do not underestimate the value of having a second person present. Even a medium size chandelier can be awkward to hold while connections are made. One person supporting the fixture while the other checks wires, threads chain links, or levels the body of the chandelier can make the difference between a calm installation and a strained, risky one.
Step 1: Choose the Right Chandelier for the Room
The first step is not electrical. It is visual. To install a chandelier elegantly, you must first choose one that suits the room’s scale and character. A fixture should feel neither timid nor oppressive. In dining rooms, chandeliers typically work best when centered over the table rather than centered to the room if the table placement is fixed. In foyers, the chandelier should acknowledge the vertical volume and the first sightline a guest experiences upon entry.
Room proportion matters as much as style. A large chandelier in a room with low ceilings can feel heavy and intrusive, while a small fixture in a tall stairwell disappears into the volume. Consider the diameter, height, materiality, and visual weight of the chandelier. Open framed fixtures read lighter, while dense crystal, metal, or alabaster pieces can feel heavier even at the same physical size. In a quiet contemporary interior, a restrained sculptural form may offer more elegance than an ornate traditional piece.
Also think about what the chandelier must do at night. Is it the primary source of illumination, or is it layered with recessed lights, sconces, and lamps? A chandelier that is largely decorative may prioritize form over brightness, while a fixture over a dining table should generally provide warm, flattering light with good dimming control. If you choose an integrated LED model, confirm the color temperature, driver requirements, and dimmer compatibility before the fixture is ever unpacked.
Elegance in lighting is rarely about excess. It is about proportion, placement, and the quiet confidence of a fixture that feels fully at home in its setting.
Step 2: Verify Weight, Box Rating, and Ceiling Support
This is the step that separates a decorative update from a safe installation. Before you remove the old fixture or touch any conductors, find out exactly how much the new chandelier weighs. Then inspect the existing ceiling outlet box and how it is attached. A standard junction box is not automatically suitable for a chandelier simply because it is overhead. The box type, mounting method, and manufacturer rating are what matter.
In Canada, a ceiling outlet box may support a luminaire weighing up to 23 kg, or 50 lb, if the box is attached directly to the building structure or to a bar hanger. If the chandelier exceeds that weight, or if the box is not properly supported, you will need an independently supported system or a rated installation method specified for the fixture. In the United States, the principle is similar. A decorative fixture must be supported according to listing and code requirements, not according to guesswork or appearance.
Look closely at whether the box is secured to framing, attached to a bar hanger, or merely mounted in a way that is insufficient for a decorative load. If the ceiling is plaster, older drywall, or otherwise fragile, this inspection becomes even more important. Remember that the canopy only conceals the connection point. It is not carrying the fixture. The structural support must exist above it, hidden but real.
If you discover that the ceiling box is not rated or not adequately attached, pause the project and correct that issue first. This may involve installing a luminaire rated box, adding bracing between joists, attaching a new support system, or hiring an electrician to handle the structural and electrical upgrade. It is far better to delay the installation than to hang a chandelier on compromised support.
Step 3: Turn Off Power and Confirm the Circuit Is De-Energized
Once you know the support is appropriate, you can move to safe electrical preparation. Turn off the correct breaker at your panel, not just the wall switch. A wall switch interrupts convenience, not necessarily certainty. Someone can accidentally flip it back on, and in some wiring scenarios it may not isolate what you expect. The breaker is the proper point of control.
After shutting off the breaker, use a voltage tester to confirm the fixture wires are de energized. Test the tester first on a known live source if possible, then verify the circuit at the fixture location. This step is small, but it deserves patience. Safety in electrical work is often the result of quiet repetition rather than dramatic expertise.
Set up your ladder on a stable surface and create enough working space to hold the chandelier parts neatly nearby. Remove jewelry, wear shoes with grip, and keep a small container for screws and canopy hardware. This atmosphere of order may sound almost decorative, but it has practical value. When the work overhead becomes delicate, calm surroundings help you think clearly.
Step 4: Remove the Existing Fixture Carefully
If a light fixture is already in place, remove it methodically. Begin with shades, bulbs, or fragile hanging elements if any are present. Then loosen the canopy and support the body of the old fixture while disconnecting the wires. If you are working alone, consider using a temporary support hook or resting point, though a helper is preferable.
As the old fixture comes down, inspect the wiring. Look for signs of brittle insulation, taped splices, scorch marks, overcrowding in the box, or unexpected conductor colors. Older homes can present surprises, and a chandelier is not the place to ignore them. If the wiring appears degraded or confusing, stop and consult a licensed electrician before proceeding. Elegant design loses all meaning when safety is compromised beneath the surface.
This is also the moment to inspect the condition of the ceiling around the box. Cracks, sagging plaster, water damage, or enlarged openings may suggest structural or finishing repairs are needed before the new chandelier is installed. A beautiful canopy can conceal minor imperfections, but it cannot correct a ceiling substrate that is failing or unstable.
Step 5: Prepare the Mounting Hardware and Adjust the Hanging Height
With the old fixture removed and the support verified, unpack your new chandelier completely and study the manufacturer instructions. Lay out the canopy, mounting strap, chain or rod sections, decorative body, shades if applicable, and wiring components. Many chandeliers require height adjustment before they are lifted into place, especially chain hung models or modular rod fixtures. Doing this on the ground is much easier than improvising overhead.
For dining rooms, a chandelier usually hangs low enough to feel intimate but high enough not to obstruct conversation. A common visual target is approximately 30 to 36 inches above the tabletop, adjusted for ceiling height and fixture scale. In entryways or open circulation spaces, ensure there is generous clearance above the floor so the fixture feels welcoming rather than intrusive. Stairwells deserve especially careful attention because sightlines shift across levels, and the chandelier must read beautifully from multiple vantage points.
If your fixture includes chain, remove or add links to reach the desired drop. If it uses rods, plan the exact combination needed. Thread the fixture wires through chain or rod components as instructed, taking care not to scrape insulation. This is also the time to orient decorative arms or crystal elements if some assembly is required. The calmer and more deliberate this stage feels, the more polished the final result will be.

Step 6: Install or Confirm the Mounting Bracket
Most chandeliers attach to a mounting bracket or strap that secures to the rated ceiling box. Install this hardware exactly as the fixture instructions specify. Tighten screws firmly, but avoid damaging threads or distorting the bracket. The chandelier’s weight should ultimately be transferred through a code compliant support path to the building structure, not merely balanced against decorative trim.
If your chandelier is especially heavy, some fixtures include a separate mounting plate, cable support, or structural hanging system. Follow those directions closely. This is not the place to substitute improvised screws or assume similar looking hardware is good enough. Listed fixtures are designed to work with specific components, and preserving that system is part of a correct installation.
Before lifting the chandelier, do a final review. Is the box rated appropriately? Are the bracket screws fully seated? Is the hanging height right? Are you certain the fixture body can be supported safely while wiring is completed? A minute of reflection here can save you from fatigue and error once the chandelier is overhead.
Step 7: Make the Wiring Connections
Now comes the electrical heart of the installation. With a helper supporting the chandelier, connect the fixture wires to the supply conductors according to the manufacturer instructions and local code requirements. In many residential situations this means matching hot to hot, neutral to neutral, and grounding conductors properly, but wire color conventions and legacy wiring conditions can vary. If anything looks unfamiliar, pause rather than guess.
Make clean, secure connections with the appropriate connectors. Tug each connection gently to confirm it is firm, and arrange the wires neatly inside the box without severe bending or pinching. Good wiring has a kind of quiet elegance of its own. It is orderly, legible, and respectful of the space it occupies. That order helps the canopy sit flush and reduces stress on the conductors.
If your chandelier has integrated LED components, pay special attention to any driver, low voltage connection, or dimming lead described in the instructions. Many modern decorative fixtures are more technologically complex than they appear. Compatibility with your existing dimmer is not guaranteed simply because the fixture turns on. An incompatible dimmer can cause flickering, dropout, limited dimming range, or audible noise. If you are installing a smart control, verify that both the fixture and dimmer are listed as compatible.
Step 8: Hang the Chandelier and Secure the Canopy
After wiring is complete, lift and secure the chandelier body according to the mounting method. Chain hung chandeliers may hook into the bracket or threaded loop first, while flush or semi flush decorative fixtures may need to be held tightly against the ceiling as mounting screws are engaged. Take your time here. This is the moment when the fixture becomes part of the room, and haste can lead to crooked alignment, pinched wires, or scratched finishes.
Once the chandelier is structurally secured, raise the canopy and fasten it neatly. The canopy should sit cleanly against the ceiling and conceal the box and hardware without strain. If it does not fit flush, do not force it into place. Recheck wire arrangement, bracket alignment, and whether the ceiling surface itself is uneven. A well fitted canopy gives the final installation a tailored appearance, but its job is visual finishing, not structural rescue.
Stand back before adding bulbs or shades and look at the fixture from several angles. Is the chain straight? Does the body hang centered? Does it align with the table, entry axis, or room geometry? Minor adjustments now can transform the result from acceptable to exquisite.
Step 9: Level the Fixture and Refine the Composition
Leveling is one of the most overlooked parts of chandelier installation, yet it has immense visual impact. A chandelier that tilts even slightly can make the entire room feel unsettled. Use a small level if helpful, but also trust your eye from a distance. Symmetry, reflection lines, and arm spacing all reveal whether a fixture is hanging properly.
For chain hung chandeliers, leveling may require subtle adjustment at the hanging loop or chain connection. For rod fixtures, confirm that each threaded connection is tightened correctly. If shades or glass elements are removable, install them evenly and check that they do not introduce visual imbalance. In a dining room, sit in nearby chairs and view the chandelier at eye level. In an entryway, observe it from the threshold and from deeper in the hall.
This is also the right time to think compositionally. A chandelier should converse with the architecture and furnishings around it. It should feel centered not just mathematically, but emotionally. Sometimes the true center of a room is defined by the table, rug, or circulation path more than by the room shell itself. Elegant installation acknowledges how people actually live and move through space.
Step 10: Add Lamps or Activate LED Components, Then Test
If your chandelier uses replaceable bulbs, install the correct type and wattage as specified by the manufacturer. LED bulbs are often an excellent choice because they reduce energy use and heat output while offering beautiful warm light when selected thoughtfully. Still, lower wattage does not eliminate the need for proper support or correct electrical installation. Mechanical safety and energy efficiency are separate concerns, and both matter.
Restore power at the breaker and test the fixture. Turn it on and off several times, then check dimming performance if applicable. Watch for flicker, delayed illumination, buzzing, uneven lamp brightness, or signs that the fixture is not functioning as intended. Integrated LED chandeliers may behave differently from conventional fixtures, so read any startup notes in the manufacturer guide. If the fixture does not operate correctly, shut off power again before investigating.
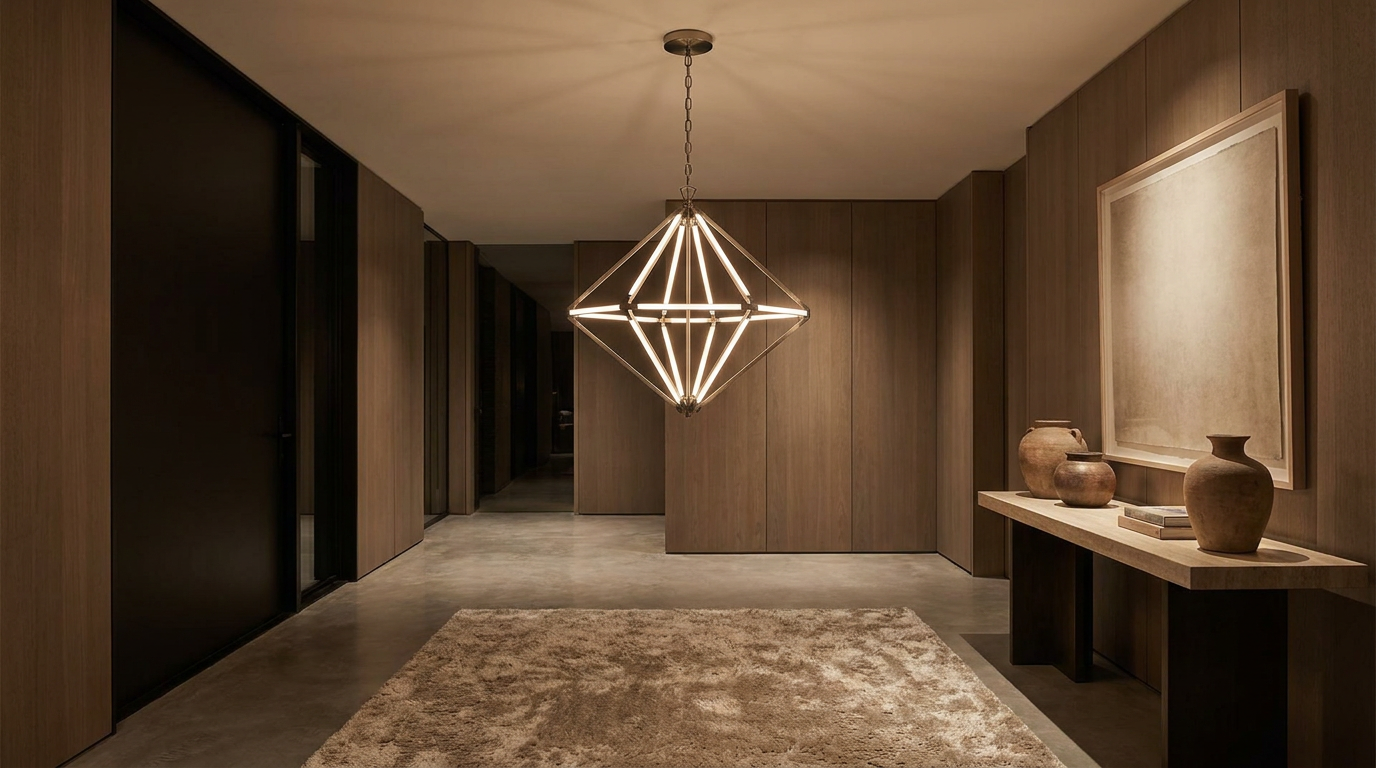
Successful testing is wonderfully satisfying because it is the first moment the room reveals what you have really done. The chandelier stops being an object and becomes atmosphere. Shadow, glow, reflection, and proportion all come alive at once. It is a practical victory, certainly, but also an emotional one.
How to Know When to Call an Electrician
There is sophistication in knowing where DIY confidence should end. If your chandelier is heavy, the ceiling support is questionable, the box must be replaced, the home has older or inconsistent wiring, or the fixture includes unfamiliar electronic components, professional help is the wiser path. This is especially true for vaulted ceilings, sloped ceilings, tall stairwells, and plaster conditions where hidden structural details matter. A professional can ensure the support system is code compliant and the wiring is safe, while you still retain full control over the design selection and final aesthetic placement.
Hiring an electrician does not diminish the elegance or accessibility of the project. In many cases it enhances both. It allows the installation to be completed cleanly, preserves the finish of the fixture, and gives peace of mind that beauty is backed by proper construction. Consider professional help part of the luxury of doing things well rather than a sign of failure.
Common Mistakes That Undermine a Beautiful Installation
Some chandelier mistakes are obvious, such as hanging a fixture too low in a circulation path. Others are more subtle. Installing a chandelier on a box that has never been weight verified is one of the most serious. Another is failing to check dimmer compatibility, especially with integrated LED fixtures. Homeowners also sometimes forget to adjust chain length before hanging, which leads to awkward ceiling level improvisation and a less polished outcome.
Misjudging scale is another frequent issue. A chandelier may be individually beautiful yet feel wrong for the room because it is too small, too large, too ornate, or too visually dense. The most compelling interiors are disciplined. They allow one feature to lead while supporting it with balance. A chandelier should never fight the room for attention. It should complete it.
Finally, many people rush the finishing stage. They tighten the canopy, flip the breaker, and move on without checking level, centering, bulb warmth, or nighttime effect. But refinement is where elegance truly appears. Ten extra minutes of adjustment can produce years of visual pleasure.
Maintenance After Installation
Once your chandelier is installed, a little maintenance preserves both safety and beauty. Dust the fixture gently and regularly, especially if it has exposed arms, glass drops, or fabric shades. Accumulated dust can dull finishes and reduce the clarity of light. Always turn off power and allow bulbs to cool before cleaning or changing lamps.
Periodically inspect the canopy and visible hanging elements to ensure nothing has loosened over time. This does not mean repeatedly disassembling the fixture, but it does mean staying observant. If the chandelier begins to lean, wobble, flicker, or buzz unexpectedly, treat that as a signal to investigate rather than a charming quirk. Decorative lighting should feel serene, not uncertain.
For integrated LED chandeliers, keep the product documentation in a safe place. Driver information, warranty details, and dimmer compatibility notes may be useful later if performance changes or a control system is upgraded. Thoughtful design includes thoughtful stewardship.
Design Notes for Different Rooms
Dining Room
The dining room is perhaps the most beloved home for a chandelier because the fixture can be centered over the table and viewed at a relatively intimate height. Here, the chandelier becomes both illumination and ritual. Use warm dimmable light and hang the piece low enough to create atmosphere while preserving comfortable sightlines across the table.
Entryway
In an entryway, the chandelier sets the tone for the entire home. It should feel welcoming from the threshold and proportionate to ceiling height. If the foyer is double height, consider how the fixture reads from the upper landing as well as from below. The installation must satisfy both drama and clearance.
Bedroom or Sitting Room
In more intimate rooms, chandeliers can soften the mood beautifully. Choose forms with a quieter silhouette and a flattering glow. Because these rooms are often used in the evening, dimming control is especially important. The fixture should feel like part of a layered lighting composition rather than the sole source of brightness.
Stairwell
Stairwells require extra caution because clearance, reach, and sightlines are more complicated. A chandelier here can be unforgettable, but it should only be installed when support, hanging height, and access for maintenance are fully resolved. If the ceiling is high or sloped, professional installation is often the most elegant choice of all.
The Final Effect: Where Safety and Beauty Meet
A chandelier is often described as jewelry for the home, and there is truth in that phrase. But the comparison is only complete if we remember that fine jewelry is also carefully made, properly set, and securely fastened. The same is true here. A chandelier becomes truly luxurious not when it is merely expensive or eye catching, but when it is integrated with precision into the architecture that holds it.
By approaching installation as both a design exercise and a structural responsibility, you create more than a brighter room. You create atmosphere with integrity. You respect the weight of the object, the intelligence of the building, and the experience of everyone who lives beneath that light. That is what makes the project feel elegant in the deepest sense.
If you follow the sequence carefully, choose a fixture with proportion and purpose, verify the ceiling support, and pause whenever uncertainty arises, a chandelier installation can be one of the most rewarding lighting upgrades in the home. It offers visible transformation, practical function, and a daily touch of beauty. Done well, it never looks merely installed. It looks inevitable, as though the room had been waiting for it all along.



No Comment! Be the first one.