



How to Build a Retaining Wall: A Step-by-Step DIY Guide for Homeowners
A retaining wall can look like a simple landscaping upgrade, but in practice it is a small engineered structure. Its job is not just to hold a line in the yard. It must resist the pressure of soil pushing against it, handle water that collects behind it, and survive seasonal movement in the ground. If you build it well, a retaining wall can reclaim usable yard space, control erosion, improve drainage, and raise the overall value and appearance of your property. If you build it poorly, it can lean, bulge, crack, or fail altogether.
Table Of Content
- Why homeowners build retaining walls in the first place
- Know when a retaining wall is DIY friendly and when it is not
- Planning the wall before you buy a single block
- Tools and materials you will likely need
- Step 1: Call before you dig and verify permits
- Step 2: Lay out the wall and mark excavation limits
- Step 3: Excavate to the right depth and width
- Step 4: Install and compact the granular base
- Step 5: Set the first course perfectly level
- Step 6: Install drainage stone and drain pipe behind the wall
- Step 7: Stack additional courses and maintain setback
- Step 8: Add geogrid if the design calls for it
- Step 9: Finish the top, install capstones, and grade the surface
- Common mistakes that lead to retaining wall failure
- What does a DIY retaining wall cost and where can you save money?
- How a retaining wall adds property value
- Maintenance after the wall is built
- When to stop and call a professional
- Final thoughts
That is why the most successful DIY retaining walls are the ones built with a practical mindset. The blocks matter, but the hidden work matters more. The trench depth, the compacted granular base, the drainage stone, the perforated drain pipe, and the surface grading all have more to do with long term performance than the face of the wall. This is especially true in Canada and other cold climate regions, where freeze thaw cycles and frost heave can turn a small mistake into a costly repair.
This guide is written for homeowners who want straight answers and a realistic step by step process. It focuses on a common do it yourself approach using a segmental retaining wall system, which is one of the most practical options for residential projects. These modular concrete blocks are widely available, generally easier to install than poured concrete or mortared masonry, and backed by manufacturer instructions and industry best practices. They are also forgiving enough for a careful homeowner, as long as the site, height, and loading conditions are suitable.
Before you start, understand one important point. Not every retaining wall should be a DIY project. Once wall height increases, drainage becomes more demanding, the slope gets steeper, or the wall is near a driveway, foundation, property line, or other surcharge load, you move out of basic landscaping and into structural territory. In many Canadian and North American jurisdictions, walls around 1.2 m or 4 ft. and higher may require permits, drawings, engineering review, or inspections. Exact rules vary, so always check with your local building department before digging.
Why homeowners build retaining walls in the first place
Most homeowners build retaining walls for one of four reasons. The first is to stop erosion on a sloped yard where rain keeps washing soil downhill. The second is to create level, usable outdoor space for a patio, walkway, shed pad, garden, or lawn. The third is to improve drainage by controlling runoff and stabilizing grade changes. The fourth is simple curb appeal, since a clean, well built wall can make a property look more finished and cared for.
The cost saving angle is real, but it only works if you build the wall correctly. Hiring a contractor for a retaining wall can be expensive because excavation, compaction, drainage materials, labor, and hauling all add up quickly. A homeowner who takes the time to plan carefully and follow proven installation steps can save a significant amount on labor. At the same time, a failed wall can cost far more to rebuild than it would have cost to do right the first time. That is why it pays to be conservative about what you handle yourself.
There is also a property value benefit when the wall solves a real site problem. Buyers notice a yard that drains properly and has usable, stable outdoor space. They also notice leaning walls, soggy side yards, and visible erosion. A retaining wall that looks good and performs well supports both function and resale. One that traps water or starts moving after the first winter does the opposite.
Good retaining walls are built from the ground back, not just from the face up. The parts you do not see are usually the parts that determine whether the wall lasts.
Know when a retaining wall is DIY friendly and when it is not
A small garden wall on a gentle slope is very different from a wall holding back a large bank of wet soil. The safest DIY projects are usually lower walls in uncomplicated settings, using a tested segmental retaining wall product and following the manufacturer specifications closely. Once a wall becomes taller, supports heavy loads, sits above or below a driveway, or affects drainage near the house, the risk rises quickly.
One common misunderstanding is that wall height is measured only by the exposed front face. In practice, retaining wall height is typically measured as the vertical difference between ground levels on each side of the wall. A wall can appear modest from the front but still count as taller once the retained grade behind it is considered. That matters for permit thresholds and engineering review.
You should strongly consider professional input if the wall is near a building foundation, septic system, utility corridor, steep ravine, or property line. You should also pause if the site stays wet for long periods, if there is visible water flow across the area, or if the ground is unstable or heavily clay based. A wall supporting soil that affects a foundation may be treated as a structural element, which raises the stakes considerably.
Do not assume permit rules are the same everywhere. Local requirements can differ by municipality, province, county, or state. Some places ask for basic plans showing wall height, grades, materials, and drainage details. Others require engineering for walls above a certain height or for walls carrying a surcharge load such as a vehicle, building, or steep upper slope. A quick call to the local authority before you start can save time, fines, and rework later.
Planning the wall before you buy a single block
Start by deciding exactly what the wall needs to accomplish. Are you holding back a small garden bed, cutting a slope back to make room for a patio, or preventing washout along the side yard? The answer affects wall height, length, drainage design, and the type of retaining wall block system you choose. You want the wall to solve the whole problem, not just create a hard edge where the soil used to move.
Walk the site after rain if possible. This is one of the simplest and most useful things a homeowner can do. Pay attention to where water comes from, where it pools, and where it exits the property. Surface water control is just as important as what happens behind the wall. If your downspouts discharge toward the wall, or if the grade above the wall funnels runoff straight into the backfill zone, the wall will be under more pressure than it should be.
Then measure the height and length of the wall carefully. Sketch the site and note the top and bottom grades. Mark nearby structures, fences, trees, walkways, and utilities. If the wall will be stepped, curved, or terraced, account for that in your material estimate. Most homeowners underestimate how much excavation and backfill material a wall requires, especially once drainage stone and base aggregate are included.
For a first DIY retaining wall, a modular segmental block system is usually the practical choice. These systems are made to stack with a slight setback, which helps the wall lean back into the retained soil. Many also have interlocking lips or pins that help align the courses. Just remember that the blocks alone do not make the wall safe. A larger, heavier block does not excuse poor drainage or weak base prep.
Tools and materials you will likely need
Most retaining wall projects require a mix of layout tools, excavation tools, compaction equipment, and drainage materials. The exact list depends on wall size and site access, but careful preparation makes the work go much more smoothly. Renting the right compaction equipment is usually money well spent because hand tamping alone is rarely enough for anything beyond a very small project.
- Segmental retaining wall blocks and matching capstones
- Granular base material such as crushed gravel
- Clean angular drainage stone for behind the wall
- Perforated drain pipe or drainage tile
- Geotextile filter fabric where recommended
- Shovel, rake, wheelbarrow, and tamper or plate compactor
- String line, stakes, tape measure, and marking paint
- 4 foot level, torpedo level, and straightedge
- Masonry saw or splitter if cuts are needed
- Work gloves, safety glasses, and hearing protection
If your wall design requires geogrid reinforcement, buy the specific product recommended by the block manufacturer or by the engineer. Not every wall needs geogrid, which is another common misconception. Whether you need it depends on wall height, soil conditions, slope, loads, and the wall system design. For taller or heavily loaded walls, reinforcement is often essential.
Step 1: Call before you dig and verify permits
Before the first shovel goes in the ground, contact your local utility locating service. Underground electrical lines, gas lines, water services, internet lines, and drainage systems are too important to guess about. Retaining walls often run along the edge of yards where buried services can be present, so treat this as non negotiable.
At the same time, verify permit requirements with your municipality or local building office. Tell them the proposed wall height, length, location, and whether it is near a driveway, house, or property line. Ask if there are rules related to drainage changes, grade alteration, or setback distances. If they want drawings, get that sorted out before material delivery. It is much easier to adjust on paper than in a half dug yard.
Step 2: Lay out the wall and mark excavation limits
Use stakes and string to mark the front face of the wall. If the wall is curved, use a garden hose or marking paint first until you are satisfied with the shape, then transfer it to the ground. Think through where each end of the wall will terminate. The ends need to tie into stable grade, step back properly, or return into the slope. Open wall ends are a common weak point.
Now mark the excavation width. You need enough room not only for the wall blocks, but also for the compacted base in front and behind the first course, plus the drainage stone zone behind the wall. Homeowners often dig too narrow, then struggle to level the first course or place drainage material properly. Give yourself working room so you can build accurately instead of fighting the trench.
Check the layout from several viewpoints before moving on. A retaining wall changes the way the yard reads visually, and a small shift in alignment can make a big difference once the wall is built. This is the cheapest stage to make corrections.
Step 3: Excavate to the right depth and width
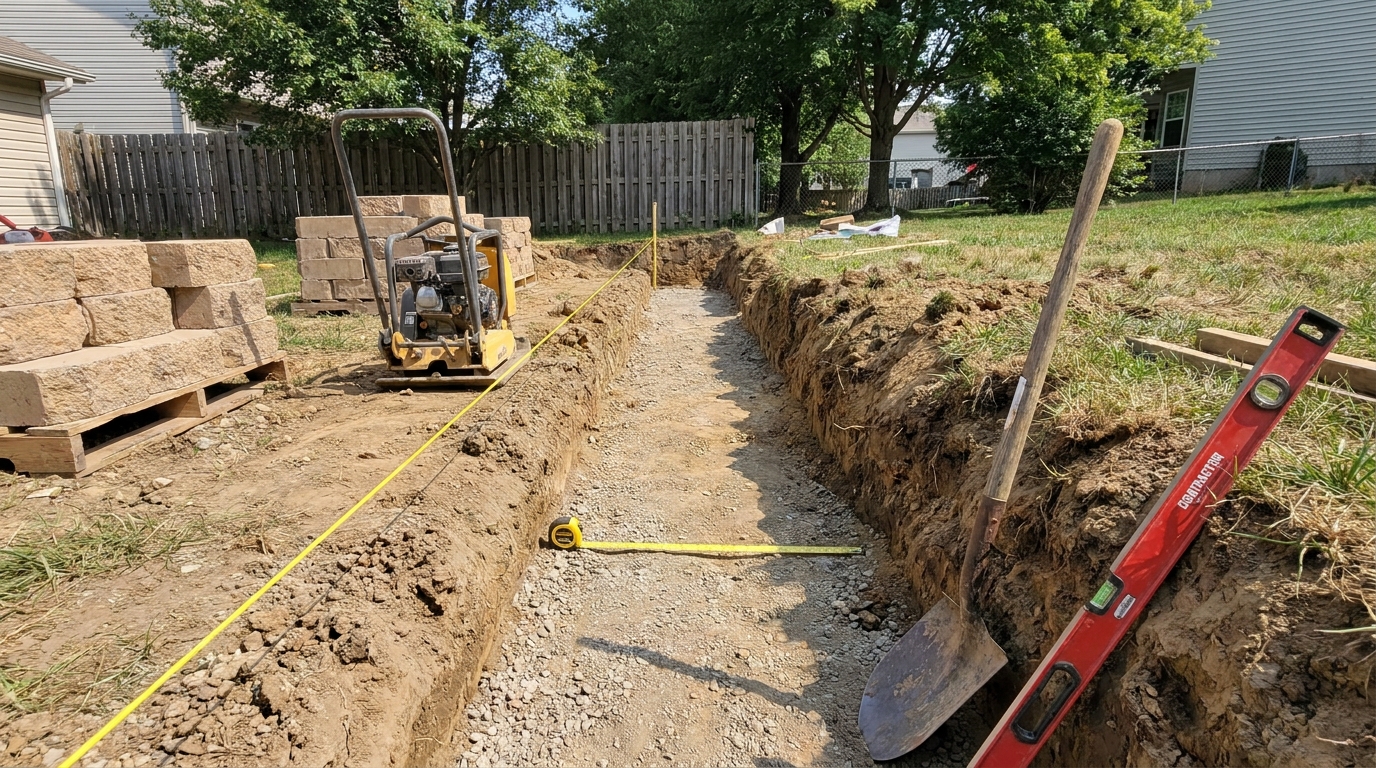
Excavate the trench according to the block manufacturer instructions and your site needs. In many segmental wall systems, the first course is partially buried, which improves stability and appearance. The trench must account for the buried block depth and the compacted granular base beneath it. Do not scrape out a shallow groove and hope the weight of the blocks will make up the difference. It will not.
The base area should extend wider than the wall itself, and the trench bottom should be level front to back and along the length. Remove all organic material, roots, sod, and loose soil. If you leave soft material in the trench, the base can settle unevenly over time. In wet or unstable soils, you may need to over excavate and replace more of the native soil with suitable granular material.
Cold climate sites deserve extra attention here. Frost action can shift walls when moisture is trapped in fine soils under or behind the structure. Good drainage and suitable base material help reduce that risk. Canadian guidance has long emphasized that drainage, grading, filters, and permeable backfill help prevent frost heaving, hydrostatic pressure, wet basements, and retaining wall damage.
Step 4: Install and compact the granular base
Place your granular base material in lifts and compact each layer thoroughly. This is one of the most important parts of the entire project. The base spreads the load, provides a stable platform, and helps water move away instead of collecting under the wall. A retaining wall built on loose base material may look fine for a short time, then start settling and opening joints after the first season.
Use a plate compactor for best results. Add material gradually, level it, and compact it until it is firm and even. Check the surface frequently with a long level and straightedge. The goal is a smooth, consistent base with no soft spots and no humps. Take your time here because every mistake at this stage gets magnified as you stack courses higher.
Do not substitute random fill, topsoil, or leftover excavation spoil for proper base aggregate. Those materials hold water and compress unpredictably. Good walls rely on clean, compactable granular material. It is not glamorous, but it is what keeps the wall standing straight.
Step 5: Set the first course perfectly level
The first course is the foundation of everything that follows. If it is out of level, every course above it will reflect that error. You cannot fix a poor first row by adjusting the top. In fact, trying to do so usually makes the wall look worse and weakens the interlock between units.
Start at the lowest point of the wall and work outward. Place each block on the compacted base, then check level side to side and front to back. Use a dead blow mallet or similar tool to seat the block firmly. Sweep away any gravel under the block that prevents full bearing. Adjacent blocks should sit tight and even, with no rocking or visible lippage.
Keep checking alignment with the string line as you go. Minor errors are easier to correct immediately than after several courses are installed. This is careful, repetitive work, but it pays off. A straight, level first course makes the rest of the build faster and cleaner.
Step 6: Install drainage stone and drain pipe behind the wall
Drainage is the part of retaining wall construction that homeowners most often underestimate. Water building up behind the wall creates hydrostatic pressure, adds weight to the retained soil, and contributes to frost problems in cold regions. Even a dry stacked wall needs drainage. In many cases, the wall does not fail because the blocks were weak. It fails because the drainage strategy was poor or missing.
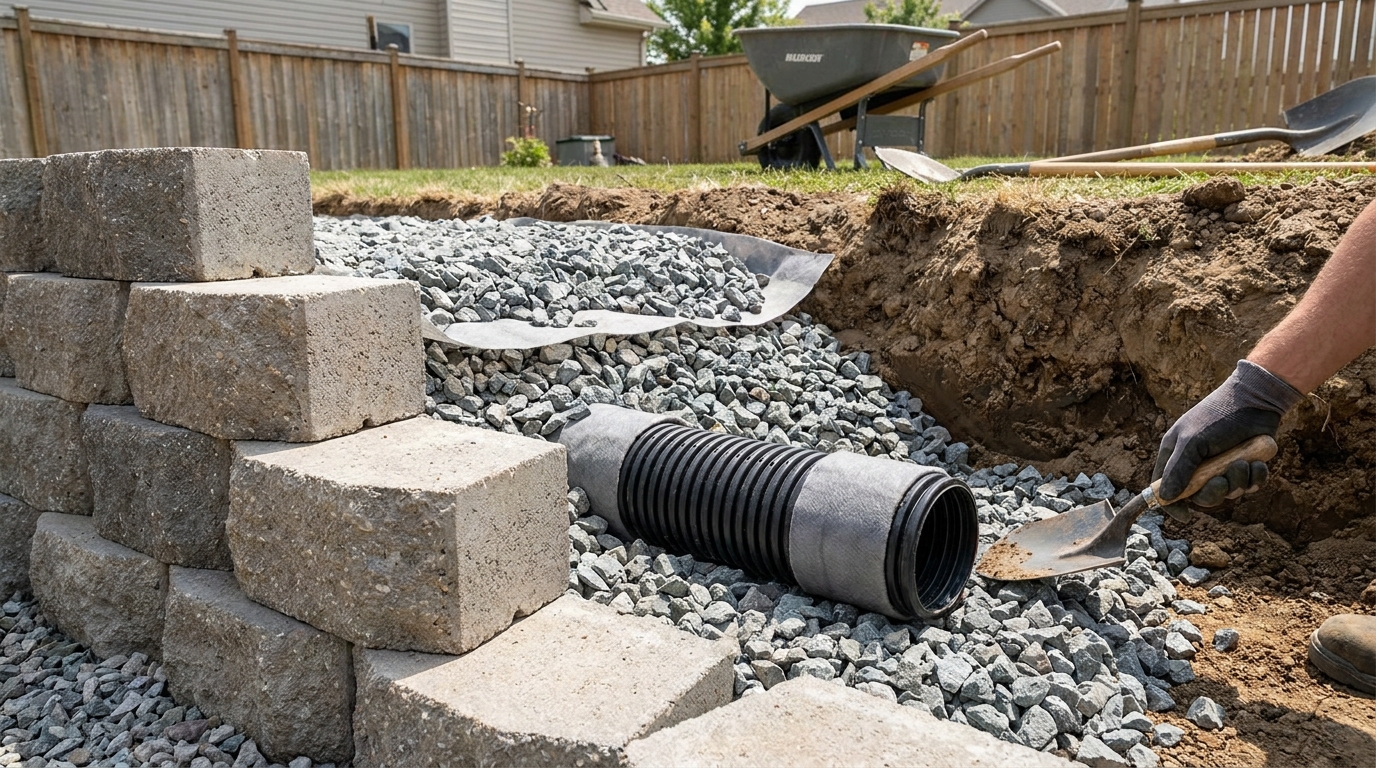
Place clean angular drainage stone directly behind the wall as you build. At the base, install perforated drain pipe or drainage tile according to the wall system instructions and local best practices. The pipe usually sits near the back of the base and is directed to daylight or another approved discharge point. Water needs somewhere to go. A drain pipe with no outlet solves very little.
If recommended, use geotextile filter fabric to separate soils from the drainage aggregate so fines do not wash in and clog the stone over time. The exact placement depends on the site and system, but the idea is straightforward. You want water to move through the drainage zone while keeping the soil where it belongs. Good grading above the wall matters too, since surface runoff should be directed away rather than allowed to pour into the backfill.
Step 7: Stack additional courses and maintain setback
Once the first course is in and drainage stone is started, continue stacking the next courses according to the block system design. Clean the top of each course before placing the next one. Dust, chips, and stray gravel can create gaps that make the wall uneven. Stagger vertical joints where required by the manufacturer so the wall bonds properly and distributes loads more evenly.
Most segmental wall systems are designed with a slight setback, meaning each course steps back a bit from the one below. This batter helps the wall resist soil pressure. Follow the system exactly. Do not improvise the setback because you think a steeper or more vertical face looks better. The wall is performing a structural job, and appearance should not override how the system was meant to work.
As each course goes in, place and compact backfill behind it in lifts. This is important. Do not build the full wall first and dump all the backfill in at the end. Controlled backfilling keeps pressure more even and reduces the chance of movement during construction. Compact carefully, especially near the wall, and use the right equipment for the available space so you do not disturb the blocks.
Step 8: Add geogrid if the design calls for it
Some retaining walls require geogrid reinforcement, which extends back into the soil to create a stronger mass behind the wall. This is common on taller walls, walls with surcharge loads, and walls on more demanding sites. The grid must be installed at the specified courses, lengths, and directions. If you need geogrid, guesswork is not acceptable.
Lay the grid on the correct block course, pull it taut, and place the next course to secure it according to system instructions. Then add specified backfill over the grid and compact it properly. The reinforcement only works if it is installed in the right material and in the right configuration. This is one area where manufacturer details and engineering recommendations should be followed exactly.
It is worth repeating that not every wall needs geogrid. Some lower walls on straightforward sites can perform well without it. The key is matching the design to the site instead of copying what somebody did in a different yard with different soil and water conditions.
Step 9: Finish the top, install capstones, and grade the surface
After the wall reaches its planned height, install the top course and capstones if your system uses them. Caps help lock the appearance together and protect the wall from small shifts at the top. Many systems use masonry adhesive for caps, but check the product instructions and install only on clean, dry surfaces when conditions are suitable.
The work behind and above the wall matters just as much at this stage. Bring the final grade in so water sheds away from the wall instead of toward it. If needed, shape a shallow swale or redirect runoff so intense rain events do not flood the backfill zone. This surface drainage step is a major part of climate resilient landscaping, especially as storms become heavier and more frequent in many regions.
Restore surrounding areas with topsoil, seed, mulch, or planting as needed, but avoid blocking drainage paths. Do not mound heavy wet soil right at the top edge in a way that traps water. A clean finished wall should look integrated into the yard, not like it was dropped into place without thought to where water travels next.
Common mistakes that lead to retaining wall failure
The most common failure point is poor drainage. A wall that traps water behind it is under far more pressure than a drained wall. Homeowners sometimes skip the drain pipe, use the wrong backfill, or allow roof runoff and yard runoff to pour toward the wall. The result can be bulging, leaning, frost movement, or outright collapse.
The next major issue is weak base preparation. Blocks set on uncompacted soil, shallow trenches, or uneven aggregate tend to settle and shift. Once one section moves, the courses above it follow. Bigger blocks do not fix a poor base. In most cases, the hidden groundwork is more important than the visible face units.
Another mistake is treating the wall like a decorative border when it is actually retaining significant soil. That leads to underestimating the need for permits, reinforcement, or professional review. It also leads to walls being built too close to property lines or too near structures without understanding how loads are transferred. A retaining wall can affect neighboring land, drainage patterns, and foundation stability, so it deserves respect.
Finally, many people ignore the top of the wall. Surface water control is often overlooked because the backfill is hidden and the wall face looks complete. Yet grading, swales, and runoff diversion can materially affect wall performance over time. A perfect block installation can still struggle if every storm sends water straight into the retained area.
What does a DIY retaining wall cost and where can you save money?
Costs vary widely based on wall height, block type, access, soil conditions, drainage requirements, and whether material has to be hauled long distances by wheelbarrow. In a typical backyard project, blocks are only one part of the budget. Base gravel, drainage stone, drain pipe, filter fabric, adhesive, disposal fees, delivery charges, and tool rentals often make up a substantial share of the real cost.
The main way homeowners save money is by doing the labor themselves. Excavation, hauling, leveling, stacking, and cleanup all take time, and that labor is expensive when outsourced. If your site is accessible and the wall is in the DIY friendly range, taking on the project yourself can cut costs significantly. Just be honest about your time, physical effort, and tolerance for precise repetitive work.
The wrong place to save money is on drainage and base materials. Skipping compacted granular base, using random fill behind the wall, or omitting the drain pipe can turn a cheaper project into a failed one. Another poor shortcut is buying a wall system without checking the manufacturer guidance for maximum unreinforced height and recommended backfill details. The smart savings come from labor and planning, not from stripping out critical parts of the assembly.
How a retaining wall adds property value
A good retaining wall can add value by improving function first. It can turn a sloped, hard to maintain part of the yard into level and usable space. It can reduce erosion that makes the landscape look neglected. It can improve drainage in a way that protects nearby features such as patios, gardens, walkways, and lawn areas. These practical improvements are often what buyers respond to.
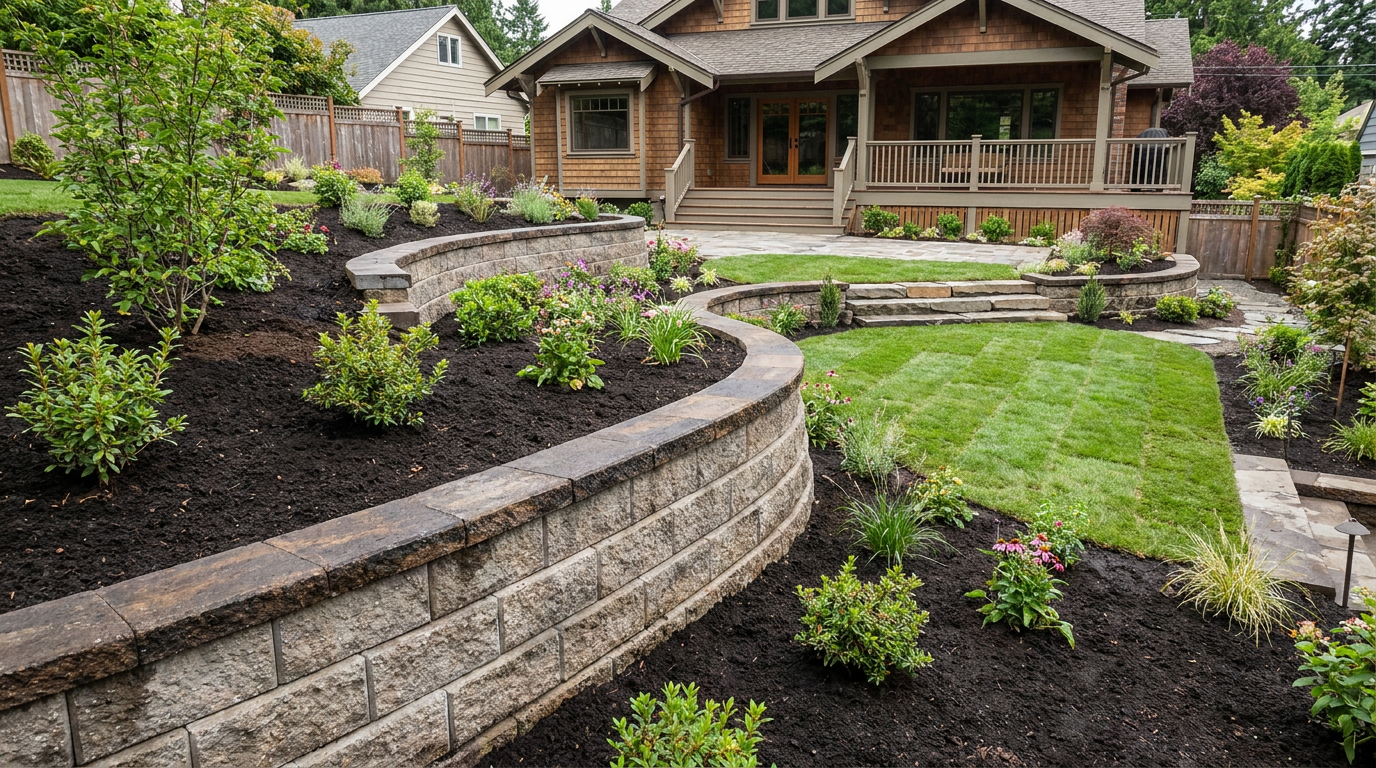
Appearance matters too. A retaining wall creates structure in the landscape, frames planting beds, and gives a yard a more finished look. On a property with grade changes, a wall that is straight, stable, and well integrated into the drainage plan signals that the site has been maintained with care. That does not mean every wall automatically increases resale value, but a well executed one that solves an obvious problem usually helps more than it hurts.
What buyers and inspectors do not like is visible movement, poor drainage, or signs that the wall was built without a plan. Leaning faces, separated caps, and washouts behind the wall suggest future expense. So if property value is part of your motivation, build with long term performance in mind, not just quick visual impact.
Maintenance after the wall is built
Retaining walls are low maintenance, but they are not no maintenance. Check the wall a few times each year, especially after heavy rain and after winter. Look for signs of movement such as new gaps, bulging sections, leaning, settled areas at the top, or water staining on the face. Catching a small issue early is much easier than rebuilding later.
Keep the drainage path working. Make sure drain outlets are clear, surface swales are not filled in, and downspouts have not been redirected toward the wall. If mulch, soil, or leaves build up and trap moisture near the top, clean them back. Plants are fine if they fit the design, but avoid large root systems that can disrupt the wall or clog drainage zones over time.
In freeze thaw climates, some small seasonal movement can happen, especially in the first year as materials settle. What you do not want to see is progressive change from season to season. If the wall keeps moving, investigate the drainage and the grade around it right away. Most long term wall problems are water problems in one form or another.
When to stop and call a professional
There is no shame in handing off a retaining wall project that has crossed into structural territory. In fact, that is often the most responsible choice. If the wall is above common permit thresholds, near a foundation, supporting a driveway, or built on a steep or wet site, a professional installer or engineer is worth serious consideration. The same goes for walls that require detailed reinforcement design or walls in municipalities with strict review processes.
You should also call in help if excavation reveals unstable soils, seepage, buried debris, old concrete, or conditions that differ significantly from what you expected. Site surprises are common, and forcing ahead with a generic plan rarely ends well. Good builders adjust to conditions instead of pretending the conditions are not there.
For many homeowners, the best approach is a hybrid one. Pay for a consultation, site review, or design check, then do the labor yourself on a modest wall that has been properly planned. That can preserve cost savings while reducing risk. It is a practical middle ground and often money well spent.
Final thoughts
Building a retaining wall is one of those projects where careful work matters more than flashy materials. If you pay attention to site assessment, permits, excavation, compacted base, drainage stone, drain pipe, first course leveling, and final grading, you can build a wall that performs well and looks good for years. If you rush any of those steps, the wall will usually tell on you later.
For the right homeowner and the right site, a segmental retaining wall is a very achievable DIY project. It can save labor costs, improve erosion control, create usable outdoor space, and strengthen curb appeal. Just stay realistic about wall height, loads, drainage, and local code requirements. The goal is not simply to stack blocks. The goal is to build a durable structure that handles soil and water the way it needs to.
If you take one lesson from this guide, let it be this: drainage and base preparation are the heart of a good retaining wall. Get those right, and the visible part of the project becomes much easier. Get them wrong, and even the nicest wall blocks in the yard will not save the job.



No Comment! Be the first one.