



Step-by-Step Guide to Installing a New Interior Door the Right Way
Installing a new interior door is one of those jobs that looks simple from across the room and gets more exacting the minute you start. A door can look fine at first glance and still rub, swing open by itself, miss the latch, or leave a crooked gap that catches your eye every time you walk past it. That is why a good installation is less about forcing a door into an opening and more about controlling alignment from the start. If you work carefully, check every step, and make adjustments before fastening everything solid, you can get a clean result that works smoothly for years.
Table Of Content
- Before You Start: Slab Door or Prehung Door?
- What You Need to Know Before Ordering the Door
- Tools and Materials for a First-Time Installation
- Step 1: Remove the Old Door and Expose the Opening
- Step 2: Measure the Rough Opening Carefully
- Step 3: Dry Fit the Door Before Fastening Anything
- Step 4: Set the Hinge Side First
- Step 5: Adjust the Head and Strike Side for Even Reveals
- Step 6: Test the Swing Before Final Fastening
- Step 7: Secure the Frame Without Bowing It
- Step 8: Check the Latch and Strike Alignment
- Step 9: Deal with Uneven Floors the Practical Way
- Step 10: Install the Casing and Finish the Opening
- Common Mistakes First-Time Installers Make
- Choosing Between Solid-Core and Hollow-Core Interior Doors
- Troubleshooting After Installation
- When to Call a Pro
- Final Thoughts
For most first-time installers, the easiest path is a prehung interior door. That means the door slab comes already mounted in its jamb, usually with hinges, stops, and a pre-machined frame. This setup removes a lot of the fine fitting that comes with a slab-only door, but it does not remove the need for careful measuring or shimming. A factory-aligned unit still depends on a rough opening that is close enough to plumb, level, and square for the frame to be adjusted correctly.
This guide focuses on practical steps and common pitfalls, especially for homeowners doing this for the first time. You will learn how to measure the opening, choose the right door swing, dry fit the unit, set the hinge side first, and fine tune the reveals so the door closes properly. You will also see where older homes complicate things, particularly when floors are out of level or walls are not straight. Those details are what separate a door that merely fits from one that actually feels well installed.
A good door installation is really an alignment job. If the hinge jamb is plumb and the reveals are even, most of the hard part is already done.
Before You Start: Slab Door or Prehung Door?
If you are replacing an interior door, the first decision is whether to install a slab door or a prehung unit. A slab door is just the door itself, without the frame. That option can work well when the existing jamb is in excellent shape, the hinges line up perfectly, and you are comfortable cutting hinge mortises, drilling the latch bore, and trimming the slab if needed. For experienced carpenters, that is normal work. For a first-time DIYer, it is where a manageable job can turn frustrating in a hurry.
A prehung door is generally the more forgiving choice. The slab is already mounted in the jamb, and the hinge locations are factory set. Retailers commonly sell these as ready-to-install assemblies, often primed and prepared for paint. That does not mean you can skip layout and fit checks, but it does mean you are starting with a door and frame that were built to work together.
There are also different door styles to keep in mind. A standard swinging interior door is what most people mean here, but French doors, pocket doors, and bifold doors all install differently. Pocket doors require wall cavity planning, bifolds rely on track and pivot hardware, and French doors introduce another level of alignment because you are dealing with paired slabs. If this is your first installation, a single prehung swinging door is by far the most straightforward place to start.
What You Need to Know Before Ordering the Door
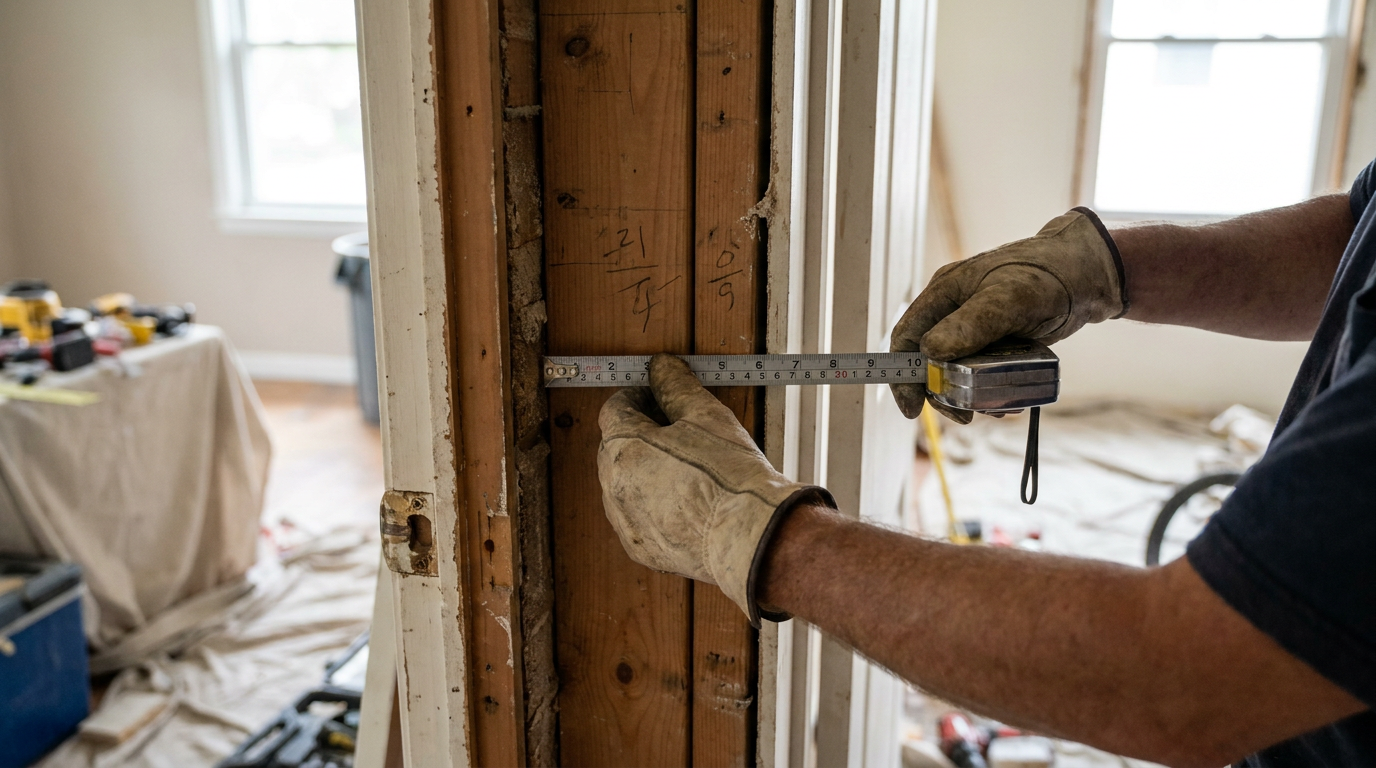
One of the most common mistakes is ordering a replacement based only on the old door slab size. That can work in limited cases, but many installations require you to know the rough opening, not just the slab dimensions. The rough opening is the framed space in the wall before trim and casing cover it up. To measure that accurately, you often need to remove some or all of the casing around the existing door.
Standard nominal widths for interior doors commonly include 20, 24, 28, 30, and 36 inches, with 80 inches as a common height. But standard sizes do not guarantee a standard opening in an older house. Over time, framing settles, floors shift, and previous work can leave openings that are technically the right size but not actually square. That is why measuring the framing matters so much.
You also need to determine the door handing, which means whether the door is left-hand or right-hand. This is where many first-time buyers get turned around. The simplest practical method is to stand on the side of the door where the hinges are visible and note whether the hinges are on your left or right as you face the opening. If they are on the left, it is left-hand. If they are on the right, it is right-hand. Always confirm the seller’s convention before ordering because product listings can vary in how they label swing.
Tools and Materials for a First-Time Installation
You do not need a full shop to install a prehung interior door, but you do need a few basic tools and enough patience to use them properly. A level is essential, and a longer level makes it easier to read the jamb accurately. A tape measure, drill or driver, utility knife, pry bar, hammer, shims, screws, and finish nails or a finish nailer will cover most of the work. A square is useful for checking corners, and a block plane or sander can help if a small adjustment becomes necessary.
If you are removing an old unit, keep a drop cloth down and have a vacuum nearby. Demolition around casing and jambs tends to scatter small chips of paint, dried caulk, and splinters. It is also smart to have extra shims on hand because they are one of the main control points in the job. Many door problems are really shim problems, not door problems.
When choosing screws, it helps to have some long enough to anchor through the jamb and into framing, especially at hinge locations. Those fasteners let you pull the hinge side into proper plumb and support the door’s weight better than short trim fasteners alone. Just be careful not to overtighten, because it is easy to bow the jamb inward if you drive screws too aggressively.
Step 1: Remove the Old Door and Expose the Opening
Start by taking the old door off its hinges. If the existing frame is being replaced too, remove the casing carefully with a pry bar and utility knife so you do not tear up the wall more than necessary. Scoring the paint or caulk line first makes a big difference. Once the trim is off, you can inspect the jamb, framing, and the space around the opening.
If the old frame is nailed into the rough opening, cut or back out fasteners and pull the jamb sections free. Take your time here because rough, rushed removal can damage drywall edges and leave more patching work later. Once the frame is out, clean up the opening. Remove loose debris, old shims, protruding nails, and anything else that would keep the new unit from sitting flat and true.
This is also the moment to slow down and inspect the floor. Check whether the subfloor or finished floor under the opening is level from one side to the other. In newer homes it may be close. In older homes it may be off enough to affect the bottom gap under the door. That matters because a perfectly plumb frame installed over an uneven floor can still produce a reveal that looks wrong at the bottom.
Step 2: Measure the Rough Opening Carefully
Measure the rough opening width in a few places and record the smallest dimension. Do the same for the height from the floor to the underside of the header or top framing. Then measure diagonally from corner to corner to get a sense of how square the opening is. If the diagonal measurements differ noticeably, the opening is out of square, and you will need to rely on careful shimming during installation.
Do not assume the old unit tells the whole story. It may have been trimmed, forced, shimmed heavily, or installed off-center to hide problems in the framing. If you simply match the old slab, you may repeat the same issues. Measuring the framing gives you the information needed to decide whether a standard prehung unit will fit comfortably and still leave room for adjustment.
Most prehung doors are sized to fit a rough opening that is slightly larger than the jamb itself. That extra room is not wasted space. It is what allows you to adjust the frame with shims and bring it into proper alignment. If the fit is too tight, the unit will be difficult to set correctly. If the opening is excessively oversized, you will spend more time stabilizing the frame and supporting trim.
Step 3: Dry Fit the Door Before Fastening Anything
Dry fitting is one of the easiest steps to skip and one of the most important. Set the new prehung door in the opening without fastening it permanently. Check whether it sits cleanly in the rough opening and whether there is enough room around the jamb for shims. This is where you catch issues like a floor hump, drywall interference, or framing that pinches one side of the unit.
If the floor under one side is higher, note that now. You may need to hold one jamb leg slightly up off the floor to maintain a more even bottom reveal under the door. This is a common reality in older homes. The goal is not to pretend the house is perfectly level. The goal is to install the door so it operates well and looks balanced within the conditions you have.
As you dry fit, check the head jamb for level and both side jambs for plumb. You are not trying to make final corrections yet. You are learning what the opening wants to do and where the adjustments will matter most. That information will guide how you place your first shims and fasteners.
Step 4: Set the Hinge Side First
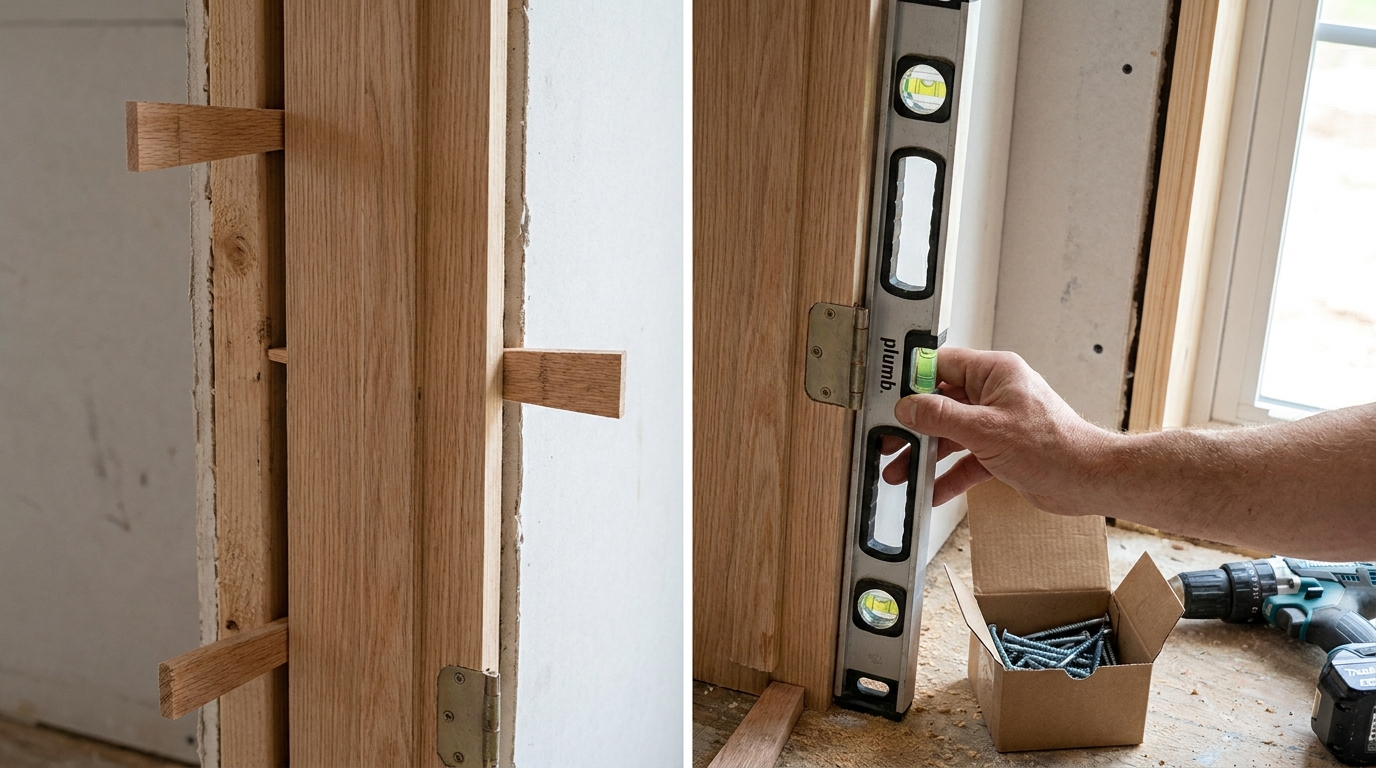
The hinge side is where the weight of the door lives, so it needs to be established first. Put the unit in the opening and place shims behind the hinge jamb, usually near the top hinge, middle hinge, and bottom hinge areas. Use your level to bring that jamb into plumb. This is one of the core principles of successful door installation. If the hinge side is off, almost everything else gets harder.
Once the hinge jamb is plumb, fasten it lightly so it stays in place while still allowing small adjustments. Many installers like to secure near the hinge locations first because those points carry the load and give the best control over the slab. If one section of the jamb is pulled too tight without support behind it, the frame can bow. That bow may not be obvious until the door swings and the reveal changes from top to bottom.
After the hinge side is set, open and close the door gently. Watch how the slab hangs in relation to the head jamb. You are looking for an even gap across the top and a stable swing without twisting. If the top reveal is wider on one side than the other, revisit the hinge jamb before moving on. This is the best time to correct it.
Step 5: Adjust the Head and Strike Side for Even Reveals
With the hinge side plumb and lightly secured, move to the top and strike side of the frame. The reveal is the visible gap between the door slab and the jamb. On a good installation, that gap should appear even and consistent. This is what people notice visually, even if they do not know the technical term for it. Uneven reveals are a sign that the frame is twisted, out of plumb, or under stress.
Shim the strike side where needed, usually near the latch area and near the top and bottom. Bring the head jamb level if it is not already. Keep checking the reveal as you make changes because each shim can affect more than one area. This is not a step to rush. A quarter turn on a screw or a slight change in shim thickness can make the difference between a door that latches cleanly and one that rubs or pops open.
Do not force the frame to match a bad opening if doing so ruins the reveal. In some homes, the framing and floor are imperfect enough that you have to prioritize smooth operation and a visually balanced gap over a theoretical perfect relationship with the wall. That is normal. The finished trim will hide small variations between the jamb and the rough opening, but it will not hide a door that binds every day.
Step 6: Test the Swing Before Final Fastening
Before you lock the frame in place with all fasteners, test the door swing repeatedly. Open it, close it, and let it rest at different points in its travel. A properly installed interior door should move freely without dragging and should not swing open or closed on its own unless the floor or house is significantly out of level. It should also meet the stop evenly as it closes.
If the latch side is too tight, the strike jamb may be pushed in too far. If the head gap narrows near the latch side, the frame may need adjustment at the top. If the door binds near a hinge, the hinge side could be bowed or pulled out of plumb. These are all alignment issues that are usually corrected with shims and fastener adjustments, not by trimming the slab immediately.
This is where first-time installers often make a costly mistake. They see a rub point and assume the door itself is wrong. In reality, the slab is often fine. The frame has simply not been set correctly yet. Exhaust the jamb and shim adjustments before reaching for tools that remove material from the door.
Step 7: Secure the Frame Without Bowing It
Once the door swings properly and the reveals look good, go ahead and secure the frame fully. Add fasteners at the shim locations so the jamb is supported wherever pressure is applied. This is important because an unsupported fastener can distort the jamb instead of holding it straight. Trim the excess shims after the frame is secure.
Be mindful of how much pressure each screw adds. A common mistake is driving fasteners too hard and pulling the jamb out of alignment at the very end of the job. That can turn a smoothly swinging door into a sticky one in a matter of seconds. Tighten gradually and keep checking the reveal as you go.
At the hinge side, longer screws can be especially helpful, particularly behind one of the hinges. They add strength and help anchor the frame to the rough opening more solidly. Just make sure any adjustment screws still preserve the plumb line you established at the beginning.
Step 8: Check the Latch and Strike Alignment
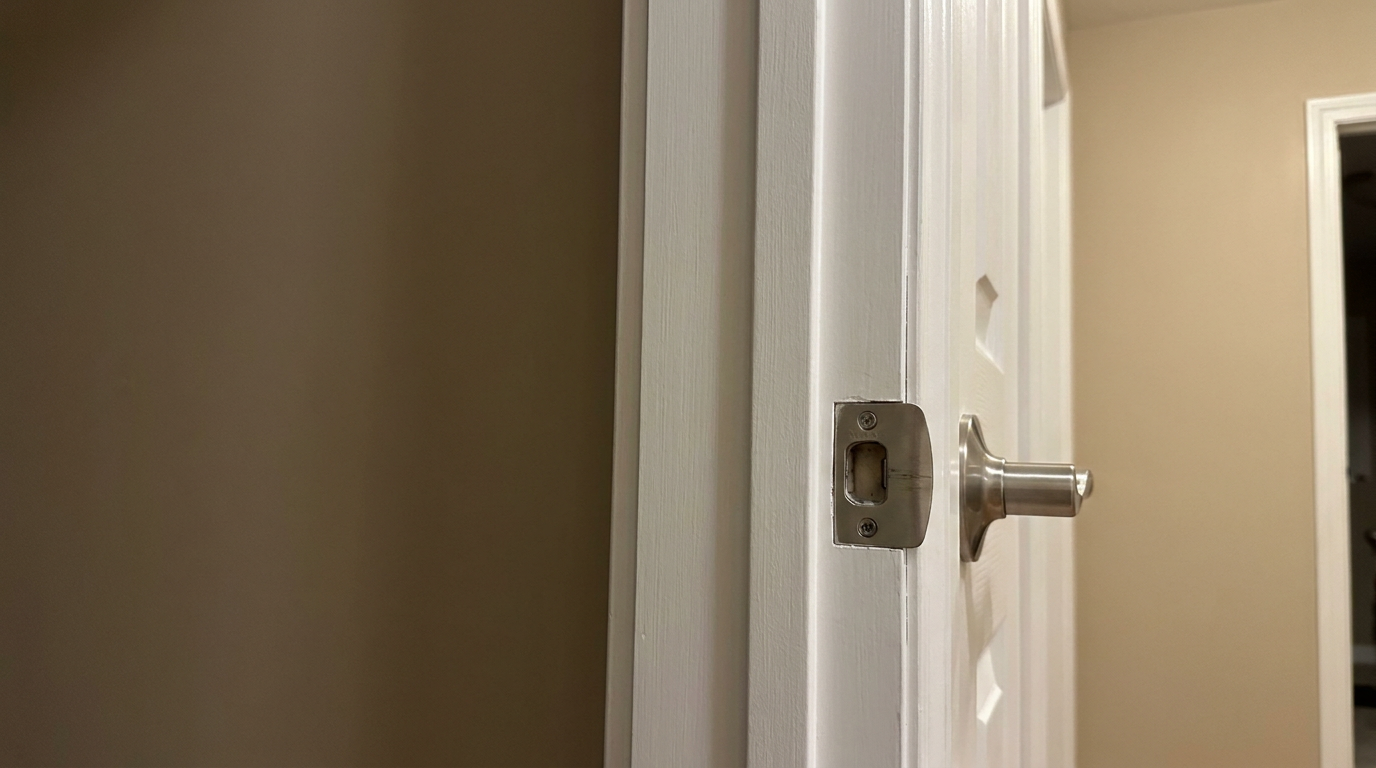
With the frame fully secured, test the latch. The door should close against the stop and click into the strike without requiring a shove. If the latch misses, the strike side may need a small adjustment, or the strike plate itself may need to shift slightly. Tiny misalignments here are common and usually simple to correct.
Watch how the door meets the stop around the perimeter. If one corner hits first while another remains open, the frame may still have a twist in it. Minor corrections are easier now than after trim and paint. This is why experienced installers keep checking function throughout the job rather than saving all testing for the end.
If your prehung unit came with the strike prepped but not fully installed, take your time placing the hardware so it matches the latch position exactly. A door that looks straight but does not latch smoothly will never feel finished. Good function matters at least as much as appearance.
Step 9: Deal with Uneven Floors the Practical Way
Uneven floors deserve special attention because they cause a lot of confusion. In an older house, one side of the opening may sit higher than the other. If you install the frame strictly by the floor, the door may look more even at the bottom but drift out of plumb. If you install the frame strictly plumb, you may end up with a bottom gap that is noticeably larger on one side. There is often some compromise involved.
The best approach is to preserve smooth operation first and then aim for the most visually balanced bottom reveal possible. That may mean holding one jamb leg slightly above the floor rather than planting both sides firmly on the surface. In some cases, a future flooring change or threshold detail can help visually. In others, a slightly uneven undercut is simply part of working in an older structure.
Do not ignore the issue and hope trim will hide it. Casing can hide the space around the jamb, but it cannot hide a bad bottom gap or a door that drags on the finished floor. When in doubt, set the door to operate well and then decide what cosmetic adjustment is acceptable in the room.
Step 10: Install the Casing and Finish the Opening
Once the door is working properly, install the casing or trim. The trim covers the gap between the jamb and the wall and gives the opening a finished appearance. Before nailing anything, dry fit the pieces and check the miters. If the wall is uneven, you may need to adjust the trim slightly so it sits cleanly against both the jamb and the drywall.
Fasten the casing carefully so you do not pull the jamb out of position. This is another subtle way a good installation can be spoiled at the end. If the trim or nails put pressure on the jamb, the reveal can change enough to affect the swing. It does not happen every time, but it happens often enough that it is worth checking the door again after trim goes on.
Finish the nail holes, caulk as needed, and paint or stain according to the door and trim material. Many prehung units come primed, which simplifies finishing. If you chose a wood door intended for stain, protect it properly and make sure the finish schedule matches the manufacturer guidance for sealing all faces and edges.
Common Mistakes First-Time Installers Make
The most common mistake is assuming the existing opening is square and ready to accept a new door without fuss. In reality, even a small out-of-plumb condition can create visible and functional problems. Another frequent issue is skipping the dry fit. Once fasteners start going in, people tend to commit to a position before they really understand how the unit sits in the opening.
Ordering the wrong swing is another classic problem. A door that opens the wrong way is not a small inconvenience. It affects furniture placement, traffic flow, and privacy, and correcting it after purchase can be expensive. Always confirm handing before ordering, and do not rely on memory alone if you are measuring multiple openings in a house.
Over-shimming is just as problematic as under-shimming. Too many shims or shims forced too tightly can bow the jamb and create binding. On the other hand, too little support behind a fastening point can let the jamb flex later. The right approach is measured, even support at the critical points, especially the hinge locations and latch area.
Another mistake is blaming the slab too early. If the door sticks, many people assume they need to plane the edge or trim the bottom. Sometimes that is true, especially in old openings or after flooring changes, but many apparent slab problems are really frame alignment issues. You should only alter the door itself after confirming that the jamb is plumb, the head is level, and the reveals are as good as the opening allows.
Choosing Between Solid-Core and Hollow-Core Interior Doors
Not every interior door feels the same in daily use. Hollow-core doors are lighter, less expensive, and easier to carry and install. They are common in bedrooms, closets, and utility spaces where budget and weight matter. For many homes, they are a practical choice and completely appropriate.
Solid-core doors offer a heavier, more substantial feel and often provide better sound control. If privacy, noise reduction, or a more durable impression matters, they are worth considering. The tradeoff is weight. A heavier slab puts more demand on the hinge side and makes careful installation even more important. If you are a first-time installer, a prehung solid-core door is still manageable, but expect it to be less forgiving to handle alone.
Your door choice should reflect how the room is used. Bedrooms and home offices often benefit from better sound control. A pantry or linen closet may not need it. Choosing the right door before installation saves frustration later and helps the finished project feel intentional rather than generic.
Troubleshooting After Installation
If the door swings open by itself, the frame is likely out of plumb or the floor has influenced your perception of straight. Recheck the hinge jamb with a level. If the latch side rubs near the top, the head or strike side may need a small adjustment. If the door binds on the hinge side, look for a bow in the jamb or a hinge area pulled too tightly without proper shimming behind it.
If the latch will not catch, start by observing whether the slab is meeting the stop evenly. If it is not, the frame alignment still needs work. If the door closes properly but the latch misses the strike, the strike location may simply need a minor shift. That is a much smaller problem and usually easy to solve once the frame itself is right.
Seasonal movement can also affect interior doors, especially in homes with humidity swings. Wood products expand and contract, and a door that worked perfectly in dry weather may become tighter later. That is another reason to avoid making the reveals too tight during installation. A little breathing room is not sloppiness. It is part of a durable fit.
When to Call a Pro
Most homeowners can install a standard prehung interior door with patience and basic tools, but some conditions justify bringing in a professional. If the rough opening is badly out of square, the wall is clearly twisted, the floor drops sharply across the opening, or the framing has damage, the job may involve more carpentry than a simple replacement. Structural movement, hidden moisture issues, or repeated door failures also deserve a closer look.
You should also think realistically about handling and finish expectations. A heavy solid-core door or a large opening can be awkward for one person. If you are working alone and cannot safely control the unit while checking plumb and reveal, help is worth getting. There is no shame in that. Good workmanship often starts with knowing where extra hands or extra experience will make the result better.
Final Thoughts
Installing a new interior door is a satisfying project because the results are immediate and practical. Done well, it improves privacy, appearance, and the everyday feel of the room. Done poorly, it creates a nuisance you notice every time you use it. That is why the key is not speed. The key is careful setup.
Measure the rough opening from the framing, not just the old slab. Confirm the handing before you order. Dry fit the unit, set the hinge side plumb first, and use shims thoughtfully rather than aggressively. Keep checking the reveals and swing before final fastening. If the floor is uneven, work with the house you have instead of pretending it is perfectly level.
For a first-time installer, a prehung interior door is usually the smartest route because the factory alignment removes a lot of guesswork. But even a ready-to-install unit still needs a careful hand. If you respect the alignment process, you can end up with a door that not only looks straight but closes cleanly, latches easily, and stays trouble free for years. That is the standard worth aiming for.


No Comment! Be the first one.