



Step-by-Step Guide to Building Your Own Pantry: Maximize Space and Efficiency
A good pantry does more than hold food. It clears pressure off your kitchen cabinets, opens up counter space, and gives you a system for storing everyday groceries, backup supplies, small appliances, and bulk items without making the kitchen feel crowded. If your current kitchen feels cluttered, building a pantry is one of the most useful improvements you can make because it solves a daily problem in a practical way.
Table Of Content
- Why building a pantry is worth the effort
- Step 1: Choose the right pantry type for your home
- Walk-in pantry
- Reach-in pantry
- Converted hallway or closet pantry
- Step 2: Check codes, walls, power, and permits before you start
- Step 3: Measure the space properly and plan your layout
- Sample planning questions to answer before building
- Step 4: Create a pantry design that matches how your kitchen works
- Step 5: Choose materials that can handle weight and daily wear
- Good material priorities for pantry construction
- Step 6: Frame or prep the pantry space
- Step 7: Plan electrical, lighting, and ventilation
- Step 8: Build strong shelving with realistic dimensions
- Suggested pantry zoning approach
- Step 9: Install doors and think carefully about swing and access
- Step 10: Finish the walls, shelves, and trim for easy maintenance
- Step 11: Organize the pantry by zones, weight, and frequency of use
- A simple category layout that works in most homes
- Common pantry building mistakes to avoid
- How to maximize space in a small pantry
- Cost factors to expect before you build
- When to call in a professional
- Final thoughts: build for daily life, not just appearance
This project is also about planning, not just carpentry. A pantry that looks nice but wastes space will frustrate you every week. A pantry that is sized properly, built with strong materials, and organized around how your household actually shops and cooks will work for years. That is why the best pantry builds start with measuring, traffic flow, shelf depth, and storage zones before you cut the first board.
There is also a strong design case for doing this well. North American kitchen trend research from NAHB and NKBA continues to show that pantries, concealed storage, and multifunctional kitchen spaces remain high priorities for homeowners and buyers. That matters if resale is on your mind, but it matters even more in daily life because a pantry can make a modest kitchen function like a larger one when the layout is right.
In this guide, I will walk you through the full process of building your own pantry, from deciding what type of pantry fits your house to framing, shelving, lighting, finishes, and final organization. The focus here is practical use. We are not chasing a showroom photo. We are building a pantry that holds weight, uses space efficiently, and fits the way real households live.
Why building a pantry is worth the effort
For most homeowners, pantry construction pays off in two ways. First, it improves kitchen efficiency right away. Instead of stuffing canned goods into lower cabinets and piling snacks wherever they fit, you create a dedicated storage zone where everything has a place. That makes shopping easier, meal prep faster, and cleanup more predictable.
Second, a pantry often makes the whole kitchen feel larger even if the room itself does not change. Once backup groceries, paper goods, and countertop appliances move into a defined storage area, the kitchen works better as a cooking space instead of a catchall. This is especially helpful in smaller homes where every cabinet does double duty and visual clutter builds up fast.
There is a common misconception that a pantry only makes sense in a large kitchen or new custom home. That is simply not true. NAHB guidance has shown that a useful walk-in pantry can work in a footprint as small as 4 by 4 feet or 6 by 6 feet, and in some homes a widened hallway or converted closet can create excellent linear pantry storage near the kitchen. The point is not square footage alone. The point is whether the storage is usable.
Practical rule: A pantry should be planned around use patterns, not empty space. If you know what needs to be stored, how often it is used, and how much clearance you need to move comfortably, the design decisions become much clearer.
Step 1: Choose the right pantry type for your home
Before you think about shelves or trim, decide what kind of pantry you are building. Most pantry projects fall into one of three categories: walk-in, reach-in, or converted-space pantry. The right choice depends on your floor plan, your storage needs, and whether you are working with existing walls or creating a new enclosure.
Walk-in pantry
A walk-in pantry gives you the most flexibility. You can combine wall shelving, deeper lower storage, pull-outs, appliance parking, and even a small prep surface if the footprint allows. This style works best if you have an unused corner, a closet-sized room off the kitchen, or enough remodel scope to carve out a dedicated storage area.
The main advantage of a walk-in pantry is access. With shelving on one or two walls and a comfortable aisle, you can see more of what you own and sort items by category. The main risk is crowding too much into a small room. If shelves are too deep or aisle space is too tight, a walk-in pantry can become a cramped box that is hard to use.
Reach-in pantry
A reach-in pantry is often the best answer in smaller homes. It acts more like a highly organized storage wall than a room. You open the doors and everything is visible from the front. This design can be more efficient than a tiny walk-in because you do not lose floor area to an interior aisle.
Reach-in pantries work well where there is a spare wall, a recess near the kitchen, or an old closet that can be rebuilt with better shelving. If you want strong storage without changing the whole layout, this is often the most practical option. It also tends to be easier to light and simpler to finish cleanly.
Converted hallway or closet pantry
Many of the smartest pantry projects come from using space that was already there but underperforming. A shallow closet, side hall, mudroom edge, or dead end near the kitchen can often be turned into a very effective pantry. NAHB design guidance notes that in some cases a hallway beside a kitchen can be widened and converted into linear pantry storage, which is exactly the kind of move that improves function without adding square footage.
These conversions require careful planning because you may be dealing with existing doors, electrical lines, or wall framing that limits what can be changed. But if your house does not have room for a traditional pantry, this route can still deliver strong results.
Step 2: Check codes, walls, power, and permits before you start
This is the step many DIY articles rush past, and it should not be rushed. Pantry projects can seem simple because they are storage projects, but once you start moving walls, changing door openings, adding lights, or installing outlets, you may be in permit territory depending on your location. In both the United States and Canada, local rules can affect wall modifications, electrical work, ventilation, and fire separation.
If you are converting a closet or hallway, confirm whether the wall is load bearing, whether wiring runs through it, and whether there are any code limits on the space you are altering. The National Building Code framework in Canada is a model system and may be adapted by provinces and territories, so local verification matters. In the U.S., local building departments and permit offices set the practical standard you need to follow.
Even if a permit is not required, code-informed planning is still useful. ADA residential-inspired dimensions are a strong reference for pantry usability. For example, accessible reach guidance sets 48 inches as a maximum high reach for accessible elements, and kitchen pass-through work areas require at least 40 inches of clearance between opposing counters, cabinets, appliances, or walls. A pantry is not a commercial kitchen, but these measurements are helpful because they force you to think about who will use the space and how comfortably they can reach items.
If the pantry will be used by older adults, children, or anyone with mobility limits, designing with reach and clearance in mind is not just a nice extra. It is a smart long-term decision. Good pantry design overlaps with universal design more than many people realize.
Step 3: Measure the space properly and plan your layout
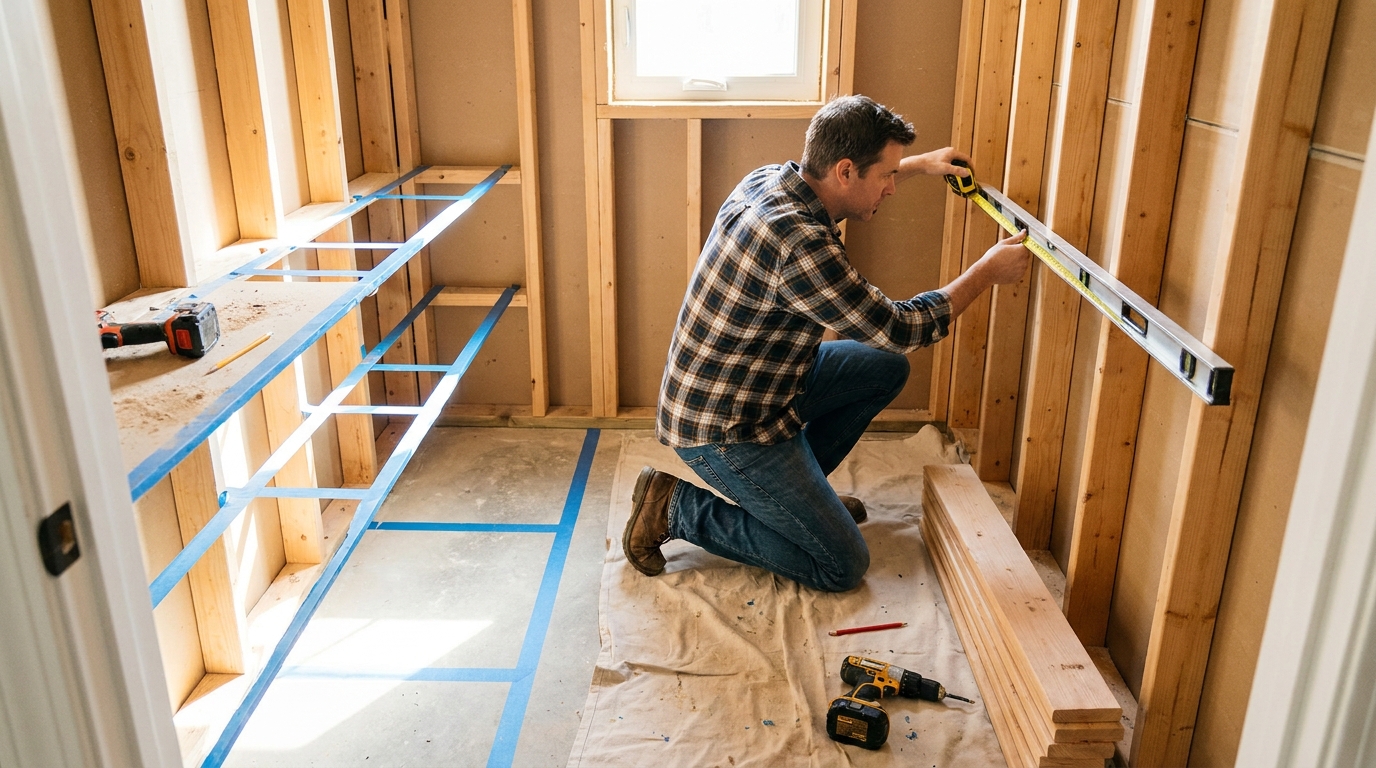
Now you can get into the planning that makes or breaks the build. Measure the length, width, and height of the space. Note door swing, baseboard location, outlet positions, light switch placement, HVAC vents, and any trim or framing irregularities. If the room is not square, catch that now, not after your shelves are cut.
Once you have raw dimensions, think in terms of use zones instead of just walls. Dry goods, canned foods, baking supplies, snacks, paper goods, small appliances, and overflow beverages all have different storage needs. A pantry works best when each category has a dedicated area and the layout reflects how often items are used.
Shelf depth matters a lot. Deep shelves sound appealing because they hold more, but deeper is not always better. If shelves are too deep, items disappear behind the front row and you end up with wasted storage. In many pantries, shallower upper shelves and somewhat deeper lower shelves strike the right balance. Lower areas can handle heavy bulk goods and appliances, while eye-level shelves should stay easy to scan and reach.
Also think about human movement. If you are building a walk-in pantry with shelves on both sides, protect your aisle space. It is better to have slightly less shelf depth and a comfortable path than to create a narrow storage tunnel. A pantry needs to be easy to enter, easy to turn around in, and easy to clean.
Sample planning questions to answer before building
- Will this pantry mainly store food, or will it also hold appliances, serving pieces, or cleaning supplies?
- Do you buy in bulk, or do you shop more frequently with smaller quantities?
- Do you want adjustable shelves, fixed shelves, pull-out drawers, or a mix of all three?
- Will you need outlets for a microwave, coffee setup, or charging station?
- Who in the household needs easy access to the most-used shelves?
- How will the door open, and does that swing interfere with movement or nearby cabinets?
Step 4: Create a pantry design that matches how your kitchen works
A pantry should support your kitchen, not fight it. If the pantry sits directly off the main cooking area, stock it with your most-used ingredients and prep tools in the easiest-to-reach places. If it is a secondary storage pantry down the hall or near the mudroom, use it more for overflow goods, bulk items, and less-frequent appliances. The layout should reflect the pantry’s relationship to the kitchen.
Modern kitchen trends also support this approach. NKBA reporting continues to highlight multifunctionality, hidden storage, and prep-oriented zones. That means your pantry can do more than hold boxes. In the right footprint, it can hide a toaster, mixer, coffee station, or backup microwave while keeping the main kitchen visually clean.
That said, avoid overbuilding for trends if the basics are not right. A hidden appliance shelf sounds nice, but not if it steals your best eye-level storage and creates a tangle of cords. Practical design comes first. Features should support function, not just novelty.
Step 5: Choose materials that can handle weight and daily wear
Pantries take more abuse than people expect. Canned goods are heavy. Beverage packs are heavy. Countertop appliances are awkward to lift and often get dragged across shelves. If you use weak shelf material or poor fastening methods, sagging and failure show up fast.
For structure, most pantry projects rely on standard wood framing where walls are added or modified. For shelving, plywood is usually the practical workhorse because it is stronger and more stable than basic particle board. Hardwood plywood, paint-grade plywood, or high-quality furniture board can all work depending on your finish goals and budget. If moisture is a concern, especially in basement-adjacent or utility-adjacent spaces, choose materials and finishes that resist humidity better.
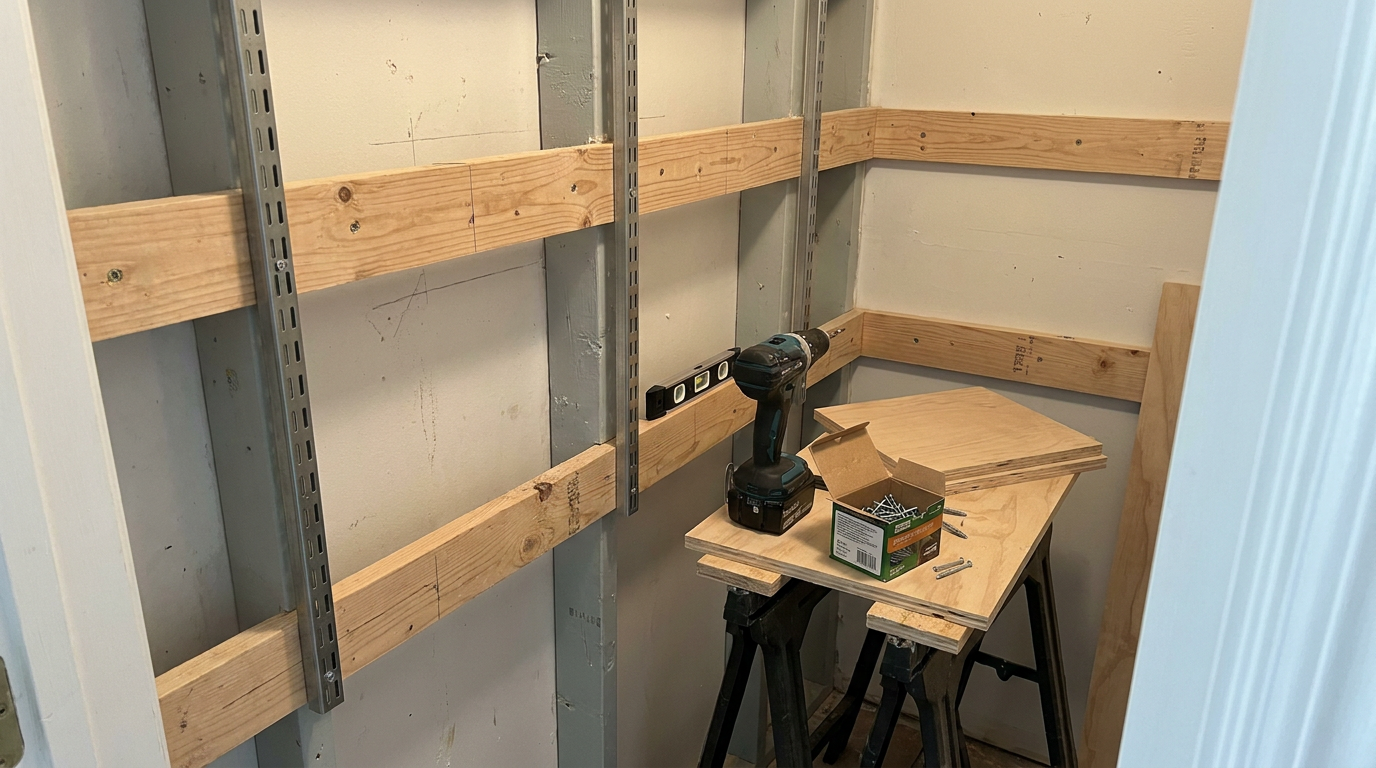
Fixed shelves can be built from plywood with solid wood edging to stiffen the front edge and reduce sag. Adjustable shelving systems are useful where flexibility matters, but they still need proper support and realistic spans. Long shelves loaded with cans need more backing and support than decorative linen closet shelves. Always plan around actual load, not just appearance.
Finish choices matter too. Painted shelves are bright and easy to clean, which is why they are common in pantries. Clear-coated wood can look warm and custom, but choose a finish that stands up to spills and wipe-downs. Melamine can be low maintenance and bright, though edge durability depends on quality. In real houses, durability usually beats showroom polish.
Good material priorities for pantry construction
- Sturdy shelf material that resists sagging under food and appliance loads
- Fasteners anchored into studs or proper wall backing where needed
- Moisture-resistant finishes if the pantry is near a basement, laundry, or exterior wall
- Smooth, wipeable shelf surfaces for easy cleaning
- Edge treatment or nosing on long shelves to improve stiffness and finish quality
Step 6: Frame or prep the pantry space
If you are building a new pantry enclosure, start by laying out wall lines carefully on the floor, then transfer those lines to the ceiling. Check for plumb, square, and any obstructions before cutting lumber. Frame walls using standard methods and tie them properly into existing structure. If this part is outside your comfort level, especially near structural walls or ceiling framing, bring in a carpenter.
If you are not building new walls and are instead converting an existing closet or alcove, the prep work is simpler but still important. Remove old wire shelving, patch damaged drywall, verify stud locations, and inspect the floor and corners for out-of-square conditions. Many pantry shelving problems start with walls that are not straight and builders who pretend they are.
Think ahead to backing. If you know where heavy shelves or cleats will go, add solid backing between studs while the wall is open. This gives you much stronger attachment points than relying on drywall anchors later. It is cheap insurance and one of those details that separates a pantry that lasts from one that starts loosening after a few years.
Step 7: Plan electrical, lighting, and ventilation
Lighting is not optional in a pantry. Dark shelves waste space because you cannot see what is on them. Even a small reach-in pantry benefits from a dedicated light. In walk-in or deeper converted pantries, good lighting is essential if you want the back corners and lower shelves to be usable.
Simple overhead LED lighting works well for many pantry builds. If the shelving arrangement creates shadows, add under-shelf or vertical strip lighting for better visibility. Keep the goal practical. You want even light that helps you identify items, read labels, and clean the space easily.
Outlets are worth planning if your pantry will hold appliances or serve as a concealed prep zone. A coffee station, microwave nook, or charging shelf all require proper electrical work. Do not overload existing circuits or run casual extension cords inside a finished pantry. If you need new outlets, do it correctly and according to local code.
Ventilation also deserves a quick check. Most pantries do not require complex ventilation, but they do need to stay dry and reasonably temperate. Avoid placing heat-generating appliances in tight enclosed spaces without considering airflow. If the pantry is near a humid area or on an exterior wall with seasonal temperature swings, material selection and airflow matter more.
Step 8: Build strong shelving with realistic dimensions
This is where the pantry becomes real. Start with your layout lines and install cleats, standards, or support framing based on the shelving system you chose. Use a level and keep checking your measurements as you go. In a pantry, visible inconsistencies are less of a cosmetic issue than a functional one because a crooked shelf affects bins, containers, and drawer movement.
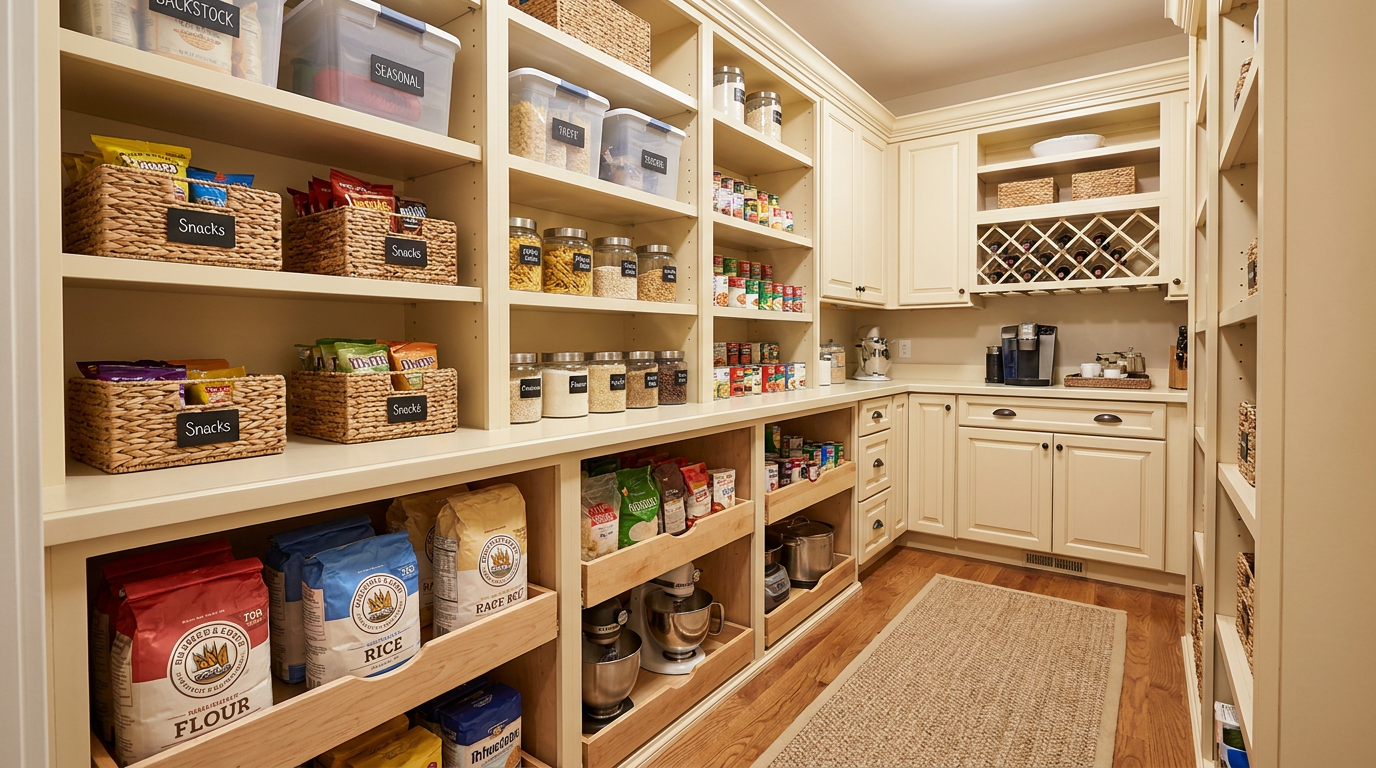
One of the best practical strategies is to mix shelf types. Use shallower upper shelves for spices, baking goods, and small packages. Use eye-level shelves for daily items. Use lower shelves for heavy loads such as canned goods, bulk staples, beverage packs, and stand mixers. OSHA storage guidance is commercial in origin, but the ergonomic lesson applies at home too: maximizing capacity without considering bending and reaching can increase strain. Heavy items belong low.
Pull-out drawers or slide-out shelves are especially useful in lower sections because they prevent items from getting buried in the back. They cost more than fixed shelves, but they improve access enough that many homeowners find them worth it. This is one area where spending a little more often improves long-term usability in a very real way.
If you want shelf flexibility, use adjustable shelf standards in selected zones rather than everywhere. A completely adjustable pantry can look busy and sometimes sacrifices strength or finish quality. A mixed approach is often better, with fixed heavy-duty lower shelves and adjustable upper or side sections for changing storage needs.
Suggested pantry zoning approach
- Lowest shelves for bulk goods, beverages, and heavy appliances
- Eye-level shelves for daily pantry staples and frequently used snacks
- Upper shelves for backup stock, seasonal items, and less-used serving pieces
- Narrow side sections for trays, cutting boards, wraps, or bottles if space allows
- Pull-outs or baskets where small items tend to get lost
Step 9: Install doors and think carefully about swing and access
The pantry door affects usability more than many people expect. A hinged door is simple and familiar, but the swing can interfere with nearby cabinets, traffic, or shelf access in small spaces. In some layouts, double doors or a pocket door can work better. In others, an outswing door preserves interior storage and clearance.
If you are working with a very compact pantry, mock the door swing before finalizing. Stand where you would normally grab items and imagine entering with grocery bags. A pantry should welcome use, not require a three-step shuffle every time you need cereal or pasta.
For style, match the door treatment to the house and kitchen rather than making the pantry feel like an afterthought. That does not mean expensive. It means consistent trim, paint, hardware, and proportions. A well-integrated pantry feels intentional and usually adds more to the room than a mismatched feature built purely for storage.
Step 10: Finish the walls, shelves, and trim for easy maintenance
Once the structure and shelving are in place, finish matters because pantries get touched constantly. Fill fastener holes, caulk visible joints where appropriate, sand rough edges, and apply paint or a durable protective finish. Bright finishes make the space easier to use because they reflect light and help you spot items quickly.
Trim can be simple. A clean baseboard, shelf face trim, and neat casing around the opening often provide enough finish quality without making the project overly complex. The goal is a pantry that feels complete and is easy to wipe down. Fine detailing is welcome if it fits your home, but practicality still comes first.
Flooring should also be considered. If the pantry is part of a remodel and the floor is exposed, use a finish that handles spills and regular sweeping well. If the existing floor stays, make sure shelf bottoms and trim account for any unevenness so the finished installation looks deliberate.
Step 11: Organize the pantry by zones, weight, and frequency of use
A pantry is only half built when the carpentry is done. The second half is organization. If you load the shelves without a system, the pantry will be cluttered in a month. Good pantry organization follows three basic rules: group like items together, store heavy items low, and put the most-used items where they are easiest to reach.
That approach lines up with both ergonomics and common sense. Frequent items should sit between waist and shoulder height when possible. Children’s snack areas should be safely reachable if that suits your household. Backup supplies and large packages can go higher or deeper as long as they remain visible and reasonably accessible.
Containers, bins, and labels can help, but do not overcomplicate the system. Clear bins are useful for packets, bars, and baking supplies. Pull-out baskets help contain potatoes, onions, or packaged snacks. Labels are valuable if multiple people use the pantry, but they should support the system rather than create one more thing to maintain.
A simple category layout that works in most homes
- Breakfast and lunch items near the front for quick daily access
- Baking supplies grouped together near measuring tools and mixing accessories
- Canned goods sorted by type on lower sturdy shelves
- Snacks in baskets or bins so they do not spread across multiple shelves
- Small appliances parked low or on dedicated shelves with enough lifting clearance
- Paper goods and overflow storage placed high or in less prime locations
Common pantry building mistakes to avoid
The biggest mistake is treating a pantry like a blank box and filling every wall with deep shelves. That usually looks impressive on day one and works poorly by month three. Storage has to be visible and reachable, not just dense. Too much depth creates buried items, duplicate purchases, and clutter that is hard to manage.
Another common mistake is underbuilding the shelves. Wire shelves, thin particle board, or poorly anchored supports may be fine for lightweight linen storage, but food and appliances are harder on materials. Use solid fastening and realistic spans. If you are unsure whether a shelf is strong enough, it probably needs better support.
Poor lighting is another problem that gets ignored until the pantry is in use. Dark corners waste storage and make inventory harder. So do awkward doors, lack of outlets where needed, and shelf spacing that does not match the actual products you buy. Measure your tallest cereal boxes, oil bottles, and appliance heights before finalizing shelf positions.
Finally, do not skip permit and wall checks. A pantry conversion can seem harmless until you discover that the wall you opened carries load, contains electrical runs, or affects required separation in the home. The earlier you verify those conditions, the smoother the project goes.
How to maximize space in a small pantry
If your pantry footprint is limited, efficiency matters even more. Start by avoiding wasted aisle width and wasted shelf depth. In a very small walk-in, one side may need shallower shelves to preserve comfortable movement. In a reach-in pantry, floor-to-ceiling storage often works well because everything is viewed from the front.
Use vertical space intelligently. Upper shelves are perfect for backstock, seasonal serving pieces, or occasional appliances. Just avoid placing everyday heavy items too high. If aging in place or universal design is part of your thinking, prioritize the central reach zone and make sure the pantry can evolve over time.
Pull-out components are especially valuable in tight spaces because they make lower storage far more usable. Door-mounted racks can help in some layouts, but they only work if the door and hinge system can handle the load and if shelf clearance remains adequate. Again, practical fit matters more than adding features for their own sake.
For small homes, hidden storage is often a major win. A pantry that conceals appliances or keeps backup supplies out of sight can make the entire kitchen look calmer and better organized. That aligns with current design trends, but more importantly, it supports how people actually want their kitchens to feel.
Cost factors to expect before you build
Pantry construction costs vary widely based on whether you are converting existing space or building new walls, whether electrical work is involved, and what level of finish you want. A basic reach-in pantry with painted shelves can be relatively affordable if the structure already exists. A custom walk-in pantry with lighting, pull-outs, outlets, and detailed millwork will cost more.
The main budget categories usually include demolition or prep, framing, drywall repair, shelf materials, fasteners and hardware, doors, trim, paint, lighting, and any electrical work. If you hire out parts of the project, labor can exceed material cost quickly, especially for finish carpentry and electrical. That is normal. Precision work takes time.
Do not save money in the wrong places. Weak shelving, poor hardware, and bad lighting are false economies because they reduce the everyday value of the pantry. It is usually better to build a simpler pantry well than a more elaborate pantry poorly.
When to call in a professional
Many homeowners can handle pantry shelving, finish work, and closet-style conversions if the project stays within their skill range. But there are clear situations where professional help is the smart move. If the project involves structural wall changes, new circuits, permit questions, or custom cabinet-grade built-ins that need to fit precisely, bring in the right trade.
A carpenter can help with framing, squaring difficult spaces, and building durable shelves that look intentional. An electrician should handle new lighting and outlets where required. If you are working in an older home with uncertain wall conditions, plumbing lines, or unusual framing, professional assessment can save you from expensive mistakes.
Good DIY means knowing what to do yourself and what to hand off. That is not a weakness. It is part of building responsibly.
Final thoughts: build for daily life, not just appearance
The best pantry is the one that fits your house, your kitchen, and your routines. It does not need to be huge, and it does not need every trend-driven feature. What it needs is a good layout, strong shelves, proper lighting, and a storage plan that makes sense for the way you buy groceries and prepare meals.
NAHB has identified walk-in pantries as one of the most wanted kitchen features, and that tells you something important. People want homes that work better. They want hidden storage, flexible kitchen zones, and practical ways to keep smaller footprints organized. A well-built pantry delivers exactly that when it is planned around real use instead of guesswork.
If you take your time on the front end, check the local rules, measure carefully, and build with durability in mind, this project can improve your kitchen more than many bigger and more expensive renovations. Done right, a pantry is not just extra storage. It is a better system for living in the house you already have.


No Comment! Be the first one.