



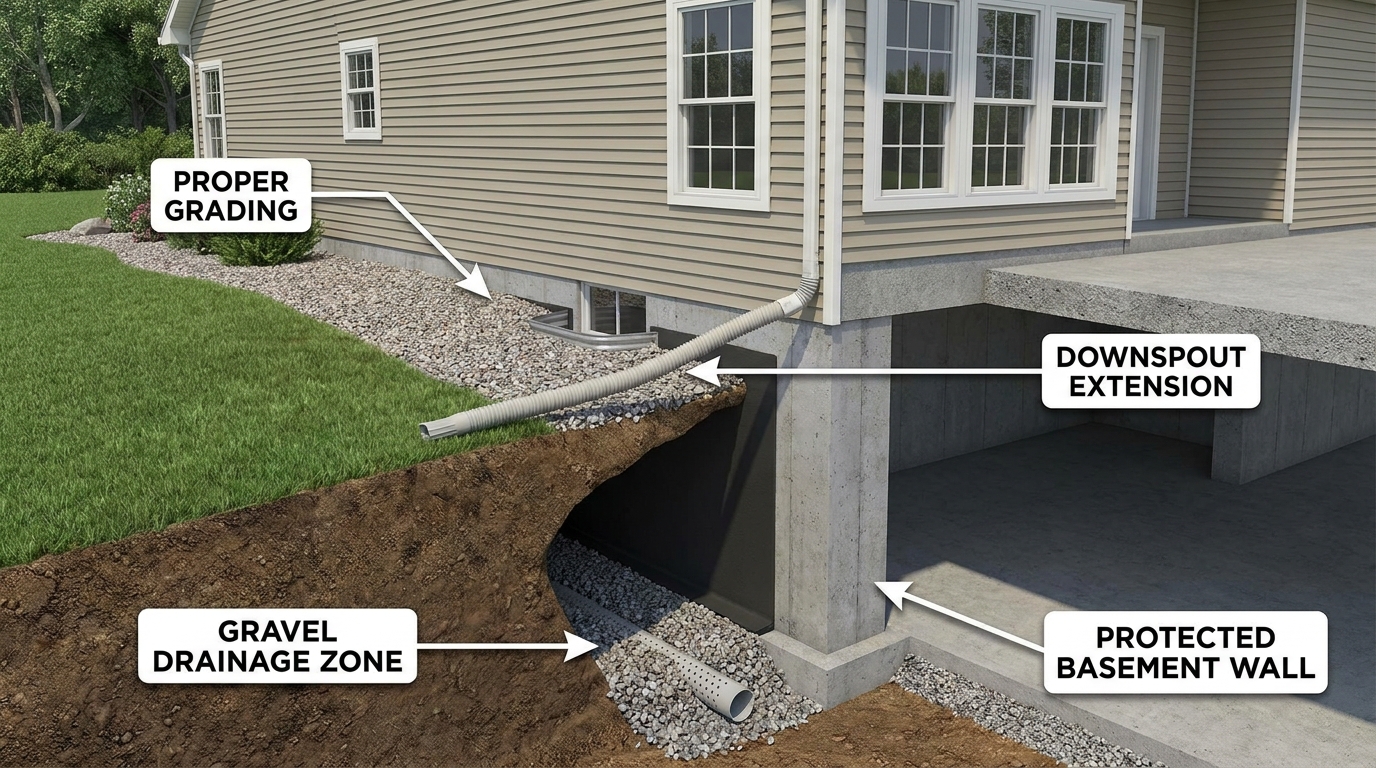
Exterior waterproofing is a system of grading, drainage, and wall protection designed to stop water from reaching a home’s foundation in the first place, rather than catching it after it seeps inside. It typically combines several components working together: soil graded to slope away from the house, gutters and downspouts that carry roof runoff well clear of the foundation, waterproof membranes applied to below-grade walls, protection or drainage boards that shield those membranes and channel water downward, and footing drains that collect groundwater and carry it away before pressure builds against the wall. This approach addresses water at the point of contact, reducing hydrostatic pressure, limiting moisture intrusion, and protecting both the foundation and indoor air quality. Because it deals with the cause rather than the symptoms, exterior waterproofing is generally considered more durable and cost-effective over time than relying on interior fixes like sealers or dehumidifiers alone.
Table Of Content
- Why Exterior Waterproofing Matters
- How Water Gets Into a Home
- Warning Signs That Your Home Needs Exterior Waterproofing
- Start With a Simple Exterior Inspection
- The Difference Between Damp Proofing and Waterproofing
- Core Exterior Waterproofing Methods
- Grading and Surface Drainage
- Gutters and Downspouts
- Foundation Crack Repair
- Exterior Membranes
- Footing Drains and Drain Tile
- Drainage Boards and Protection Layers
- Choosing the Right Waterproofing Solution for Your Home
- What a Typical Exterior Waterproofing Project Looks Like
- Common Mistakes Homeowners Should Avoid
- Can Homeowners Do Exterior Waterproofing Themselves?
- Cost Factors That Affect Exterior Waterproofing
- Questions to Ask Before Hiring a Waterproofing Contractor
- Maintaining an Exterior Waterproofing System Over Time
- Final Thoughts on Protecting Your Home From Water Damage
Water has a way of finding the smallest weakness in a house. It slips through cracks, collects against foundation walls, leaks past poor drainage, and slowly turns a sound structure into a repair project. Homeowners often notice the results long after the problem starts. A musty basement smell, peeling paint, damp drywall, or a crack that keeps growing are usually signs that water has been working in the background for some time. That is why exterior waterproofing matters so much. It deals with water before it gets inside, which is almost always the smarter and more durable approach.
Exterior waterproofing is not just about coating a wall and hoping for the best. It is a system. Good waterproofing starts with the way water moves across your property, how your roof sheds runoff, how your yard slopes, how your foundation was built, and how drainage is handled below grade. When these parts work together, the home stays drier and the structure lasts longer. When one piece fails, the whole system gets stressed.
This guide is written for homeowners who want straight answers. You do not need to be a contractor to understand the basics of exterior waterproofing, but you do need a clear picture of what causes water problems and what practical solutions are available. Some homes need simple drainage improvements. Others need excavation, membrane waterproofing, footing drains, or crack repair. The right fix depends on the age of the home, the type of foundation, the soil conditions, and the severity of the water issue.
In the sections below, we will break down how exterior waterproofing works, what signs to look for, which methods are most effective, what common mistakes to avoid, and how to decide whether a job is realistic for a homeowner or better left to an experienced contractor. The goal is simple. Protect your home from water damage in a way that makes sense in the real world, with methods that hold up over time.
Why Exterior Waterproofing Matters
Many people think of water damage as an interior problem because that is where they see it. They see a wet basement floor, stained drywall, warped trim, or mold along the lower part of a wall. But in most cases, the real source is outside. Rainwater and groundwater put pressure on the foundation and surrounding building materials. If the outside of the home cannot manage that water properly, the inside eventually pays the price.
One of the main reasons exterior waterproofing is so important is that it addresses water at the point of contact. Instead of catching water after it gets through the wall, waterproofing stops or redirects it before it enters the structure. That is a more reliable strategy because it reduces hydrostatic pressure against the foundation, limits moisture intrusion, and protects the wall assembly itself. It also helps preserve indoor air quality by lowering the risk of mold growth and hidden dampness.
There is also a structural side to this. Water does not just stain surfaces. Over time, it can weaken concrete, contribute to freeze thaw damage, rust reinforcing steel, soften surrounding soil, and create movement around the foundation. In cold climates, trapped moisture can expand when it freezes and worsen existing cracks. In expansive soils, excess moisture can lead to swelling and foundation movement. These are not cosmetic concerns. They affect the long term stability of the building.
From a cost standpoint, exterior waterproofing often saves money by preventing bigger repairs later. Replacing damaged finishes inside the basement is expensive enough, but fixing structural problems, mold contamination, or repeated drainage failures costs much more. Homeowners who deal with water early usually spend less than those who wait until damage becomes obvious. In practical terms, waterproofing is less about adding a feature and more about protecting the basic value and service life of the house.
How Water Gets Into a Home
Before choosing a waterproofing method, it helps to understand how water actually gets in. Houses rarely leak for only one reason. Usually, several small issues combine into a bigger problem. Poor grading might direct water toward the foundation. Short downspouts may dump roof runoff too close to the house. A foundation crack might allow seepage under pressure. A failed window well could let water collect against a basement opening. Each issue adds another path for moisture.
The most common entry point is the foundation wall or the joint where the wall meets the footing or slab. Concrete and masonry are durable, but they are not naturally waterproof. They can absorb moisture and allow seepage through pores, cracks, and joints. If water builds up in the soil outside, pressure increases against the wall. This is called hydrostatic pressure, and it is one of the main reasons basements leak.
Surface water is another major culprit. During a heavy rain, large amounts of roof runoff hit the ground quickly. If gutters are clogged, missing, or undersized, water spills over and saturates the soil at the foundation edge. If the yard slopes toward the house, that water stays there. It does not take much time for repeated wetting to overwhelm a weak exterior wall or a poorly drained foundation.
Water can also enter around penetrations and transitions. Hose bibs, utility lines, window wells, retaining walls against the house, porch connections, and old parging can all become weak spots. Homes with additions often have tricky connections where old and new foundations meet. These transition points need close attention because they may behave differently from the rest of the wall. The lesson is simple. Effective exterior waterproofing depends on understanding the full water path, not just the spot where moisture appears indoors.
Warning Signs That Your Home Needs Exterior Waterproofing
Some water problems are obvious, but many are subtle at first. Homeowners should pay attention to changes that seem minor because moisture damage often builds slowly. A basement that smells damp after rain, a section of efflorescence on concrete walls, or persistent puddling near the house can all point to a larger drainage issue outside.
Look for signs both indoors and outdoors. Indoors, common clues include water stains, bubbling paint, moldy odors, white mineral deposits on masonry, warped flooring near exterior walls, and humidity that feels unusually high in lower levels. Even if you never see standing water, moisture moving through foundation walls can still cause damage over time. If stored items in the basement feel damp or cardboard boxes soften near the wall, take that seriously.
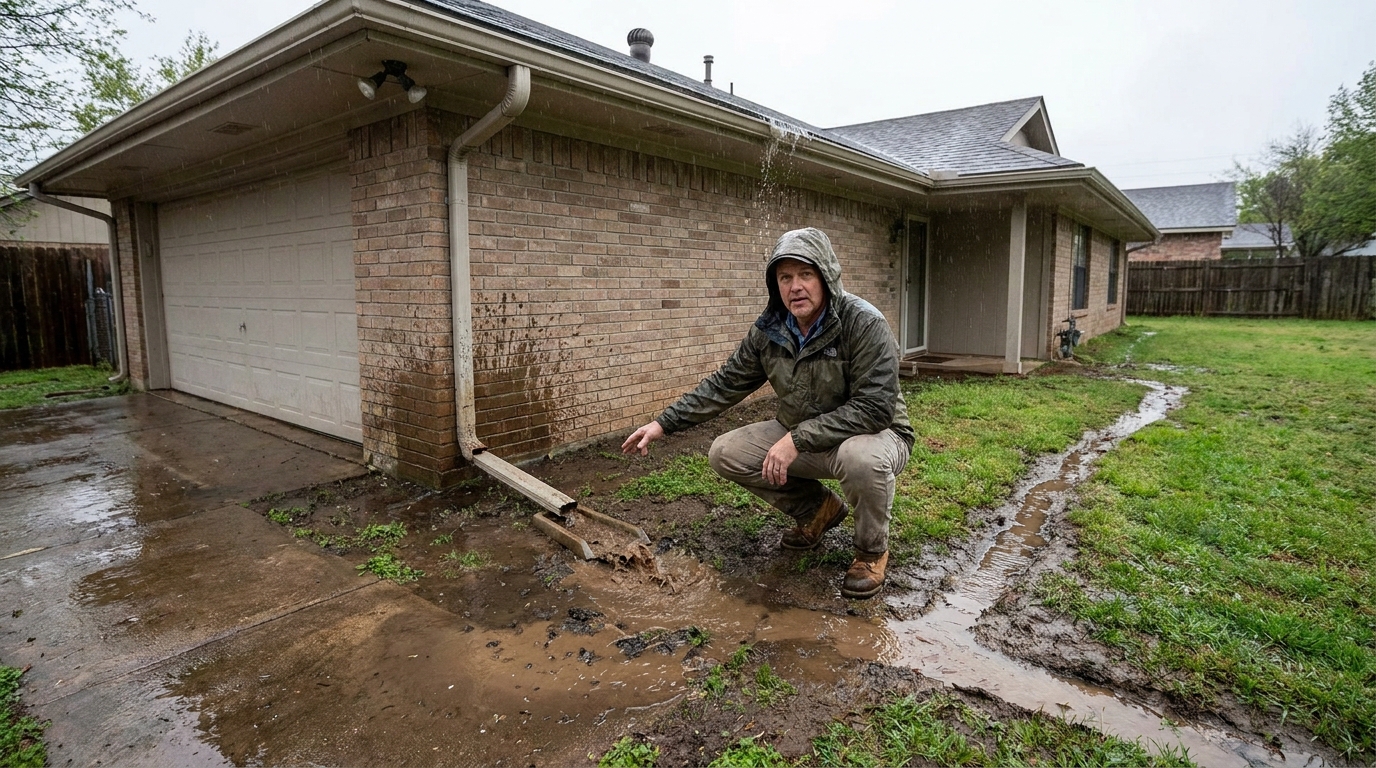
Outside, inspect the grading around the home, especially after a storm. Water should move away from the house, not collect along the foundation. Watch for soil erosion, sunken spots, overflowing gutters, missing downspout extensions, cracks in parging, and areas where mulch or landscaping traps moisture against the wall. Window wells that fill with debris or water are another red flag. If a retaining wall or hardscape feature directs runoff toward the house, that should be corrected.
Pay attention to foundation cracks too. Not every crack means major structural trouble, but any crack that leaks, changes over time, or appears with settlement should be assessed. Vertical shrinkage cracks are common in concrete, but horizontal cracks, stair step cracks in masonry, and cracks wider than a few millimeters deserve closer evaluation. Waterproofing is most effective when it is part of a broader repair plan, not a substitute for addressing movement or structural defects.
Start With a Simple Exterior Inspection
Homeowners can learn a lot from a careful walk around the property. The best time to inspect is during rain or right after it. That is when the water path becomes visible. You can see where downspouts discharge, where puddles form, how quickly soil drains, and whether water flows toward the home instead of away from it. A dry day can hide problems that show up clearly when the system is under load.
Start at the roof edge. Check whether gutters are clean, securely attached, and properly pitched toward downspouts. Look for sections that overflow or leak at seams. Then check downspouts and make sure they discharge far enough from the house. In many cases, adding extensions is one of the simplest and most effective improvements a homeowner can make. A downspout that ends right at the foundation is asking for trouble.
Next, examine the ground around the home. The soil should slope away from the foundation for the first several feet. Flat grading or reverse grading is a common cause of moisture problems. If garden beds are built up too high against siding or masonry, they can trap water and bridge above the damp proofing line. Also look for hard surfaces like patios, walkways, and driveways that tilt back toward the house. These can send a surprising amount of water to the foundation during storms.
Finish by checking visible foundation surfaces. Note any cracks, deteriorated parging, open joints, or areas where previous repairs are failing. If the house has a basement entrance, window wells, or below grade vents, inspect these carefully because they are common leak points. Take photos and keep notes. A basic record helps you compare conditions over time and makes conversations with contractors much more productive.
The Difference Between Damp Proofing and Waterproofing
This is one area where homeowners often get confused, and contractors do not always explain it well. Damp proofing and waterproofing are not the same thing. Damp proofing is a lighter level of protection. It is meant to resist soil moisture, not hold back water under pressure. Many homes were built with damp proofing only, often a thin asphalt based coating applied to foundation walls before backfilling.
True waterproofing is designed to prevent liquid water from penetrating the structure. It uses more robust materials and is usually combined with drainage components that reduce water pressure against the wall. Depending on the system, this may include liquid applied membranes, sheet membranes, drainage boards, protection boards, sealants at joints, and footing drains surrounded by washed stone. The goal is not just to coat the wall but to create a managed path for water to move safely away.
For a home in dry, free draining soil with no basement and no history of leaks, damp proofing may be enough. But for homes with basements, heavy clay soil, poor drainage, or recurring seepage, waterproofing is usually the better long term option. If you are already excavating to repair a leak, this is not the place to cut corners. The cost difference between a basic coating and a proper waterproofing assembly is often small compared with the cost of excavating again later.
A practical rule is this: if water has already been entering the home or collecting against the foundation, think in terms of waterproofing and drainage, not just a cosmetic coating. A thin layer brushed onto the wall without drainage improvement rarely solves a real exterior water problem for long.
Core Exterior Waterproofing Methods
Grading and Surface Drainage
The first line of defense is always water management at the surface. If you can keep most water away from the foundation, the rest of the system works with less stress. Regrading soil so it slopes away from the house is often the best starting point. This does not need to be dramatic, but there should be a clear fall over the first several feet. In some cases, adding compacted fill, adjusting landscape beds, or reshaping lawn areas can make a big difference.
Surface drainage improvements may also include swales, catch basins, trench drains, or redirecting runoff from hardscapes. These are especially useful on sloped lots or homes where neighboring properties send water toward the foundation. The key is to control the direction and speed of water. Letting it pond or concentrate near the wall increases the chance of infiltration.
Gutters and Downspouts
Gutters are basic, but they are critical. A roof sheds a huge volume of water in a storm, and if that water is not captured and carried away, it falls right at the base of the house. Gutters should be large enough, kept clean, and connected to downspouts that discharge well away from the foundation. Extensions, splash blocks, or underground leaders can all help, depending on the site.
If your home has repeated moisture issues and short downspouts, fix that before spending money on bigger repairs. It is one of the highest value improvements you can make. Many basements get noticeably drier just from proper gutter maintenance and better runoff control.
Foundation Crack Repair
Cracks need to be evaluated based on type, location, and whether they are active. Some vertical cracks can be repaired from the exterior with sealants or injection methods after excavation. Wider or moving cracks may require structural assessment first. The important point is that waterproofing should not cover up a foundation issue without addressing the crack itself. Water will often exploit the same weak point again if the repair is only skin deep.
Exterior Membranes
Membranes are the heart of many exterior waterproofing systems. These can be liquid applied products that cure into a seamless layer or sheet membranes that are adhered to the wall. The best choice depends on the substrate, site conditions, installer skill, and manufacturer guidance. What matters most is proper surface preparation, continuity, and detailing at corners, penetrations, and transitions.
A good membrane system should be protected from damage during backfilling. That is where drainage boards or protection boards come in. Without that layer, sharp stone or careless backfill work can tear the waterproofing and create a hidden failure before the job is even finished.
Footing Drains and Drain Tile
Footing drains collect water at the base of the foundation and carry it away before pressure builds. These are usually perforated pipes installed beside the footing in washed stone and wrapped or detailed to reduce clogging. In many serious water problem cases, a membrane alone is not enough. The drain is what relieves the water load and gives the system a path to discharge.
Drain tile must lead somewhere. Depending on the property, that may be daylight, a storm system where permitted, or a sump arrangement. This part of the design needs to be thought through carefully. A drain that has nowhere to send water is not doing its job.
Drainage Boards and Protection Layers
Drainage boards create an air gap or drainage space against the wall so water can move downward to the footing drain. They also shield the membrane from backfill damage. This is one of those components homeowners may not notice, but it adds real value to the assembly. In wet soils or deep foundations, combining a waterproof membrane with a quality drainage board makes the overall system much more resilient.
Choosing the Right Waterproofing Solution for Your Home
There is no single best waterproofing method for every house. A shallow crawlspace in sandy soil has different needs than a full basement in heavy clay. An older stone foundation behaves differently from poured concrete. A home with occasional dampness after severe storms may need basic drainage corrections, while a home with standing water and wall seepage usually needs excavation and a full exterior system.
Start by defining the problem clearly. Is the issue surface runoff, groundwater pressure, a visible crack, a failed old coating, or a combination of these? Then consider the site. How does the lot slope? What happens during heavy rain? Does the home sit low compared with neighboring properties? Are there retaining walls, patios, or additions complicating drainage? Good waterproofing decisions come from understanding conditions, not from picking the first product you see advertised.
Budget matters too, but it should be viewed in terms of service life and risk. A lower cost patch can be reasonable for a minor isolated crack if the rest of the system is sound. But repeated interior sealing, repainting, and dehumidifying can become a false economy if exterior water pressure is the real issue. In many cases, spending more once on proper exterior work is cheaper than paying for repeated interior fixes that do not solve the cause.
Good waterproofing is rarely about one miracle product. It is about combining drainage, slope, protection, and sound detailing so water has no reason to stay against the house.
If you are unsure, get opinions from contractors who specialize in exterior waterproofing, not just general repair. Ask them to explain the water source, the proposed system, the discharge path, and what warranty applies. A trustworthy contractor should be able to show you how each part of the system works together.
What a Typical Exterior Waterproofing Project Looks Like
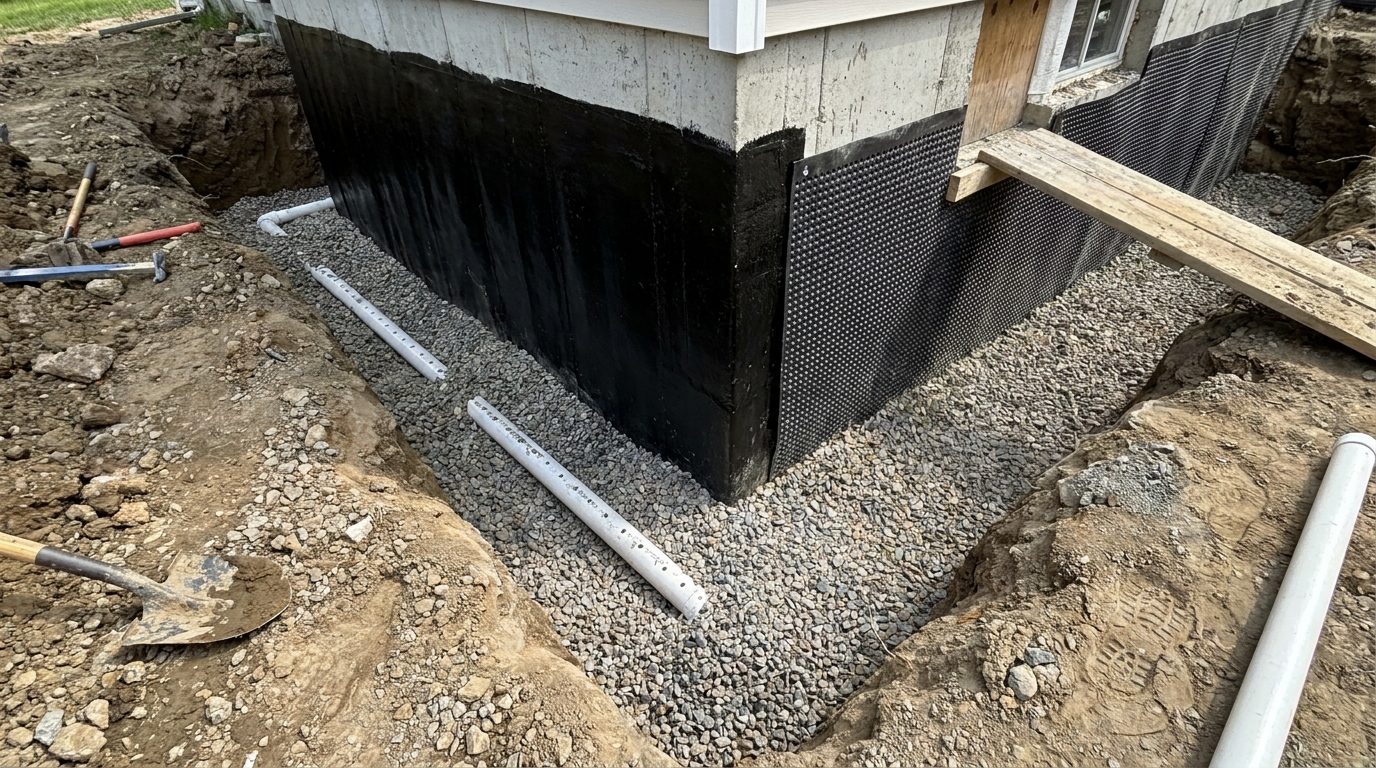
For homeowners who have never seen this work done, exterior waterproofing can sound more mysterious than it is. In a typical full perimeter project, the contractor excavates the soil along the affected foundation wall or around the entire house, depending on scope. The wall is then cleaned so defects can be seen and repaired. Cracks, honeycombing, holes, and deteriorated areas are patched before any membrane goes on.
Next comes the waterproofing layer. This may be a liquid membrane, a sheet membrane, or a system that combines multiple products. The installer pays close attention to corners, wall to footing transitions, and utility penetrations because these areas are common weak points. Once the membrane is installed and cured as needed, a drainage board or protection board is placed against it.
At the base of the wall, the contractor may install or replace footing drain tile in washed stone. This helps move groundwater away efficiently. Some jobs also include filter fabric, insulation, or additional drainage components depending on the design and local climate. Finally, the trench is backfilled carefully so the waterproofing is not damaged. Surface grading is restored to shed water away from the house, and downspouts are extended or reconnected as needed.
Not every project requires full excavation around the entire home. Sometimes one leaking wall, one corner, or one addition connection is the main issue. But if several areas show signs of pressure or the original drainage system has failed, a wider scope is often the better long term decision. A partial repair can work well when the diagnosis is accurate. It works poorly when the water source is broader than expected.
Common Mistakes Homeowners Should Avoid
One of the most common mistakes is focusing only on the inside symptoms. Interior paint, sealers, and dehumidifiers may improve conditions temporarily, but they do not stop water from pressing against the outside of the foundation. If the problem is external, the durable fix usually needs to be external too. Interior systems have their place, especially in some retrofit situations, but homeowners should understand what they are and are not solving.
Another mistake is ignoring roof drainage. People sometimes spend thousands on basement work while leaving clogged gutters and short downspouts untouched. That is backward. Water management should begin at the roof and move outward from there. If you do not control the volume of water reaching the foundation, other repairs carry more risk.
Hiring based on price alone is also risky. Waterproofing is hidden work once the trench is filled back in, so quality matters. Poor surface preparation, thin application, bad detailing, or improper backfill can lead to failure that you cannot see until leakage returns. Ask questions, review the system components, and make sure the contractor has experience with foundation waterproofing rather than just general excavation.
A final mistake is overlooking maintenance after the project is complete. Even a well waterproofed home still needs clean gutters, functioning downspouts, proper grading, and regular checks around window wells and drainage paths. Waterproofing is a strong defense, but no system performs well if surface water management is neglected year after year.
Can Homeowners Do Exterior Waterproofing Themselves?
Some parts of exterior water management are very realistic for homeowners. Cleaning gutters, extending downspouts, improving simple grading, maintaining window wells, and observing how water behaves during storms are all worthwhile tasks. Minor crack sealing above grade or simple landscape drainage corrections may also be manageable for a skilled homeowner who follows product instructions carefully.
Full exterior waterproofing below grade is another matter. Excavation beside a foundation is physically demanding and can be dangerous if done incorrectly. There are also risks to utilities, landscaping, walkways, and the foundation itself. Proper membrane application requires good substrate preparation and attention to details that are easy to miss. If the home has deep basement walls, difficult access, poor soil stability, or significant water intrusion, this is usually contractor work.
That said, an informed homeowner is still in a strong position. You can inspect, document, ask better questions, compare proposals intelligently, and understand whether a recommended system makes sense. In construction, that knowledge matters. It helps you separate a real solution from a sales pitch.
Cost Factors That Affect Exterior Waterproofing
Waterproofing costs vary widely because the conditions vary widely. The depth of the foundation, the length of wall involved, access for machinery, type of soil, amount of excavation, landscaping restoration, and need for crack repair or drain replacement all affect price. A simple runoff correction may be modest in cost, while a full perimeter excavation and membrane system is a significant project.
Older homes can cost more because foundations may be irregular, fragile, or complicated by additions and outdated drainage. Urban sites with tight property lines often require more manual labor. Heavily landscaped yards, decks, porches, and driveways can add complexity because they must be worked around or removed and restored. If groundwater conditions are severe, additional drainage design may be needed as well.
The best way to think about cost is in relation to the risk you are removing. If water is threatening finished space, stored belongings, air quality, or the structure itself, proper exterior waterproofing protects much more than the wall. It protects the larger investment of the house. Homeowners should compare proposals carefully and make sure they understand what is included, what is excluded, and how the contractor plans to manage water once the system is complete.
Questions to Ask Before Hiring a Waterproofing Contractor
Before signing any contract, ask the contractor to explain where the water is coming from and why they believe their proposed method will solve it. If they cannot describe the cause clearly, that is a warning sign. Good contractors diagnose first and sell second. They should also explain whether the issue is surface water, groundwater, structural cracking, or a mix of problems.
Ask what products and components will be used, whether drains will be added or replaced, how water will discharge, and how the wall will be protected during backfill. Ask who performs the excavation, whether utilities will be located, and how landscaping or hardscapes will be restored. It is also fair to ask about project timeline, weather delays, cleanup, and warranty terms.
If the home has visible cracks or movement, ask whether a structural review is recommended before waterproofing begins. Waterproofing and structural repair are related, but they are not the same thing. A contractor who respects that distinction is more likely to give honest advice.
- What is the exact source of the water problem?
- Why is exterior waterproofing the right solution for this home?
- Will the system include membrane, drainage board, and footing drain work?
- Where will collected water discharge?
- How will grading and downspouts be handled after the work is done?
- What warranty is provided, and what conditions could void it?
Maintaining an Exterior Waterproofing System Over Time
Once waterproofing is in place, the work is not completely finished. The good news is that maintenance is usually simple. Keep gutters clean, check downspout extensions, and make sure soil and mulch have not built up in ways that trap water against the house. After major storms, walk the perimeter and look for new low spots or erosion that could change how water drains.
Window wells should be cleared of leaves and debris so they do not hold water. If your system relies on a sump or discharge point, inspect that as well. Any drainage component is only as reliable as its ability to stay open and move water where it is supposed to go. Small maintenance tasks done once or twice a year can protect a much larger investment.
It also helps to keep records of the original work. Save photos, invoices, product details, and warranty information. If future work is needed or you sell the home later, that documentation is valuable. Buyers and contractors both appreciate clear records showing what was done behind the soil line.
Final Thoughts on Protecting Your Home From Water Damage
Exterior waterproofing is one of those parts of homeownership that is easy to overlook until something goes wrong. But when water problems start, they rarely stay small on their own. Moisture moves, spreads, and finds weak points. The practical way to deal with it is to start outside, understand the water path, and choose a solution that matches the real conditions of the house.
For some homeowners, the answer will be basic drainage improvements and better roof runoff control. For others, it will mean a full exterior waterproofing system with excavation, membrane protection, drainage board, and footing drains. Neither approach is automatically right or wrong. The right answer is the one that addresses the actual source of moisture and holds up over time.
If you remember one thing from this guide, make it this: waterproofing works best as a system, not a single product. Good grading, solid gutters, controlled runoff, proper wall protection, and reliable drainage all matter. When those pieces are in place, your home has a much better chance of staying dry, sound, and easier to maintain for years to come.


No Comment! Be the first one.