


How to Properly Weatherstrip Your Doors for Better Energy Efficiency
Door weatherstripping is one of those home projects that sits in a very practical sweet spot. It is relatively inexpensive, beginner friendly, and immediately noticeable once it is done well. If you have ever felt a cold draft at your ankles near the front door, heard outdoor noise slipping in around the edges, or noticed a room that never seems to feel quite comfortable, there is a good chance your door seals need attention. For homeowners trying to improve comfort without taking on a major renovation, weatherstripping is one of the smartest places to start.
Table Of Content
- Why weatherstripping matters more than many homeowners realize
- Start with diagnosis before you buy anything
- Understanding the difference between weatherstripping and caulk
- Choosing the right weatherstripping material for your door
- How to decide which material is best for you
- Tools and supplies you will need
- Step by step: how to weatherstrip a door properly
- Step 1: Remove worn or failed weatherstripping
- Step 2: Measure each side separately
- Step 3: Clean the contact surfaces thoroughly
- Step 4: Install the top and side weatherstripping
- Step 5: Install or replace the door sweep
- Step 6: Test the seal and fine tune
- Common mistakes to avoid
- Budget friendly and eco conscious material choices
- When a draft is really a door adjustment problem
- Maintaining your weatherstripping over time
- How weatherstripping fits into a larger green building envelope strategy
- Final thoughts
There is also a broader sustainability case for this simple upgrade. Improving the seal around an existing door helps your heating and cooling system work less to maintain indoor temperatures. That means lower energy waste and, in many homes, lower utility bills. According to ENERGY STAR, sealing and insulating can save up to 10% on annual energy bills in some homes. While that figure applies to a wider set of air sealing improvements, door weatherstripping is one of the low cost actions that contributes to those savings and often delivers immediate comfort benefits.
Just as importantly, weatherstripping supports a low waste approach to home improvement. Instead of replacing an entire door, frame, or entry system, you can often restore performance with a focused repair. That makes this especially valuable in older homes, historic homes, and houses where the door itself is still structurally sound but no longer seals properly. Good weatherstripping extends the useful life of what you already have, which is often the most practical and sustainable move.
This guide will walk you through the full process from diagnosis to product selection to installation. We will look at how to identify the exact source of a draft, how to choose a material that matches your door and climate, and how to install seals that actually work without making the door hard to close. We will also cover the mistakes people commonly make, because weatherstripping only works well when it is fitted thoughtfully rather than applied as a one size fits all patch.
Key principle: Weatherstripping is for parts of the building envelope that move, such as doors and operable windows. Caulk is for joints that do not move. That distinction, emphasized by Natural Resources Canada, is one of the most important starting points for a durable air sealing repair.
Why weatherstripping matters more than many homeowners realize
A door is an opening in the building envelope, and every opening is a weak point if it is not sealed well. When air moves through small gaps around the top, sides, or bottom of a door, your home loses conditioned air that you have already paid to heat or cool. In winter, cold outside air enters and warm indoor air escapes. In summer, the opposite happens, especially in air conditioned homes. Even modest leaks can create a surprisingly strong sense of discomfort because moving air feels cooler on the skin than still air at the same temperature.
Energy loss is only part of the story. Air leaks around doors can also bring in dust, moisture, pollen, and outdoor noise. If your home is near a busy street, weatherstripping can improve acoustic comfort in addition to thermal comfort. The U.S. Department of Energy has noted that air sealing and weatherstripping can produce immediate comfort and noise benefits, even when homeowners are thinking about efficiency first. This is one reason the upgrade often feels worthwhile right away rather than only over time through lower bills.
Door weatherstripping also plays a role in a larger home performance strategy. ENERGY STAR and NRCan both frame it as part of creating a more continuous air barrier around the home. That means it is not just a stand alone fix. It works best when paired with other sensible steps such as sealing fixed trim gaps, addressing attic and basement leakage, and maintaining thresholds and sweeps. Even so, doors are one of the most accessible places to begin because the leaks are easier to detect and the materials are easier to replace than hidden leaks inside walls or above ceilings.
Start with diagnosis before you buy anything
One of the biggest mistakes homeowners make is buying a roll of foam tape before they know where the leak is or what size gap they are trying to seal. Weatherstripping works best when it is matched to the exact condition of the door. A small even gap at the top of the door needs a different approach than a large uneven gap at the threshold. A newer insulated steel door behaves differently than an old wood door that has shifted slightly over time. Diagnosis saves money, reduces frustration, and leads to a result that lasts.
Begin with a visual inspection in daylight. Stand inside with the door closed and look closely at the perimeter where the slab meets the frame. Check the top edge, the latch side, the hinge side, and especially the bottom where the door meets the threshold. Look for worn, cracked, flattened, or missing weatherstripping. Pay attention to places where the seal appears compressed on one side but loose on the other. That often signals door misalignment or an uneven frame, which may need adjustment along with new material.
Next, use a light test. If possible, have someone stand outside at night with a bright flashlight while you look from inside, or reverse the setup during the day if the light contrast is strong enough. Visible light around the perimeter is a strong indicator of an air gap. This is particularly useful around the threshold where the eye can miss a narrow but continuous opening. If you can see light, air is moving there too.
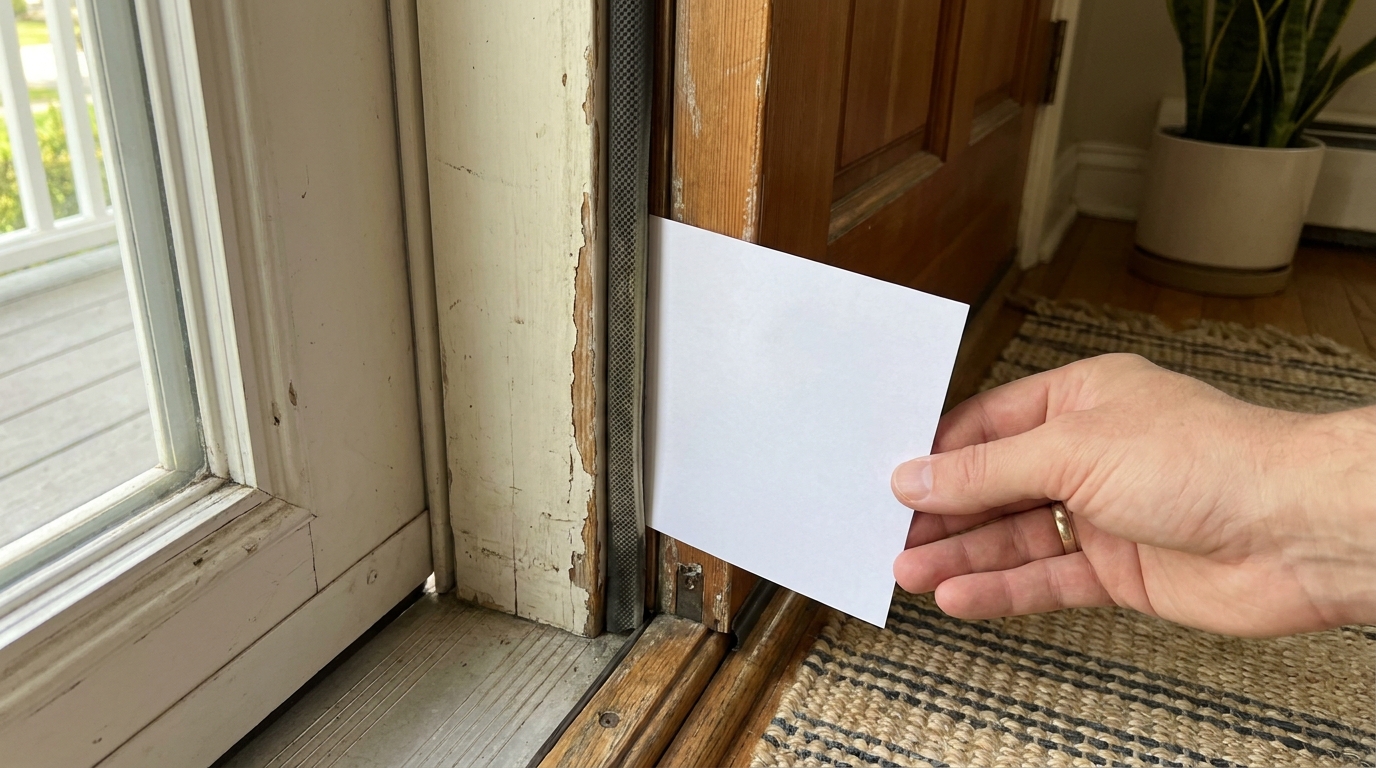
Then try the paper test that ENERGY STAR commonly recommends. Close the door on a piece of paper placed between the door and the frame. Gently pull the paper. If it slides out very easily, the seal is too loose at that point. Repeat this test around the perimeter, especially at the corners and bottom edge. This gives you a simple map of where the weatherstripping is making contact and where it is failing.
It is also wise to step back and think about the whole home. A draft near the front entry may feel important because you experience it directly, but larger leaks can exist in the attic, basement, or around penetrations behind trim. That does not mean you should ignore the door. It simply means you should think of weatherstripping as one targeted measure within a broader air sealing plan. If you are considering a larger efficiency upgrade, a home energy audit can help prioritize which leaks matter most.
Understanding the difference between weatherstripping and caulk
This is a small distinction with big consequences. Weatherstripping is designed for moving parts. It compresses, flexes, or brushes against a surface as the door opens and closes. Caulk, by contrast, is intended for stationary joints. It forms a fixed seal where two materials meet and stay in place. If you caulk a moving joint, the seal will crack, tear, or interfere with operation. If you try to weatherstrip a fixed exterior trim gap, you will end up with an awkward repair that does not last.
On a typical exterior door, weatherstripping belongs at the top and side stops and often at the bottom in the form of a sweep or bottom seal. Caulk belongs at exterior trim joints, between the frame and the siding if accessible and appropriate, or where interior trim meets the wall if there is a visible fixed gap that needs finishing. The two materials often work together, but they are not interchangeable. Knowing where one stops and the other begins is one of the clearest signs of a well planned repair.
For sustainability minded homeowners, this distinction also matters because it reduces waste. Using the right material the first time means fewer failed products, fewer rework cycles, and less discarded packaging and seal material. Practical green maintenance is often less about buying something special and more about using standard materials correctly and conservatively.
Choosing the right weatherstripping material for your door
There is no single best weatherstripping product for every door. The right choice depends on gap size, door condition, exposure to weather, durability needs, and how neatly the door aligns with the frame. NRCan lists several common materials for doors, including closed cell foam, ribbed closed cell rubber, tubular stripping, tension strips, and threshold or bottom seal options. Each can work well when matched to the right conditions.
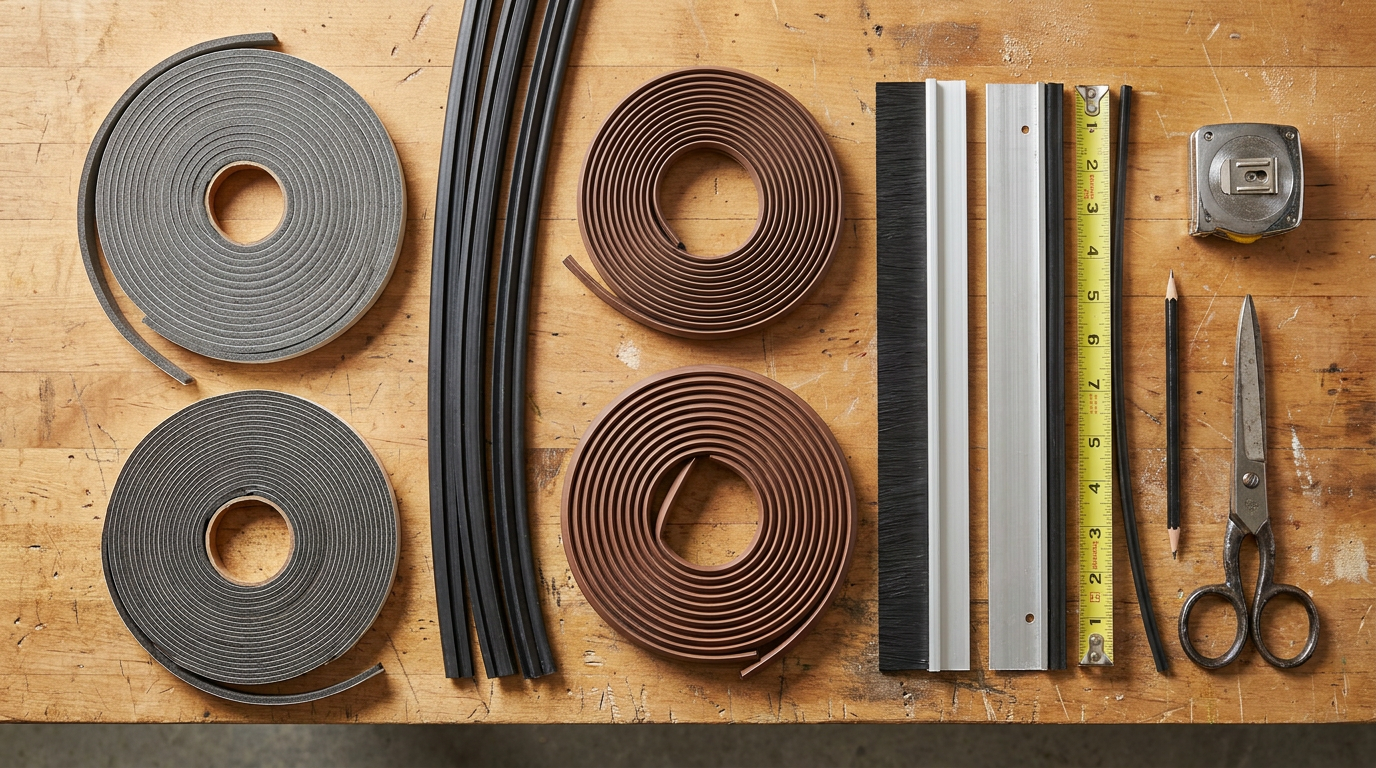
Closed cell foam tape is often the easiest and cheapest option. It is self adhesive, simple to cut, and widely available. It works best for relatively small, consistent gaps and for homeowners who want a fast repair with minimal tools. The tradeoff is durability. Foam can compress permanently, tear, or lose adhesion over time, especially on heavily used exterior doors or in harsh climates. It is fine as a starter solution, but not always the best long term choice.
Ribbed closed cell rubber or vinyl is more durable and often creates a better compression seal than basic foam. These products usually mount with adhesive or a kerf fit system depending on the door frame design. They are a solid middle ground for many homes because they tolerate repeated use better and maintain resilience for longer. If your front door sees frequent opening and closing, rubber tends to age more gracefully than simple foam tape.
Tubular weatherstripping uses a hollow rubber or vinyl shape that compresses when the door closes. It is effective for medium sized gaps and can be quite durable. It does, however, need correct sizing. If the tube is too large, the door becomes difficult to latch. If it is too small, the draft remains. This is a material where careful measuring pays off.
V strip or tension strip weatherstripping, often made from plastic or metal, is useful for irregular doors and areas where a flexible spring action helps maintain contact. It can be especially effective in older homes where the gap changes slightly along the jamb. A tension strip bridges those variations better than a rigid profile. Some homeowners find it a bit more involved to install neatly, but it rewards patience with a durable and adaptable seal.
Spring bronze weatherstripping is a classic durable option often used in older or historic homes. It is long lasting and elegant when installed properly, though it usually requires more skill and precision than peel and stick products. For homeowners preserving traditional doors, spring bronze can be one of the most effective and lowest waste solutions because it performs well for years and complements existing materials.
Door sweeps and bottom seals address the bottom edge of the door, where many drafts occur. Some attach to the face of the door and use a rubber or brush insert that lightly contacts the threshold. Others fit into a channel under the door. A sweep is not a substitute for a threshold in poor condition, but together they create a far better seal than either one alone. Bottom sealing is frequently overlooked, and that is why many weatherstripping jobs fail to deliver the expected result.
How to decide which material is best for you
If your door is fairly modern, square, and evenly aligned, a rubber compression strip plus a good quality door sweep is often the most effective combination. If your budget is very tight and the gaps are small and even, closed cell foam tape can be a reasonable first improvement. If your house is older and the gap varies from point to point, tension strips or flexible compression products tend to outperform rigid pieces. If you are maintaining a heritage home and want something durable and discreet, spring bronze deserves serious consideration.
Also think about exposure. A sheltered side door under a deep overhang can get away with lighter duty materials than a front door exposed to driving rain, snow, and temperature swings. The more exposed the door, the more worthwhile it is to choose a durable product rather than the cheapest option. Sustainable buying is not always about natural materials alone. In many cases, the more sustainable choice is the one that lasts longer and needs less frequent replacement.
Tools and supplies you will need
Weatherstripping is a modest DIY project, but having the right tools makes the work cleaner and easier. Most homeowners can complete the job with basic supplies already on hand. Before starting, set up a small work area near the door so you can measure, trim, and test the fit without walking back and forth too much. That helps maintain accuracy and reduces the temptation to rush.
- Measuring tape
- Pencil
- Scissors or utility knife
- Screwdriver or drill, depending on the sweep type
- Cleaning cloths
- Mild soap or degreaser
- Putty knife or scraper for old adhesive
- Replacement weatherstripping
- Door sweep or bottom seal if needed
- Optional exterior caulk for fixed trim gaps nearby
The most overlooked supply is a simple cleaning cloth. New weatherstripping adheres and performs better on a clean surface. Dust, old adhesive, oils, or flaking paint can prevent a good bond and shorten the life of the repair. Take a few extra minutes on preparation and the installation tends to go much more smoothly.
Step by step: how to weatherstrip a door properly
Step 1: Remove worn or failed weatherstripping
Open the door fully and inspect the existing seals. If they are brittle, torn, flattened, or detached, remove them completely rather than layering new material on top. Use a putty knife or scraper carefully to lift adhesive backed strips. For mechanical fasteners or kerf fit seals, pull them out gently and avoid damaging the frame. Try to remove residue as thoroughly as possible because uneven buildup can affect the fit of the new product.
If the old paint around the stop is peeling or rough, smooth it lightly and wipe away dust. You do not need to over restore the area, but you do want a reasonably even and clean contact surface. If the frame itself is damaged or rotten, pause and address that issue before weatherstripping. A seal can only perform as well as the surface it is attached to.
Step 2: Measure each side separately
Measure the top, hinge side, and latch side of the door opening separately. Do not assume both vertical sides are identical, especially in older homes. Measure the bottom width for a sweep as well. Many installation problems begin with a single rough measurement and a cut that is just a little too short. Taking individual measurements keeps your cuts precise and reduces material waste.
It also helps to note the gap condition. If the latch side gap is larger than the hinge side, you may need a slightly more compressible material there or a minor hinge adjustment to improve alignment. This is where diagnosis and installation overlap. A good weatherstripping job is rarely just about sticking material in place. It is about understanding how the door actually behaves when it closes.
Step 3: Clean the contact surfaces thoroughly
Use mild soap or a gentle degreaser on the frame where the new weatherstripping will attach. Dry it fully before installation. Adhesive products in particular need a clean surface to bond properly. Even mechanical strips benefit from a clean stop because dirt and grit can interfere with how evenly the seal compresses.
This is also a good moment to inspect the threshold. If debris has collected there, vacuum or wipe it out. Dirt at the threshold can wear down the sweep faster and prevent a consistent bottom seal. Many draft problems blamed on the sides of the door are actually made worse by a dirty or damaged threshold that no longer supports the seal evenly.
Step 4: Install the top and side weatherstripping
Start at the top of the frame and then move to the sides. Follow the manufacturer instructions for the specific product you chose. For adhesive backed foam or rubber strips, peel back a short section of the backing rather than removing it all at once. Press the strip into place gradually, checking that it stays straight and lands exactly where the door will compress it when closed. For kerf fit or nailed products, work slowly so the material seats evenly without stretching.
The goal is a light, continuous compression seal. That phrase matters. Too loose and air slips through. Too tight and the door becomes difficult to latch, which can lead people to slam the door, crush the weatherstripping prematurely, or stop using the seal altogether. More compression is not always better. In fact, excessive compression is one of the most common reasons new weatherstripping fails early.
When you reach corners, fit them neatly without bunching. Depending on the product, you may butt the ends together or miter them slightly. The important thing is continuity. Corners are common weak points, so take the time to make those transitions clean and snug.
Step 5: Install or replace the door sweep
The bottom edge of the door deserves special attention because it often handles the strongest draft and the most wear. Close the door and measure the gap between the bottom edge and the threshold. Choose a sweep that can bridge that space with gentle contact. If the sweep drags too hard, it will wear out quickly and may make the door difficult to open. If it barely touches, it will not seal effectively.
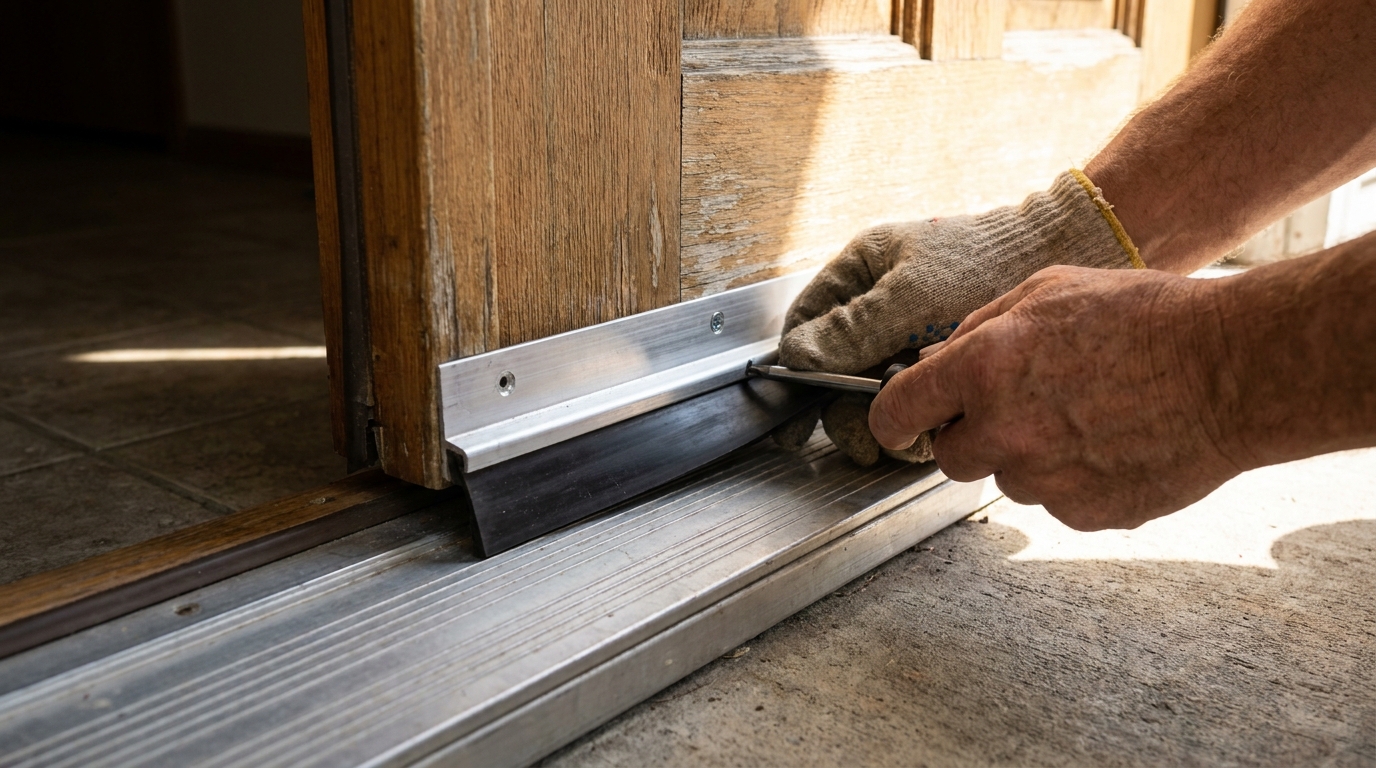
Mark the sweep length carefully and cut it to fit. Attach it according to the product instructions, usually with screws on the interior or exterior face of the door depending on the design. Before tightening everything fully, test the door movement several times. You want the sweep to make consistent contact across the threshold without binding. This small adjustment period is worth it. A properly fitted sweep can make the biggest difference in how the entry feels.
If the threshold itself is damaged, deeply worn, or out of level, consider replacing or adjusting it as part of the same project. A new sweep against a failing threshold is only a partial solution. The two components need to work together to control air movement at the bottom of the opening.
Step 6: Test the seal and fine tune
Once everything is installed, repeat the paper test and light test. Check the top, sides, and bottom. Close and latch the door normally, not by pulling or forcing it into place. If the paper still slips freely in certain spots, identify whether the issue is a gap in the material, insufficient compression, or slight misalignment of the door. Small adjustments can often solve the problem, especially at the latch side and bottom edge.
Open and close the door several times to make sure it moves smoothly. Listen for scraping, watch for the sweep catching, and notice whether the latch engages without extra pressure. A good weatherstripping job should improve comfort without making the door annoying to use. Everyday function matters because a seal that frustrates people rarely stays in proper condition for long.
Common mistakes to avoid
Some weatherstripping errors are easy to spot. Others are subtle but just as important. The first common mistake is using caulk where weatherstripping belongs or vice versa. The second is choosing a product based on price alone without considering the actual gap size and door condition. A third is ignoring the threshold and focusing only on the side jambs. Many draft complaints are really bottom edge problems, especially in winter.
Another frequent issue is over compressing the seal. Homeowners sometimes assume that a tighter fit must be better, but too much pressure can warp adhesive backed products, flatten foam too quickly, and strain the latch. In some cases, it can even lead to the weatherstripping peeling away because the door repeatedly rubs too hard against it. Aim for contact, not force.
It is also important not to assume the door is the only source of discomfort. If your entry area still feels cold after a careful weatherstripping upgrade, larger building envelope leaks may be contributing. Attic leakage, basement leakage, and poorly sealed penetrations can drive airflow patterns that make door areas feel drafty even when the door itself is much improved. This is why many efficiency professionals encourage whole home assessments rather than isolated fixes alone.
Budget friendly and eco conscious material choices
For many households, the appeal of weatherstripping is that it is affordable. That budget advantage does not have to conflict with sustainability. In fact, weatherstripping is a good example of practical green maintenance because it improves building performance with very little material. You are reducing heating and cooling losses, extending the life of an existing door, and avoiding the carbon and cost impacts of premature replacement.
If you are choosing among materials, think beyond the sticker price. The cheapest foam tape may cost less upfront, but if it fails after a season or two in a high use entry, it is not necessarily the best value or the lowest waste option. A durable rubber compression strip or a quality sweep that lasts longer may be the smarter purchase. The most sustainable material is often the one you do not have to replace frequently.
Look for products with clear sizing information, reputable testing, and realistic use cases. If you are replacing the door itself in a future project, ENERGY STAR certified products can offer independently tested performance benchmarks, and certified residential swinging doors must meet specific air leakage requirements. Even when you are only repairing the existing assembly now, that performance mindset is useful. Fit, durability, and verified performance matter more than marketing language.
Homeowners should also check for local utility rebates, weatherization assistance, or regional efficiency programs. ENERGY STAR notes that many local utilities and assistance programs may help cover air sealing projects. In Canada, federal guidance also recommends inexpensive weatherstripping for windows and doors as a money saving measure. These programs can make small upgrades easier to prioritize, especially when paired with broader home energy improvements.
When a draft is really a door adjustment problem
Not every air leak calls for thicker weatherstripping. Sometimes the real issue is that the door has shifted. Loose hinges, a slightly sagging slab, or a strike plate that no longer aligns well can all reduce contact pressure at one point of the frame while increasing it somewhere else. In that situation, adding bulkier material may create a temporary patch but not a durable fix.
Check the hinge screws first, especially on older exterior doors. Tightening them can pull the slab back into better alignment. Observe the reveal, which is the visible gap around the closed door. If one side is inconsistent, the door may need minor adjustment before weatherstripping will work properly. Likewise, if the latch does not catch smoothly, the strike plate may need repositioning so the door closes against the seal as intended.
This is another reason not to rush the project. Weatherstripping performs best when the hardware and frame are reasonably sound. Seals can compensate for normal movement and small irregularities, but they are not meant to solve structural or alignment issues on their own.
Maintaining your weatherstripping over time
Once installed, weatherstripping is not something you should forget forever. A quick seasonal inspection keeps it working and helps you catch wear before drafts return. At the start of the heating season and again before summer cooling season, inspect the top, sides, and bottom for compression, tearing, gaps, or loose sections. Clean dirt off the threshold and sweep area so the seal does not grind itself down unnecessarily.
Use the paper test again if comfort changes or if your energy bills rise unexpectedly. That simple test remains one of the best ongoing diagnostic tools because it tells you whether contact is still happening where it should. If one section fails early while the rest looks good, you may have a localized alignment problem rather than a product failure.
Durable weatherstripping can last for years, but no seal lasts forever. Sun exposure, moisture, temperature swings, and repeated door use all take a toll. Replacing a single worn strip or sweep is still a small maintenance task compared with the energy waste and discomfort of ignoring it. This is the kind of routine upkeep that keeps a house feeling stable and efficient without dramatic interventions.
How weatherstripping fits into a larger green building envelope strategy
Green building is sometimes discussed in terms that feel large and expensive, but much of it comes down to careful maintenance and sensible upgrades. The building envelope, which includes walls, roof, windows, doors, and foundation interfaces, is where comfort and efficiency are won or lost. Every small improvement that reduces uncontrolled air leakage helps that envelope perform more consistently. Weatherstripping is a modest project, but it directly supports that goal.
It is also a gateway project. Once homeowners experience how much difference a better sealed door can make, they often feel more confident tackling related tasks such as sealing attic hatches, improving window weatherstripping, adding insulated curtains, or arranging a professional energy assessment. Small wins matter because they make energy efficiency feel achievable rather than abstract. That is especially important in existing homes, where smart incremental upgrades are often more realistic than full replacement projects.
From a sustainability perspective, this is where weatherstripping shines. It is accessible, low cost, low disruption, and aligned with a repair first mindset. You are making your home work better with the materials and assemblies already in place. In many cases, that is exactly what thoughtful housing decisions look like: practical, elegant, and grounded in long term performance rather than quick consumption.
Final thoughts
If you want a home that feels more comfortable, wastes less energy, and costs less to operate, weatherstripping your doors is a very good place to begin. It is one of the few home maintenance projects that offers immediate tactile feedback. The room feels less drafty, the floor near the entry feels warmer, outside noise softens, and the heating or cooling system does not have to work as hard. Those are meaningful improvements from a relatively small investment of time and money.
The key is to approach the job as a process rather than a product purchase. Diagnose the leak first. Match the weatherstripping to the actual gap and movement of the door. Install it cleanly. Test the results and make small adjustments. When you do that, the outcome is not just a tighter door. It is a more resilient, comfortable, and efficient home.
For homeowners trying to make sustainable choices without overcomplicating the process, this is exactly the kind of upgrade worth doing. It respects your budget, extends the life of what you already own, and contributes to a healthier building envelope. In that sense, proper weatherstripping is more than a seasonal fix. It is a quiet but effective way to care for your home over the long term.



No Comment! Be the first one.