



How to Install and Maintain a Greywater System at Home: A Practical Guide for Homeowners
For many homeowners, water conservation can feel like a worthy goal that becomes complicated the moment plumbing is involved. A greywater system offers a more practical middle ground. It can reduce demand on drinking water, support landscaping, and make everyday water use more efficient without requiring a dramatic lifestyle change. When planned carefully, it becomes one of those quiet home upgrades that does meaningful work in the background.
Table Of Content
- What a Greywater System Is and Why Homeowners Use One
- Start Here First: Check Local Rules Before You Buy Anything
- Choose the Right Type of Greywater System for Your Home
- Questions That Help Narrow the Right System
- Understand the Safety Principles Before Installation
- Planning Your Greywater System Step by Step
- Materials and Components You May Need
- How to Install a Simple Residential Greywater System
- Step 1: Confirm the approved source and reuse method
- Step 2: Create a clear plumbing layout
- Step 3: Install a diversion valve
- Step 4: Add filtration or lint capture as needed
- Step 5: Run dedicated non-potable piping
- Step 6: Build the irrigation or discharge area
- Step 7: Test with clean water and then with normal use
- Step 8: Document the final setup
- When You Should Hire a Professional
- How to Use a Greywater System Safely Day to Day
- Greywater System Maintenance: What to Do and How Often
- Monthly maintenance
- Seasonal maintenance
- Annual maintenance
- Simple maintenance checklist
- Common Problems and How to Fix Them
- Best Practices That Keep the System Simple and Effective
- Misconceptions to Leave Behind
- Is a Greywater System Worth It?
- Final Thoughts
Greywater systems are especially appealing because they connect sustainability with something tangible. Instead of sending all lightly used household water straight to the sewer or septic system, a greywater setup redirects certain water sources for approved non-potable uses such as subsurface irrigation or, in more advanced systems, toilet flushing. The idea is straightforward, but the details matter. Good design, code compliance, safe plumbing separation, and regular maintenance are what make the system useful rather than risky.
This guide is designed for homeowners who want clear instructions without unnecessary complexity. You do not need to become a water engineer to understand the process, but you do need to approach the project thoughtfully. The most successful home greywater systems are usually the ones that stay simple, match the site, and are maintained with the same consistency you would give any other plumbing system.
Before getting into installation steps, it helps to understand one central principle. Greywater is not the same as drinking water, and it is not the same as raw sewage either. It sits in a middle category that can be useful when managed properly and problematic when handled casually. That balanced understanding is the best place to begin.

What a Greywater System Is and Why Homeowners Use One
In residential settings, greywater generally refers to used water from showers, baths, bathroom sinks, and laundry. These sources are commonly considered suitable for reuse in well-designed systems because they are usually less contaminated than toilet waste. Kitchen sink water and dishwasher water are often excluded from basic residential greywater plans because they tend to carry more grease, food residue, and organic contamination. Toilet waste is excluded entirely because it is blackwater and requires a different level of handling and treatment.
The appeal of greywater reuse is practical as much as environmental. Every gallon reused for irrigation or flushing is a gallon of potable water that does not need to be drawn, treated, pumped, and delivered for a task that does not require drinking water quality. The U.S. Environmental Protection Agency describes onsite non-potable reuse as a way to reduce freshwater demand and lower wastewater flows to sewer systems. In some contexts, that can also reduce energy use and carbon emissions associated with transporting and treating water.
For households watching utility costs, greywater can be one part of a broader water efficiency strategy. Health Canada notes that simple household water efficiency changes can reduce home water consumption significantly, by up to 40 percent in some cases. Greywater is not a stand-alone solution, and it works best when combined with efficient fixtures, leak repair, thoughtful landscaping, and sensible irrigation practices. Still, it can be a meaningful improvement for homes with gardens, drought concerns, or a desire to lighten the load on septic infrastructure.
There is also a lifestyle benefit that is easy to overlook. Many sustainable upgrades ask homeowners to actively change behavior every day. A well-planned greywater system does not demand much attention once it is running properly. It works in the background, provided that you keep up with routine inspection and use cleaning products that are compatible with the system and the landscape it serves.
Start Here First: Check Local Rules Before You Buy Anything
If there is one step that should never be skipped, it is checking your local regulations. Greywater rules vary widely across North America. Some states, provinces, and municipalities allow simple diversion systems with relatively clear pathways for approval. Others require permits, inspections, professional design, or restrict certain uses altogether. Canada’s plumbing framework is shaped by a national model code, but provincial and territorial authorities decide what actually applies locally. In the United States, state and local rules can differ significantly, sometimes even within the same region.
This matters because a legal and code-compliant system is safer, easier to insure, and less likely to create expensive rework later. Local authorities may regulate which sources you can collect from, whether storage is allowed, minimum setbacks from property lines or wells, irrigation depth, labeling requirements for non-potable pipes, and whether a licensed plumber must perform the installation. They may also have very specific rules about backflow prevention and cross-connection control.
Before sketching a layout or ordering parts, contact your municipal building department, local plumbing inspector, environmental health office, or water utility. Ask direct questions and take notes. Clarify what source fixtures are permitted, what end uses are allowed, whether a permit is needed, and whether your property has any specific limitations tied to septic systems, slope, soil type, or groundwater conditions. This early homework often saves the most time.
Practical rule of thumb: If you are planning to cut into household plumbing, add pumps, connect to toilets, or create any system that could interact with potable lines, assume permits and inspections are likely required until your local authority confirms otherwise.
Choose the Right Type of Greywater System for Your Home
Homeowners are often drawn to the idea of a fully integrated reuse system, but the simplest approach is usually the most durable. Greywater systems generally fall into two broad categories. The first is a simple diversion system, often gravity-fed or lightly pump-assisted, that sends water from a source such as a washing machine or shower to the landscape for subsurface irrigation. The second is a treated reuse system, which filters and may disinfect water for uses such as toilet flushing. Both can work, but they differ significantly in complexity, cost, and maintenance demands.
For most single-family homes, a basic irrigation-focused system is the most approachable starting point. It avoids long storage times, limits human contact, and keeps plumbing separation easier to manage. Laundry-to-landscape systems are popular because washing machines already discharge water under pressure, making distribution more practical in some layouts. Shower and bath systems can also work well if the house allows a reasonable route to the exterior without major structural disruption.
More advanced systems can make sense for homes with serious water scarcity, large renovation budgets, or new construction plans that include dual plumbing from the beginning. These systems can supply treated non-potable water to toilets or urinals, but they require a higher standard of design and ongoing care. Once treatment, pumps, sensors, and indoor reuse are involved, the margin for error becomes smaller and the maintenance expectation becomes more formal.
When choosing a system, think about your goals in plain terms. Are you trying to keep a few trees and shrubs watered through dry months. Are you hoping to reduce strain on a septic system. Are you renovating a utility room and want to incorporate a simple diversion valve while the walls are open. A realistic objective leads to a more reliable design than trying to reuse every drop at once.
Questions That Help Narrow the Right System
- Which water sources are legally allowed in your area.
- How close are those sources to the yard or approved reuse point.
- Is your site sloped enough for gravity flow, or will you need a pump.
- What plants or landscape areas can accept subsurface irrigation.
- Do you want a simple diversion system or a treated indoor non-potable reuse system.
- How much maintenance are you genuinely willing to do each month.
Understand the Safety Principles Before Installation
Greywater systems are useful only when they are safe. The greatest risk identified in public health guidance is microbiological contamination. Even water from showers and laundry can contain pathogens, soap residues, hair, lint, and household chemicals. That means a greywater system should always be designed to minimize exposure, prevent stagnation, and keep non-potable water completely separate from drinking water plumbing.
Cross-connection prevention is one of the most important technical ideas in this entire project. A cross-connection happens when non-potable water can flow into potable plumbing, whether through incorrect pipe connections, pressure changes, or back-siphonage. This is why dual plumbing identification and approved backflow prevention devices are so important, especially in systems that involve indoor reuse or any makeup water connection. Improper installation can contaminate household drinking water, which is why these details are generally not optional.
Storage is another area where homeowners should be cautious. Untreated greywater should not be stored for long periods because odors, biofilm growth, and pathogen concerns increase quickly. Simple systems are usually designed to send water directly to subsurface irrigation as it is generated. If your intended design involves any significant storage, treatment, or indoor redistribution, it should be approached as a more advanced reuse system with professional input.
Finally, the water should go where it can do its job without creating pooling, runoff, or direct contact. Greywater is typically best used below the soil or under mulch around established plants, trees, or shrubs. It is generally not suited to spraying over lawns, letting children play in irrigated runoff, or discharging onto hard surfaces where water can collect and create hygiene concerns.
Planning Your Greywater System Step by Step
Good installation begins with planning, not cutting pipe. Start by mapping your water sources and intended reuse area. In a typical home, this means identifying whether the system will capture water from a laundry drain, a shower line, a bathtub drain, or a combination of approved sources. Then look at where that water can go. Measure distances, elevation changes, and possible pathways through walls, crawlspaces, basements, or exterior runs. A simple line on paper is often enough to reveal whether the design is practical.
Next, estimate the amount of water produced. A household laundry cycle may provide a meaningful pulse of reusable water on certain days, while daily shower use creates a more regular supply. This matters because the irrigation zone needs to be sized appropriately. Too little landscape demand can lead to saturated soil, odors, or runoff. Too much demand can leave the area dry despite the investment. Matching supply to demand is one of the quiet essentials of a successful system.
Soil and drainage conditions also deserve attention. Sandy soil absorbs water differently than heavy clay, and sloped lots can create runoff concerns if discharge points are not distributed carefully. In colder climates, freeze protection becomes part of the design. In homes on septic systems, routing some water to irrigation may reduce septic loading, but only if local regulations allow it and the system remains balanced overall. Every site has a few constraints, and the best designs work with them instead of forcing a universal template.
At this stage, think about serviceability as well. If a filter needs cleaning, can you actually reach it. If a valve sticks, can it be isolated without opening a wall. If roots grow into distribution outlets, can those outlets be flushed or repaired. A homeowner-friendly greywater system is not just one that works on installation day. It is one that still feels manageable three years later.
Materials and Components You May Need
The exact materials depend on your chosen system and local code requirements, but most residential greywater projects rely on a fairly understandable set of components. Simpler systems often include a diversion valve, approved piping, unions or accessible fittings, a filter or screen, a lint trap for laundry sources, distribution tubing, and discharge points such as mulch basins or subsurface emitters. Some layouts may require a small pump, check valve, timer, or surge tank depending on source and distance.
What matters more than the length of the parts list is the quality and suitability of each component. Piping should be appropriate for the application and clearly identified where required. Valves should be durable and accessible. Filters need to be easy to remove and clean. If local codes require labels for non-potable lines, use them consistently. If the system includes a backflow preventer or air gap, it should be installed exactly as specified by code and manufacturer instructions.
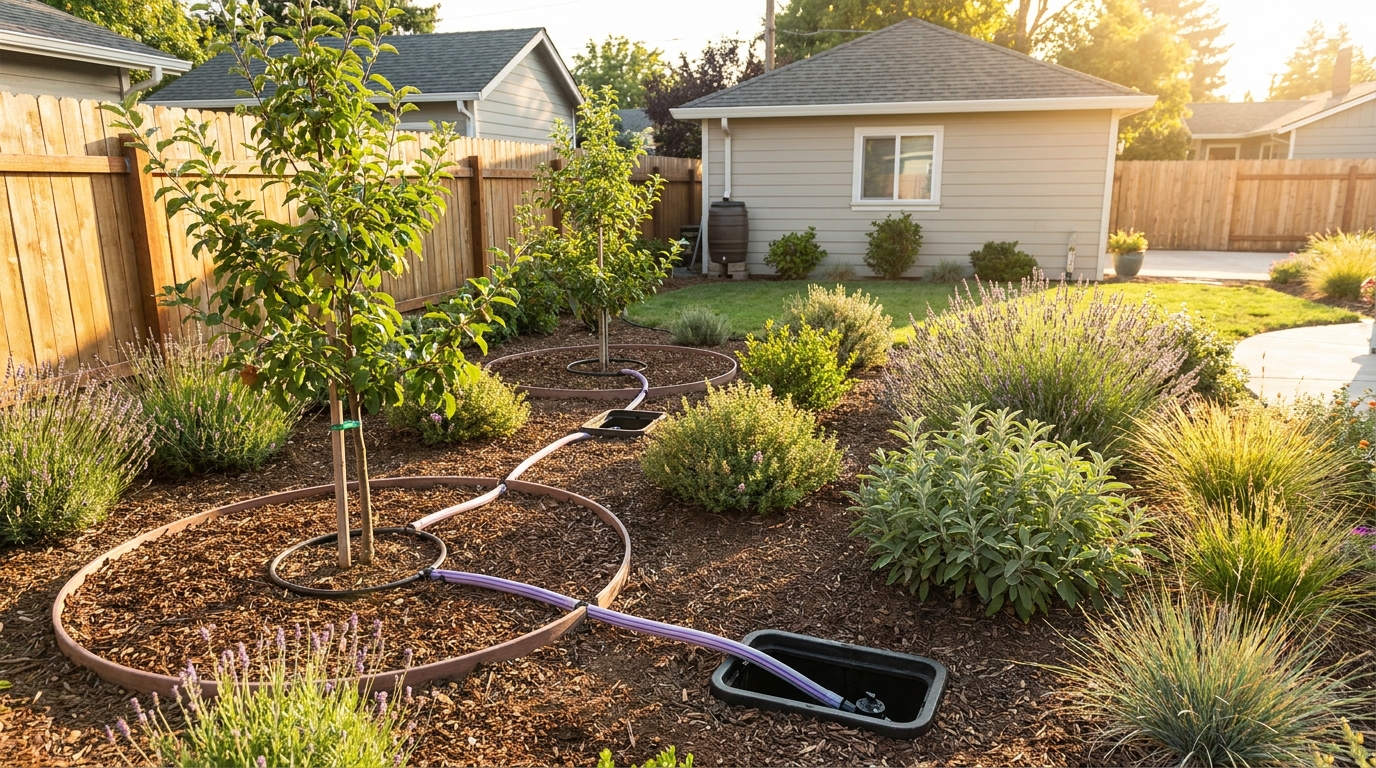
For irrigation zones, many homeowners find that mulch basins are forgiving and practical. They allow water to infiltrate gradually around plants without visible pooling. Distribution should be arranged so that no single area receives too much water at once. In some designs, branched drain layouts can passively split flow among several outlets. In others, pressure from the washing machine or a pump drives water to multiple subsurface zones more evenly.
It is also worth choosing compatible household products from the beginning. Since soap residues enter the system, detergents and cleaners should be selected with both the plumbing and the plants in mind. Lower salt, lower boron, and biodegradable products are often better choices for irrigation-oriented systems. Strong bleach use, solvent-heavy cleaners, and products that create excessive foam or residue can make maintenance harder and plant health less predictable.
How to Install a Simple Residential Greywater System
Installation details vary by home and jurisdiction, and many projects should involve a licensed plumber. Still, the overall sequence is fairly consistent. A simple homeowner-focused system often begins with selecting one source, keeping the route short, and incorporating a way to divert water back to the sewer or septic line when needed. That diversion feature is important because it gives you flexibility during wet seasons, maintenance periods, or times when unsuitable water has entered the drain.
Step 1: Confirm the approved source and reuse method
Begin with the source your local rules and your site make easiest. Laundry is often a logical first choice because it is relatively accessible and can supply water directly to an outdoor distribution line. Shower drains can also be good candidates, particularly in homes with crawlspace or basement access. Confirm that your planned reuse method, such as subsurface irrigation to mulch basins, is allowed before moving to the next step.
Step 2: Create a clear plumbing layout
Map the route from the source to the landscape or reuse area. Keep runs as direct as possible and avoid unnecessary bends that can collect debris. Plan for proper slope if the system is gravity-fed. Include cleanouts or access points at sensible intervals. If a pump is needed, determine where it will sit and how it will be powered and protected. This is the stage where professional review can prevent frustrating revisions later.
Step 3: Install a diversion valve
A diversion valve allows you to send water either to the greywater system or back to the conventional drain line. This is one of the most practical pieces in the whole setup. It gives you control during storms, maintenance, winterization, or when washing loads contain bleach or other products you do not want in the landscape. Install it in an accessible location and label it clearly so every household member understands its purpose.
Step 4: Add filtration or lint capture as needed
Laundry systems especially benefit from a lint filter or lint trap, while other sources may need a basic screen or accessible filter depending on the design. The goal is not to overcomplicate the system but to catch the materials that commonly cause clogging. Hair, lint, soap scum, and small debris are among the most frequent reasons simple greywater systems underperform over time.
Step 5: Run dedicated non-potable piping
Install the piping from the source to the discharge area according to code and manufacturer specifications. Maintain clear separation from potable lines and protect against any possibility of cross-connection. If your local code requires color coding, labeling, or special pipe identification for non-potable water, apply it consistently. This is one of the places where code compliance is closely tied to long-term safety.
Step 6: Build the irrigation or discharge area
For a basic landscape system, create mulch basins or subsurface distribution points around suitable plants. The discharge should be below the surface or under mulch where possible, not exposed for direct contact. Space outlets to distribute water reasonably evenly. Avoid locations near foundations, neighboring properties, wells, edible plant surfaces, or anywhere prohibited by setbacks. The soil should absorb the expected flow without ponding.
Step 7: Test with clean water and then with normal use
Before fully relying on the system, test it carefully. Check for leaks, backup, slow drainage, uneven distribution, and any sign that water is surfacing where it should not. Operate the diversion valve, inspect the filter access points, and verify that all parts are reachable. If a pump is involved, test timers and shutoffs. Then observe the first few normal-use cycles with attention to flow behavior and soil absorption.
Step 8: Document the final setup
Once the system is working, create a simple record of the layout, valve locations, cleanout points, and maintenance steps. Keep product manuals and permit documentation in one place. This is a small habit that becomes very helpful later, especially if you sell the home, call for service, or need to explain the setup to another family member.
When You Should Hire a Professional
Even confident DIY homeowners should be selective about what they take on themselves. If the project involves opening finished walls, altering drain lines, adding pumps, integrating treatment equipment, or connecting to indoor non-potable fixtures such as toilets, professional design and installation are usually the right choice. A licensed plumber or greywater specialist can help protect against cross-connections, improper venting, drain slope issues, and other hidden problems that are easy to miss.
Professional help is also wise if your property has constraints such as a high water table, steep slopes, difficult access, septic sensitivities, or complex local permitting. In many places, inspections are required anyway, and experienced installers understand how to prepare a system so that approval is smoother. Hiring help for the technical portions does not mean giving up the practical value of the project. It often means making the project durable and legally secure from the start.
How to Use a Greywater System Safely Day to Day
Once installed, a greywater system works best when household habits support it. The first habit is simple product awareness. Detergents, shampoos, and soaps eventually reach the soil or treatment components, so choose products that are gentler on both. This does not require perfection. It just means avoiding unnecessarily harsh products and being thoughtful about what goes down approved drains.
The second habit is knowing when to divert water away from the system. If you are using bleach-heavy laundry products, washing paint rags, disposing of harsh cleaning residues, or dealing with illness in the household where local guidance suggests extra caution, send that water back to the sewer or septic line through the diversion valve. Flexibility is one of the reasons a diversion system is so useful.
The third habit is observation. You do not need to inspect the system obsessively, but you should pay attention to odors, slow drainage, soggy soil, unusual sounds from pumps, or plants that seem stressed rather than helped. Greywater systems typically give early warning signs when something is off. Catching those signals early turns most issues into manageable maintenance instead of expensive repairs.
Greywater System Maintenance: What to Do and How Often
Maintenance is where many homeowners feel uneasy, mostly because the word suggests constant upkeep. In reality, a well-designed greywater system should have a routine that feels closer to seasonal home care than to a major chore. The key is consistency. Small, regular checks prevent the common problems caused by lint, soap residue, hair, oils, and root intrusion.
Monthly maintenance
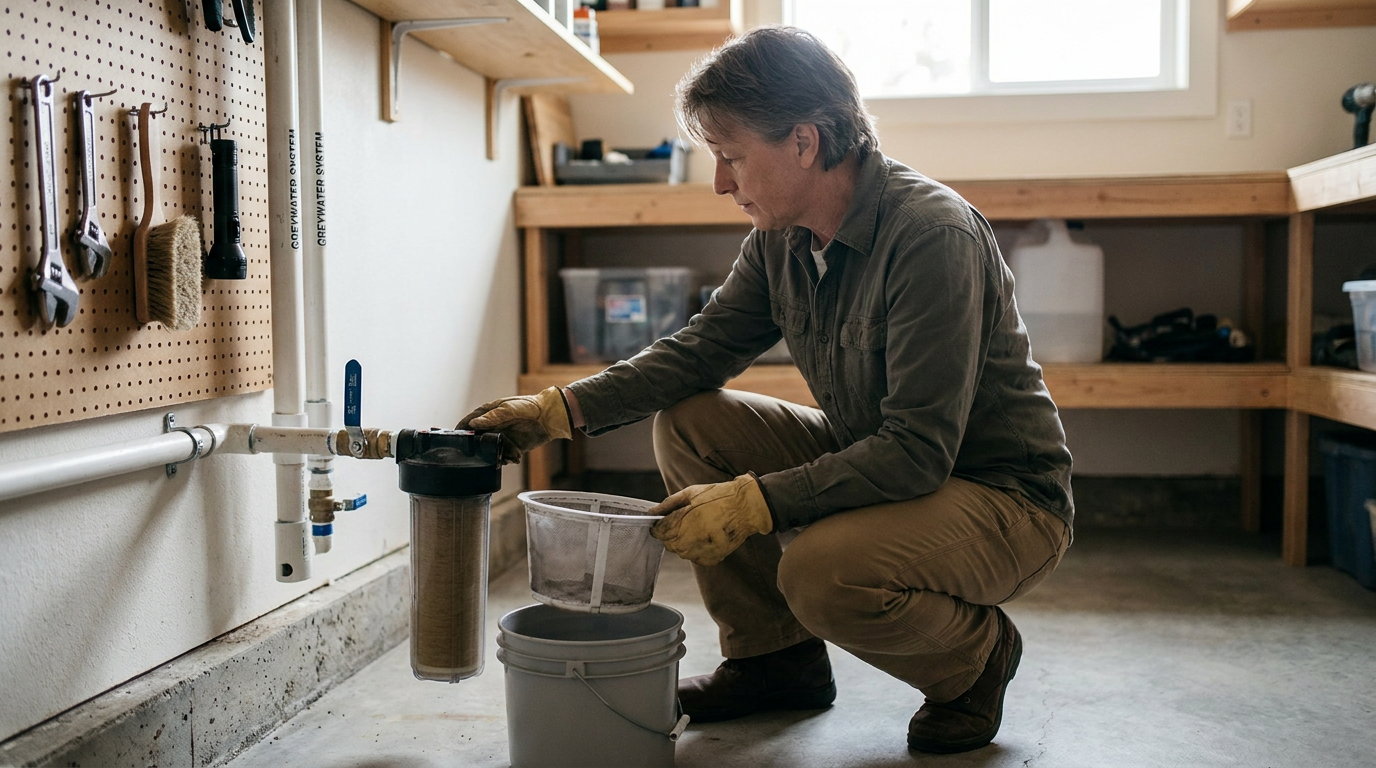
Inspect filters, screens, and lint traps at least monthly, or more often if the system handles laundry water or a high household volume. Clean any removable components according to manufacturer instructions. Check the diversion valve to make sure it moves freely and fully. Look around the source plumbing and accessible fittings for leaks, residue buildup, or signs of slow drainage. If there is a pump, listen for changes in sound that may indicate wear or obstruction.
Seasonal maintenance
At the change of seasons, inspect the outdoor discharge areas more thoroughly. Make sure mulch basins are still absorbing water properly and have not compacted or eroded. Check for root intrusion, clogged outlets, or signs of pooling. In cold climates, verify that any vulnerable parts are protected against freezing. During rainy periods, consider diverting water back to the sewer or septic line if the landscape no longer needs irrigation and the soil is already saturated.
Annual maintenance
At least once a year, review the system as a whole. Flush lines if your design allows it. Examine all labels, access points, and service records. Replace worn seals, damaged screens, or aging flexible components before they fail. If the system includes treatment or disinfection equipment for indoor non-potable reuse, follow the manufacturer’s service schedule closely and consider professional inspection. Annual review is also a good time to reassess whether household product choices are supporting healthy operation.
Simple maintenance checklist
- Clean lint traps and filters regularly.
- Operate and inspect diversion valves.
- Check pumps, timers, and electrical connections where applicable.
- Watch for odors, surface pooling, or slow drainage.
- Inspect mulch basins and subsurface outlets for clogging or root growth.
- Update your maintenance log after each service task.
Common Problems and How to Fix Them
Odors are one of the most common complaints, and they usually point to stagnation, clogging, or improper discharge. Greywater should move through the system promptly rather than sit in lines or tanks untreated. Clean filters, check for blockages, inspect the slope of gravity lines, and confirm that discharge points are not waterlogged. If odors persist, divert the system and investigate before continuing use.
Ponding or soggy soil usually means the landscape area is receiving more water than it can absorb or that outlets are concentrated too tightly. Reduce the amount of water sent to that zone, expand the distribution area, or alternate with diversion back to the drain line during wet conditions. It can also help to refresh mulch basins so infiltration improves.
Clogs and slow flow often come from lint, hair, soap scum, or oils. This is why accessible filters and cleanouts matter so much. Clean the relevant components first, then inspect line routing for sharp turns or low spots that trap debris. If root intrusion is the issue outdoors, affected sections may need to be cleared or redesigned.
Plant stress can happen when the water quality is not suitable for the plant mix or when salts and residues accumulate over time. Review detergent choices and consider shifting to more plant-compatible products. Also check whether the irrigation pattern is too concentrated at one root zone rather than spread out gently.
Pump or control issues should be handled early. Unusual cycling, noise, or failure to move water may indicate debris, electrical problems, or worn components. If the system depends on mechanical equipment, maintenance becomes less optional. A simple annual inspection by a qualified technician can be worthwhile for pump-assisted systems.
Best Practices That Keep the System Simple and Effective
The easiest greywater systems to live with tend to share a few qualities. They use approved sources only. They avoid unnecessary storage. They direct water to subsurface or mulch-covered areas rather than exposed surfaces. They include a diversion valve. They make filters and service points easy to access. And they match the volume of water produced with the amount the landscape can realistically absorb.
There is also a design principle worth emphasizing. Do not chase maximum complexity when moderate performance will do the job well. For many homes, a laundry-to-landscape or simple shower diversion setup provides most of the practical value with fewer things to fail. Elegant sustainability often looks less like adding equipment and more like removing friction from everyday systems.
It also helps to think of greywater as one layer in a broader home water strategy. Pair it with low-flow fixtures, drought-tolerant planting, drip irrigation for potable backup where needed, leak checks, and smart seasonal watering habits. Health Canada’s framing around household water efficiency is useful here. Greywater can be a meaningful contributor, but it works best as part of a whole-house approach.
Misconceptions to Leave Behind
One common misconception is that greywater is simply harmless water that can be redirected anywhere. It is not sewage in the same category as toilet waste, but it still contains pathogens and chemicals that require care. Another misconception is that any drain in the house can be connected to a reuse system. In reality, kitchen and toilet waste are commonly excluded, and local rules may narrow the list further.
A third misconception is that once installed, a greywater system is maintenance-free. Every real-world system collects residue over time. Filters need cleaning, valves need checking, and irrigation outlets need observation. The good news is that this maintenance can be light and manageable when the design is simple. The mistake is not that maintenance exists. The mistake is assuming it will somehow not be necessary.
Finally, some homeowners assume that storing greywater for later is always acceptable. Without treatment, this is generally not advisable because storage increases the chance of odor, microbial growth, and operational issues. Immediate or near-immediate reuse is usually the safer and simpler path for residential systems.
Is a Greywater System Worth It?
For many households, yes, provided the system suits the home and the homeowners are prepared to maintain it. The benefits are real. Greywater reuse can reduce potable water demand, support resilient landscaping, and lower wastewater loading in some situations. It can also make a home feel more thoughtful and future-ready, especially in places where water scarcity or rising utility costs are becoming part of daily decision-making.
That said, the value of a greywater system is not measured only by gallons saved. It is measured by whether the system feels manageable, safe, and well integrated into the home. A modest setup that you understand and maintain is usually far more successful than an ambitious one that becomes frustrating or falls out of compliance. Sustainable choices tend to last when they fit real life.
Final Thoughts
Installing a greywater system at home does not have to be overwhelming. The clearest path is usually the most grounded one. Start with local rules, choose a simple and approved source, design for safe separation and easy maintenance, and match the system to your landscape and household habits. If parts of the project call for professional help, that is not a compromise. It is often the smartest way to protect both the investment and the home.
In the end, a greywater system is less about doing something dramatic and more about doing something practical, durable, and quietly responsible. It allows lightly used water to serve a second purpose before leaving your property, which is a sensible form of efficiency. For homeowners who want sustainability to feel achievable rather than abstract, that is a very good place to begin.



No Comment! Be the first one.