



Interior waterproofing is one of those topics homeowners often discover only after there is already a problem. A damp basement, peeling paint, musty smell, or a small puddle after heavy rain can seem minor at first. In reality, those signs usually mean water is moving through the building in a way it should not. If the source is not identified early, what starts as a nuisance can become damage to finishes, insulation, framing, stored belongings, and indoor air quality.
Table Of Content
- What Interior Waterproofing Really Means
- The Biggest Mistake: Treating Waterproofing as a Cosmetic Job
- Common Mistake: Assuming All Water on a Basement Wall Comes Through the Wall
- Common Mistake: Treating Every Crack the Same Way
- Common Mistake: Believing Waterproof Paint Is Enough
- Common Mistake: Ignoring Drainage and Flood Protection Devices
- Common Mistake: Finishing a Basement Before Moisture Problems Are Solved
- Common Mistake: Underestimating Condensation and Humidity
- Common Mistake: Delaying Mold and Wet Material Removal
- Common Mistake: Relying on a Single Contractor Opinion Without Understanding the Scope
- Best Practices That Actually Work
- How to Build a Smart Homeowner Action Plan
- When You Should Call a Professional Right Away
- Final Thoughts
The first thing to understand is that interior waterproofing is not one magic product. It is a system of moisture control measures used to manage water that enters or threatens to enter below grade spaces such as basements and crawl spaces. That system may include crack repair, drainage management, sump systems, humidity control, seal improvements around penetrations, and removal of damaged materials. Homeowners who expect a single coat of paint or a quick patch to solve everything usually end up paying twice.
This matters even more today because water damage is becoming a bigger financial risk. Severe weather losses in Canada now routinely reach into the billions, and recent freezing events have caused major insured losses tied to burst pipes and water damage. For a homeowner, that means waterproofing is no longer just about making a basement feel nicer. It is part of home resilience, maintenance planning, and protecting the value of the property.
This guide focuses on the common mistakes people make during interior waterproofing efforts and the best practices that lead to durable results. The goal is simple. If you understand what usually goes wrong, you can make smarter decisions, ask better questions, and spend money where it actually improves the performance of the house.
Practical rule: If water is showing up indoors, do not start by covering the symptom. Start by figuring out how the water is getting there, when it appears, and what conditions make it worse.
What Interior Waterproofing Really Means
Many homeowners hear the term interior waterproofing and picture a roll-on coating or a waterproof paint applied to a concrete wall. Those products can play a role in some situations, but they are not the whole solution. In most basements, moisture problems come from a combination of foundation cracks, seepage through porous materials, hydrostatic pressure from saturated soil, poor grading outside, failed seals around penetrations, window well issues, floor joint leakage, plumbing leaks, or indoor condensation. That is why a reliable repair plan starts with diagnosis, not product shopping.
Government guidance in Canada consistently frames foundation moisture issues as source-control problems. Homeowners are advised to inspect foundations inside and out, monitor cracks, maintain drainage, and seek professional help when cracks are actively leaking, widening, or difficult to explain. That is good practical advice because basement water rarely behaves in a simple way. Water can travel behind finishes, along wall cavities, under slabs, and across floors before it becomes visible where you notice it.
Interior waterproofing, when done properly, is a layered approach. One layer may slow or redirect water at the wall or floor surface. Another layer may collect and carry water to a sump pit. Another may reduce interior humidity to control condensation. Another may prevent sewer backup or reduce the damage if water gets in anyway. Good results come from treating the basement like a system instead of a room with a stain problem.
The Biggest Mistake: Treating Waterproofing as a Cosmetic Job
The most common and expensive mistake is treating interior waterproofing as a cosmetic repair. A homeowner sees damp concrete, some flaking paint, or light mold growth and decides to scrape, patch, paint, and move on. That may improve appearance for a while, but if the water source is still active, the problem almost always returns. The result is repeated spending, frustration, and often more hidden damage than there was in the beginning.
Health guidance on mold makes this point clearly. If mold returns after cleaning, the moisture source has not been removed. That is the core principle homeowners need to keep in mind. Mold is not the main problem. Water is the main problem. Cleaning or painting over the symptom might buy time visually, but it does nothing to stop continued moisture migration through the wall, floor, or air.
Cosmetic-only repairs also create false confidence. A freshly painted wall can hide efflorescence, staining, and dampness for months. During that time, insulation behind a finished basement wall may stay wet, drywall paper can support mold growth, wood framing can deteriorate, and stored items can absorb moisture. By the time the problem becomes obvious again, the repair often costs much more because demolition and remediation are now part of the job.
The best practice is to hold off on finish repairs until you understand the moisture pattern. Track whether water appears after rain, during spring thaw, during humid weather, or only near certain plumbing fixtures. Note whether the issue is at a crack, at the wall-floor joint, under a window, or in the middle of the slab. A little patience at the start saves a lot of waste later.
Common Mistake: Assuming All Water on a Basement Wall Comes Through the Wall
Homeowners often assume that if a wall looks wet, the wall itself is the leak. Sometimes that is true, but not always. Water can enter at the top of the foundation, around a service penetration, through a basement window assembly, or from plumbing and then run down the wall face. Condensation can also create the appearance of seepage, especially on cool surfaces in humid basements. If you repair the wrong location, the real pathway stays active.
This is why inspection matters. Look for staining patterns, mineral deposits, rust marks, softened drywall, and moisture concentrated around pipes, ducts, sill areas, and window openings. Efflorescence, the white chalky deposit left by mineral-bearing water, is often a sign that moisture is moving through masonry or concrete. It does not tell you the exact source by itself, but it does tell you water has been traveling through the material.
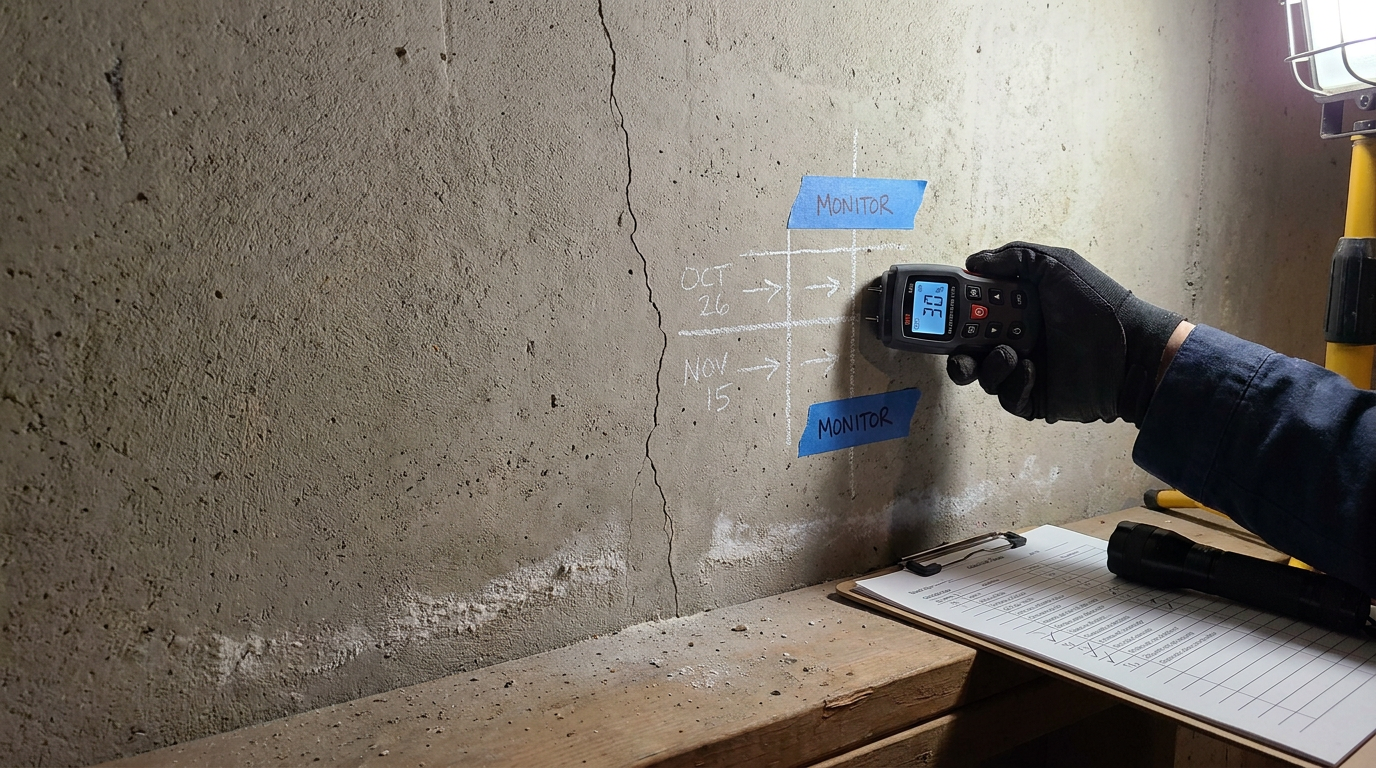
A practical method is to document conditions over time. Take photos after storms. Mark the ends of visible cracks and note dates. Check whether the floor is wet at the wall base before the wall surface darkens. These details help distinguish groundwater seepage from surface water entry, plumbing leaks, or condensation. Good diagnosis is not glamorous, but it is what separates durable waterproofing from trial-and-error spending.
Common Mistake: Treating Every Crack the Same Way
Not all foundation cracks are equal, and this is where homeowners can either save money or make a small issue much worse. A minor stable hairline crack may be suitable for a straightforward repair if there is no active movement and no significant water entry. A wider crack, a crack that changes over time, or one that leaks under pressure is a different matter. In those cases, a do-it-yourself patch can be temporary at best and misleading at worst.
Canadian guidance advises homeowners to inspect cracks and consult a professional when cracks are growing, actively leaking, or wider than about 0.25 inch. The exact repair method depends on the crack type, location, cause, and whether movement is ongoing. A shrinkage crack in a poured wall is different from a structural crack tied to settlement, lateral soil pressure, frost movement, or repeated water loading.
Another mistake is patching only the visible surface. If water pressure is forcing moisture through the crack, a superficial filler may not bond reliably or may fail as the structure moves seasonally. Homeowners should understand that a crack repair is not judged by how smooth it looks on the room side. It is judged by whether it stops water and remains stable over time.
Best practice starts with observation. Measure and photograph the crack. Mark the ends with pencil or tape and check it periodically. Note whether seepage happens after rain or snowmelt. If there is movement, repeated leaking, displacement, bowing, or uncertainty about structural significance, call a foundation professional or structural engineer before you finish the wall. Waterproofing over an active structural issue is just covering the evidence.
Common Mistake: Believing Waterproof Paint Is Enough
There is a strong market for products that promise to waterproof basement walls from the inside. Some coatings can help reduce minor dampness or improve surface resistance, but they do not solve every water problem. If water is pushing through a wall or slab due to hydrostatic pressure, paint alone is usually the wrong answer. It may peel, blister, or trap moisture where it can damage adjacent materials.
This misconception survives because coatings are easy to understand and easy to sell. They offer a visible before-and-after change. A homeowner can finish the work in a weekend and feel like the issue is handled. The trouble is that water pressure does not care what the label says. If the source is drainage failure, a leaking crack, a wall-floor joint issue, or an overwhelmed sump system, the coating is only interacting with the symptom.
There is also confusion around membrane products. Some dimple membranes, for example, are drainage layers rather than fully waterproof barriers and may require additional materials depending on the assembly. Assuming all membranes perform the same is a mistake. Good waterproofing decisions depend on knowing whether a product blocks water, channels water, manages vapor, or simply protects another layer.
A sensible approach is to ask what job the material is supposed to perform. Is it sealing a crack, resisting vapor, redirecting water to drainage, or protecting a finish surface? If the answer is vague, the specification is not complete enough yet. Homeowners do not need to become material scientists, but they do need to stop thinking of waterproofing as a paint aisle decision.
Common Mistake: Ignoring Drainage and Flood Protection Devices
One of the clearest best-practice messages from current guidance is that homeowners need layered protection. That means trying to keep water out, diverting it away from the house, and safely removing any water that still gets in. Yet many interior waterproofing projects focus only on the room itself and ignore the drainage devices that determine whether the system can handle real events.
Backwater valves, sump systems, floor drains where applicable, basement window maintenance, and elevating vulnerable appliances are all practical flood-risk reduction measures. These are not glamorous upgrades, which is why they are often delayed. But when a storm hits, a sewer surcharge occurs, or groundwater rises, these components are often what prevents a manageable event from becoming a major loss.
The mistake here is thinking that a dry basement today proves no drainage work is needed. Waterproofing is not only about current leaks. It is about preparing for future weather, aging infrastructure, and changing site conditions. A basement that has never had visible water can still be vulnerable if the sump has no backup power, the window well is poorly maintained, or the washing machine and furnace sit directly on the floor in a flood-prone area.
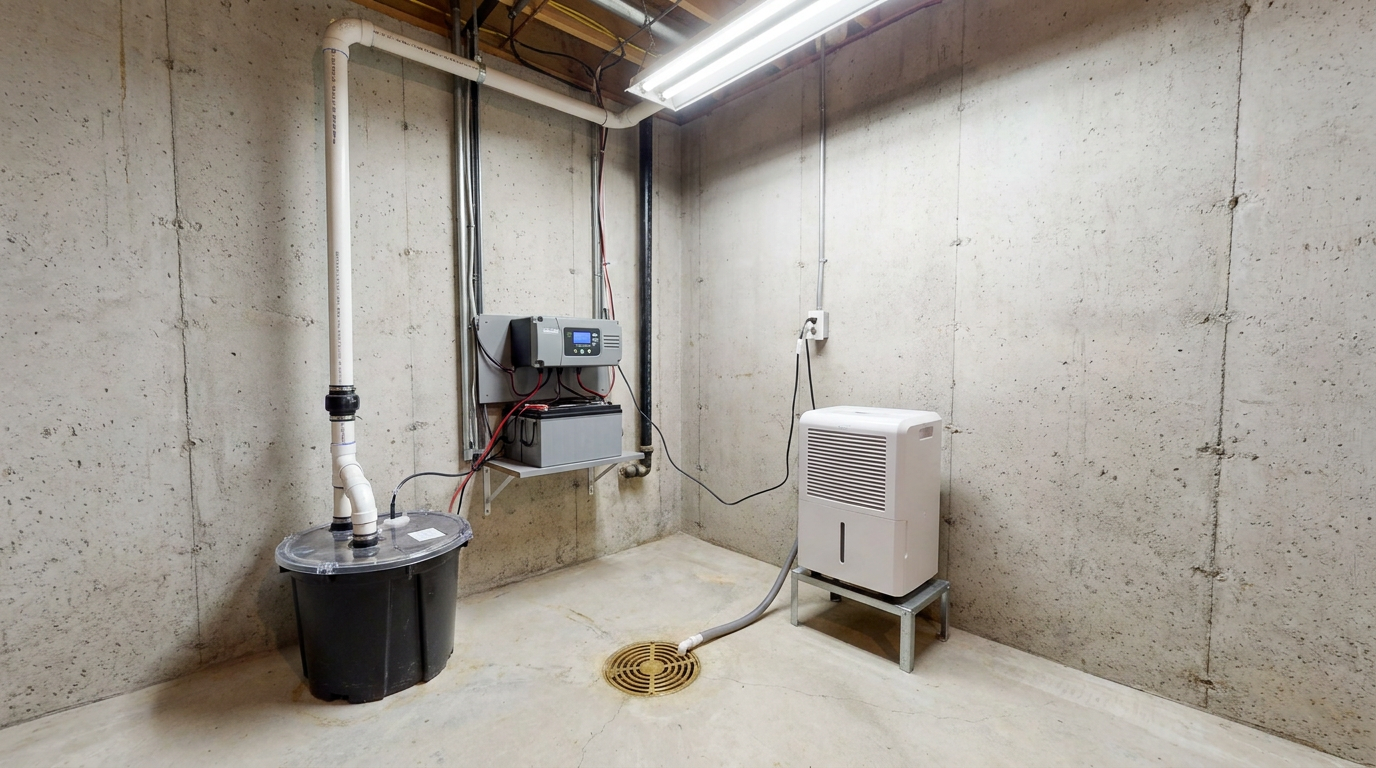
Best practice means building redundancy into the system. If you rely on a sump pump, consider battery backup where appropriate. If there is a risk of sewer backup, ask whether a backwater valve makes sense. Keep window wells clear and drainage paths functioning. Raise or relocate basement appliances and utilities if water could reach them. These measures often cost far less than replacing finished materials and major equipment after one flood event.
Common Mistake: Finishing a Basement Before Moisture Problems Are Solved
A newly finished basement can hide moisture problems very effectively. That is exactly why finishing too soon is such a common mistake. Once drywall, flooring, insulation, trim, and built-ins cover the foundation, small leaks become hidden leaks. By the time the damage shows up as warped flooring, musty odors, or discoloration, the repair usually requires demolition.
This problem is especially common in older homes where basements were not originally designed to perform like above-grade living spaces. Concrete and masonry below grade manage moisture differently. They are in direct contact with soil, they stay cooler, and they are more vulnerable to seasonal moisture loading. If a homeowner rushes to insulate and finish without first confirming the space stays dry through wet seasons, they are taking a gamble.
Best practice is to monitor the basement through enough weather cycles to understand its behavior. If there has been water entry before, correct the cause and verify performance before reinstalling finishes. If materials were previously wet, make sure they are actually dry and not just outwardly dry. Moisture meters, professional assessment, and patience are worth the effort before a full renovation.
When finishing after waterproofing work, choose materials with below-grade durability in mind. Avoid trapping moisture behind impermeable layers where it can feed mold. Keep inspection access where practical. Leave mechanical systems serviceable. Good basement construction is not just about appearance. It is about maintaining the ability to observe and respond to moisture over time.
Common Mistake: Underestimating Condensation and Humidity
Not every wet basement problem is bulk water coming through the foundation. Sometimes the issue is interior humidity condensing on cool surfaces such as foundation walls, water pipes, ductwork, or slab edges. This is common in summer when warm humid air enters a cool basement. Homeowners may think the wall is leaking when in fact moisture is forming from indoor air reaching its dew point.
The mistake is treating condensation like seepage without addressing humidity control. If the basement air stays damp, mold can still develop, stored contents can still be damaged, and finishes can still fail even if the foundation itself is not leaking. A dehumidifier, better ventilation control, insulation details that reduce cold surface exposure, and sealing humid air pathways may be part of the fix.
One clue is timing. Condensation often gets worse during hot humid weather, while groundwater seepage is more closely tied to storms, thaw cycles, or prolonged wet soil conditions. Another clue is location. Water beading uniformly on pipes or broad cool surfaces points toward condensation rather than a specific entry point. Still, homes can have both issues at once, so it pays to avoid assumptions.
Best practice is to measure humidity instead of guessing. If the basement regularly runs at high relative humidity, treat that as a moisture problem in its own right. Interior waterproofing is not only about blocking liquid water. It is also about controlling the indoor environment so the space stays dry enough to protect materials and air quality.
Common Mistake: Delaying Mold and Wet Material Removal
When a water event happens, many homeowners focus first on drying what they can save. That makes sense, but a major mistake is holding onto porous materials that have been soaked and cannot be dried properly. Guidance on flood cleanup is clear that materials such as insulation, drywall, carpets, mattresses, cushions, and some particleboard products may need to be discarded if they were exposed and cannot be fully dried. Trying to save everything can keep contamination and odor in the house.
This is where waterproofing overlaps with health. A basement that remains damp after a leak or flood is not just inconvenient. It can create persistent mold growth and poor indoor air quality. If mold returns after cleaning, the moisture source is still active or the damaged materials are still part of the problem. Homeowners sometimes spend too much time cleaning surfaces and too little time deciding what must be removed.
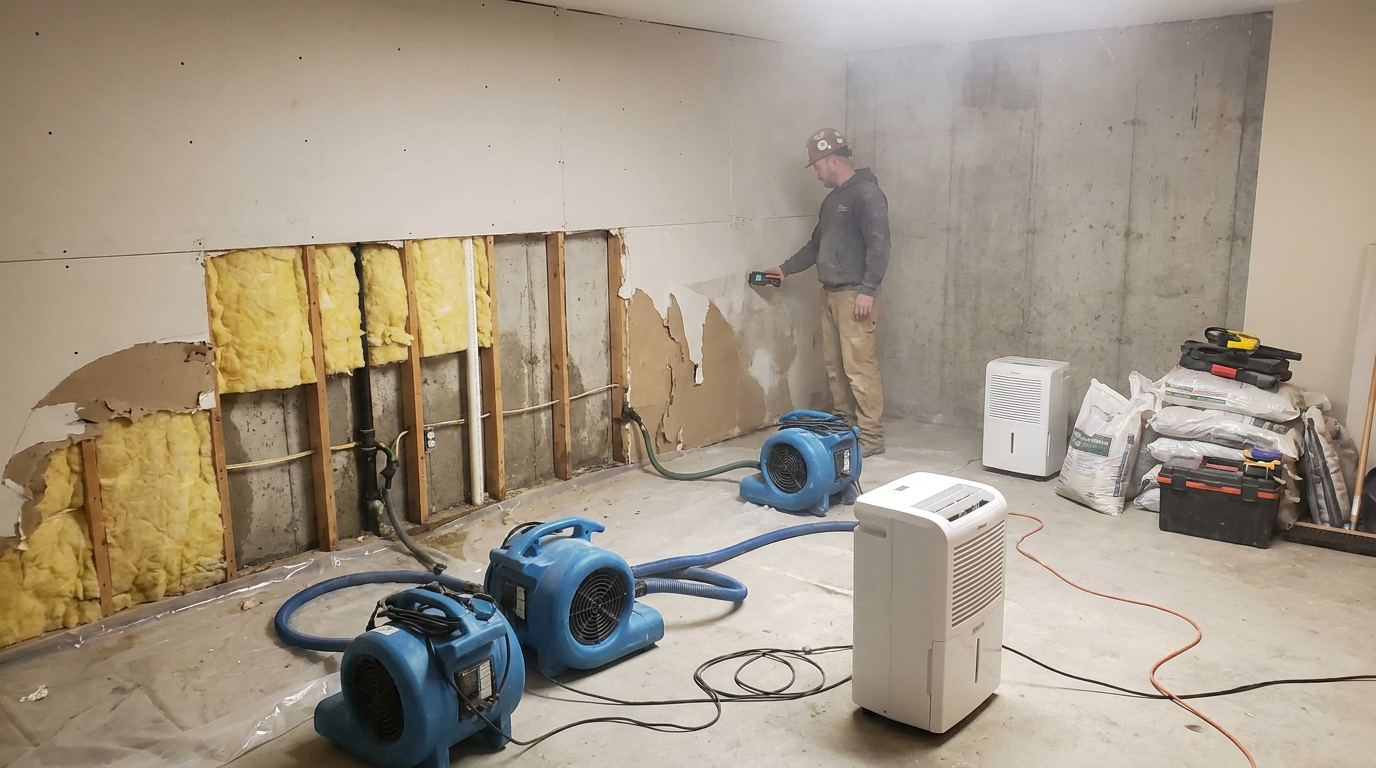
Best practice after any significant water intrusion is speed and honesty. Remove standing water quickly. Open up concealed areas if needed. Separate salvageable non-porous materials from unsalvageable porous materials. Dry the structure thoroughly before rebuilding. If the event was substantial, contaminated, or prolonged, professional remediation may be the safest path. Waterproofing is not complete until the damaged materials are dealt with properly.
Common Mistake: Relying on a Single Contractor Opinion Without Understanding the Scope
Water problems are expensive, and that makes homeowners vulnerable to both under-scoping and over-scoping. One contractor may recommend a coating. Another may recommend full interior drainage and a sump system. Another may say the issue is mostly exterior grading or a plumbing leak. Without understanding the reasoning behind the recommendation, it is hard to compare options fairly.
The mistake is buying the biggest promise or the cheapest fix without a clear diagnosis. A good waterproofing recommendation should explain the observed symptoms, the likely water pathway, why the proposed method addresses that pathway, and what limitations remain. If the explanation is vague or relies on sales language more than building logic, that is a warning sign.
Homeowners should ask direct questions. Where exactly is the water entering. What evidence supports that conclusion. Is the crack structural or non-structural. Is the membrane for drainage, waterproofing, or vapor control. What maintenance will the system need. What happens if the power goes out and the sump is needed. Practical questions tend to reveal how well the problem has actually been understood.
In many cases, the best result comes from combining trades and perspectives. A foundation specialist, plumber, drainage contractor, or structural engineer may each have part of the answer depending on the failure. Getting clear on scope before repairs begin is one of the most effective ways to avoid wasted money.
Best Practices That Actually Work
After looking at the common mistakes, the most useful thing for homeowners is a clear list of what strong waterproofing practice looks like in the real world. Good results do not come from luck. They come from a methodical approach that matches the repair to the failure and respects how below-grade spaces behave.
- Start with the source. Identify when and where moisture appears. Distinguish between seepage, plumbing leaks, condensation, and flooding. Track conditions before choosing materials.
- Inspect inside and outside. A basement problem may be tied to foundation cracks, grade, windows, penetrations, drainage paths, or roof runoff patterns. Do not inspect only the room side.
- Treat waterproofing as a system. Combine sealing, drainage, collection, discharge, humidity control, and flood-risk reduction where needed. One layer is rarely enough.
- Respect crack severity. Monitor hairline cracks, but get professional help for active leaks, wider cracks, movement, bowing, or uncertainty about structure.
- Use the right materials for the right job. Know whether a product is a sealer, drainage layer, waterproof barrier, or vapor management component.
- Verify drying before rebuilding. Do not close up wet assemblies behind new finishes. Dry the structure and remove unsalvageable porous materials.
- Plan for future events. Consider sump backups, backwater protection, appliance elevation, and maintenance access. Prevention is part of waterproofing.
How to Build a Smart Homeowner Action Plan
If you suspect a waterproofing problem, the best next step is not panic and not a weekend of random patching. Build a simple action plan. Start by documenting all visible symptoms such as staining, cracks, odors, peeling finishes, and water locations. Note weather conditions, plumbing use, and whether the problem is seasonal. This record becomes valuable if you need contractor quotes or insurance documentation later.
Next, inspect the basement as a system. Look at the slab, wall-floor joint, windows, service penetrations, utility areas, and any finished assemblies that may conceal moisture. If safe and accessible, inspect related exterior conditions too. You are looking for clues, not trying to force a diagnosis from one symptom alone.
Then prioritize based on risk. Active leaking, structural concerns, mold growth, and electrical hazards come first. Cosmetic staining comes later. If you have standing water or significantly wet materials, move quickly on water removal and drying. If the issue is uncertain or recurring, bring in qualified help before putting money into finishes.
Finally, think long term. Waterproofing work should improve resilience, not just restore appearances. That may mean spending on a sump backup before new flooring, or replacing wet insulation before repainting, or delaying a finished basement until a full wet season passes without problems. Practical decisions are not always the most exciting ones, but they are the ones that hold up.
When You Should Call a Professional Right Away
Some waterproofing issues are reasonable for a careful homeowner to monitor or address. Others should move to the professional category quickly. If a crack is leaking under pressure, widening over time, or accompanied by wall movement, professional assessment is the right call. The same goes for repeated unexplained water entry, sewer backup concerns, major mold contamination, or any situation where electrical systems may have been affected.
Professional help is also important when the true source is hard to trace. Water does not always show up where it enters, and false assumptions are expensive. An experienced contractor or specialist can often spot patterns that homeowners miss, such as hydrostatic pressure indicators, plumbing crossover issues, or hidden condensation paths. That is not about giving up control. It is about using expertise where it matters.
If the basement has been flooded, if there are strong odors, or if porous materials stayed wet for too long, proper cleanup and remediation become part of the waterproofing conversation. In those cases, getting the moisture out and restoring healthy indoor conditions is just as important as stopping future entry. A dry-looking basement is not necessarily a safe basement if contamination remains in the materials.
Final Thoughts
Interior waterproofing goes wrong when people expect it to be simple. Water in a basement is rarely just a paint problem, a crack problem, or a cleaning problem on its own. It is usually a building-system problem that needs to be understood in context. That is why the biggest savings come from careful diagnosis, realistic planning, and choosing methods that address the actual water pathway.
Homeowners who do this well tend to follow the same pattern. They inspect early, document what they see, resist cosmetic-only fixes, and use layered protection that includes drainage, moisture control, and damage reduction. They also know when to stop guessing and call in a professional. That combination of patience and practicality is what keeps waterproofing work from turning into a cycle of repeated repairs.
If there is one takeaway worth remembering, it is this: the goal is not to make the basement look dry for a month. The goal is to make it stay dry, stay healthy, and stay repairable over time. That is what good interior waterproofing is really about, and that is what saves homeowners time, money, and avoidable damage in the long run.



No Comment! Be the first one.