



Step-by-Step Guide to Replacing Your Kitchen and Bathroom Faucet for Better Style and Performance
A new faucet can change the atmosphere of a room with surprising immediacy. In the kitchen, it can sharpen the lines of the workspace, improve reach and comfort, and make daily rinsing, filling, and washing feel more fluid. In the bathroom, it often becomes a visual anchor at the vanity, adding polish, proportion, and a sense of intentional design. For homeowners who want a meaningful upgrade without the cost and disruption of a full renovation, faucet replacement remains one of the most elegant and practical improvements available.
Table Of Content
- Why Replacing a Faucet Has Such a Big Design Impact
- Before You Buy: How to Choose the Right Faucet
- Match the Sink Hole Configuration
- Think About Spout Height, Reach, and Handle Clearance
- Choose a Finish That Suits the Room and Your Maintenance Preferences
- Compare Faucet Types for Kitchen and Bathroom
- Efficiency, Safety, and Certification: The Details That Matter
- Tools and Materials You Will Likely Need
- Step-by-Step: How to Replace Your Faucet
- Step 1: Clear the Area and Protect the Space
- Step 2: Shut Off the Hot and Cold Water Supply
- Step 3: Disconnect the Supply Lines
- Step 4: Remove the Old Faucet Mounting Hardware
- Step 5: Clean the Sink Deck Thoroughly
- Step 6: Confirm Compatibility One More Time
- Step 7: Install the Gasket or Sealant as Directed
- Step 8: Secure the New Faucet
- Step 9: Reconnect the Supply Lines
- Step 10: Turn the Water Back On Slowly
- Step 11: Check Carefully for Leaks
- Kitchen Faucet Selection: Style That Supports Real Work
- Bathroom Faucet Selection: Refinement, Scale, and Comfort
- Common Mistakes to Avoid
- When to Call a Professional Instead
- Final Styling Notes After Installation
- Conclusion: A Small Upgrade with Lasting Elegance
What makes this project especially rewarding is the way it brings together two ideas that should never be separated in good design: aesthetics and functionality. A faucet is not only a decorative fitting. Its finish affects durability and upkeep, its handle style influences ease of use, and its spout height and reach shape the entire experience of the sink. Even technical details such as hole configuration, deck plate compatibility, and supply line connections influence whether the installation feels effortless or frustrating.
This guide will walk you through the complete process of replacing your kitchen or bathroom faucet step by step. Along the way, we will look closely at how to choose the right faucet for your space, how to avoid the most common compatibility mistakes, and why efficiency and certification matter just as much as silhouette and finish. The result is not simply a fixture swap. It is a thoughtful upgrade that can refine your home’s visual language while improving everyday life.
Why Replacing a Faucet Has Such a Big Design Impact
In both kitchens and bathrooms, the faucet sits at the intersection of use and visibility. It is touched many times a day, and it is often one of the first metallic finishes the eye notices. Because of this, replacing a dated faucet can make a room feel newly considered even when the countertop, cabinetry, and tile remain the same. A sleek pull down kitchen faucet can make an older sink area feel more current, while a graceful widespread bathroom faucet can instantly elevate a modest vanity.
The appeal of this upgrade is also financial. Faucet replacement is generally one of the highest impact, lowest cost projects in a kitchen or bathroom refresh. Compared with replacing cabinets, countertops, or flooring, the material investment is relatively modest. Yet the visible transformation is immediate, especially when the old fixture is stained, worn, oversized, undersized, or out of step with the room’s finish palette.
There is also the subtle question of rhythm and ergonomics. A well chosen faucet should feel natural in the hand and proportionate to the sink. The height should suit the basin depth, the spout reach should align with the bowl, and the handle should move easily without striking a backsplash or mirror. These details may sound small, but together they shape whether a room feels calm and effortless or slightly awkward every day.
Beautiful rooms are rarely built from decoration alone. They feel complete because the practical elements have been chosen with as much care as the visible ones.
Before You Buy: How to Choose the Right Faucet
The smartest faucet installation begins long before any wrench is lifted. One of the most common misconceptions is that replacing a faucet is always a simple like for like exchange. In truth, the success of the project depends heavily on compatibility. A faucet may look perfect online or in a showroom, yet still be wrong for your sink, countertop, plumbing connections, or under sink clearance.
Start by identifying where the faucet will be used and how the sink is configured. Kitchen sinks and bathroom sinks have different practical demands, and even within each category there are meaningful variations. A busy family kitchen may benefit from a pull down sprayer and a higher arc, while a powder room vanity might call for a more sculptural silhouette with restrained water use. Understanding the room’s needs allows you to choose with confidence rather than impulse.
Match the Sink Hole Configuration
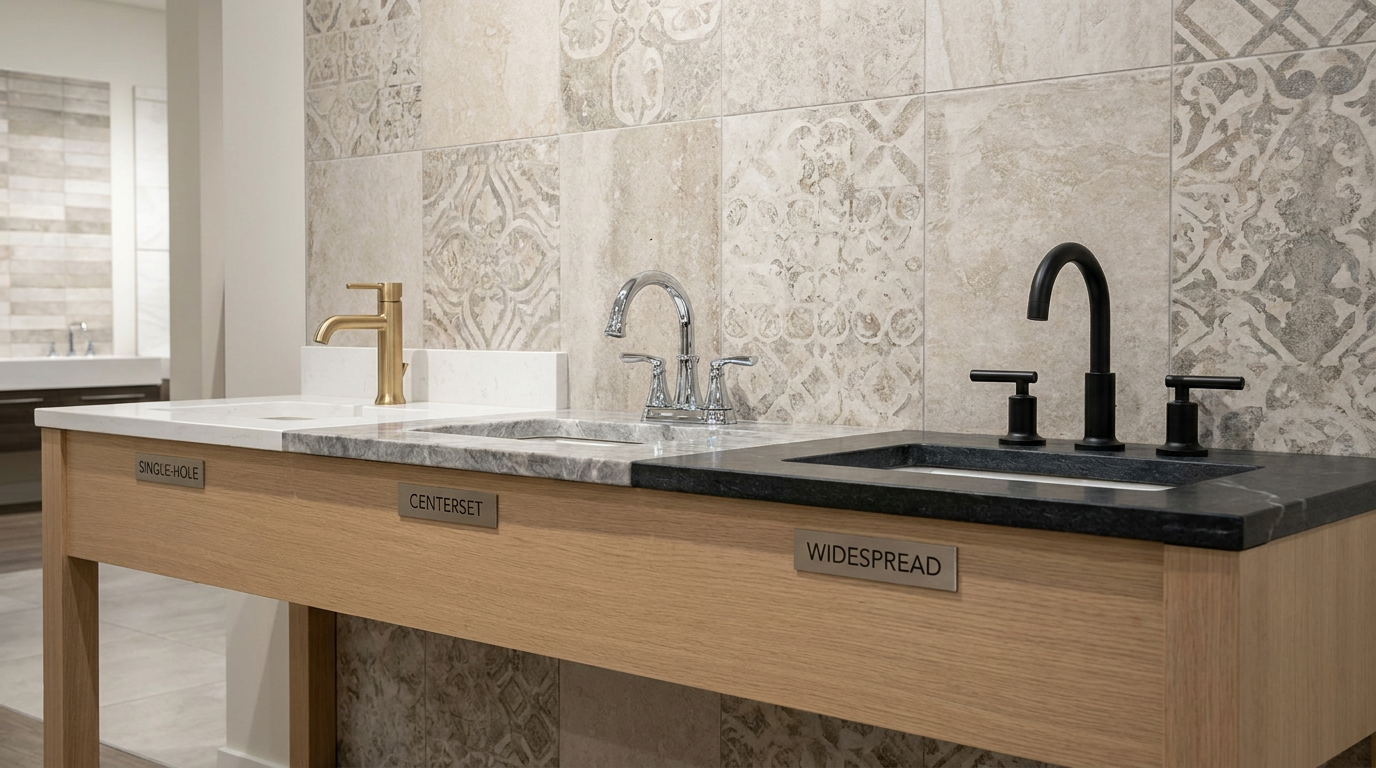
Check the number of holes in your sink or countertop before buying anything. This single step prevents a remarkable number of installation disappointments. Bathroom faucets commonly come in single-hole, centerset, and widespread configurations, while kitchen faucets may use one, two, three, or more holes depending on whether there is a side sprayer, soap dispenser, or accessory. If your new faucet does not match the sink deck, you may need a deck plate, also called an escutcheon, or you may need to choose another model entirely.
Also consider the faucet footprint. Some older faucets leave visible marks or uncovered areas when removed, especially if the new base is narrower. A deck plate can solve this issue gracefully, but only if the faucet is designed to accommodate one. Compatibility here is not merely mechanical. It affects the final visual finish and whether the sink deck looks clean and intentional after installation.
Think About Spout Height, Reach, and Handle Clearance
For kitchens, spout reach matters as much as style. The water stream should land near the center of the sink bowl, not too far forward and not too close to the back wall. A pull down faucet can add welcome flexibility for rinsing pans and produce, but be sure there is enough room above and around it. In smaller kitchens or beneath low cabinets, proportions deserve careful attention.
In bathrooms, spout reach and sink depth should work together to reduce splashing. A faucet that extends too little may push water against the back of the basin, while one that extends too far can direct water awkwardly toward the front edge. Handle clearance is equally important. If the faucet sits close to a wall, mirror, or backsplash, make sure the handle has enough room to operate comfortably.
Choose a Finish That Suits the Room and Your Maintenance Preferences
Finish is more than ornament. It affects how the faucet interacts with light, how fingerprints show, how easily mineral spots appear, and how gracefully the fixture ages over time. Matte black, brushed nickel, and warm metallic tones remain particularly popular because they add character while pairing well with a broad range of cabinet colors and tile finishes. Chrome still offers a crisp, classic brightness and tends to work beautifully in bathrooms that need visual freshness.
If ease of maintenance matters, brushed finishes often hide water spots better than highly polished ones. In humid bathrooms and hardworking kitchens, that practicality can influence long term satisfaction. A faucet should not only look beautiful on the day it is installed. It should continue to support the visual calm of the room after months and years of use.
Compare Faucet Types for Kitchen and Bathroom
When comparing options, it helps to understand how faucet categories affect both appearance and usability. In kitchens, single handle faucets are often favored for their clean line and one hand control, while double handle models offer a more traditional rhythm and visual symmetry. Pull down faucets usually suit deeper sinks and contemporary spaces, while pull out styles can feel more compact and practical in smaller kitchens.
In bathrooms, single hole faucets create a streamlined look and are often ideal for modern vanities. Centerset faucets, which combine spout and handles on a compact base, are a classic choice for smaller sink decks. Widespread faucets separate the handles from the spout, giving a more custom, refined feeling that works especially well in larger vanity settings. Wall mounted faucets can look striking and architectural, but they require a very different plumbing arrangement and are rarely the simplest DIY replacement.
Efficiency, Safety, and Certification: The Details That Matter
A truly good faucet does more than complement tile and cabinetry. It should also perform responsibly. In North America, efficiency and certification labels can help homeowners choose fixtures that save water, protect drinking water quality, and align with commonly recognized standards. These details are often overlooked in the excitement of selecting a finish, yet they shape the faucet’s value over time.
For bathroom sinks, the most important benchmark in the United States is EPA WaterSense. WaterSense labeled bathroom sink faucets and accessories use a maximum of 1.5 gallons per minute, which is about 30% less than the standard 2.2 gpm flow rate. Crucially, this does not mean automatically sacrificing performance. One of the persistent myths around low flow fixtures is that efficiency must feel weak. WaterSense programs are designed to maintain practical performance while reducing unnecessary water use.
For kitchens, standards and product development continue to move toward stronger efficiency expectations. Natural Resources Canada has identified faucets as an active category for efficiency standards development and has considered a kitchen faucet maximum flow rate of 6.8 L/min at 60 psi. This reflects a wider North American trend toward design forward efficiency, where consumers expect fixtures to save resources while still feeling comfortable and effective in daily use.
Safety is equally important. Under the U.S. Safe Drinking Water Act, lead-free plumbing fixtures are defined as having a weighted average of no more than 0.25% lead across wetted surfaces, plus 0.2% for solder and flux. Another standard worth watching for is NSF/ANSI/CAN 61, which is used to evaluate the health effects of materials and components that come into contact with drinking water. Many modern faucets sold in the United States and Canada carry recognized certifications, and this is a reassuring sign of quality for homeowners who want beauty with substance.
It is also wise to investigate local utility programs before buying. Many municipalities and utility providers offer rebates or incentives for WaterSense labeled or otherwise efficient plumbing fixtures. That means a more responsible product can sometimes reduce both installation costs and future utility bills. Good design becomes even more compelling when it rewards the household quietly over time.
Tools and Materials You Will Likely Need
Most faucet replacement projects do not require an elaborate set of tools, but having the right essentials nearby creates a calmer and cleaner process. Working under a sink is less about brute force than patience, reach, and organization. Before you begin, set everything out within easy access so you do not have to stop midway with a loose faucet and wet hands.
- New faucet and any included gasket, deck plate, mounting hardware, and supply lines
- Adjustable wrench
- Basin wrench for hard to reach mounting nuts
- Bucket or shallow pan to catch residual water
- Towels or rags
- Flashlight or work light
- Plumber’s putty or silicone if the manufacturer specifies it
- Cleaning sponge and non abrasive cleaner for the sink deck
- Safety glasses and gloves if desired
Do not assume every faucet includes the same accessories. Some models come with integrated supply lines, while others require separate purchases. Some specify silicone rather than plumber’s putty. Always follow the product instructions first, because the manufacturer’s guidance takes precedence over general habits.
Step-by-Step: How to Replace Your Faucet
The sequence below works for most deck mounted kitchen and bathroom faucet replacements. Details can vary from one model to another, but the core logic remains the same: shut off the water, disconnect the old fixture, prepare the surface, confirm compatibility, install the new faucet, reconnect the water lines, and test carefully. Move slowly and deliberately. A thoughtful pace tends to produce a better looking and leak free result.
Step 1: Clear the Area and Protect the Space
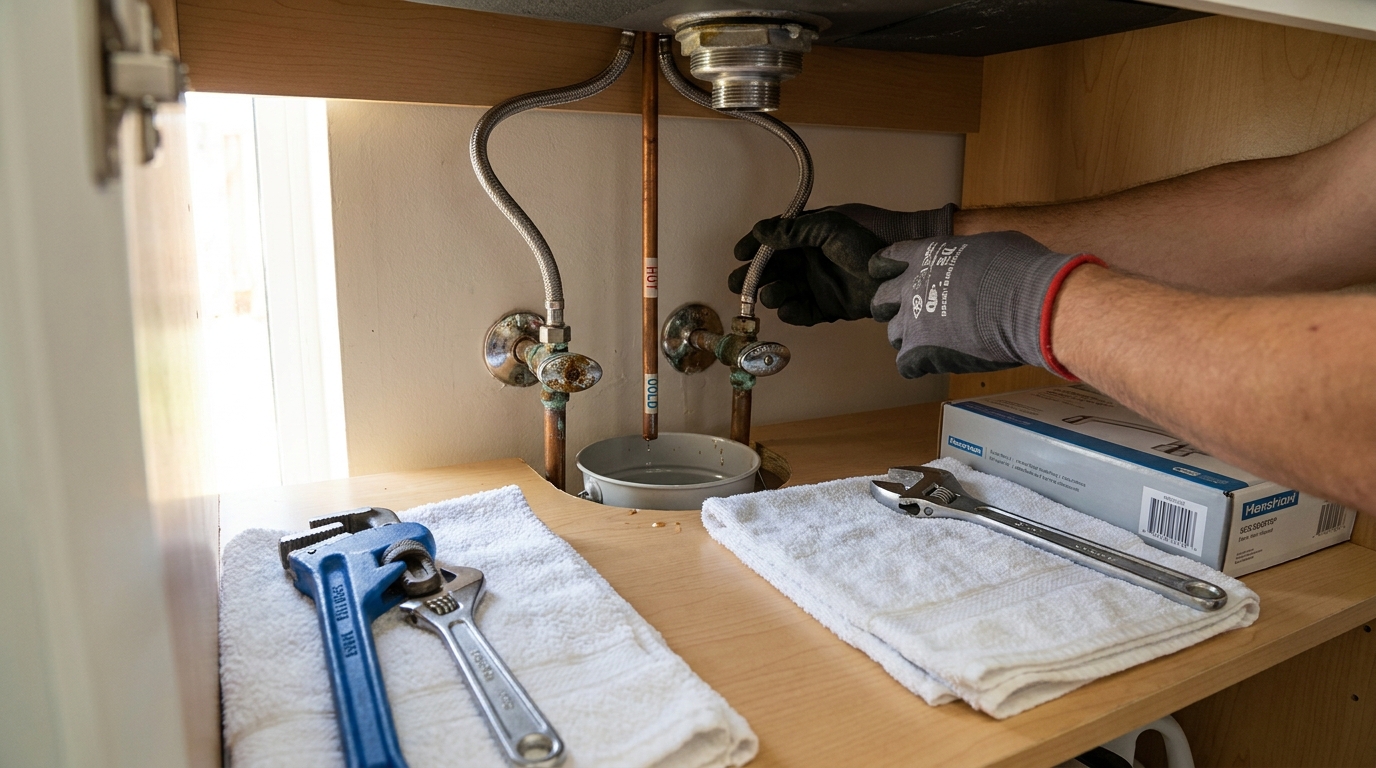
Begin by removing items from the cabinet beneath the sink so you can work comfortably. This is especially important in bathroom vanities where storage can become cluttered, and in kitchen sink bases where cleaning supplies often crowd the valves. Lay down towels and place a bucket below the supply line connections to catch residual drips. Good preparation makes the project less messy and gives you better visibility.
Take a few reference photos of the existing plumbing setup before disconnecting anything. These images can be useful if you need to remember the original arrangement of supply lines, brackets, or accessories. This small step is often overlooked, yet it can save time during reassembly.
Step 2: Shut Off the Hot and Cold Water Supply
Locate the shutoff valves beneath the sink and turn them clockwise until they stop. There is usually one for hot water and one for cold. After shutting them off, open the faucet above to relieve pressure and allow any remaining water in the lines to drain. If the faucet has a sprayer, activate that as well to release trapped water.
If the shutoff valves are old, stiff, or appear to leak when turned, pause and assess before continuing. In some homes, aging valves may need replacement before a faucet project can proceed smoothly. This is one of the moments where practicality matters more than speed.
Step 3: Disconnect the Supply Lines
Use your adjustable wrench to loosen the supply line connections from the shutoff valves. Keep the bucket underneath, because some water will likely spill. If the connections are corroded or difficult to reach, a basin wrench can help. Work patiently rather than applying sudden force, especially if the plumbing components are older.
Once disconnected, inspect the supply lines. Some new faucets include new lines, and in many cases it is wise to use them rather than reusing older parts. If your faucet does not come with supply lines, verify the correct size and connection type before installation. This is one of those compatibility details that often causes unexpected delays.
Step 4: Remove the Old Faucet Mounting Hardware
Under the sink, locate the nuts or brackets securing the faucet to the sink or countertop. This part can be the most awkward, particularly in tight bathroom vanities or deep kitchen cabinets. A basin wrench is especially helpful here. Loosen and remove the mounting hardware, keeping any washers or clips together as they come off.
Once the hardware is released, lift the old faucet out from above. If it resists, old sealant or mineral buildup may be holding it in place. Gentle twisting can help break the bond. Avoid prying aggressively against the sink surface, especially if you are working with porcelain, stone, or composite materials that could chip or scratch.
Step 5: Clean the Sink Deck Thoroughly
With the old faucet removed, take time to clean the exposed area completely. Old caulk, grime, hard water residue, and hidden stains often collect beneath the faucet base. Removing these marks is essential for both appearance and seal quality. A clean deck allows the new gasket or sealant to sit properly and gives the finished installation a more professional look.
This is also the moment to check whether the old faucet left discoloration or an uncovered footprint. If so, confirm that your new faucet base or deck plate will conceal it elegantly. If not, you may want to reconsider the faucet choice before moving forward.
Step 6: Confirm Compatibility One More Time
Before installing the new faucet, do a final dry fit. Confirm the hole count, spacing, deck plate or escutcheon requirements, mounting style, and under sink clearance. Make sure the handles will move freely and the faucet body will sit flush without wobble. This last review can prevent the frustration of nearly finishing the project only to discover a mismatch.
Pay close attention to under sink obstructions. Garbage disposals, sink clips, shallow drawers, and tight cabinet framing can all influence installation ease. Some faucet bodies or mounting systems require more room than expected beneath the sink.
Step 7: Install the Gasket or Sealant as Directed
Most modern faucets include a gasket designed to create a watertight seal between the faucet base and the sink or countertop. Some manufacturers call for silicone or plumber’s putty instead, though many specifically prohibit putty on certain materials. Follow the product instructions exactly. This is not a place for guesswork.
Seat the gasket neatly or apply the sealant carefully, then lower the faucet into place from above. Align the spout and handles so the fixture sits straight. A faucet that is slightly off center can subtly disturb the visual balance of the sink area, especially in a bathroom vanity where symmetry matters.
Step 8: Secure the New Faucet
From below, attach the mounting hardware according to the manufacturer’s sequence. Hand tighten first to keep the faucet in position while you check alignment from above. Once the faucet is properly centered, tighten the hardware firmly but avoid overtightening. Excessive force can damage gaskets, distort parts, or even crack delicate sink surfaces.
If you are working alone, it can help to place a small strip of painter’s tape temporarily across the faucet base above the sink to hold alignment while you tighten below. Remove it once the faucet is secure.
Step 9: Reconnect the Supply Lines
Attach the hot and cold supply lines to the corresponding shutoff valves. Start threading by hand to avoid cross threading, then tighten with a wrench only as much as needed. Over tightening can damage fittings and create leaks just as surely as leaving them too loose. The goal is a snug, accurate connection rather than force.
Double check that the hot and cold lines are connected correctly. This sounds obvious, yet it is a common oversight when working in cramped conditions. If your faucet includes a pull down or pull out sprayer hose, make sure it hangs freely and does not catch on the cabinet wall, supply lines, or stored items.
Step 10: Turn the Water Back On Slowly
With all connections in place, turn the shutoff valves back on slowly. Gradual reintroduction of water helps reduce stress on the system and gives you time to watch for immediate leaks. Keep the faucet in the open position and allow water to flow for a minute or two. This helps flush debris and air from the lines.
For kitchen faucets with a pull down sprayer, extend and retract the hose to ensure smooth movement. For bathroom faucets, observe whether the water stream lands comfortably in the basin without excessive splash. This is the moment where design and function meet in a very tangible way.
Step 11: Check Carefully for Leaks
Inspect every possible leak point: the shutoff valves, the supply line connections, the faucet base, and the spout area. Run both hot and cold water, then dry each connection with a towel and check again after a few minutes. A tiny drip may not reveal itself immediately, so patience matters here.
If you notice a leak, shut the water off again and correct the connection before moving on. Do not ignore even a minor drip. Small leaks can damage cabinetry over time and diminish the satisfaction of an otherwise successful installation.
Kitchen Faucet Selection: Style That Supports Real Work
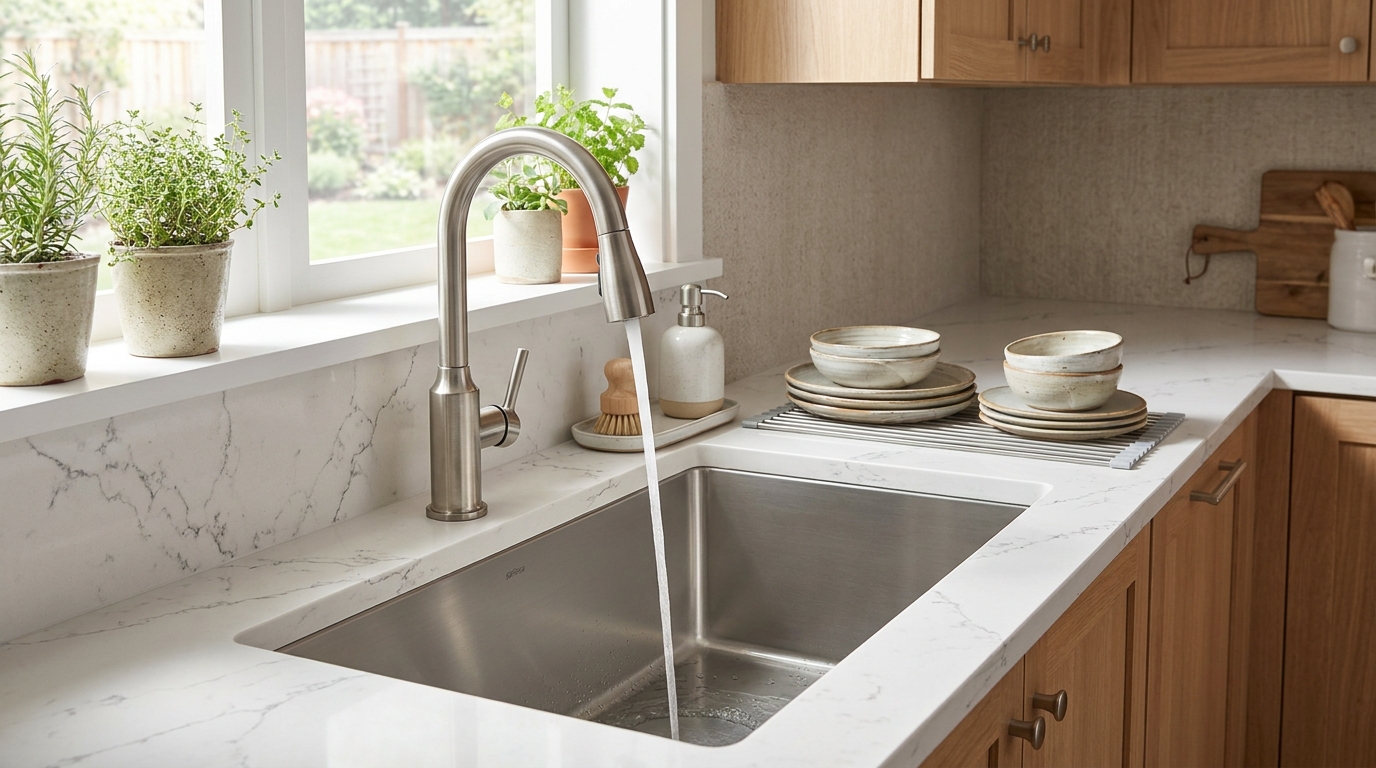
In the kitchen, the faucet is asked to do more than almost any other decorative fixture in the home. It must accommodate large pots, food prep, cleanup, hand washing, and often multitasking in a busy household. This is why the best kitchen faucet choices are not based on looks alone. They should support movement, reach, and cleaning efficiency while still complementing the room’s design language.
Pull down faucets remain especially popular because they combine a contemporary profile with practical flexibility. They often suit deep sinks and larger work zones, and many include multifunction spray heads that switch between stream and spray. Pull out models can be excellent in smaller kitchens where a slightly lower, more compact profile feels more proportionate. The right choice depends on sink depth, cabinet height, and how you actually use the space each day.
Single handle kitchen faucets are often the most intuitive for busy use, allowing quick temperature adjustment with one hand. Touchless models are also growing in popularity for convenience and hygiene, though installation complexity and power requirements may vary. If you are pursuing a simple DIY swap, compare features carefully so that the faucet’s sophistication does not exceed your preferred installation comfort level.
Bathroom Faucet Selection: Refinement, Scale, and Comfort
Bathroom faucet replacement tends to feel more decorative, but comfort should remain central. A faucet that looks elegant in a product photo may feel oversized on a petite vanity or too small on a broad countertop. Scale matters deeply in bathrooms because the sink area is often viewed head on and at close range. The faucet should feel composed within the mirror, lighting, and hardware ensemble.
Single hole faucets bring visual clarity and are especially suitable for contemporary and transitional bathrooms. Centerset faucets are reliable and compact, often ideal for standard vanities and family bathrooms. Widespread faucets offer a more tailored, luxurious impression and can make even a modest bathroom feel more custom. Their spacing creates a sense of air and craftsmanship that many homeowners find especially appealing.
For bathrooms, WaterSense labeling deserves special attention because the sink faucet is used frequently for short tasks throughout the day. Choosing an efficient model can reduce water use without changing daily habits. In a well designed bathroom, this kind of quiet performance is one of the truest forms of luxury.
Common Mistakes to Avoid
Most faucet replacement problems come from rushing the decision stage rather than the installation itself. Buying a faucet before checking the sink hole count is perhaps the most common mistake. So is overlooking whether a deck plate is needed to cover unused holes or stains left by the old fixture. These are simple details, yet they determine whether the final result feels seamless.
Another frequent error is assuming all new faucets are equally safe and equally well made. A polished finish and a stylish silhouette do not guarantee compliance or material quality. Looking for lead free status and recognized certifications such as NSF/ANSI/CAN 61 can help you choose a product that supports drinking water safety as well as visual appeal.
Homeowners also sometimes fear that a low flow faucet will feel weak, leading them to avoid efficient models entirely. In reality, certified products are designed to preserve practical performance while reducing water use. Efficiency should be seen as part of modern quality, not a compromise against it.
When to Call a Professional Instead
Although many faucet replacements are very manageable, there are situations where professional help is sensible. If your shutoff valves fail, if plumbing connections are corroded beyond easy removal, if the new faucet requires unexpected changes to the sink or countertop, or if you are dealing with wall mounted plumbing, a licensed plumber can save time and prevent damage. Confidence is useful in DIY work, but so is discernment.
Professional assistance may also be worth considering if local code questions arise. In both the United States and Canada, plumbing fixtures often need to align with local requirements, and certain installations may call for closer attention to code compliance. This is especially relevant in more complex remodels rather than straightforward replacement projects.
Final Styling Notes After Installation
Once the faucet is installed and confirmed leak free, take a moment to complete the visual composition around it. Replace any worn sink accessories, remove old caulk stains nearby, and consider whether the cabinet hardware, mirror trim, towel bar, or pendant lighting still harmonize with the new finish. A faucet replacement can sometimes reveal that one or two surrounding elements deserve a refresh as well.
In kitchens, a coordinated soap dispenser, tray, or filtered water fixture can help the sink area feel resolved. In bathrooms, even a new hand towel, a polished tray, or a more sculptural mirror can amplify the effect of the faucet upgrade. These small additions do not need to be expensive. They simply need to feel intentional.
Conclusion: A Small Upgrade with Lasting Elegance
Replacing a kitchen or bathroom faucet is a practical project, but it is also a design decision with daily consequences. The right faucet improves comfort, supports water efficiency, respects safety standards, and brings new life to the room through proportion, finish, and form. This is why the best faucet replacement is never just about taking out the old and putting in the new. It is about choosing a fixture that belongs to the way you live and the way you want your home to feel.
When approached carefully, this DIY upgrade can be deeply satisfying. You save on professional costs, gain a more beautiful room, and develop a clearer eye for how the smallest details shape domestic experience. In a kitchen, the new faucet may turn a routine cleanup into a more graceful motion. In a bathroom, it may lend the vanity a composed and polished presence that quietly elevates every morning and evening. That is the beauty of thoughtful design: its power is often felt most in the moments we repeat every day.
If you begin with compatibility checks, choose a faucet that balances style with performance, and follow each installation step with patience, this is a makeover that rewards both effort and taste. A faucet may be a relatively small element, yet in the language of interiors, it speaks with remarkable clarity.



No Comment! Be the first one.