



How to Build a Pergola in Your Backyard: A Practical Step-by-Step Guide for Beginners
A pergola is one of those backyard projects that can make a space feel finished without turning the whole job into a major addition. It gives structure to an open yard, creates a place to sit, and makes a patio or garden area feel more intentional. For a DIY beginner, it is also a good project because the basic form is simple. You are building a set of posts, beams, and top members in a clean sequence, and each step is manageable if you plan carefully and work accurately.
Table Of Content
- Start With the Right Pergola Plan
- Check Permits, Setbacks, and Utility Locations Before You Build
- Choose the Best Location in the Yard
- Materials That Make Sense for a Beginner Build
- Tools You Will Likely Need
- Plan Footings for Frost Depth, Drainage, and Anchorage
- Lay Out the Pergola So It Is Actually Square
- Step 1: Dig and Pour the Footings
- Step 2: Set and Brace the Posts
- Step 3: Install the Beams
- Step 4: Add Rafters Across the Top
- Step 5: Install Shade Slats or Purlins
- Step 6: Trim, Sand, and Finish the Structure
- Common Beginner Mistakes to Avoid
- How Weather Affects Your Pergola Design
- Simple Upgrades You Can Add Later
- What a Pergola Really Costs
- Maintenance That Keeps the Pergola Straight and Sound
- Final Thoughts
- Quick Reference Build Sequence
That said, a pergola is still a structure. It has to stand straight, stay anchored, and handle the weather in your area. The biggest mistakes usually happen before the first board is cut. People assume a pergola never needs a permit, they guess at footing depth, or they treat an open pergola the same as a patio cover with a roof or fabric sail. Those shortcuts can lead to a structure that shifts, loosens, or becomes unsafe in wind and snow.
This guide takes a direct, practical approach. The goal here is to help you build a simple freestanding backyard pergola that looks good and stays solid. We will cover planning, tools, materials, layout, footings, framing, finishing, and the common points where beginners get into trouble. If you stay patient and take the layout seriously, this is a project you can handle.
Start With the Right Pergola Plan
The easiest pergola for a beginner is a freestanding open-top pergola. That means no solid roof, no heavy shade sail stretched across the top, and no attempt to tie the structure into the house unless you have proper experience and local approval. A basic rectangular pergola with four posts is the most approachable version because it keeps the framing straightforward and gives you fewer variables to manage while you learn.
Before you settle on size, think about how you will use the space. A pergola over a dining set needs enough room for chairs to move comfortably. A pergola over a bench or conversation area can be smaller and more intimate. A common beginner size is around 10 by 10 feet or 10 by 12 feet because it is large enough to feel useful but still manageable for material handling and beam spans.
Try to keep the design simple on your first build. Decorative curved tails on rafters can wait until you are confident in layout and cutting. Clean lines, square cuts, and a strong frame matter more than fancy detailing. Good workmanship always looks better than overcomplicated design.
Check Permits, Setbacks, and Utility Locations Before You Build
This is the first real job, and it is the one people most want to skip. In Canada, the National Building Code of Canada is a model code, but local rules come from the province, territory, and municipality. In plain terms, what is allowed in one area may not be allowed in another. Some places exempt small accessory structures under certain size limits, while others regulate pergolas more closely, especially if height, footprint, or proximity to property lines becomes an issue.
There is another point beginners often miss. A pergola can cross from simple open structure into something more regulated if you add a roof-like cover, dense slats, privacy walls, climbing vines that trap snow, or a stretched shade sail that behaves like a wind-catching surface. Once you start adding those features, the loads can change enough that footing depth, beam sizing, and connection details matter more than the average online sketch suggests.
Practical rule: before you buy lumber, confirm local permit requirements, setback rules, and whether your planned pergola is considered an accessory structure, an open pergola, or something closer to a patio cover.
Also call for utility locates before you dig. Underground gas, power, communication, and irrigation lines are not guesses you want to make with a shovel or auger. A simple utility locate can prevent expensive damage and a dangerous accident.
Choose the Best Location in the Yard
A pergola should feel like it belongs to the yard instead of being dropped into it. Look for a spot that connects naturally to the house, patio, garden path, or seating area. If you place it too far from where people already spend time, it may end up looking nice but seeing very little use. If you place it where drainage is poor or where frost heave is common, you may create more maintenance problems than you expect.
Sun and wind matter just as much as appearance. A pergola is usually meant to define shade, but an open pergola does not block midday sun the same way a solid roof does. Think about how the slats will run and what time of day you want the area to feel most comfortable. If your yard gets strong prevailing wind, take that seriously when choosing orientation and anchoring details.
Ground conditions are worth checking early. A level patio edge or compact, well-drained area is easier to work with than a low wet corner of the yard. You can build on sloped ground, but the layout and post height calculations become more demanding. For a first pergola, a reasonably flat location saves time and reduces error.
Materials That Make Sense for a Beginner Build
Most DIY pergolas are built from either pressure-treated lumber or cedar. Pressure-treated lumber is common because it is available, structural, and usually more budget-friendly. It is often the practical choice for posts and load-bearing members, especially when you want straightforward durability. Cedar is popular for appearance and natural resistance to decay, and many homeowners like it for visible rafters and trim.
The important thing is not just the wood species but the full assembly. Outdoor structures need corrosion-resistant connectors, proper post bases, approved fasteners, and hardware suited for treated lumber exposure. A pergola that uses decent lumber but cheap indoor-grade screws is not built correctly. In wet and cold climates, connector quality can determine whether the structure stays tight and aligned over the years.
Here is a typical material list for a basic freestanding pergola:
- 4 pressure-treated or cedar posts, often 6×6 for a sturdier beginner build
- Beam members sized to suit the span, commonly doubled 2×8 or 2×10 boards
- Rafters, commonly 2×6 or 2×8 depending on span and design
- Top slats or purlins, often 2×2, 2×4, or 2×6 depending on look
- Concrete for footings
- Metal post bases and structural connectors
- Structural screws, bolts, washers, and exterior-rated fasteners
- Gravel for drainage at footing bases if appropriate to your design and soil conditions
- Exterior stain or sealant if you want a finished look and added weather protection
If you are using a modular pergola hardware kit, the job can go faster, especially at the beam-to-post connections. These kits are popular because they simplify some of the joinery and alignment. Just remember that a kit does not replace local structural requirements. It only simplifies installation if it is used in a design that actually suits your site and climate.
Tools You Will Likely Need
You do not need a full workshop to build a pergola, but you do need the basics in good working order. A circular saw, drill, impact driver, level, tape measure, speed square, post level, clamps, and ladders are standard. For layout, string line, stakes, and marking paint help a lot. For footings, a shovel or rented auger may be needed depending on soil and local depth requirements.
Accuracy tools are not optional on a project like this. A pergola can look simple, but every small error compounds. A post set slightly off layout can throw off beam alignment, and a beam that is not level can make every rafter cut feel wrong. Take the measuring seriously and use a long level or laser level if you have access to one.
Plan Footings for Frost Depth, Drainage, and Anchorage
The footing work is where the long-term success of a pergola is decided. In cold climates, frost depth matters because shallow footings can move with seasonal freeze-thaw cycles. Once that happens, posts go out of plumb, beams twist, and the whole structure begins to look tired before its time. Check your local requirements for footing depth and do not rely on a generic number from a different climate.
Wind uplift matters too. Research on storm damage has shown that porch and patio-style covers can detach in high winds when anchoring is poor or connectors fail. A pergola might look light and open, but it still catches wind, and accessories can make that worse. Good post bases, proper embedment or anchor systems, and approved hardware are what keep the structure attached to the ground.
If you are building a simple four-post freestanding pergola, the usual sequence is to dig each footing below local frost depth where required, pour concrete, and set post base hardware correctly so that the posts sit above standing water. Keeping wood slightly elevated off concrete helps durability. Drainage around the footing area also matters because water collecting at the base leads to more movement and faster wear.
Lay Out the Pergola So It Is Actually Square
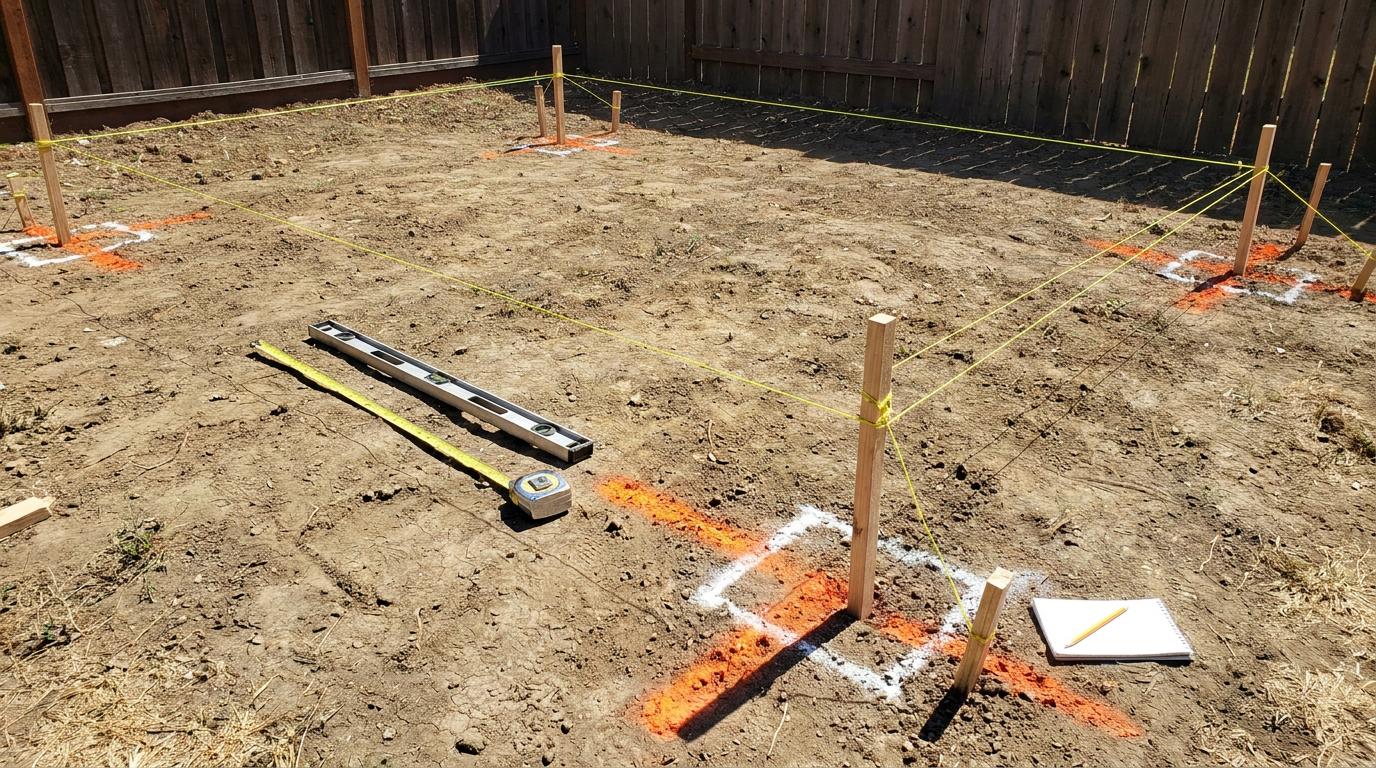
Layout is the part that separates a smooth project from a frustrating one. Start by marking the outer dimensions with stakes and string lines. Measure carefully and check that the placement makes sense in the yard before you commit to digging. Once the rectangle is marked, compare diagonal measurements. When both diagonals match, the layout is square.
This sounds basic, but it is where many beginners lose time. If the footprint is not square, the posts will not line up cleanly, the beam lengths will seem inconsistent, and the rafters will fight you during installation. Spend extra time here and save yourself hours later. A square layout is one of the best favors you can do for the rest of the build.
Mark each post center clearly, then verify spacing again before digging. If the pergola will sit next to a patio, check that the lines are visually parallel to the house or hardscape. A layout can be mathematically square but still look crooked if it is awkwardly positioned relative to nearby surfaces.
Step 1: Dig and Pour the Footings
With layout confirmed, dig the post holes to the diameter and depth needed for your design and local conditions. The exact size depends on span, loads, soil, and code requirements, so do not treat internet dimensions as universal. If your municipality provides guidance for accessory structures, follow that. If not, ask before you pour.
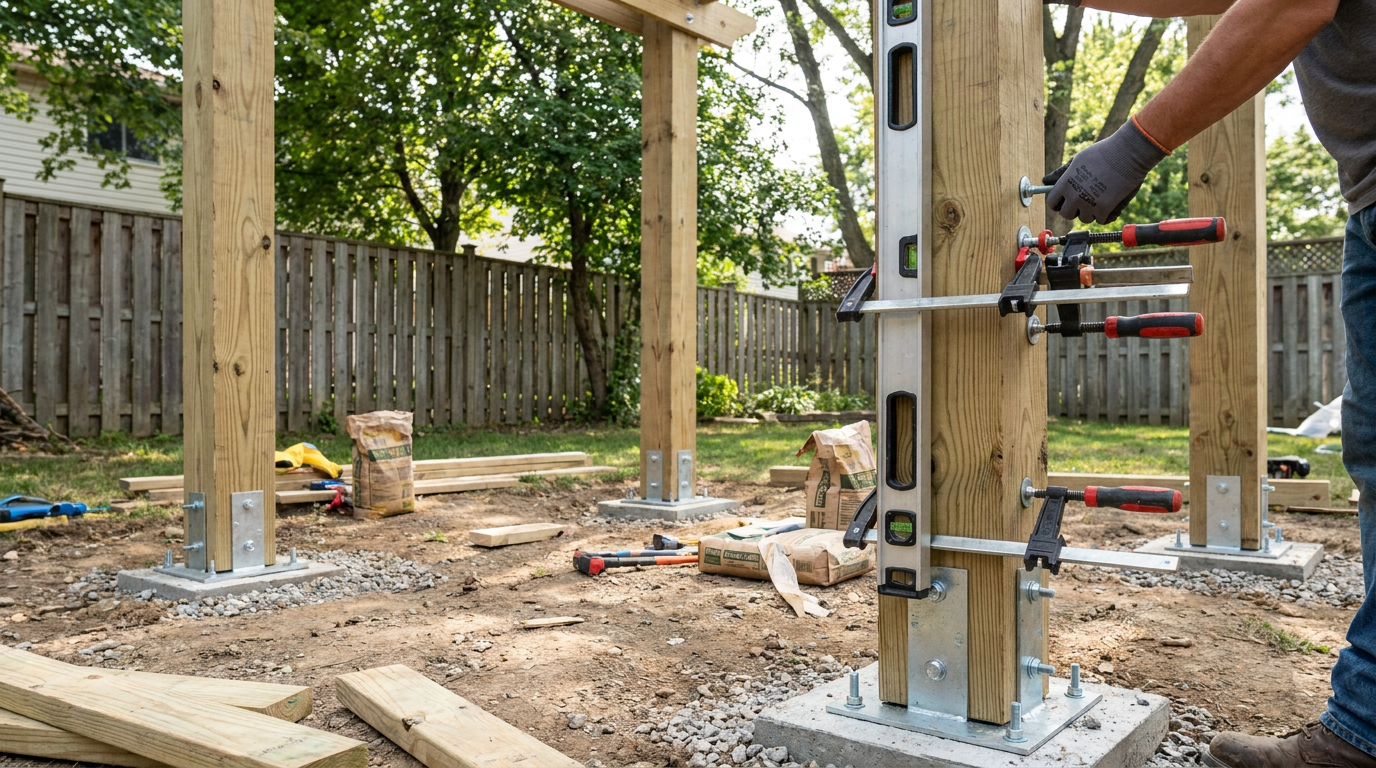
Once the holes are dug, clean out loose soil and prepare the base as required for your footing method. Some builders use a small gravel layer for drainage under certain conditions, but the footing design should suit the soil and local practice. Pour the concrete carefully and place the anchor or post base hardware so it is aligned with the future framing direction. Take your time here because misaligned anchors make every later step harder.
Let the concrete cure properly before loading it. Beginners often rush this step because the visible framing is more exciting than concrete work. The problem is that early loading or poorly placed anchors can leave you with weak or misaligned post connections right from the start.
Step 2: Set and Brace the Posts
After the footings are ready, stand the posts in their bases and plumb them carefully. A 6×6 post is heavier than it looks, so work safely and get help if needed. Use temporary bracing to hold each post steady while you adjust and fasten it. A post level is useful here because it lets you check two faces quickly.
Before fully tightening the hardware, confirm that the posts align with your layout and that opposite posts remain consistent in spacing. Small adjustments are easiest now. Once beams go on, correcting post position becomes much more difficult. If your pergola sits over a patio or paving area with mixed elevations, measure the finished beam height from a consistent reference point instead of assuming the ground is level.
Post height should also be thought through before cutting. A pergola that is too low feels cramped, while one that is too high can lose the sense of enclosure people want. Around 8 feet to the underside of the beams is common, but the right answer depends on your proportions, furniture, and site.
Step 3: Install the Beams
Beams tie the posts together and carry the rafters, so this is structural work, not trim carpentry. In a simple build, the beams may be made from doubled dimensional lumber fastened together and attached to the sides or tops of the posts depending on the design. The exact detail matters because connection strength is part of how the pergola resists load and movement.
Lift one beam assembly at a time, clamp it in place, and check for level before fastening. Use the bolts or structural screws specified for the connection and do not substitute with whatever fasteners are lying around in the garage. Outdoor framing hardware is designed for a reason. It has to resist weather and movement while holding a real load.
Once both beam runs are installed, stand back and sight across the structure. This is a good time to check for visual alignment, confirm post tops are trimmed correctly if needed, and make sure the frame looks consistent from multiple angles. A pergola is simple enough that small visual errors stand out.
Step 4: Add Rafters Across the Top
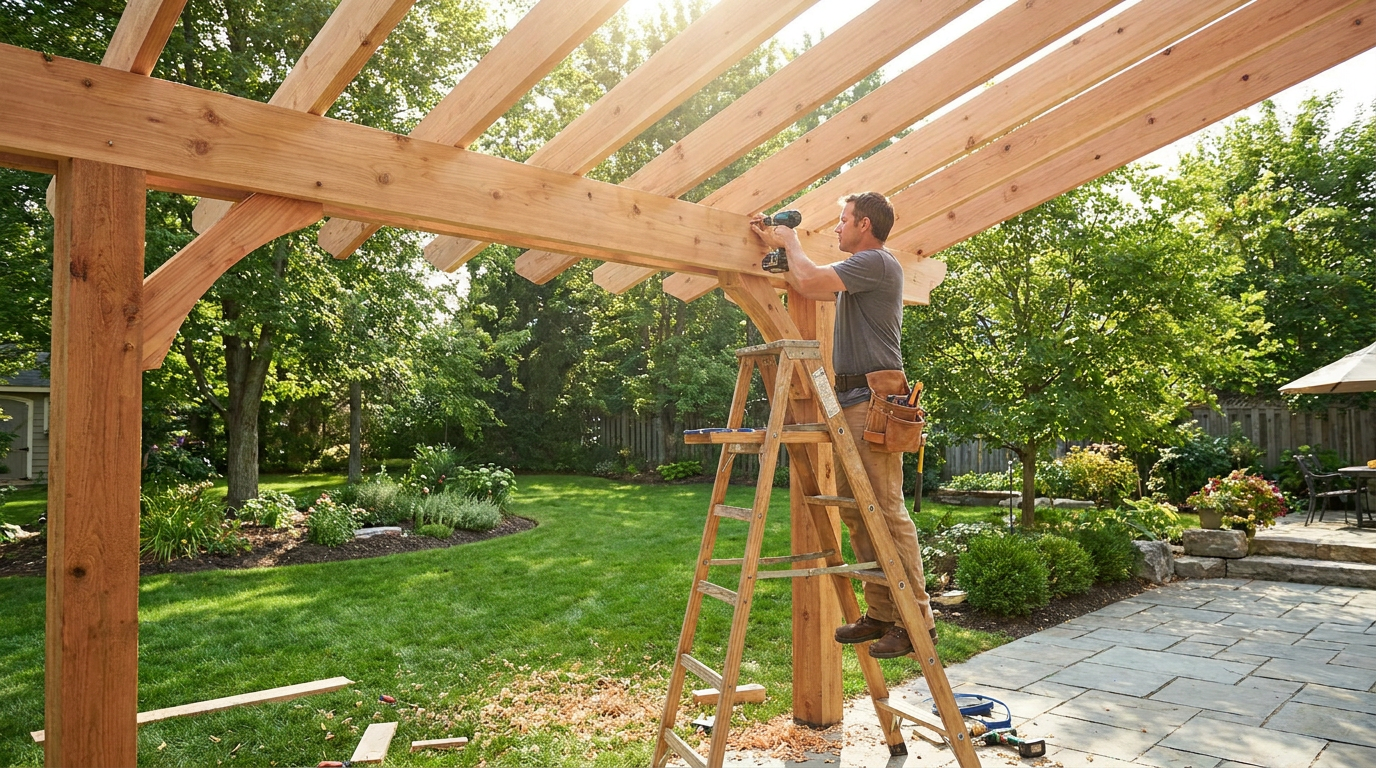
Rafters span from beam to beam and start giving the pergola its finished shape. Mark the rafter layout on both beams so the spacing stays even across the structure. Consistent spacing is one of the things that makes a pergola look professionally built, even when the design itself is plain.
Set the end rafters first, then fill in the field rafters. Check that each one crowns the same way if the lumber has a slight curve, and fasten them with approved connectors or structural fasteners. If you want decorative cut ends, make a template and cut them consistently before installation. Beginners get better results from repeating a clean pattern than from trying to freehand each piece.
Keep in mind that tighter spacing and heavier top treatments can change how the structure behaves in wind and snow. An open pergola with reasonably spaced members is simpler. Once you begin closing in the top or adding coverings, the project starts acting more like a roofed structure and may need stronger design decisions than this basic guide covers.
Step 5: Install Shade Slats or Purlins
The top slats are what give a pergola its character. They can run perpendicular to the rafters and create the classic filtered-light effect most people want. Spacing is mostly a design choice on a basic open pergola, but wider spacing usually feels lighter and keeps snow and debris from collecting as easily as a tighter pattern.
Lay out the slat positions with a spacer block so the gaps stay consistent. This is faster and more accurate than measuring each one separately. Fasten them securely with exterior-rated fasteners and keep the overhangs uniform. Clean repetition is what makes a simple pergola look intentional rather than improvised.
If you think you may want a retractable canopy later, plan for that now. Leave yourself clear, straight framing lines that could accept future hardware. This is one of the best upgrade paths for beginners because you can build the pergola as an open structure first, then add comfort features later once you have seen how the space works in real use.
Step 6: Trim, Sand, and Finish the Structure
After the frame is complete, go back and clean up the details. Trim any uneven post tops, lightly sand rough edges, and remove pencil marks. If you used pressure-treated lumber, check moisture content and product guidance before staining because very wet treated wood often needs time to dry before finish will take properly. Cedar can usually be finished sooner, depending on conditions and the product you choose.
A finish is not just about color. A good exterior stain or sealer can help slow weathering, reduce checking, and make maintenance easier. Pick a product made for exterior wood exposure and follow the application conditions on the label. Rushing finish work on a dusty, damp day usually gives disappointing results.
Do one final hardware check before you call the project done. Look at every bolt, screw, bracket, and connector. Tight, aligned hardware is part of the finished job, not an afterthought.
Common Beginner Mistakes to Avoid
The first common mistake is assuming a pergola is too simple to need planning. It may be simpler than a deck roof or gazebo, but it still needs layout, anchoring, and local approval where required. The second mistake is underbuilding the support system because the top looks open. Open structures still face wind, and climate conditions matter a lot more than a generic backyard photo suggests.
The third mistake is confusing a pergola with a patio cover. A pergola is usually open and slatted. A patio cover behaves more like a roofed structure and often carries different loading and permit expectations. If you add polycarbonate panels, a taut shade sail, or a dense vine canopy, you may be changing the design category in a meaningful way. At that point, snow load and uplift concerns can become much more serious.
The fourth mistake is poor hardware selection. Outdoor structures need connectors rated for the environment and compatible with treated lumber where used. Interior screws, random leftover bolts, and undersized brackets are false economy. You save a few dollars upfront and risk years of movement, staining, corrosion, or outright failure later.
How Weather Affects Your Pergola Design
Weather is the part of the build many online tutorials barely mention, but it is one of the most important factors in real life. In northern climates, frost heave can move shallow footings and throw the structure out of line. In windy areas, uplift and racking forces can stress weak post connections and beam joints. In snowy regions, even a structure that begins as an open pergola can face higher loads if the top is modified or plant growth traps drifting snow.
One practical rule of thumb is this: the more your pergola starts acting like a roof, the more seriously you should treat structural design. That does not mean every backyard pergola needs an engineer, but it does mean that adding coverings and dense features is not just a cosmetic decision. It changes the way the structure handles vertical load and wind pressure.
Keep it beginner-friendly: build an open pergola first, make sure it is well anchored, and add optional accessories only after you understand how those changes affect load, permitting, and maintenance.
Simple Upgrades You Can Add Later
One reason pergolas are so popular is that they are modular. The base structure can be straightforward, and the comfort features can come later. That is a smart approach for a beginner because you can focus on building a strong frame first. Once the pergola has lived through a season, you will know what the space actually needs.
Retractable canopy fabric is a common upgrade because it adds shade without making the pergola feel permanent in the same way a solid roof does. Privacy panels can help if the pergola sits near a property line or overlooks neighboring windows. Lighting is another easy improvement, especially low-voltage or solar options that do not require major wiring changes. Climbing plants can add character too, but remember they add weight, trap moisture, and in some climates can contribute to snow accumulation.
If you know these features are likely in your future, leave room for them in the original design. Straight framing, consistent spacing, and well-placed fasteners make later upgrades much easier and cleaner.
What a Pergola Really Costs
The cost of a pergola depends mostly on size, lumber choice, footing requirements, and hardware quality. A modest open pergola built from pressure-treated lumber will generally cost less than a larger cedar build with decorative cuts and premium finishes. Hardware is one area where beginners are sometimes surprised. Structural connectors, anchor bases, and proper exterior fasteners add up, but they are money well spent.
Site conditions can also push the cost around. Deep frost footings, difficult digging, sloped ground, or a location far from material access all increase effort and time. If you rent an auger, buy extra concrete, or bring in help for lifting beams, those are real project costs too. It is better to budget honestly than to start cutting corners halfway through.
If you want the cleanest path, build the basic frame now and save optional add-ons for later. That keeps the first phase focused and avoids spending heavily on features before you know how the pergola works in your yard.
Maintenance That Keeps the Pergola Straight and Sound
A pergola does not need constant work, but it does need occasional attention. Check it seasonally for loose fasteners, cracking, post movement, and early signs of connector corrosion. If you live in a freeze-thaw climate, take a close look after winter to make sure the structure has not shifted and that water is draining away from the footings as intended.
Wood movement is normal outdoors. Boards can shrink, check, and weather differently based on sun exposure. What you are watching for is not cosmetic change alone but structural change. If a post base loosens, a beam connection opens up, or one corner starts settling, address it early before the problem spreads through the frame.
Refinish as needed based on the wood species, exposure, and the product you used. A pergola that is maintained a little at a time generally stays attractive and serviceable for far longer than one that is ignored until major repairs are needed.
Final Thoughts
Building a backyard pergola is a very doable project for a careful beginner. The shape is simple, the sequence is logical, and the finished result adds real value to how an outdoor space feels and functions. The trick is to respect the parts people do not see in the final photo. Footings, layout, post anchors, hardware, and local code checks are what make the project successful.
If you keep the first build straightforward, a pergola is a solid introduction to outdoor structural work. Choose a sensible size, set it out square, anchor it properly, and resist the urge to overcomplicate the top. A clean open pergola built well will usually serve you better than a more ambitious version built with shortcuts.
In the end, good backyard construction comes down to the same principles as any other build. Plan first, build accurately, use the right materials, and let the structure match the conditions it has to live in. Do that, and your pergola will not just look good on day one. It will keep doing its job for years.
Quick Reference Build Sequence
- Confirm permit rules, setbacks, and utility locates.
- Choose a simple freestanding open pergola design.
- Lay out the footprint with stakes, strings, and diagonal checks.
- Dig and pour footings to the proper local depth and size.
- Install approved post bases and set the posts plumb.
- Attach beams level and secure them with structural hardware.
- Install rafters with consistent spacing.
- Add top slats or purlins for shade and appearance.
- Trim, finish, and inspect all fasteners and connectors.
- Add optional upgrades later once the base structure has proven itself.
If you follow that order and stay patient through the measuring and footing stages, the actual framing work becomes much simpler. That is usually the difference between a pergola that feels like a satisfying DIY project and one that turns into a string of avoidable fixes.


No Comment! Be the first one.