
Step-by-Step Guide to Building Your Own Backyard Patio
A backyard patio is one of those projects that changes how a home feels without changing the house itself. It gives you a dry, stable place to sit, cook, gather, and use your yard with less mud and less wear on the lawn. It also adds practical value because a well built patio creates usable square footage outdoors in a way that feels permanent and finished. For many homeowners, it is one of the most worthwhile DIY outdoor projects they can take on.
Table Of Content
- Why a Proper Patio Base Matters More Than the Surface
- Step 1: Plan the Patio Before You Break Ground
- Step 2: Choose the Right Patio Material for Your Site and Budget
- Step 3: Determine Slope, Drainage, and Finished Height
- Step 4: Mark the Layout and Excavate Properly
- Step 5: Build the Base in Layers and Compact Every Lift
- Step 6: Install Bedding Material the Right Way
- Step 7: Lay Pavers, Slabs, or Stone With Control and Consistency
- Step 8: Cut Edge Pieces Safely and Install Edge Restraint
- Step 9: Fill Joints and Finish the Surface
- Step 10: Check Drainage Around the Patio and Protect the House
- Common Mistakes Homeowners Make When Building a Patio
- How Climate and Soil Change the Way You Build
- How Long It Takes and What Affects the Cost
- Simple Maintenance That Protects Your Work
- Final Thoughts on Building a Backyard Patio Yourself
The part people often underestimate is that a patio is not really about the pavers or slabs on top. The visible surface matters for appearance, comfort, and budget, but the real work happens underneath. If the base is weak, if water has nowhere to go, or if the patio is pitched the wrong way, the finished surface will move, settle, hold puddles, and become a repair project. In colder parts of Canada and across much of North America, freeze thaw cycles make these mistakes show up faster and more severely.
This guide focuses on practical construction, not just design ideas. You will learn how to plan the layout, choose a material that matches your budget and use, excavate to the right depth, build a compacted base, manage drainage, and install the surface so it stays in place. The goal is to make the project approachable for a homeowner while still respecting the parts that determine whether the patio lasts five years or twenty.
One point is worth keeping in mind before you start. Patios are not one size fits all. Soil type, rainfall, snow, frost, and site grading vary a lot by region. Canada alone sees major differences in frost timing, frost free period length, snow depth, and ground conditions. That means your patio plan should reflect your site, not just a generic online diagram. The basic method stays consistent, but the depth of excavation, amount of base material, and drainage details should fit local conditions.
The best looking patio in the neighborhood will still fail if it is built on a weak, wet, or poorly compacted base.
Why a Proper Patio Base Matters More Than the Surface
When homeowners picture a patio project, they usually imagine selecting pavers, natural stone, or concrete slabs. Those decisions matter, but they are not the first technical decisions. What determines durability is the layered system below the finish surface. A good patio needs stable soil, adequate excavation, proper base stone, correct compaction, edge restraint, and a slight slope that moves water away from the home.
Frost heave is one of the biggest reasons patios fail in colder climates. It happens when freezing temperatures, moisture, and frost susceptible soil combine. Water in the ground freezes, expands, and lifts sections of the patio. When thawing comes, the patio may not settle evenly, which leaves dips, rocking pavers, and tripping edges. A well drained granular base helps reduce this risk by limiting trapped moisture and improving stability.
Drainage matters for more than the patio itself. Water that collects near the foundation can contribute to moisture problems around the house. Good grading and a patio slope that directs runoff away from the structure help reduce the risk of water working back toward the home. A patio is not a house foundation, but it absolutely affects how surface water moves around one.
This is also where many common misconceptions cause trouble. You cannot simply place patio stones on bare soil and expect them to stay level. A thin layer of gravel is not always enough. A perfectly level patio is usually not correct near a home because outdoor surfaces should generally slope slightly away to shed water. If you treat base work like an optional step, the finished patio will remind you later why it was not optional.
Step 1: Plan the Patio Before You Break Ground
Start by deciding exactly how the patio will be used. A small sitting area for two chairs needs far less space than a dining area, grill zone, and walkway combination. Think about furniture size, traffic flow, door swings, and how people will move from the house to the yard. It is much easier to adjust a drawing than to shift a built patio.
Measure the area carefully and sketch a simple plan. Mark the house wall, steps, doors, garden beds, fences, and any structures that affect the layout. For a dining patio, leave enough room to pull chairs out comfortably. For a grill area, keep safe clearance around heat sources and circulation space so the patio does not feel cramped when in use.
You should also decide whether the patio will sit close to grade or be slightly raised within the yard. If it ties into an existing door threshold, pay close attention to final surface height so you do not create a step that catches water or becomes awkward to use. The finished patio surface should remain below siding, trim, and weep details where applicable, and it should not block drainage paths already working around the house.
Before you dig, arrange for utility locates. This is non negotiable. Gas, electrical, communications, irrigation lines, and other buried services may run through areas that look clear from the surface. A patio project often involves enough excavation depth to create real risk if you skip this step. Marked utilities also help you decide whether the layout needs to change before the work begins.
Step 2: Choose the Right Patio Material for Your Site and Budget
There is no single best patio material for every backyard. What works well depends on budget, appearance, local climate, and how easy you want future repairs to be. Concrete pavers are a favorite for DIY builds because they are modular, available in many styles, and easier to replace individually if something shifts or stains. They also work well with standard base construction methods that homeowners can learn with reasonable confidence.
Large concrete slabs and natural stone can create a strong visual impact, but they often require more careful handling because each piece is heavier and less forgiving. Natural stone gives a unique look and can be extremely durable, but thickness can vary, which adds time during installation. Poured concrete is another option, though it is a different kind of project and usually less forgiving for DIY work, especially where control joints, finishing, and crack management are concerned.
Permeable paver systems are worth considering if drainage and stormwater management are priorities. These systems allow water to pass through joints into a specially designed base. They can help reduce runoff, but they are not a shortcut. In most cases they require deeper excavation and more carefully graded granular layers than a conventional patio. They also need periodic maintenance to preserve infiltration performance, so they should be chosen for the right reasons, not because they sound maintenance free.
As you compare materials, think about how the patio will age. Modular systems tend to be more repairable. A patio that can be taken up and reset in a small section has a practical advantage over one that is difficult to fix after settlement. In climates with active freeze thaw cycles, this matters. A beautiful material that is hard to repair can become frustrating if the base or site conditions were more challenging than expected.
Step 3: Determine Slope, Drainage, and Finished Height
One of the most important layout decisions is the slope of the patio. Outdoor hard surfaces should generally slope away from the house so water drains off rather than collecting at the foundation. That slope is usually subtle enough that you do not notice it while standing on the patio, but it is enough to keep water moving in the right direction. A dead level patio may look precise during installation, but if it traps water, it is not built correctly.
Use stakes, string lines, and a line level or laser level to establish the finished elevation. Measure from a fixed point at the house and plan the slope out toward the yard. If the site naturally drains back toward the house, you may need to modify grading beyond the patio area or create a drainage path such as a swale. The point is to make sure runoff leaves the patio and does not simply move to another problem spot.
Climate resilient thinking matters here. Weather patterns are changing, and heavy rain events can put more stress on site drainage than older rules of thumb assumed. Building in better slope control, stronger edge restraint, and more reliable drainage now is simply smart future proofing. A patio should not just survive a calm summer. It should keep performing during wet periods, winter freeze cycles, and seasonal shifts in soil moisture.
As you set the height, remember all the layers that must fit below the final surface. The visible top of the patio is only the end of a stack that may include geotextile fabric, several inches of compacted granular base, bedding material, and the surface units themselves. If you do not account for those layers now, you may end up with a patio that sits too high against the house or too low compared to the surrounding yard.
Step 4: Mark the Layout and Excavate Properly
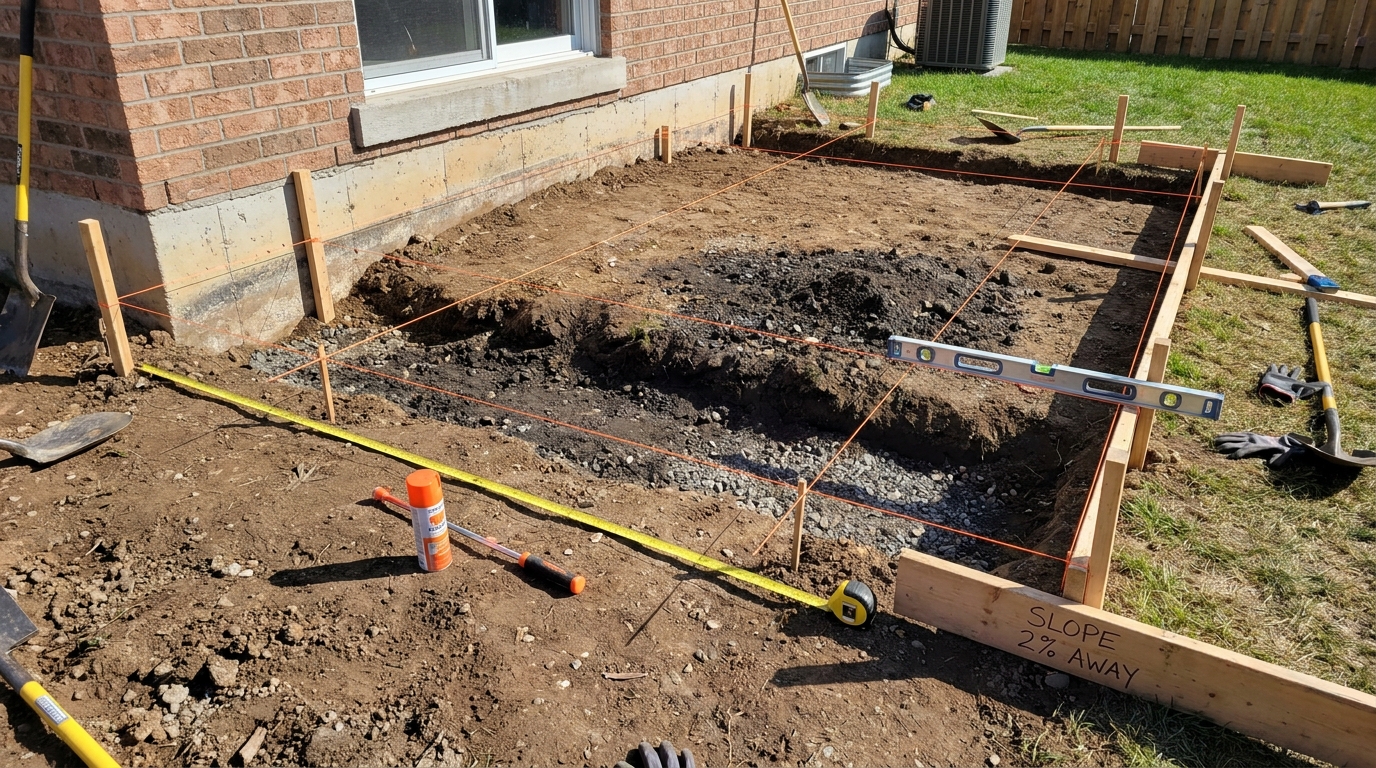
Once the plan is set, mark the patio perimeter with stakes, string, and marking paint. Double check dimensions diagonally if the layout is rectangular, because equal diagonal measurements confirm that corners are square. Curved patios require flexible marking methods, but the principle is the same. You want a clearly defined footprint before excavation begins.
Excavation should remove sod, roots, and organic topsoil until you reach firm subgrade. Organic material is unstable and should never remain under a patio. It decomposes, shrinks, and holds moisture. If you build over it, the patio will settle unevenly no matter how nice the pavers look on day one.
The required depth depends on your material thickness, bedding layer, and base thickness, which in turn depends on your soil and climate. Areas with heavy clay, poor drainage, or severe freeze thaw exposure often benefit from deeper excavation and a more substantial granular base. In practical terms, do not copy the shallowest patio detail you see online and assume it applies to your yard. Local conditions drive the depth, especially in regions with frost concerns.
After rough excavation, check the subgrade for soft spots. If some areas feel spongy underfoot or pump water, they need attention before you proceed. You may need to remove additional unsuitable material and replace it with compactable granular fill. This is also the stage where geotextile fabric can be useful, especially over weaker soils, because it helps separate the subgrade from the granular base and reduces mixing over time.
Step 5: Build the Base in Layers and Compact Every Lift
This is the step that separates a durable patio from one that starts moving after the first winter. The base should be made from appropriate granular material placed in layers, often called lifts, and compacted thoroughly before the next layer goes down. Dumping the full base depth into the hole at once and compacting only the top does not achieve the same result. The lower material stays loose, and the patio ends up settling later.
Spread the base stone in even lifts according to the capacity of your compactor and the type of aggregate being used. Then compact each lift methodically, overlapping passes until the surface firms up. Keep checking your elevations and slope as you build. It is much easier to correct grade within the base than after the pavers are installed.
In wet sites or frost prone areas, this layered and compacted base is especially important. Frost heave needs moisture and susceptible conditions to do damage. A better draining granular structure helps reduce trapped water and improves load distribution. It does not eliminate all site movement under every condition, but it gives the patio a far better chance of staying flat and serviceable.
Edge planning matters during base work too. The patio perimeter should have room for edge restraint that locks the field of pavers or slabs in place. Without good edge restraint, the surface can creep outward under foot traffic, weather, and seasonal movement. A patio is a system, not a pile of stones. Each part supports the rest.
Step 6: Install Bedding Material the Right Way
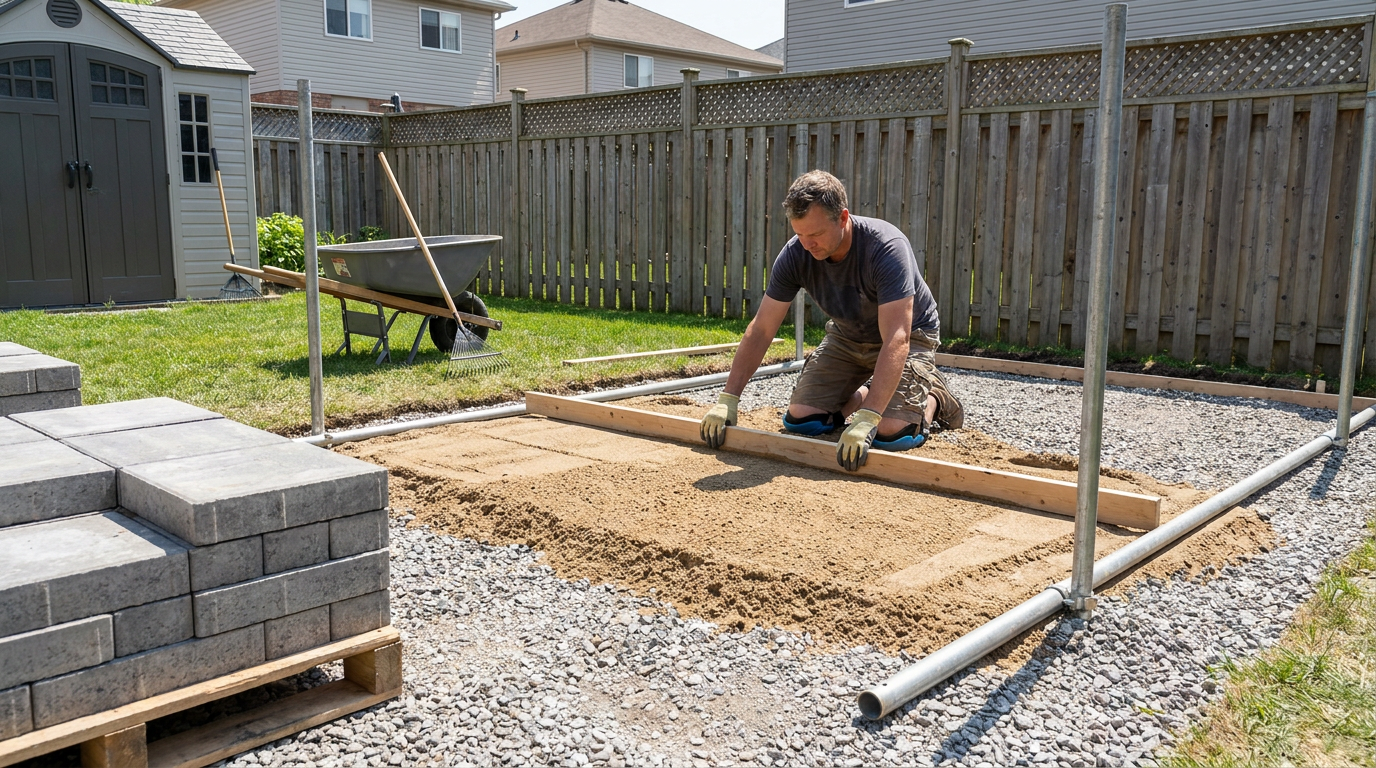
After the compacted base reaches the correct height and slope, the next layer is the bedding material. For many paver patios, this is a thin, screeded layer used to create a uniform bed for the units. The key point is that bedding material is not there to make up for a poor base. It is a setting layer, not a structural fix.
Set screed rails or guides and pull a straight board across them to create a smooth, consistent surface. Work in sections and avoid walking on freshly screeded bedding any more than necessary. If you disturb an area, re screed it instead of trying to patch it by eye. Consistency at this stage helps the pavers sit evenly and reduces later lippage.
Keep the bedding thickness within the intended range for your system. Too thick and it can compress unevenly. Too thin and it becomes difficult to bed the pavers properly. Follow the material manufacturer recommendations where applicable, but the broad principle remains the same. The strength comes from the compacted base below, while the bedding layer provides uniform support at the surface interface.
Do not drag bedding over muddy, wet, or contaminated areas. If rain interrupts the work and damages the screeded surface, pause and restore it before laying pavers. This may feel tedious when you want to keep moving, but a rushed bedding layer often shows up later as uneven spots that are hard to ignore once the patio is complete.
Step 7: Lay Pavers, Slabs, or Stone With Control and Consistency
Begin laying from a straight reference edge or a corner that keeps your pattern aligned. Work outward while checking line and spacing frequently. Avoid sliding pavers across the bedding layer because that can disturb the surface under them. Set each unit carefully, maintaining consistent joint widths and keeping the pattern true as you move across the patio.
For modular pavers, pulling from multiple pallets at once helps blend slight color variations so the final patio looks more natural. Check alignment every few rows with a string line or straight edge. Small errors can build up quickly. What looks like a minor drift at the start can become a visible problem by the far edge of the patio.
If you are laying irregular natural stone, expect slower progress. You will spend more time rotating pieces, checking fit, and managing variable thickness. This is one reason many homeowners choose concrete pavers for a first patio project. The modular format speeds the work and gives more predictable results when you are learning as you go.
Leave edge cuts for the right stage in the process rather than trying to force full units into a shape they do not fit. A patio usually looks best when cut pieces are planned neatly and kept to practical sizes. Very small slivers at the edge are weak and unattractive. Sometimes shifting the layout slightly earlier can avoid awkward cuts later, which is another reason to dry plan carefully.
Step 8: Cut Edge Pieces Safely and Install Edge Restraint
Most patios need cut pieces around the perimeter unless the layout dimensions happen to match the paver module exactly. Mark cuts clearly and use the right tool for the material. Wear proper eye, hearing, and dust protection. Cutting can be one of the messier parts of the build, so give yourself enough space and time to work carefully rather than rushing through it.
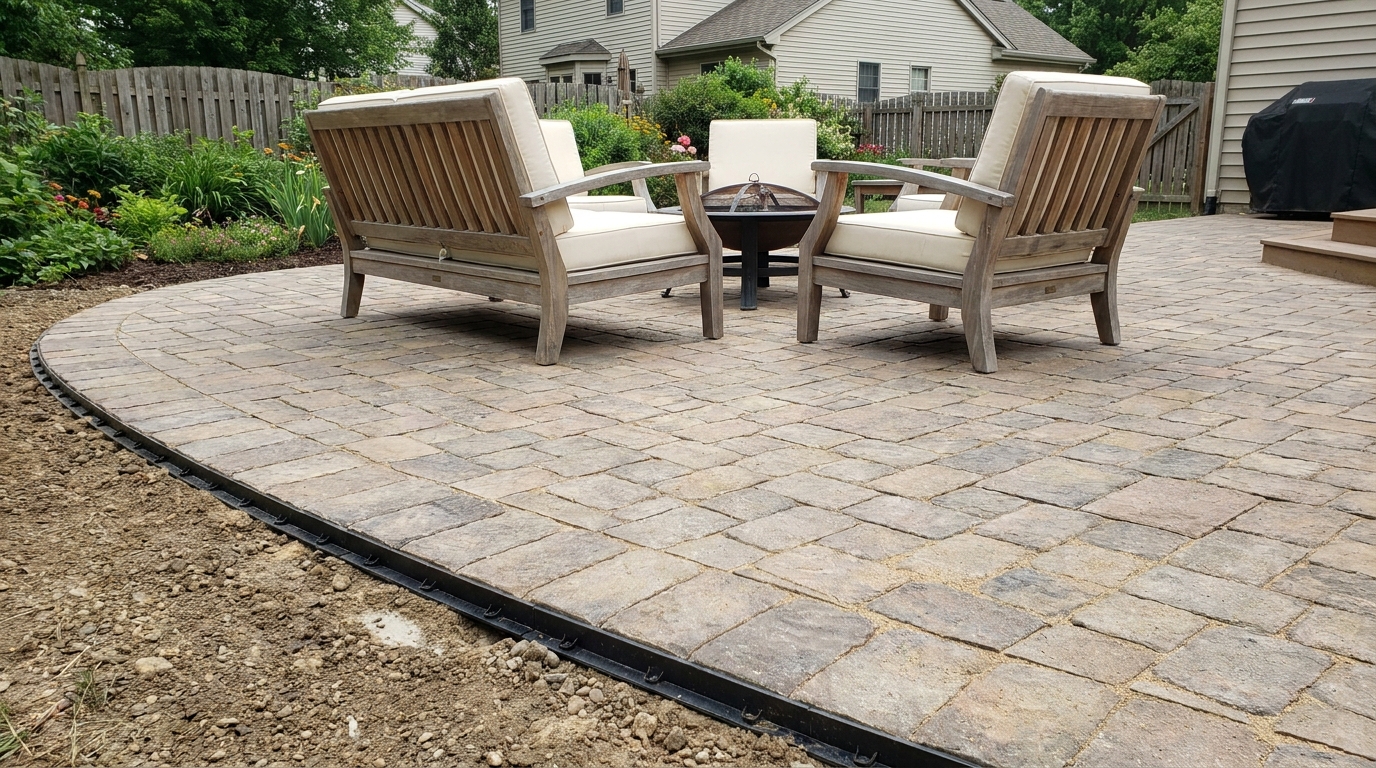
Once the field is laid and edge pieces are fitted, install edge restraint according to the patio system you are using. This step is often overlooked by first time builders because it seems less important than the visible surface. In reality, edge restraint is what helps keep the patio locked together. It resists spreading at the perimeter and supports the pattern under seasonal movement and daily use.
A patio without proper edge restraint may look fine right after installation. The problem is that movement often starts gradually. Joints open, the perimeter shifts outward, and individual units begin to lose confinement. By the time the issue is obvious, repairs are more involved than they would have been if the edges had been secured correctly from the start.
This is also a good point to look over the entire surface for line, spacing, and overall plane. Minor adjustments are much easier before the joints are filled and the patio is compacted into final position. Slow, careful checks here save a lot of frustration later.
Step 9: Fill Joints and Finish the Surface
After the pavers are in place and the edge restraint is installed, sweep the selected joint material into the joints. The exact product depends on the system, but the basic goal is to fill the gaps and help interlock the surface. Work the material thoroughly into the joints rather than assuming one quick pass is enough. Incomplete joints reduce stability and can allow more movement.
For conventional paver systems, follow the manufacturer instructions for any specialized jointing product. Some materials require dry conditions and careful activation. Others are simpler but still need proper compaction and sweeping. Whatever you use, read the instructions before opening the bag. Many finishing problems come from skipping the basics during the last ten percent of the job.
Compact the patio surface as appropriate for the material, often with a protective pad on the compactor to avoid scuffing. This helps seat the pavers into the bedding layer and settle the joint material. Then sweep in more jointing material if needed until the joints are properly filled. The patio should feel firm underfoot, not loose or rattling.
Finally, clean the surface and inspect drainage with a hose if conditions allow. Water should move off the patio without forming stubborn puddles. A quick water test can reveal low spots while the project is still fresh in your mind. If something needs minor correction, now is the time to deal with it.
Step 10: Check Drainage Around the Patio and Protect the House
Once the patio is finished, step back and look at the broader site, not just the paving itself. Where will roof runoff go during a heavy rain? Are downspouts discharging onto or beside the patio in a way that could wash out joints or overload the edge? Does water have a clear path away from the house after it leaves the patio surface? These questions matter because a patio is part of the drainage system around the home whether you planned for it or not.
If necessary, extend downspouts, adjust nearby grade, or shape the surrounding landscape to keep water moving away from the foundation. Surface improvements that direct water properly are often cheaper and simpler than dealing with moisture problems later. The patio should complement foundation moisture management, not interfere with it.
This is especially important in places that see repeated freeze thaw cycles. Water sitting at the patio edge or against the house can work into joints, saturate adjacent soil, and increase the potential for movement or moisture issues. A little attention to runoff now supports both the patio and the building over the long term.
Good drainage is one of the clearest examples of practical craftsmanship. It is not flashy, but it shows in how a project performs year after year. Homeowners often focus on color and pattern first. Experienced builders usually look at slope and water first for a reason.
Common Mistakes Homeowners Make When Building a Patio
The first common mistake is underestimating excavation and base depth. People want to save time, effort, or gravel, so they dig shallow and hope the patio will settle into place. It does settle, but not in a good way. Thin bases are vulnerable to rutting, rocking units, and frost movement, especially where soils are clay heavy or moisture stays high.
The second mistake is treating the patio like an interior floor and aiming for perfect level. Outdoors, level can be wrong. A slight slope away from the house is usually necessary, and ignoring that can create ponding or direct water toward the foundation. A patio can feel flat to users while still being properly pitched for drainage.
The third mistake is poor compaction. Base stone must be compacted in lifts, not just dumped and flattened. If the lower layers remain loose, they compress later under traffic and weather. That delayed settlement is one of the most frustrating failures because the patio looked fine when the tools were put away.
Another common mistake is assuming permeable pavers solve all drainage problems automatically. They can be a strong choice in the right setting, but they still require thoughtful excavation, proper aggregate layers, and maintenance to keep the system functioning. They are a designed drainage approach, not a magic product.
How Climate and Soil Change the Way You Build
Regional climate matters more than many DIY guides admit. Canada has major differences in frost timing, snow depth, frost free periods, and even permafrost conditions in some areas. A shallow patio detail that works in a mild region may not perform well in a colder inland climate with stronger frost action. That does not mean every homeowner needs an engineer for a patio, but it does mean local judgment matters.
Soil matters just as much. Granular, well draining soils behave differently from silty or clay rich soils that hold moisture. Because frost heave depends on freezing temperatures, moisture, and frost susceptible soil, the same patio build can perform very differently from one yard to another. If your site stays wet, drains poorly, or has a history of movement, give the base and drainage extra respect.
Homeowners in northern and prairie climates should be especially cautious about base design and water management. Long winters and repeated freezing can punish shortcuts. Wet coastal or low lying areas may put more pressure on drainage and base separation. In every case, matching the build to actual site conditions is more reliable than trying to force a standard detail onto an unsuitable location.
This is where climate resilient construction becomes practical rather than abstract. Better drainage, stronger edge restraint, appropriate materials, and enough base depth are not overbuilding. They are sensible decisions that make outdoor projects more durable under changing weather patterns and seasonal stress.
How Long It Takes and What Affects the Cost
For a homeowner working weekends, a modest patio may take several days to a couple of weekends depending on size, access, weather, and cutting complexity. Excavation and base work usually take longer than expected. Laying pavers is often the part people look forward to, but it comes only after the hard groundwork is done correctly.
Cost depends on material choice, excavation depth, base thickness, tool rental, disposal fees, and whether the site has access issues. Premium pavers or natural stone raise the material budget quickly, but a deeper base and drainage upgrades can also add significant cost. That is money well spent when it addresses the conditions that would otherwise cause early failure.
Permeable systems typically cost more because they often require deeper excavation and more granular material. They can provide drainage benefits that justify the extra work, but homeowners should go into that choice with realistic expectations. Conventional patios can also perform very well if slope, runoff, and base preparation are handled properly.
If you are trying to control cost, resist the temptation to cut the invisible parts first. Saving money by reducing base quality is usually false economy. It is cheaper to install the right structure once than to rebuild a patio that moved because the hidden work was not adequate.
Simple Maintenance That Protects Your Work
A well built patio is low maintenance, but it is not no maintenance. Sweep debris regularly so organic matter does not collect in joints and support weed growth. Refill joints when needed, especially after the first season if some settling occurs. Keep nearby drainage working so water does not begin undermining the edges or saturating the base area.
If individual pavers settle or rock slightly over time, modular patios offer a real advantage because repairs are usually localized. You can lift the affected area, correct the bedding or base, and reinstall the units. That repairability is one reason pavers are such a practical choice for homeowners compared to monolithic surfaces.
Watch the perimeter as the seasons change. Edge movement, washout, or standing water near the patio can be early signs that site drainage needs attention. Small corrections made early are easier than waiting until broad sections become uneven. A few minutes of observation after a heavy rain can tell you a lot about how the patio is really performing.
In colder climates, avoid using harsh methods that can damage the surface during winter care. Use products and tools appropriate for your patio material. The goal is to get many years from the build, and good maintenance habits support the quality of the installation you worked hard to achieve.
Final Thoughts on Building a Backyard Patio Yourself
Building your own backyard patio is absolutely achievable for many homeowners, and it is one of the more satisfying outdoor projects because the result is useful right away. You can see the value every time you sit outside, cook for family, or walk across a clean, stable surface instead of wet grass. The key is to approach the job as a construction project, not just a decorating project.
If you remember only one lesson from this guide, let it be this: the base and drainage decide whether the patio lasts. Material selection matters, pattern matters, and neat cuts matter, but none of them can compensate for poor excavation, weak compaction, or water trapped where it does not belong. That is the practical side of craftsmanship, and it is what separates a patio that performs from one that disappoints.
Take the time to plan the layout, confirm utilities, set proper slope, excavate thoroughly, compact the base in layers, and finish the edges with care. Match the build to your local climate and soil conditions rather than assuming every backyard behaves the same way. When you do that, you are not just building a patio. You are building a surface that works with the site, protects the house, and stands up better to real weather.
Done right, a DIY patio does more than save labor cost. It gives you a better understanding of how your property handles water, how ground conditions affect construction, and why good workmanship starts below the surface. That knowledge pays off long after the last paver is set.


No Comment! Be the first one.