



How to Build Custom Built-In Storage for Any Room
Custom built-in storage is one of the best ways to make a home feel more useful, more organized, and more finished. It solves a practical problem first, which is where to put everyday things without filling a room with loose furniture and plastic bins. When built-ins are planned well, they can turn an awkward alcove into productive storage, give a plain wall a purpose, and make a smaller room work like a larger one. That is why this kind of project keeps showing up in home renovations, from mudrooms and home offices to closets, bathrooms, and living rooms.
Table Of Content
- Why Built-In Storage Makes Sense in Real Homes
- Start With the Right Type of Built-In
- Measure the Room Like the Project Depends on It, Because It Does
- Choose Materials That Stay Stable
- Tools You Actually Need
- Design Around Real Function
- Useful Dimensions to Consider
- Build a Solid Base First
- How to Build the Cabinet Boxes or Carcasses
- Face Frames, Frameless Boxes, and Trim
- Anchoring and Load Capacity Are Non-Negotiable
- Step-by-Step Build Process for a Typical Wall Built-In
- Room-by-Room Built-In Ideas That Work
- How to Save Money Without Making the Project Cheap
- Common Mistakes to Avoid
- When to Call a Pro
- Finishing Details That Make Built-Ins Look Custom
- Final Thoughts
The good news is that built-ins do not have to mean expensive custom millwork from a specialty shop. Many of the best DIY built-ins are really straightforward carpentry projects made from cabinet-grade plywood, solid wood trim, basic fasteners, and careful measuring. The difference between a project that looks homemade and one that looks intentional usually comes down to layout, alignment, fastening, and finish work. If you take your time and respect the structure behind the wall, you can build storage that looks tailored to the room and costs far less than a fully outsourced install.
This guide is built around the practical side of the work. We will cover how to choose the right type of built-in for your room, how to measure and plan around studs, what materials are worth paying for, how to build the boxes, how to anchor everything safely, and how to finish the project so it actually looks built in. The goal is not to make this seem easier than it is. The goal is to show you a realistic path that a careful homeowner can follow with good results.
The smartest built-ins start as space-planning projects, not woodworking projects. Before you cut a single panel, you need to know what the unit must store, how much weight it must hold, where the studs are, and whether the wall has electrical, plumbing, or code limits that affect the design.
Why Built-In Storage Makes Sense in Real Homes
Storage is not just a nice feature anymore. It is one of the most wanted parts of home design because homes are being asked to do more with the same square footage. Laundry rooms, pantry cabinets, linen closets, mudroom storage, and garage organization remain high priorities because people want cleaner rooms and easier routines. A built-in is often the best answer when standard furniture wastes wall space or does not fit the room properly.
There is also a cost argument. A well-planned built-in can replace several store-bought pieces while using space more efficiently. Instead of buying a bookcase, a cabinet, a bench, and wall shelves, you can often build one unit that does all four jobs and fits your exact dimensions. That makes built-ins especially useful in smaller homes, older homes with odd layouts, and multipurpose rooms where every inch matters.
Built-ins also help with resale appeal because they read as intentional improvements rather than temporary storage. Buyers tend to notice organized entryways, practical laundry storage, functional offices, and finished media walls. Even if you are building primarily for your own use, it is worth knowing that sensible storage upgrades are aligned with broader remodeling demand. That matters if you want your work to improve daily life now and still make sense later.
Start With the Right Type of Built-In
Not all built-ins need the same level of complexity. One of the most common mistakes is trying to build a high-end cabinet shop project when the room really only needs a simple box-and-trim solution. If you match the construction method to the function, the project becomes more affordable and more achievable. In most homes, built-ins fall into a few practical categories.
The first is the shelf-and-panel built-in. This is a good option for alcoves, office walls, niches, and simple open storage. It may include vertical side panels, fixed shelves, adjustable shelves, and a face trim package that hides the rough edges and gaps. It is one of the easiest ways to get a custom look without complicated joinery.
The second is the cabinet-box built-in. This method uses separate plywood carcasses for base cabinets, tall towers, or upper units, then ties them together with filler strips, trim, and a continuous top. It is ideal for media centers, home office walls, pantries, laundry rooms, and mudroom storage. In many ways, this is the most flexible route because each box can be built and installed in sections.
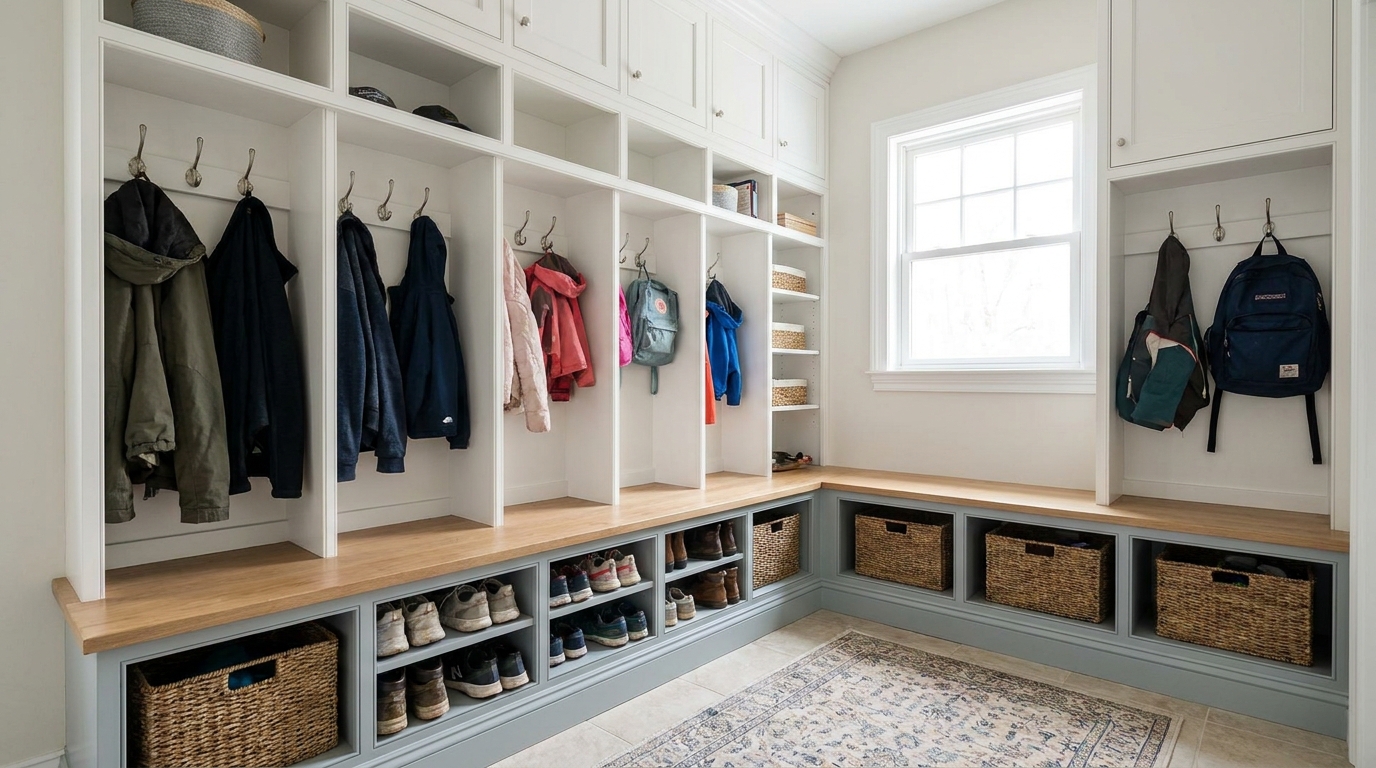
The third is the bench or cubby built-in. This is common in entryways, mudrooms, under windows, and kids’ rooms. It combines seating with shoe storage, baskets, drawers, or lift-up compartments. Because these units deal with daily wear and heavier point loads, they need solid framing and proper anchoring.
The fourth is the hybrid built-in, where store-bought cabinets or modular components are used as the base and then customized with tops, side panels, trim, and shelving. This is one of the best cost-saving strategies for homeowners. It saves time on box construction and lets you put your effort into fit, finish, and room-specific details.
Measure the Room Like the Project Depends on It, Because It Does
Before materials, before tools, and definitely before cutting, measure the room carefully. Start with the overall wall width and ceiling height, then check the floor for level and the wall corners for plumb. In older homes especially, a wall that appears straight can be out enough to create visible gaps if you build everything to perfect shop dimensions. Built-ins need to fit the room you have, not the room you wish you had.
Find the studs next. In North American wood-frame construction, studs are commonly spaced 16 inches on center in many walls, especially exterior walls, but you should never assume layout without confirming it. Use a stud finder, verify by tapping and checking outlet locations, and mark each stud clearly across the project area. The stud layout affects where you can safely anchor shelves, cabinets, and cleats, and it may influence the spacing of vertical dividers or cabinet seams.
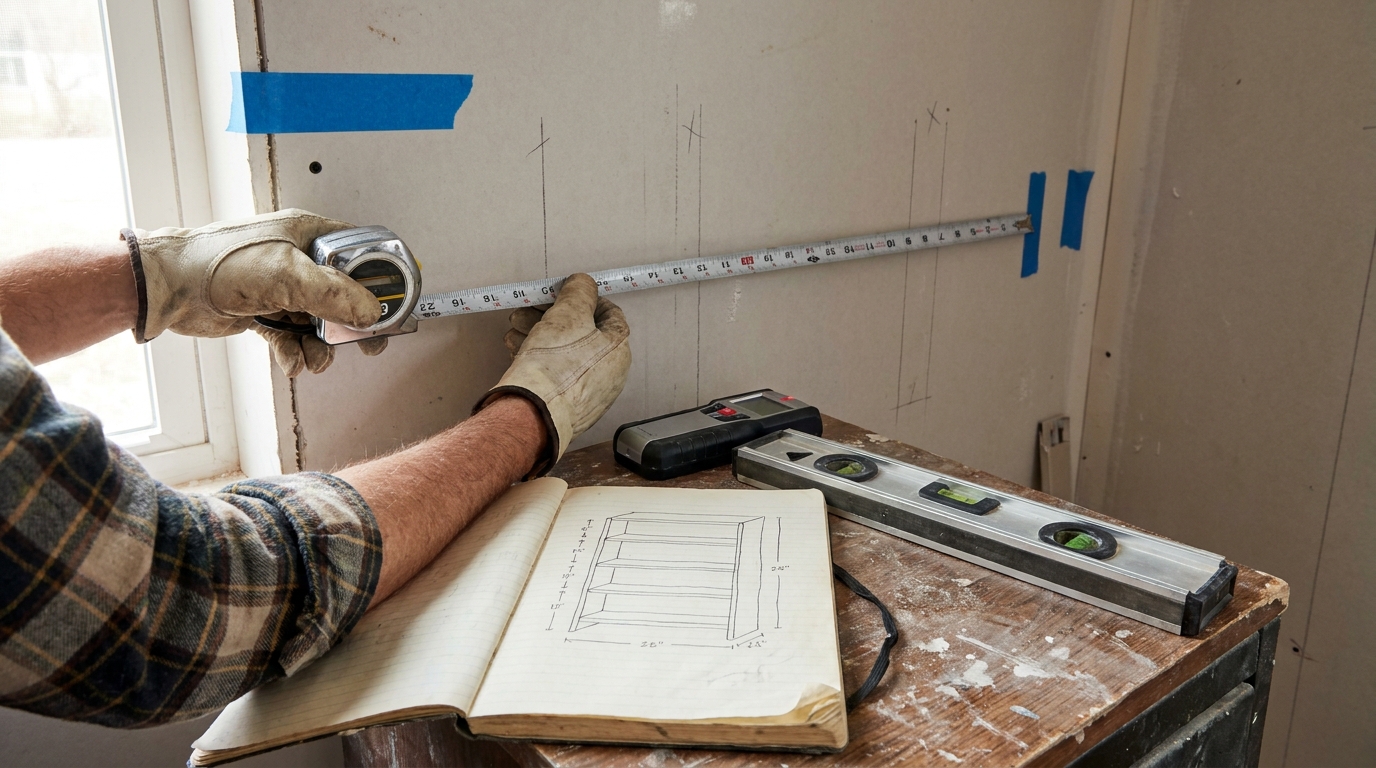
While you are measuring, identify anything hidden in or on the wall that could affect the project. Outlets, switches, HVAC vents, baseboard heaters, return air grilles, plumbing lines, low windows, and access panels all matter. If your built-in may interfere with egress, electrical work, fire blocking, or structural elements, check local code requirements before you proceed. Code requirements vary by province, territory, municipality, and state, so a quick local check is smarter than guessing.
Once you have the wall dimensions, make a scale sketch. Include total width, height, depth limits, stud locations, outlet positions, and the size of whatever you plan to store. Books, vacuum cleaners, printer paper, sports gear, pantry items, media equipment, and laundry supplies all need different clearances. A built-in works best when the storage dimensions are driven by actual use rather than generic shelf spacing.
Choose Materials That Stay Stable
Material choice matters more in built-ins than many first-time DIYers expect. Shelving and cabinets use wide panels, and wide panels will show movement, sagging, and surface defects if you use unstable stock. That is why cabinet-grade plywood is usually the best starting point for the carcass. It is flatter, more dimensionally stable, and easier to finish cleanly than low-grade sheet goods. For painted built-ins, birch or maple plywood is often a solid balance of quality and cost.
Moisture control is a real quality issue in millwork and cabinetry. Kiln-dried lumber is worth paying attention to because wood that is not properly dried can move, twist, cup, or shrink after installation. If you bring plywood or trim into the house from a cold garage or a humid yard and build immediately, you increase the risk of later movement. Let materials acclimate to interior conditions before cutting and assembly, especially for large panels and face frame stock.
For visible edges and trim, solid wood, hardwood plywood edge banding, or paint-grade trim can all work depending on the design. Painted built-ins usually use a combination of plywood, poplar or similar paint-grade wood, and MDF trim in low-moisture areas. In bathrooms, laundry rooms, basements, and other humidity-prone spaces, use materials that can handle those conditions and prime all surfaces thoroughly. Durability starts before the first coat of paint.
Hardware quality matters too. Drawer slides, hinges, shelf pins, hanging rods, and pulls take daily abuse. Cheap hardware can make a well-built box feel flimsy. You do not need luxury-grade hardware for every project, but you do need hardware rated for the load and the use. If a shelf will hold books, dishes, or tools, choose support methods and thicknesses that respect weight, not just appearance.
Tools You Actually Need
You can build many custom built-ins with a moderate DIY tool set. The exact list depends on your design, but the core tools are practical and common. A circular saw with a straightedge guide or a track saw is useful for breaking down plywood accurately. A miter saw helps with trim and repeated crosscuts. A drill and driver, clamps, a level, a good tape measure, a stud finder, a square, and a sander cover much of the rest.
If you want cleaner and faster cabinet assembly, a pocket hole jig can help, especially for face frames and some carcass connections. A brad nailer is useful for trim, back panels, and light assembly, though it is not a substitute for structural screws. A jigsaw can help with notches around baseboards or outlets, and a router is helpful for edge treatment or dadoes if you want more refined joinery. None of these tools replaces good layout. Accuracy on simple cuts beats fancy tools used carelessly.
Safety gear is not optional. Wear eye protection, hearing protection, and a dust mask or respirator when cutting sheet goods and sanding. Support plywood fully when cutting to avoid binding and kickback. If the unit is tall or heavy, have help during lifting and installation. Most accidents on projects like this happen during cutting and handling, not during the easy-looking finish phase.
Design Around Real Function
The best built-ins are specific. A media wall should fit the actual television, speaker clearance, and cable route. A mudroom should fit the number of people in the house and the actual size of boots, backpacks, and coats. A linen tower should be based on folded towel depth and basket sizes, not random shelf spacing. When homeowners skip this step, they often end up with storage that looks good in photos but wastes capacity in daily life.
Depth is one of the biggest design decisions. Shallow storage works well for books, display items, folded linens, and office supplies. Deeper storage is better for pantry goods, vacuum storage, bins, and media components. Very deep shelves can become clutter traps if they are not designed for large items. If you are unsure, mock up the depth with boxes or painter’s tape on the floor before committing to a layout.
Think about open versus closed storage early. Open shelves are cheaper and easier to build, but they demand tidier habits and collect dust. Lower cabinets hide mess and are often better for family rooms, entryways, and kids’ spaces. A good balance in many rooms is closed storage below with open shelving above. That gives you function without turning the unit into a wall of visual noise.
Useful Dimensions to Consider
- Base cabinet depth often falls around 12 to 24 inches depending on use.
- Bookshelves commonly work well around 10 to 12 inches deep for standard books.
- Bench height is often around 17 to 19 inches depending on cushion or shoe use.
- Upper shelves should remain reachable unless they are for seasonal storage only.
- Long shelves need thicker material, a front edge stiffener, or intermediate supports to limit sagging.
These are not fixed rules, but they are practical starting points. The exact dimensions should be driven by the room, the items being stored, and the visual balance of the wall. It is better to build a slightly simpler unit that functions well than a more elaborate one that fights the space.
Build a Solid Base First
A lot of built-ins start with a base platform, especially when using lower cabinets, benches, or full-wall units. The base brings everything to a consistent level plane even if the floor is not perfectly flat. This matters because if the first part of the project is out of level, every cabinet, shelf, and trim line above it will show the error. A simple base made from straight lumber or plywood strips can save a lot of trouble later.
Set the base back slightly from the face of the finished unit so the toe kick or front trim can cover it cleanly. Shim the platform until it is level in both directions, then fasten it securely where appropriate. Recheck for twist, not just level, especially on wider runs. Taking ten extra minutes here is usually worth more than an hour of adjustment later.
If your built-in runs wall to wall, plan how the side panels will meet uneven drywall. Scribing filler strips or end panels is often cleaner than trying to force a perfect rectangular box into an imperfect opening. Professional-looking built-ins usually account for imperfect walls instead of pretending they do not exist. That is one of the main differences between custom-looking work and rushed work.
How to Build the Cabinet Boxes or Carcasses
For most DIY projects, separate carcasses are easier to manage than one massive unit. Build the lower cabinets, towers, or shelf boxes as individual sections, then install and connect them on site. This approach is easier to transport, easier to square during assembly, and much more forgiving if the room is slightly out. It also allows you to complete part of the project now and add more later if the budget is tight.
Cut all panels accurately and label them before assembly. Keep left and right sides paired, and double-check any pieces that need outlet cutouts or notches around trim. A square cabinet starts with square cuts. If your cuts wander, you will spend the rest of the build hiding gaps and fighting alignment.
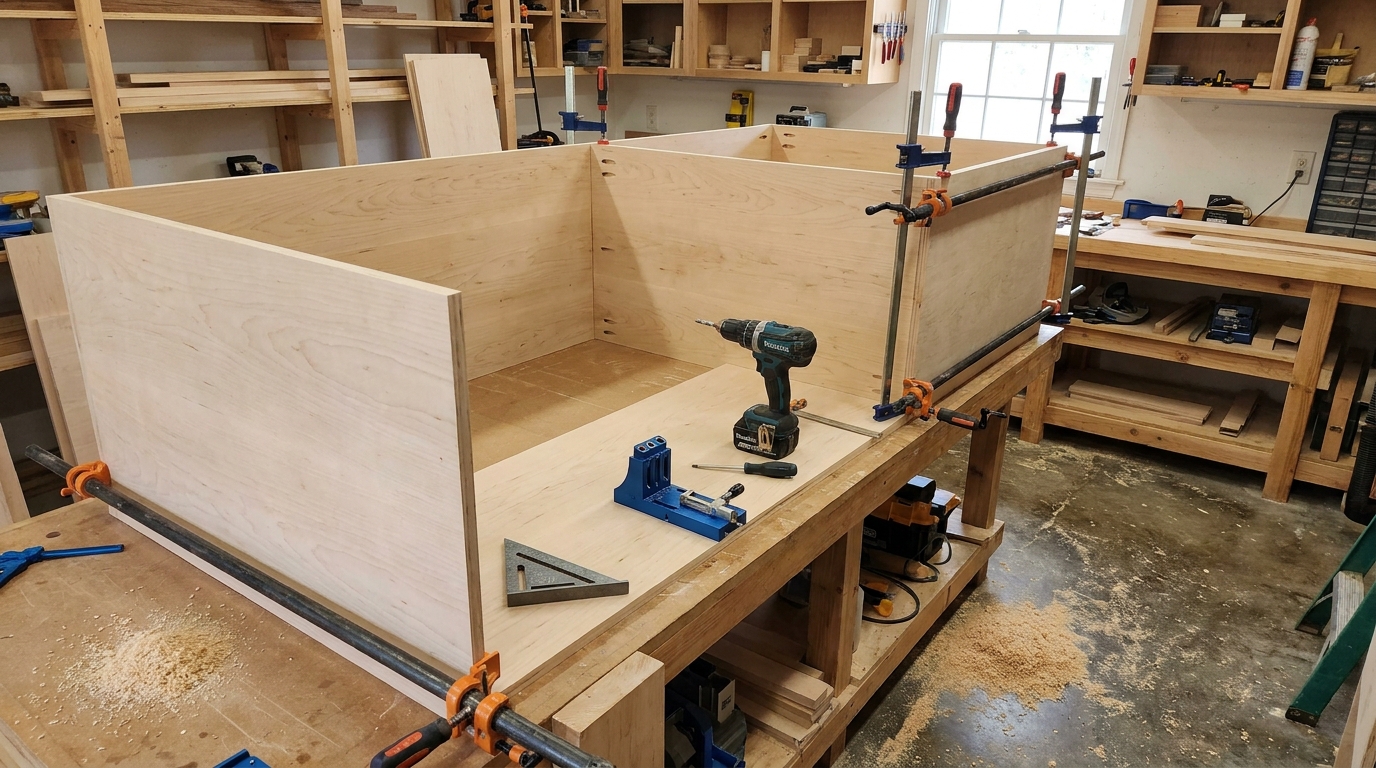
Assembly can be done with a few different methods. Pocket screws are common for face frames and some cabinet construction. Screws through predrilled and countersunk sides into top and bottom panels are straightforward and strong for painted utility built-ins. Dados and rabbets add alignment and strength if you have the tools and patience for them, but they are not mandatory for every project.
Use the back strategically. A full plywood back adds stiffness and helps keep the box square. A thinner back panel can work in lighter applications, especially when the cabinet is also fastened firmly to studs. Open-backed sections may be acceptable where the wall is finished and fastening cleats provide support, but do not sacrifice stiffness just to save a little material. Flex shows up quickly in tall storage units.
Face Frames, Frameless Boxes, and Trim
You have two broad ways to make the front look finished. A face frame uses solid wood on the front edges of the box and gives a more traditional built-in look. It can also hide minor inaccuracies in plywood edges and make scribing to walls easier. Frameless construction, on the other hand, relies on clean plywood edges, edge banding, and trim details and often feels more modern.
For many homeowners, the best compromise is simple plywood boxes with applied face trim only where it improves appearance or stiffness. You do not need to overbuild decorative details for the project to look custom. A consistent reveal, crisp caulk lines, and a level installation usually matter more to the final look than ornate detailing. Keep the design clean and let the fit do the work.
Anchoring and Load Capacity Are Non-Negotiable
If there is one part of this project that deserves zero shortcuts, it is fastening. Heavy built-ins should generally be anchored into studs whenever possible. Drywall alone is not a dependable structural surface for loaded shelves, upper cabinets, or tall units unless you are using hardware specifically engineered and rated for that substrate and load. Even then, stud fastening is still the better option when available.
This matters because shelf and cabinet hardware often has much higher safe capacity when fastened into wood studs than when used in drywall only. The difference is not minor. It can be the difference between a shelf that carries books for years and one that starts pulling from the wall. Use structural screws or cabinet installation screws of the correct length, and make sure you are getting solid bite into framing.
For tall units, anchor near the top and in multiple locations. For wide lower runs, connect adjacent boxes together and then anchor the run to the wall. For floating shelves, use cleats or concealed hardware rated for the depth and expected load, and install them exactly as specified. Whenever a built-in could tip, rack, or pull forward under load, assume more fastening is better than less if done properly.
Do not design a heavy storage unit first and figure out attachment later. Stud locations and fastening strategy should shape the design from the beginning.
Step-by-Step Build Process for a Typical Wall Built-In
The exact sequence changes by room, but a standard wall built-in follows a clear order. First, clear the area and remove any baseboard or trim that will interfere with installation. Patch obvious wall damage and mark studs, outlet locations, and final cabinet lines on the wall. Dry-fit key components before final fastening.
Next, build and level the base platform if the design includes one. Install the lower boxes first because they establish the footprint and working height for everything above. Clamp adjacent units together, check for level and flush faces, and fasten them to each other before anchoring to the wall. This creates one stable assembly rather than several pieces trying to move independently.
Then install side panels, vertical dividers, or tall towers depending on the design. Use a long level to verify plumb and shim where needed behind anchor points. Add upper cabinets, shelves, or cleats only after the lower structure is stable. If the unit spans a wide wall, step back often and check sight lines. It is easier to fix alignment before trim goes on.
After the main structure is in place, install tops, face trim, crown if desired, toe kicks, and filler strips. This is the phase where the built-in stops looking like boxes and starts looking like part of the room. Keep reveals consistent and avoid forcing trim into severe bows. If a wall is uneven, scribe the trim or filler for a tight fit instead of relying on caulk to hide everything.
Finally, fill fastener holes, sand, prime, caulk the right joints, and paint or clear-finish the unit. Let the finish cure properly before heavy loading. Rushing this stage usually leads to dented paint, blocked drawer slides, and a project that never quite looks complete. Finish work is slower than people expect, but it is what the room sees every day.
Room-by-Room Built-In Ideas That Work
Different rooms ask for different storage logic. In a living room, a media wall works best when it balances screen placement, closed storage, cable management, and some open display space. A full wall of nothing but open shelves can feel busy unless the room is styled carefully. Lower cabinets with adjustable upper shelving are often the most forgiving choice for daily use.
In an entryway or mudroom, built-ins should prioritize abuse resistance. People drop bags, lean on benches, kick off boots, and hang wet coats there. Use durable paint, strong hooks fastened into solid backing, and a bench structure that can handle repeated weight without flexing. Cubbies, baskets, and upper cabinets work better than delicate open shelving in this kind of space.
In a home office, built-ins should account for work habits, not just décor. Think about printer space, paper storage, hidden outlets, monitor height, and whether the room needs doors to reduce visual clutter. If the office doubles as a guest room or study zone, closed lower cabinets help maintain order. A wood top over painted cabinets is a practical way to add warmth without complicating the whole build.
In a bedroom, built-ins around a bed or along a blank wall can replace dressers and free up floor space. In a closet, simple plywood towers and adjustable shelves often outperform many cheap wire systems. In a bathroom, tall shallow storage works well, but moisture resistance becomes much more important. In a basement or garage, utility matters most, so prioritize heavy-duty shelves, strong anchor points, and easy-clean finishes over decorative detailing.
How to Save Money Without Making the Project Cheap
The biggest savings usually come from simplifying the construction, not from using bad materials. A clean rectangular design with standard sheet-good dimensions wastes less plywood and cuts down on complicated joinery. Building lower boxes first and leaving doors or drawers for a later phase can also spread cost over time. There is nothing wrong with a staged built-in project if the structure is planned for it.
Another smart strategy is to use modular cabinets where they make sense. Off-the-shelf base cabinets can provide a solid starting point for a window seat, office wall, laundry setup, or entertainment unit. Add a custom top, side panels, shelves, and trim, and the result can still read as built in. This approach is often faster and more forgiving for homeowners who want a strong visual result without building every box from scratch.
Open shelves are cheaper than drawers, and paint-grade finishes are cheaper than stained hardwood cabinet work. But cheaper does not have to mean careless. Spend money where performance matters, such as plywood quality, hardware, fasteners, and trim that people will touch and see closely. Save money on complexity, not on structure.
Common Mistakes to Avoid
The first common mistake is building to nominal room dimensions without checking for out-of-square conditions. Walls, floors, and ceilings are often imperfect, and built-ins reveal those imperfections quickly. Measure at multiple points and plan filler strips or scribe pieces where needed. If you skip this, you will end up with gaps that are hard to hide cleanly.
The second mistake is underestimating load. Long shelves sag, benches flex, and upper cabinets get overloaded with things people never planned to store there. Always think ahead about the heaviest realistic use. Add dividers, thicker shelves, front edge stiffeners, or stronger cleats where needed.
The third mistake is poor anchoring. A beautiful built-in that is weakly attached is not finished, it is unsafe. Fasten into studs whenever possible, use the right screws, and anchor in multiple locations. If the wall construction is unusual or the load is significant, slow down and verify the fastening method before moving on.
The fourth mistake is rushing the finish. Nail holes that were not filled properly, seams that were not caulked well, and paint over dusty surfaces will all stand out. Most custom-looking built-ins earn that look in the prep stage. Sanding, priming, caulking, and second coats are not glamorous, but they are what people notice from across the room.
When to Call a Pro
There is no shame in using a hybrid approach. In fact, it is often the smartest path. If the project involves moving electrical, dealing with plumbing, cutting into structural elements, changing egress conditions, or solving a complicated out-of-square installation, professional help may save time and prevent expensive mistakes. Local code checks matter when a project affects more than surface-level carpentry.
You can still do a lot yourself even if you bring in help for part of the job. Many homeowners handle design, demolition, painting, simple shelving, and trim while outsourcing cabinet fabrication, electrical work, or final installation of difficult components. That kind of split is realistic and often gives the best balance of cost and quality. The point is not to do every step personally. The point is to end up with safe, durable, useful storage.
Finishing Details That Make Built-Ins Look Custom
The final look of built-ins comes from the details where the unit meets the room. Baseboard returns, crown transitions, consistent gaps, flush trim alignment, and clean caulk lines all matter. If the project has doors, make sure reveals are even and hardware is aligned. If it has open shelves, keep shelf spacing deliberate and visually balanced.
Paint selection matters too. Many homeowners use a durable cabinet or trim enamel rather than standard wall paint because it cures harder and cleans better. Sand between coats where needed and be realistic about cure time before heavy use. If you are using a stained or clear wood top, protect it properly and allow for seasonal movement if the piece is wide enough to require it.
Take a final pass through the project with the same eye you would use if you had paid for it. Open the doors, lean on the bench, check the shelf level, and load it gradually. Built-ins should not just look solid. They should feel solid every time you use them. That is the standard worth aiming for.
Final Thoughts
Building custom built-in storage is one of those projects that rewards careful planning more than flashy technique. If you measure accurately, choose stable materials, respect the wall structure, and keep the design matched to the room, you can build storage that changes how a home functions every day. It can make a small room calmer, a busy room more efficient, and an awkward wall finally useful. That is a practical improvement, not just a cosmetic one.
If this is your first built-in, start with a room that needs straightforward storage and a design that stays honest about your tools and skill level. A simple base cabinet run with upper shelves can look excellent if it is level, anchored well, and finished cleanly. You do not need to copy luxury millwork to get a strong result. In most homes, a sensible built-in that is safe, sturdy, and tailored to real use is the better project anyway.
Done well, built-ins are not just something you added to the wall. They become part of how the room works. That is why they remain one of the most worthwhile DIY carpentry projects a homeowner can take on.


No Comment! Be the first one.