



How to Build Your Own Outdoor Kitchen: A Step-by-Step DIY Guide for Homeowners
An outdoor kitchen is one of those projects that looks simple from a distance and gets more technical the closer you get to the work. A grill, a counter, a few cabinets, maybe a sink. That part is easy to picture. What actually makes the project successful is the part behind the finish materials, which means layout, drainage, framing, safe clearances, utility planning, and choosing materials that can survive weather year after year.
Table Of Content
- Why an Outdoor Kitchen Is Worth Building
- Start with a Realistic Budget and Scope
- Step 1: Choose the Right Location
- Step 2: Plan the Layout Before You Build Anything
- Step 3: Check Permits, Codes, and Utility Rules Early
- Step 4: Pick a Base That Will Stay Put
- Step 5: Choose a Construction Method That Matches Your Skill Level
- Step 6: Gather Tools and Materials
- Core tools
- Common materials
- Step 7: Build or Set the Base Cabinets and Frame
- Step 8: Plan Utility Rough-Ins Before Closing Anything Up
- Step 9: Sheath and Finish the Structure with Exterior Materials
- Step 10: Install the Countertop with Weather in Mind
- Step 11: Install the Grill and Appliances Carefully
- Step 12: Test, Inspect, and Finish the Details
- Best Budget-Friendly Choices for a First Build
- Common Mistakes to Avoid
- Outdoor Kitchen Maintenance and Winter Care
- Sample Step-by-Step Project Sequence
- Final Thoughts
If you are a homeowner looking for a hands-on, budget-conscious way to build an outdoor kitchen, the smartest approach is to keep it practical. Start with a compact footprint, build on a solid base, and focus first on the parts you will use every week. In most cases, that means a grill, a prep surface, and some weather-resistant storage. You can always add a sink, fridge, lighting, and more seating later once the basic structure is in place and working well.
This guide takes a straightforward step-by-step approach to building your own outdoor kitchen. It covers planning, tools, layout, framing, finishes, utility decisions, and common mistakes. It also makes an important distinction that every homeowner needs to hear early: many parts of this job are DIY-friendly, but gas, electrical, and plumbing work often fall under local code rules and may require licensed trades or inspections. That is not a small detail. It is part of building something safe, durable, and worth the time and money you put into it.
A good outdoor kitchen is not just a grill on a deck. It is a weather-ready work area built with safe clearances, proper support, and a realistic plan for utilities and maintenance.
Why an Outdoor Kitchen Is Worth Building
Outdoor kitchens have stayed popular because they improve how people actually use their yards. Instead of carrying trays in and out of the house, you can prep, cook, and serve in one area. That makes backyard meals easier and cuts down on traffic through the house. It also helps when you have guests, because the cook is no longer stuck indoors while everyone else is outside.
There is also a value angle, though homeowners should think about function first. A well-built outdoor kitchen can make a backyard feel more complete and more useful, which can support resale appeal. It is not only a luxury feature for large homes. Recent cost guides still place many professional outdoor kitchen projects in the mid-teens of thousands of dollars on average, with luxury versions going much higher, but simple DIY and modular builds can be done for far less if you stay disciplined on scope and materials.
The budget-friendly path is usually phased construction. Build a solid cooking station now, then expand later. That lets you spread out costs and avoid overbuilding a setup you may not need. In practical terms, the first phase often gives you the biggest return because it covers the main work zones that matter most in daily use.
Start with a Realistic Budget and Scope
Before you buy a single cabinet or mark a line on the patio, decide what this kitchen is supposed to do. A lot of projects get expensive because people try to include every feature at once. Grills, counters, storage, refrigeration, plumbing, and lighting all add cost, but the biggest budget drivers are usually appliances, cabinet or frame systems, countertops, and utility runs. The farther your build is from existing gas, water, and electrical service, the more money and coordination it usually takes.
For a first-time homeowner build, a compact straight-line layout is often the best fit. It is easier to frame, easier to finish, and less likely to create circulation problems in the yard. If you already have a patio slab or a well-built paver base, you can save a lot by building on that existing surface instead of pouring a new pad. If you do need a new base, do not treat it as an afterthought. The base controls everything that comes after.
A simple budget outdoor kitchen often includes a freestanding or drop-in grill, two sections of counter, one or two storage cabinets, and weather-resistant cladding. A mid-level build may add a built-in grill surround, better countertops, task lighting, and a dedicated serving section. Water, refrigeration, and permanent gas service are useful upgrades, but they are rarely the most cost-effective starting point if the main goal is to get cooking outdoors soon.
Step 1: Choose the Right Location
Location decides more than appearance. It affects safety, cost, convenience, and how often you will use the kitchen. The best location is usually close enough to the house to keep utility runs short and food transport easy, but far enough away to respect grill clearances and keep smoke away from doors, windows, and traffic paths. You want a spot that feels connected to the backyard without boxing heat and smoke into a tight corner.
Look at the ground first. The kitchen needs a stable, level base that can support cabinets, counters, and appliances without shifting. Existing concrete patios are often ideal if they are in good condition and sized correctly. Paver patios can work too, but the base underneath must be properly compacted and suitable for the weight. Soft ground, uneven decks, and sloped lawn areas are not good places to start unless you plan to build proper support and meet the safety requirements of the appliance manufacturer.
Think about prevailing wind, sun exposure, and access. A grill facing directly into the wind can be frustrating to use. Harsh afternoon sun can make prep work unpleasant. A kitchen tucked too far into the yard may look nice in photos but become inconvenient in real life. Practical placement wins over dramatic placement almost every time.
Step 2: Plan the Layout Before You Build Anything
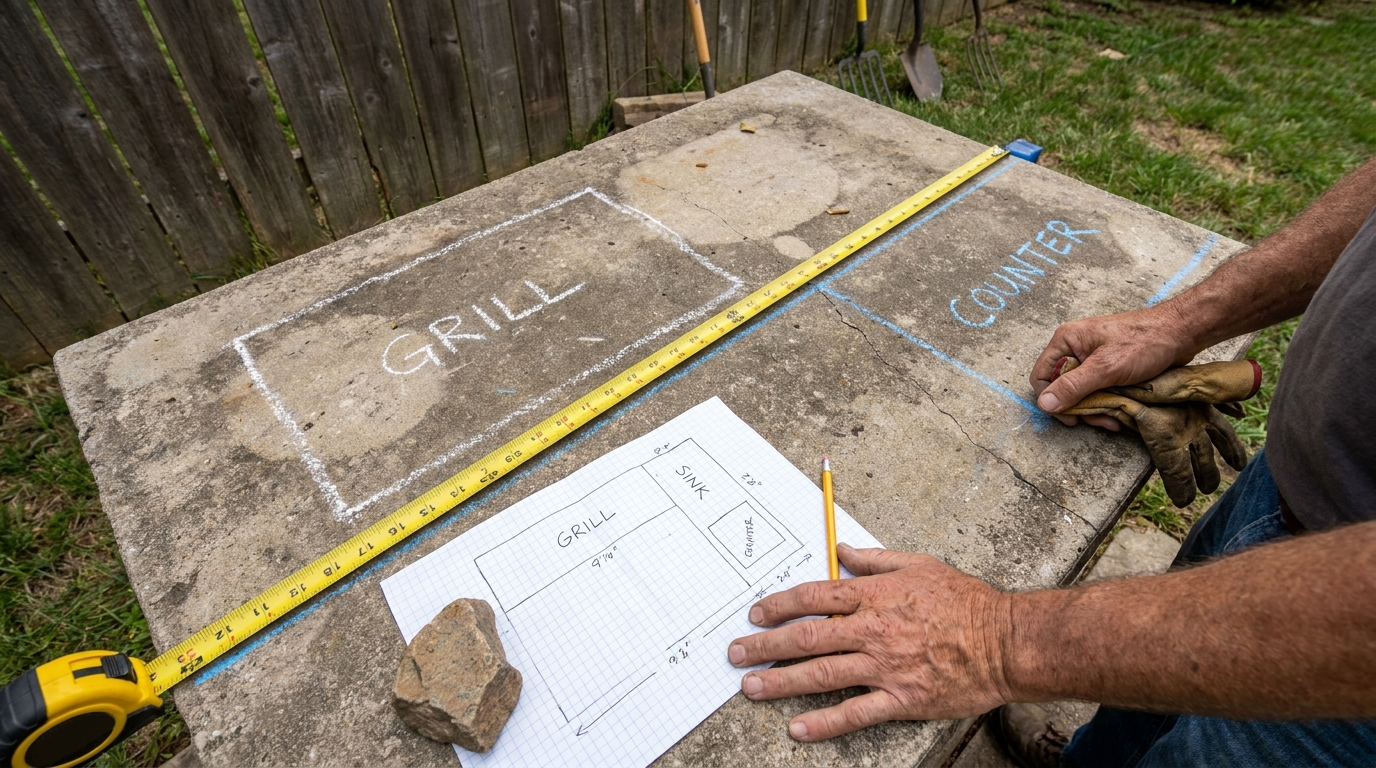
A good outdoor kitchen works in zones. Even a small one should account for prep, cook, serve, and if possible, clean. You do not need a giant footprint, but you do need enough clear counter area on at least one side of the grill for trays, tools, and ingredients. Homeowners often underestimate how much they use prep space until they have nowhere to put a cutting board or hot platter.
Sketch the layout to scale. Mark the grill width, counter depth, storage access, and any required clearances from manufacturer instructions. Do not guess on these numbers. Built-in grills, side burners, and outdoor-rated appliances all come with installation requirements that matter. Code guidance for outdoor kitchens still expects appliance instructions and electrical rules to be followed, even though the space is outdoors.
For most DIY builds, one of the following layouts makes the most sense:
- Straight-line kitchen: Best for small patios and tight budgets. It keeps construction simple and utility planning straightforward.
- L-shaped kitchen: Good when you want a more distinct prep zone and serving area without building too large.
- Phased modular layout: Ideal if you plan to add features over time. Start with a grill cabinet and prep cabinet, then expand later with matching units.
Leave room for people to move. An outdoor kitchen that blocks pathways or crowds furniture gets annoying fast. Measure not just the kitchen itself, but the working space in front of it. You need room to stand, open doors, and carry food safely.
Step 3: Check Permits, Codes, and Utility Rules Early
This is the part many people skip until late in the project, and it is where costly mistakes start. Outdoor kitchens can involve building permits, electrical permits, plumbing permits, gas permits, or all of the above depending on where you live and what you install. The rules vary by municipality, so call the local building department before finalizing your plan. Ask what permits are needed for structures, gas appliances, receptacles, lighting, sinks, or hard-piped utility runs.
If your kitchen uses natural gas or propane line work, code compliance matters. In Canada, CSA B149.1 is the main natural gas and propane installation code relevant to outdoor gas appliances and line work. Product instructions often also point to local code compliance or reference standards such as CSA B149.1, NFPA 54, or NFPA 58 depending on region and product type. That means homeowners should not assume a gas extension is just another DIY task.
The same goes for electrical. Outdoor receptacles usually require weather-resistant components and GFCI protection. Wiring methods, box locations, in-use covers, bonding, and circuit sizing all matter. If you want task lighting, a refrigerator, an ignition-powered grill, or even a convenience outlet for small appliances, plan that system on paper before the cabinets go in. Hidden rework is expensive.
Plumbing deserves the same caution. In cold climates, outdoor water lines should be designed so they can be shut off and drained for winter. That winterization detail should be part of the design from day one. If it is not, freeze damage can undo your work in one season.
Step 4: Pick a Base That Will Stay Put
The base is the foundation of the kitchen in the practical sense, even if the structure is not a full building. If you already have a sound patio slab, that is often the simplest and least expensive option. Check for cracking, settlement, low spots, and drainage issues. Minor cosmetic cracks are different from structural movement. If the slab has shifted or ponds water, deal with that before installing anything on top of it.
If you are building a new base, a properly poured concrete slab or a correctly constructed paver base are the usual choices. Concrete is simple to clean, stable under heavy cabinets, and a good match for modular systems. Pavers can look excellent, but they need proper excavation, compacted aggregate base, sand bedding where applicable, edge restraint, and good drainage. If the pavers move, the kitchen above them will show it in cabinet alignment and countertop joints.
Do not build a heavy masonry-style kitchen on a weak or questionable surface. Weight adds up quickly once you combine framing, sheathing, cladding, countertops, grill components, and stored equipment. If there is any doubt about capacity or movement, correct the base first.
Step 5: Choose a Construction Method That Matches Your Skill Level
There are three common ways homeowners build outdoor kitchens. The first is a fully custom framed build using pressure-treated lumber or steel studs, then sheathing and cladding it with exterior-rated materials. The second is a modular system using outdoor kitchen cabinets designed for exterior use. The third is a masonry or block approach, which can be durable but is usually more labor-intensive and less forgiving for first-time DIY builders.
For a budget-friendly and straightforward project, modular outdoor kitchen cabinets and prefab grill surrounds are hard to ignore. They are increasingly available, often come with leveling feet, and many are designed with practical utility access in mind. That can shorten the build time and reduce installation guesswork. If your goal is function over custom detailing, modular components can be the cleanest path.
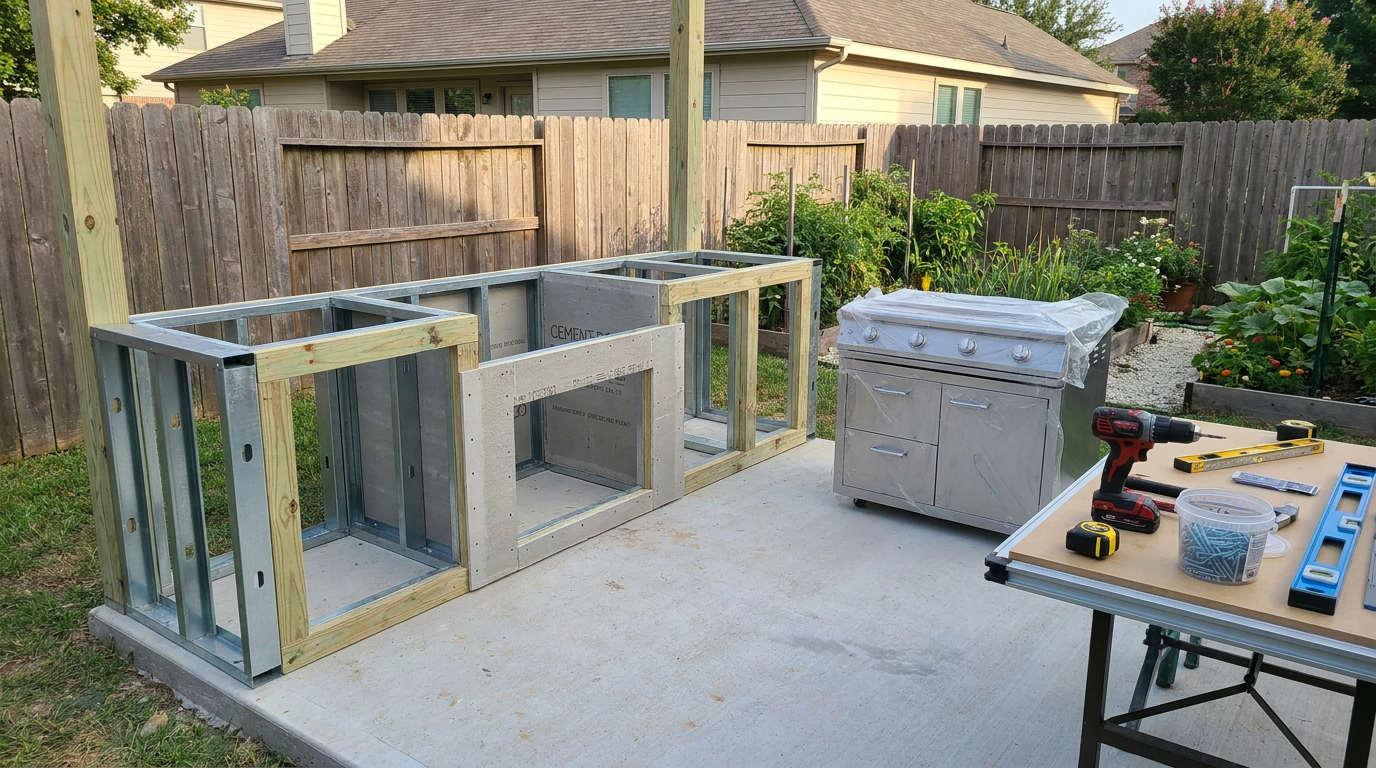
Custom framing still makes sense if your patio dimensions are unusual or you want a built-in look at lower material cost. Pressure-treated wood can be used where allowed and where it is protected appropriately, but many builders prefer non-combustible framing around grills because heat and appliance clearances need to be respected carefully. Steel stud framing paired with cement board is a common outdoor approach because it handles moisture better and avoids some of the movement issues of wood.
Step 6: Gather Tools and Materials
The exact list depends on your design, but most DIY outdoor kitchen builds need a practical mix of layout, cutting, fastening, and finishing tools. Being organized here saves time and reduces mistakes later. It also helps you identify early which parts of the job are truly DIY and which parts should be left to licensed trades.
Core tools
- Tape measure, framing square, level, and chalk line
- Drill and impact driver
- Circular saw or miter saw for framing material where appropriate
- Angle grinder or metal cutting tools if using steel framing
- Caulking gun and trowels
- Masonry or tile tools depending on finish materials
- Safety glasses, gloves, hearing protection, and dust protection
Common materials
- Concrete slab or finished patio base
- Outdoor-rated modular cabinets or framing materials
- Cement board or other exterior-rated sheathing
- Stainless steel doors, drawers, and hardware
- Exterior stone veneer, stucco system, tile, or other weather-resistant finish
- Concrete, granite, porcelain, or other exterior-suitable countertop
- Built-in or freestanding grill rated for the installation type
- Exterior-rated fasteners, sealants, and trim
Be careful with substitutions. Indoor cabinetry, ordinary particle board, and basic interior screws do not belong in an outdoor kitchen. Weather exposure finds weak materials quickly. It is cheaper to buy the right materials once than replace failed components after one winter.
Step 7: Build or Set the Base Cabinets and Frame
Once the layout is marked on the patio, dry-fit everything first. Set cabinets or frame sections in place without fastening them permanently. This is where you confirm door swing, appliance width, countertop overhang, and working clearances. Small layout errors are still easy to fix at this stage. Once cladding and countertops are involved, they are not.
If you are using modular cabinets, start with the main grill cabinet or center unit and work outward. Level each cabinet carefully and follow the manufacturer instructions for joining units together. Use shims or adjustable feet as needed, and recheck alignment after fastening. Cabinets that are slightly out of level now can create major problems for countertops later.
If you are framing a custom structure, build it square and anchor it securely as required by the design and local conditions. Keep the grill opening dimensions exact to the appliance specifications. Do not crowd the cavity or improvise around ventilation requirements. Built-in grills need the right clearances and, in many cases, specific ventilation openings around the enclosure. This is not finish detail. It is safe operation detail.
Step 8: Plan Utility Rough-Ins Before Closing Anything Up
This step is where disciplined sequencing pays off. Do not sheath, clad, or countertop the structure until all utility paths have been reviewed. If you are adding gas, water, drain, or electrical service, the rough-in route needs to be settled first. That includes shutoffs, access panels, conduit paths, and any required inspection stages.
For many homeowners, the smart move is to do all layout and structural work themselves, then bring in licensed trades for utility connections. That approach keeps costs lower than a full professional build while still respecting the specialized work. Gas lines in particular should be installed and tested correctly, with proper shutoff valves and leak testing procedures. Safety-focused accessories such as better shutoff valves, gas outlet boxes, and excess-flow or thermal protection components are becoming more common and are worth asking about.
If you want a sink, think carefully about how often you will really use it. An outdoor sink is convenient, but it introduces water supply, drainage, and winterization requirements. In freeze-prone regions, a shutoff-and-drain setup is essential. Some homeowners decide to skip a permanent sink in phase one and use a portable water station instead. That is not glamorous, but it is practical and much cheaper.
Step 9: Sheath and Finish the Structure with Exterior Materials
After the frame and utility paths are ready, install the exterior-rated sheathing system called for by your build method. Cement board is common because it handles moisture better than interior products and gives you a stable surface for many finishes. Fasten it with the right screws and spacing, and treat joints according to the finish system requirements. Sloppy prep here shows up later as cracked finish surfaces.
The best budget-conscious finish is the one you can install correctly and maintain without trouble. Stone veneer is popular because it gives a solid built-in look without full-depth masonry weight. Stucco systems can work well if the substrate and weather barrier details are right. Exterior tile can also be effective, but freeze-thaw conditions make installation quality critical. If water gets behind the finish and freezes, failures follow.
Hardware should be stainless or otherwise rated for exterior use. Hinges, pulls, drawer slides, and vent covers all need to tolerate weather. Cheap hardware is one of the first things to fail outdoors, and once rust starts, it spreads the tired look across the whole kitchen.
Step 10: Install the Countertop with Weather in Mind
Outdoor countertops need to handle sun, rain, temperature swings, and regular cleaning. Concrete is a common DIY option because it can be cast or formed to suit the layout, and it pairs well with a practical backyard build. It does require careful reinforcement, finishing, sealing, and support. Granite remains popular too, though not every stone behaves the same outdoors, so ask the fabricator about exterior suitability.
Porcelain slabs and tile surfaces can work, but substrate quality and installation details matter. Avoid countertop materials that are better suited to indoor kitchens. Laminate and many wood-based products simply do not last outside in most climates. A countertop that looks inexpensive because it failed after one season is not really a savings.
Keep the overhangs modest unless the support system is designed for more. Large unsupported spans can crack or feel bouncy, especially if people lean on them during gatherings. If you want a raised bar or serving ledge, frame and support it intentionally rather than treating it as a last-minute add-on.
Step 11: Install the Grill and Appliances Carefully
When the structure and countertop are complete, appliance installation can begin. Follow the product instructions exactly. That means the correct cutout dimensions, ventilation requirements, connection methods, and clearance rules. Outdoor gas and appliance instructions commonly require outdoor-only use, compliance with local codes, and proper grounding or electrical compliance where power is involved. That language is there for a reason.
Do not assume every grill can be dropped into every surround. A built-in grill enclosure has to match the appliance design. Heat, grease, and combustion air all need a path that the manufacturer anticipated. If you are converting from a freestanding grill to a built-in setup, verify that the appliance is actually intended for that type of installation.
Install stainless access doors and any storage inserts after the main appliance fit is confirmed. Check that nothing binds and that you still have access to shutoffs and service points. Maintenance access is part of a good install. If you cannot reach the important parts later, the build was not truly finished right.
Step 12: Test, Inspect, and Finish the Details
Before the first cookout, test every part of the kitchen methodically. Open and close all doors and drawers. Check that the grill sits square, ignites correctly, and operates as intended. Confirm that electrical outlets work properly and that protective covers close as they should. If plumbing is involved, test for leaks and proper drainage.
Gas systems deserve extra attention. Connections should be checked according to approved methods and local requirements. If the work was done by a licensed gas fitter or plumber, keep the paperwork and inspection records. If your area requires final sign-off, schedule it before regular use. It is easier to fix issues before the kitchen is in active rotation than after trim pieces, furniture, and accessories crowd the space.
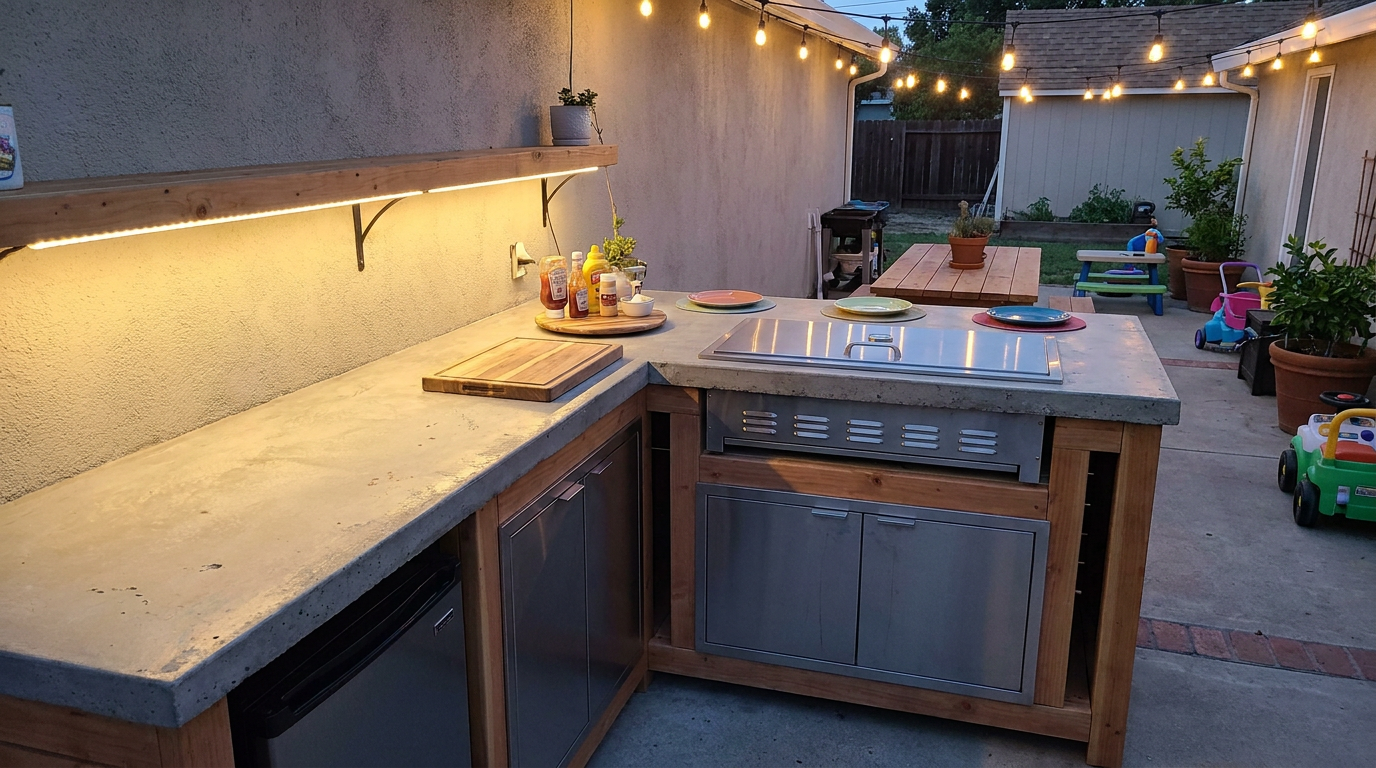
Finish details matter more than many homeowners expect. Add weather-resistant caulking where needed, touch up coatings, install task lighting if part of the plan, and make sure water sheds away from the structure. Good detailing is what separates a project that still looks solid in three years from one that starts to look neglected after the first hard season.
Best Budget-Friendly Choices for a First Build
If you want the most function for the least money, keep the footprint small and the features focused. Build near existing utilities or skip utility extensions in phase one. Use modular outdoor cabinets if custom masonry is beyond your comfort level. Choose a practical countertop material that is proven outdoors and easy to maintain. Spend your money where failure is expensive, which usually means the base, the grill, the exterior-rated structure, and proper finishes.
A compact setup with a good grill, 6 to 8 feet of prep surface, and enclosed storage can feel surprisingly complete. Most homeowners get more use out of that arrangement than they do from a long list of premium accessories. Refrigeration outdoors is nice, but not if it blows the budget and delays the project for months. A sink is useful, but only if you can do it in a way that meets code and survives winter.
The phased approach is not settling for less. It is building in the right order. Start with the cooking core, live with it, and learn how you use the space. Then add only what proves necessary.
Common Mistakes to Avoid
The most common mistake is underestimating the importance of layout. People leave too little prep space, crowd the grill into a corner, or forget that doors and drawers need room to open. Another frequent problem is treating the project like indoor cabinetry with a grill attached. Outdoor kitchens need better moisture resistance, better hardware, and more attention to heat and ventilation.
A second major mistake is ignoring permits or assuming utility work is simple because it is outside. It is not. Gas, electricity, and plumbing still have rules, and those rules exist because bad installations fail in dangerous ways. Homeowners can absolutely do a lot of the work on an outdoor kitchen, but knowing where your role ends is part of doing the job responsibly.
A third mistake is using materials that are not meant for exterior exposure. Indoor cabinets, standard drywall, non-rated screws, and bargain finishes may lower the price today, but they usually raise it later. The outdoors is hard on materials. Build for that reality, not for best-case weather.
Outdoor Kitchen Maintenance and Winter Care
Once the kitchen is built, regular maintenance is simple if the materials were chosen well. Clean grease and food debris promptly, especially around the grill and ventilation openings. Wipe down stainless surfaces, keep drains clear, and inspect sealant joints once or twice a season. Catching small issues early keeps moisture from getting into places where damage starts quietly.
In cold climates, winterizing is essential. If you installed water lines, shut them off and drain them according to the system design. Disconnect and protect any seasonal components as recommended by the manufacturer. Store removable accessories indoors if possible. A little routine care before freeze season can prevent cracked fittings, damaged valves, and expensive spring repairs.
Also think about broader site exposure. In some parts of Canada and other wildfire-prone regions, climate resilience matters more every year. Keeping the outdoor kitchen area clear of combustible clutter, maintaining gas components well, and understanding local siting concerns are all practical habits. A safe outdoor kitchen is not just about the day it is built. It is about how it is kept over time.
Sample Step-by-Step Project Sequence
If you want the whole process in one clean order, follow this sequence. It keeps rework low and makes the project easier to budget and schedule.
- Set the budget, decide the scope, and choose the main features.
- Select the location based on safety, utilities, drainage, and convenience.
- Check permits, local code requirements, and manufacturer installation rules.
- Build or confirm a stable patio slab or paver base.
- Mark the layout full-size and dry-fit cabinets or frame lines.
- Install modular cabinets or build the custom frame.
- Coordinate gas, electrical, and plumbing rough-ins before closing walls.
- Sheath the structure with exterior-rated materials.
- Add finish cladding such as veneer, stucco, or tile.
- Install the countertop and confirm support and level.
- Set the grill and other appliances according to instructions.
- Test, inspect, caulk, clean up, and put the kitchen into service.
Final Thoughts
Building your own outdoor kitchen is absolutely realistic if you approach it like a construction project instead of a weekend decorating project. The work is manageable when you break it into parts and stay honest about your skill level. Layout, base prep, framing, cabinet assembly, and finish work are all within reach for many homeowners. Utility work may not be, and there is no shame in hiring that portion out. In fact, that is often the smartest money spent on the whole job.
If you remember only a few things, remember these. Keep the first phase simple. Build on a solid, level base. Use exterior-rated materials. Follow appliance clearances and manufacturer instructions. Plan utility access before covering anything. In cold climates, design for winterization from the start. Those decisions are what make the kitchen durable, safe, and worth using for years.
The best outdoor kitchen is not the biggest one or the most expensive one. It is the one that fits your yard, your budget, and the way you actually cook. Build that version first. You can always add the extras later, but getting the basics right is what turns a backyard project into a space that truly works.



No Comment! Be the first one.