



Interior waterproofing is one of those subjects that gets simplified far too often. Many people think it starts and ends with a coating on a wall, a sheet membrane, or a product sold as a quick fix. In real buildings, that is rarely how moisture problems work. Water damage inside a home usually comes from a combination of bulk water entry, vapor movement, air leakage, condensation, plumbing leaks, and daily indoor humidity. If you want a dry basement, a durable bathroom, or a healthier crawlspace, you need to treat waterproofing as a full moisture-management system.
Table Of Content
- Why interior waterproofing matters more than most people think
- Start with diagnosis, not products
- The layered approach that actually works
- Exterior drainage still comes first, even in an interior waterproofing project
- Interior drainage systems and sump pumps
- Foundation crack repair and joint sealing
- Vapor control, air sealing, and why plastic is not always the answer
- Insulating interior foundation walls without trapping moisture
- Waterproofing bathrooms, showers, and laundry rooms
- Crawlspaces and below-grade utility areas
- Humidity, condensation, and indoor air quality
- Common mistakes that undermine interior waterproofing
- How to choose the right materials
- What skilled craftsmanship looks like on a waterproofing job
- A practical step-by-step plan for homeowners and remodelers
- Waterproofing for resilience in 2025 and beyond
- Final thoughts
Interior waterproofing is the practical work of managing water and moisture from inside a building: stopping bulk water at foundations and walls, controlling vapor diffusion and air leakage that carry moisture into assemblies, managing condensation on cold surfaces, and finishing with materials that dry safely rather than trap water. It applies most directly to basements, crawlspaces, bathrooms, and laundry rooms, where concrete foundations, plumbing fixtures, and everyday humidity create the highest risk of hidden damage. Done well, it follows a strict order of operations: fix exterior drainage and grading first, repair active leaks and cracks second, add interior drainage or a sump system where groundwater persists, then choose vapor control, insulation, and finishes suited to below-grade or wet-room conditions. Relying on a single product, such as a wall coating or a plastic vapor barrier, is the most common reason waterproofing projects fail.
That matters because the damage from poor moisture control is not always obvious right away. A room can look clean and finished while hidden water slowly affects framing, drywall, flooring, insulation, and indoor air quality. Health guidance in both Canada and the United States continues to make the same point: mold is controlled by controlling moisture. The real job is to find where the water or humidity is coming from, stop it in the right order, and build assemblies that can tolerate normal seasonal changes without trapping moisture.
This guide is built around straightforward, workable methods. It focuses on basements, crawlspaces, bathrooms, laundry rooms, and other moisture-prone interior areas. It also puts a proper spotlight on craftsmanship, because waterproofing success depends as much on diagnosis and detailing as it does on materials. A good crew knows the difference between a crack leak and condensation, between a drainage defect and a plumbing issue, and between a smart vapor-control layer and one that will cause trouble later.
For homeowners, the goal is understanding what actually works and what questions to ask before paying for a system. For contractors and remodelers, the goal is a cleaner approach to sequencing and assembly design. Either way, the message is the same: interior waterproofing is not a single product purchase. It is a practical, layered strategy that starts with water management and ends with maintenance.
The most reliable approach to interior waterproofing is simple in principle: stop bulk water first, then manage air leakage, vapor, and condensation, and only then install finishes that can stay dry or dry out safely.
Why interior waterproofing matters more than most people think
Moisture problems inside a building do more than stain surfaces. They shorten the life of materials, create odors, increase maintenance costs, and can make finished lower levels uncomfortable or unhealthy. In below-grade spaces, the risks are higher because concrete is in direct contact with soil, outdoor drainage conditions change through the year, and temperature differences can create steady condensation on cold surfaces. Add a finished wall, carpet, or poorly placed insulation, and you can hide a lot of trouble behind a neat appearance.
Public health agencies have been consistent on this point. The U.S. EPA notes that mold spores are everywhere and cannot be fully eliminated indoors. The practical strategy is to eliminate or reduce moisture sources. Health Canada similarly emphasizes drainage away from the structure and maintenance that reduces moisture entry. That means the right question is not simply which waterproof paint to buy. The right question is what path the moisture is taking and how the assembly is supposed to dry.
Interior waterproofing also matters because homes are being asked to do more than they used to. More basements are being turned into living space, home offices, gyms, and bedrooms. Older houses are being retrofitted to perform better in wetter seasons and heavier rain events. Homeowners are expecting comfort, lower humidity, better indoor air quality, and fewer callbacks after renovations. Those expectations are reasonable, but they require a more disciplined approach than cosmetic upgrades alone.
In practice, good waterproofing protects both the building and the people living in it. It helps preserve insulation value, keeps wood moisture content in a safer range, reduces the chance of hidden mold growth, and improves the odds that a renovation will last. That is why this work deserves the same seriousness as structural framing or roofing. If the moisture plan is wrong, the finish quality will not save it.
Start with diagnosis, not products
The first mistake in interior waterproofing is choosing a remedy before identifying the source. Water stains near a basement floor may suggest seepage through the wall, but they can also come from condensation, capillary moisture, or a nearby plumbing leak. Musty smells in a crawlspace may come from high ground moisture, leaky ducts, open vents, unsealed earth, or poor air sealing at the floor above. A shower leak may not be a tile issue at all if the drain connection or membrane detailing failed behind the finish.
A proper diagnosis looks at timing, location, and conditions. Does the problem appear after heavy rain, during snowmelt, in humid summer weather, or only when a fixture is used? Is the moisture concentrated at cracks, wall bases, pipe penetrations, corners, or around windows? Are there signs of efflorescence on concrete, rusted fasteners, swollen trim, peeling paint, cupped flooring, or condensation on cold surfaces? These clues matter because each one points toward a different moisture mechanism.
It also helps to think in categories. Bulk water is liquid water entering under pressure or by gravity. Capillary moisture is water moving through porous materials like concrete and masonry. Air leakage carries moisture-laden air into assemblies where it can condense. Vapor diffusion is slower, but still important in some wall and floor systems. Indoor humidity from showers, laundry, cooking, and poor ventilation can create its own problems even if no liquid water is entering through the structure.
Skilled waterproofing contractors earn their value here. They know that treating every damp wall with an interior coating is lazy work. They know that a humid finished basement may need dehumidification and insulation changes more than another layer of paint. They know that the success of any membrane, drainage channel, or foam insulation depends on what is happening outside the wall and inside the room. Diagnosis is the first layer of craftsmanship.
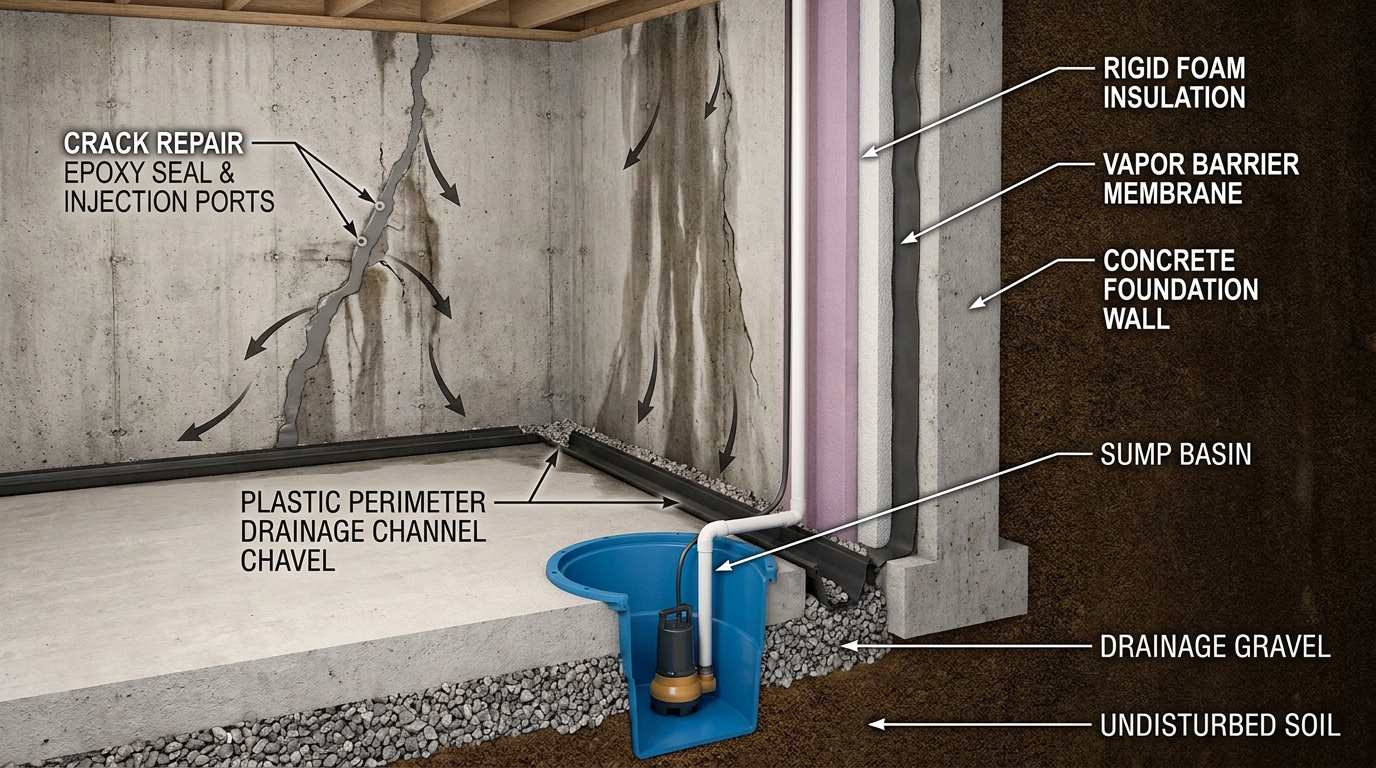
The layered approach that actually works
The clearest way to understand interior waterproofing is to think in layers of defense. The outermost layer is site drainage and exterior water control. The next layer is the foundation and any water-managed or waterproofed assembly at that level. The interior layer handles any moisture that still gets through, while the finish layer is selected so it does not trap moisture or fail quickly when conditions fluctuate. When these layers work together, a building has a real chance of staying dry.
This is where many homeowners get tripped up by marketing. An interior membrane alone is not the same as a full waterproofing solution. Building science guidance makes an important distinction between water-managed foundation systems and waterproofing systems. Drainage, dampproofing, crack repair, grading, air sealing, vapor control, dehumidification, and finish selection are separate functions. They overlap, but they are not interchangeable.
For example, if the grade slopes toward the house and downspouts dump roof water next to the foundation, an interior wall coating is trying to solve the wrong problem. If a basement is dry most of the year but gets damp and sticky in summer, the main issue may be humid outdoor air condensing on cool surfaces rather than water penetrating through the wall. If a shower bench was tiled without a continuous waterproof membrane, the grout is not the waterproofing. The water control layer has to be beneath the finish and continuous at transitions.
The practical lesson is that interior waterproofing should be planned from the outside in and from the slab up. Correct the obvious water loads first, give any unavoidable water a safe collection path, reduce cold-surface condensation risk, and finish with materials that can tolerate occasional moisture without feeding mold or rot. That sequencing is what separates durable work from expensive rework.
Exterior drainage still comes first, even in an interior waterproofing project
It may sound odd in an article about interiors, but the first step in many interior waterproofing jobs is outside the house. Health Canada points out that rain, irrigation water, and snowmelt should drain away from the structure. That means checking roof runoff, grading, window wells, hardscape slopes, splash blocks, and any landscaping that holds water against the foundation. A surprising number of wet basements begin with clogged gutters and short downspouts.
Roof drainage should carry water well away from the foundation, not just to the corner of the house. The grade around the home should slope away so water does not pond next to below-grade walls. Irrigation heads should not be soaking the foundation. If there are signs of settlement or reverse slope near the building, those areas need correction before the inside work is judged. Otherwise, you are asking the interior drainage system to handle water that should never have been there in the first place.
In some cases, exterior foundation work is the right answer. That might involve excavation, exterior waterproofing membrane repair, footing drain replacement, or correcting a failed window well system. Interior waterproofing can still be useful, especially in retrofit work where excavation is too disruptive or costly, but it should not be sold as a magic substitute for obvious exterior defects. Good contractors are honest about that balance. They explain what interior systems can do and what they cannot.
For homeowners on a tighter budget, exterior improvements often provide the best value per dollar. Cleaning gutters, extending downspouts, regrading problem areas, and redirecting surface runoff are not glamorous tasks, but they reduce the load on every interior assembly. If you lower the amount of water reaching the foundation, every other layer of defense works better.
Interior drainage systems and sump pumps
When water still enters at the foundation level, interior perimeter drainage is one of the most common practical solutions. These systems collect water where the wall meets the slab or at the footing area, then route it to a sump basin for removal. In many existing homes, this is the most realistic way to manage groundwater intrusion without full exterior excavation. When designed and installed well, it can be effective and durable.
That said, interior drainage is management, not elimination. It accepts that some water may reach the inside face or lower portion of the foundation and provides a controlled path for it. The system needs proper pitch, clean connections, and a sump pump sized for the expected load. It also needs a discharge line that sends water far enough away from the home that it does not cycle right back to the foundation.
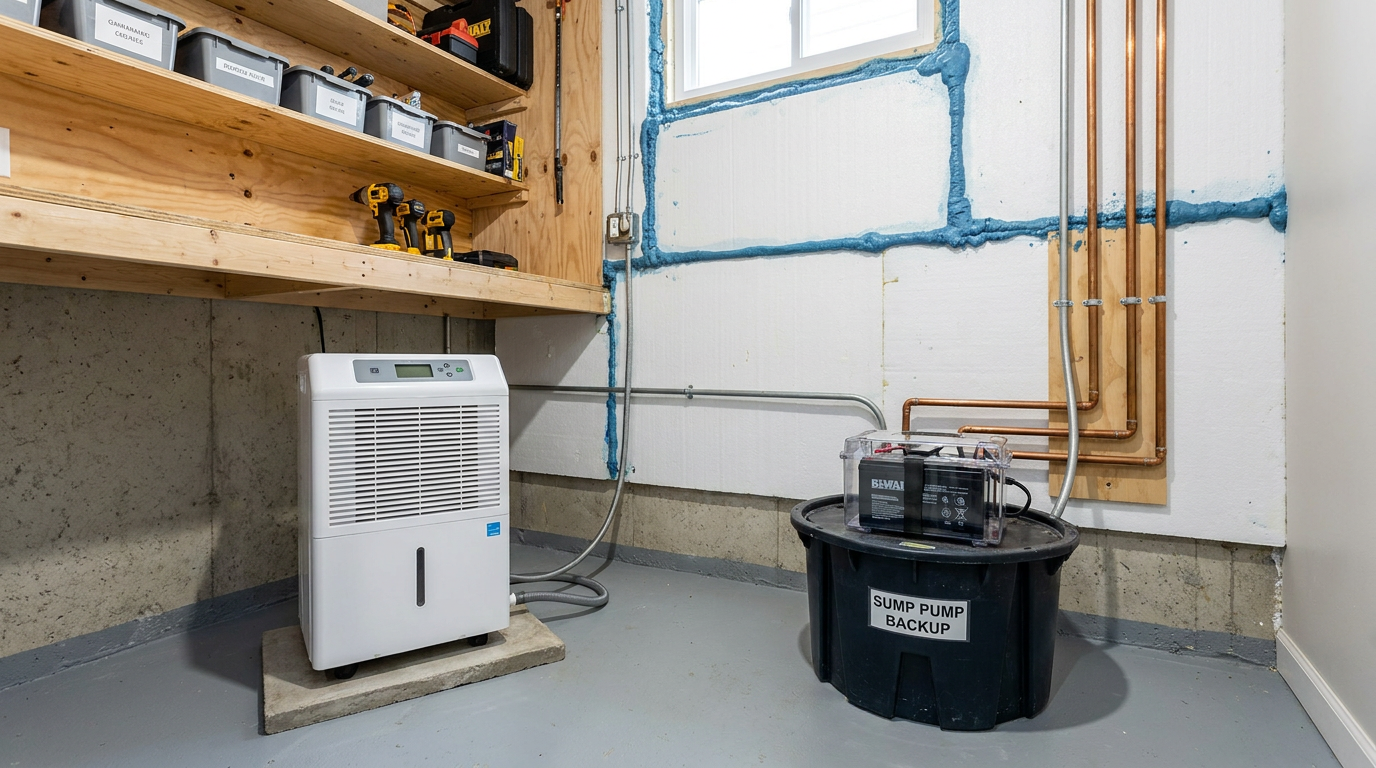
Backup planning matters more than many people realize. If a basement depends on a sump pump and the power fails during a storm, the system is only as good as its backup. Battery backups, water-powered backups where permitted, high-water alarms, and routine testing are practical parts of waterproofing. Too many basements are finished nicely but left with a neglected sump pit, no alarm, and no maintenance plan.
It is also important that drainage systems be integrated cleanly with wall assemblies. If a drainage channel is installed but the finished wall blocks access or creates a place for hidden moisture accumulation, the project can still fail. Access panels, inspection points, and clear detailing at the base of walls can make the difference between a maintainable system and one that becomes a mystery behind drywall.
Foundation crack repair and joint sealing
Cracks are common in concrete and masonry foundations, but not all cracks behave the same way. Some are cosmetic shrinkage cracks with little active water entry. Others are movement-related, wider, or clearly tied to water paths. Floor-to-wall joints, pipe penetrations, tie holes, and cold joints can also be common points of leakage. The job is to determine which defects are active water routes and which are simply visible but not currently causing intrusion.
For active leaks, crack injection with appropriate materials can be effective. Epoxy and polyurethane systems serve different purposes, and the right choice depends on whether structural bonding, water stopping, or flexibility is needed. Surface patching alone is rarely enough when water pressure is involved. The repair must address the full depth or path of the crack, not just improve its appearance for a few months.
Joint sealing is equally important at penetrations and transitions. Water often follows the easiest route, and poorly sealed service entries provide plenty of opportunities. In bathrooms and laundry areas, transitions around drains, tub flanges, shower valves, and floor penetrations need careful detailing. The weak point in a waterproofing system is almost always at a seam, corner, joint, or change in material.
There is also a point where crack repair becomes a structural conversation. Large displacement, step cracking in masonry, repeated movement, or signs of settlement need a deeper assessment. Waterproofing should never be used to hide structural distress. Dry is good, but stable comes first.
Vapor control, air sealing, and why plastic is not always the answer
This is one of the most misunderstood parts of interior waterproofing. People hear the word moisture and assume more plastic is always safer. In below-grade assemblies, that can go wrong fast. Building Science Education warns that Class I vapor retarders such as polyethylene should not be used interior to fibrous insulation in basements and crawlspaces because they can trap moisture in the wall assembly. Once that happens, drying potential is reduced and hidden deterioration can start behind the finish.
The key is understanding that below-grade concrete behaves differently than an above-grade framed wall. Concrete can store and release moisture. Soil conditions and seasons change. Interior humidity changes too. If you place low-permeance plastic on the wrong side of an assembly, especially with fibrous insulation against cold concrete, you can create a cold, damp cavity that stays wet without obvious surface warning.
Air sealing is often the bigger win. Moist air leaking into cool cavities can deposit a lot of moisture through condensation. Sealing rim joists, penetrations, top plates, utility chases, and junctions between materials helps limit that transport. Code guidance consistently ties moisture control to proper vapor-retarder placement and air-barrier continuity, which is a reminder that waterproofing is a detailing trade as much as a materials trade.
The practical approach is to use vapor control appropriate to the climate, the assembly, and the drying path. Some assemblies benefit from vapor-permeable or vapor-smart layers. Others work well with rigid foam or closed-cell spray foam directly against concrete because these materials reduce interior condensation risk while resisting moisture better than fibrous batts placed tight to the wall. The point is not that one material is perfect. The point is that placement and compatibility matter more than labels on the package.
Insulating interior foundation walls without trapping moisture
Basement insulation should never be separated from moisture strategy. BuildingScience.com emphasizes that groundwater and rainwater management come first, then insulation is used to reduce cold surfaces that condense moisture and raise humidity. That is exactly how contractors should think about it. Insulation is not just there to improve comfort. It is there to help control the temperature profile of the assembly.
In many northern climate retrofits, rigid foam board installed against the interior face of concrete is a practical option because it limits contact between humid indoor air and cold concrete. Closed-cell spray foam can also perform well in some applications, especially where irregular surfaces or rim joist areas need air sealing and moisture resistance together. DOE and Building America materials support its use in some interior foundation insulation systems, but only as part of a broader plan that also addresses drainage and drying.
What usually causes problems is combining the wrong insulation with the wrong vapor layer. Fiberglass batts in a stud wall directly against a damp foundation, covered with polyethylene and drywall, have been responsible for plenty of musty basements. The insulation loses performance, the cavity stays cool, and moisture has nowhere useful to go. The assembly may look finished, but it is poorly set up for real conditions.
For finished basements, durable wall assemblies usually prioritize moisture-tolerant materials near the concrete and keep wood, paper-faced drywall, and sensitive finishes away from direct contact with potentially damp surfaces. Even the bottom plate and flooring transitions deserve attention. A basement can fail at the first few inches above the slab long before the upper wall shows anything visible.
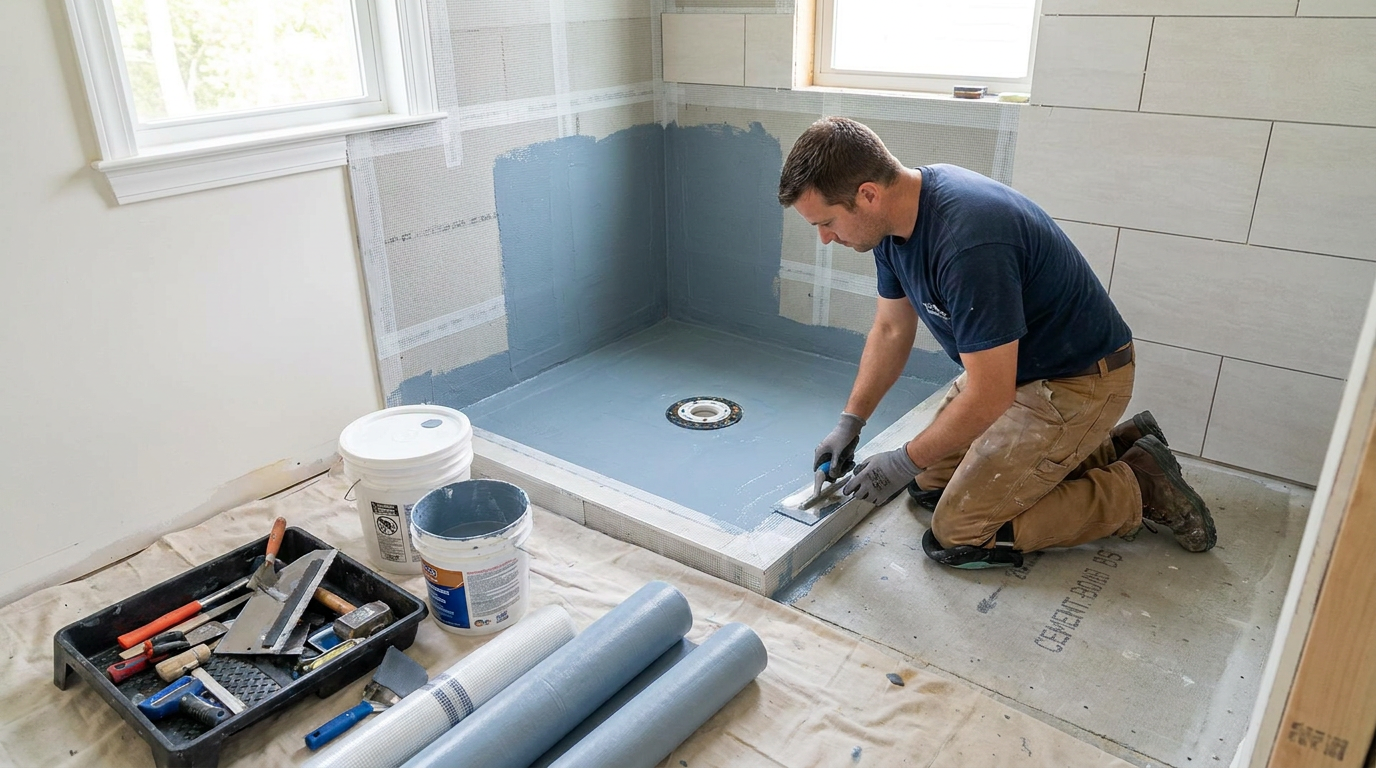
Waterproofing bathrooms, showers, and laundry rooms
Interior waterproofing is not just about basements. Bathrooms, showers, laundry rooms, and utility areas produce or handle a lot of water in a concentrated way, and failures there are usually about detailing. A tiled surface is not automatically waterproof. Tile and grout shed some water, but the real waterproofing layer belongs behind or beneath them in the form of a membrane system that is continuous and properly tied into drains, corners, curbs, benches, niches, and penetrations.
Shower failures often happen at transitions. Corners are not reinforced properly. Fasteners are placed through curb tops. Membranes are not bonded correctly at drains. Niches are built without slope or proper corner treatment. On a good job, these details are slow and deliberate because they have to be. Skilled installers understand that the visible tile pattern is the easy part. The hard part is building a watertight shell before the finish goes on.
Laundry rooms deserve similar attention, especially in upper-floor locations or finished basements. Supply hoses, drain pans, floor drains, shutoff access, and moisture-tolerant flooring all matter. In a basement laundry room, the waterproofing conversation should also include humidity control, venting of dryers, and any plumbing lines that may sweat in warm conditions. If the room is cool and enclosed, condensation can be as damaging as an actual leak over time.
Bathrooms also need reliable ventilation. A waterproof shower assembly does not solve mirror fogging, damp walls, or chronically elevated humidity after use. Exhaust fans should be sized appropriately, vented correctly, and used consistently. In moisture-prone rooms, ventilation is part of waterproofing because it helps limit the water that remains in the air after fixtures are used.
Crawlspaces and below-grade utility areas
Crawlspaces are often neglected because they are out of sight, but they can drive moisture problems throughout the house. Ground moisture, open vents, poor drainage, unsealed earth, and air leakage at the floor above can combine to make a crawlspace damp year-round. That moisture then affects wood framing, insulation performance, and indoor air quality in occupied rooms above.
In many cases, the right approach is to treat the crawlspace as a controlled part of the building rather than a damp outdoor void. That can involve ground vapor control, drainage improvements, sump systems where needed, sealed penetrations, moisture-tolerant insulation, and humidity management. Just as in basements, the mistake is relying on one material without addressing the water load and air movement first.
Mechanical rooms and utility corners also deserve attention. Water heaters, condensate drains, HVAC equipment, and plumbing manifolds can all introduce moisture. A small persistent drip can do a lot of damage if it lands in a concealed corner or behind stored items for months. These areas benefit from clear access, regular inspection, and sensible floor and wall finishes that do not hide trouble too well.
Below-grade spaces work best when they are clean, visible, and maintainable. Too many moisture issues become severe because the first signs were blocked by storage, paneling, or finish materials that concealed the problem. Waterproofing is helped by design choices that make inspection easier, not harder.
Humidity, condensation, and indoor air quality
Not every wet basement or bathroom has a leak. Sometimes the main issue is humidity meeting a cold surface. Concrete walls, slab edges, metal ducts, cold water pipes, and poorly insulated corners can all attract condensation when indoor moisture levels are high. This is especially common in summer when warm humid air enters a cool lower level. The result can look like seepage even when bulk water is not entering through the wall.
CMHC identifies daily activities, leaks, cracks, and water entering through the building envelope as moisture sources in homes. That matters because occupancy-driven moisture is real. Cooking, bathing, drying clothes, and even normal breathing contribute water vapor indoors. In a tight house or a finished basement with limited air movement, that load can build up quickly unless ventilation and dehumidification are handled properly.
Maintaining indoor humidity in a healthy range is one of the most practical waterproofing steps available. Dehumidifiers are not glamorous, but in many basements they are essential equipment. Good drainage and insulation may reduce moisture load, but the room still needs active control during humid weather. Properly vented bath fans, dryer exhaust, and balanced air movement help too.
Indoor air quality ties directly to moisture management. If materials stay damp, microbial growth is more likely, odors persist, and occupants may notice irritation or discomfort even before visible damage appears. That is why modern guidance increasingly treats moisture control as both a building durability issue and a health issue. Keeping assemblies dry is not just about preserving finishes. It is about making the home safer and more comfortable to live in.
Common mistakes that undermine interior waterproofing
Most failures come from a few repeat mistakes. The first is treating a symptom instead of the source. Painting over dampness, replacing drywall without fixing the leak, or blaming mold without correcting moisture only delays the problem. The second is assuming that more barrier material is always better. In below-grade assemblies, incorrect vapor barrier placement can trap moisture and make conditions worse, not better.
Another common mistake is finishing a basement too quickly after installing drainage or insulation work. Assemblies need to be dry enough for the next step, and contractors should confirm that moisture conditions are under control before closing walls. Rushing into trim, flooring, or cabinetry before the moisture strategy is proven is asking for callbacks. Good sequencing saves money because it reduces the chance of tearing out finished work later.
Poor detailing at transitions is another major issue. Waterproofing products often perform well in field areas, but corners, penetrations, drain connections, and floor-to-wall joints are where failure starts. This is true in showers, basements, utility rooms, and crawlspaces alike. If the crew is careless at edges and joints, the brand of membrane matters less than people think.
Finally, too many projects ignore maintenance. Sump pumps are not tested. Dehumidifier filters are not cleaned. Gutters overflow for years. Caulk joints fail quietly. Homeowners store boxes in front of the one wall that needs to stay visible. Waterproofing systems need occasional attention. A dry house is rarely the result of a one-time installation that never gets checked again.
How to choose the right materials
Material selection should follow diagnosis, not the other way around. For below-grade walls, moisture-tolerant materials with sensible drying potential are usually the safest route. For active water entry, drainage and crack repair take priority over decorative coatings. For showers and wet rooms, use a tested waterproofing system with compatible components rather than mixing products that were not designed to work together.
When evaluating materials, look beyond the headline claim. Ask how the product handles bulk water, how vapor-open or vapor-closed it is, whether it serves as an air barrier, how it connects to adjacent layers, and whether it remains durable under real job-site conditions. A product can be excellent in one assembly and a poor choice in another. That is why simple brand loyalty is not enough in waterproofing work.
For basement wall systems, rigid foam, closed-cell spray foam, cementitious materials, mold-resistant finishes, and carefully detailed drainage components often play useful roles. For bathrooms, sheet membranes, liquid-applied membranes, sealants, and drain assemblies need to function as one system. For crawlspaces, reinforced ground covers, sealed seams, drainage mats, and sump components may be part of the package.
Compatibility matters. A good contractor checks manufacturer instructions, overlap requirements, cure times, substrate prep, and environmental limitations. Waterproofing can fail because of poor adhesion to dusty concrete just as easily as it can fail from a bad design. Craftsmanship is what turns decent materials into a reliable assembly.
What skilled craftsmanship looks like on a waterproofing job
Homeowners often ask how to tell whether a contractor really understands waterproofing. The simplest answer is that skilled people talk about causes, sequencing, and details before they talk about products. They inspect inside and outside. They ask when the problem appears and what has changed over time. They discuss drainage, humidity, insulation, and maintenance together rather than pushing one miracle solution.
On the job, craftsmanship shows up in substrate preparation, clean transitions, protected weep paths, careful fastening, proper cure times, and tested operation of pumps and drains. It also shows up in restraint. Good contractors do not bury problems behind finish materials before conditions are stable. They leave systems accessible where access is needed. They explain what the system will manage and what the owner still needs to maintain.
Communication is part of craftsmanship too. Waterproofing can involve trade coordination between excavation crews, plumbers, tile installers, framers, insulation contractors, and HVAC technicians. If one trade breaks the continuity of another trade’s water or air control layer, the whole assembly suffers. The best projects are coordinated, documented, and checked as they go.
That may not sound exciting, but it is what reliable work looks like. Waterproofing is rarely about one dramatic product. It is about dozens of careful decisions made in the right order by people who understand what water is trying to do.
A practical step-by-step plan for homeowners and remodelers
If you are planning an interior waterproofing project, the clearest path is to work through the building methodically. Start with observation and moisture history. Then reduce exterior water loads. After that, fix direct entry points and build the interior system around drainage, drying, and durable finishes. This sequence works because it follows the actual movement of water rather than chasing random symptoms.
-
Inspect the outside first. Check gutters, downspouts, grading, window wells, irrigation, and any hardscape that may slope toward the home. Correcting runoff is often the cheapest and most effective first move.
-
Identify the interior moisture source. Look for active leaks, condensation, efflorescence, plumbing failures, and signs of seasonal humidity patterns. If needed, use a qualified waterproofing or building-diagnostics professional.
-
Repair obvious defects. Seal active foundation cracks appropriately, correct plumbing leaks, and address failed joints or penetrations before closing anything up.
-
Install drainage where required. In basements and crawlspaces with recurring water entry, interior perimeter drainage and a sump system may be necessary. Include a backup plan and test it.
-
Choose insulation and vapor control carefully. Avoid assemblies that trap moisture against cold concrete. Prioritize moisture-tolerant materials and proper air sealing.
-
Select durable finishes. In below-grade spaces, use materials that can handle occasional moisture and do not feed hidden mold growth easily.
-
Control humidity. Add ventilation and dehumidification as needed, especially in summer and in rooms with regular water use.
-
Maintain the system. Test pumps, clean gutters, inspect visible walls and utility areas, and respond early if conditions change.
Waterproofing for resilience in 2025 and beyond
Current building trends are pushing waterproofing toward resilience rather than simple repair. Wetter seasons, heavier rain events, and aging housing stock mean more homes are dealing with recurring moisture stress. At the same time, more people want to finish basements safely or get more usable space from older houses. That combination makes moisture-safe retrofits increasingly important.
The better retrofit mindset is not to seal everything in plastic and hope for the best. It is to create assemblies that manage water, limit condensation, allow appropriate drying, and stay serviceable over time. That often means combining drainage improvements, sump backups, dehumidification, air sealing, and vapor-smart insulation rather than betting the whole job on a single membrane or coating.
This shift also reflects a broader understanding of indoor air quality and housing adequacy. Moisture problems are no longer seen as just cosmetic defects or maintenance annoyances. They affect comfort, durability, and health. A dry basement is not only easier to finish. It is also less likely to smell musty, less likely to harbor hidden damage, and more likely to support good living conditions over the long haul.
For contractors, this is a chance to deliver more honest, better-performing work. For homeowners, it is a reminder that quality waterproofing is worth doing properly because the payoff shows up every day in comfort, durability, and fewer expensive surprises.
Final thoughts
Interior waterproofing is best understood as disciplined moisture control. The goal is not just to block water at one visible spot. The goal is to manage bulk water, vapor, air movement, and condensation across the whole assembly so the building can stay dry and dry out safely when conditions change. That requires diagnosis, sensible materials, proper sequencing, and attention to detail.
The most reliable projects are the ones that respect simple priorities. Stop outdoor water from collecting at the structure. Repair direct entry points. Provide interior drainage when needed. Insulate and air seal in ways that do not trap moisture. Finish with materials suited to below-grade or wet-room conditions. Then maintain the system like any other important part of the house.
If there is one takeaway worth keeping, it is this: waterproofing interiors is not a shortcut trade. It rewards practical thinking and careful workmanship. When the craft is right, the result is not just a cleaner wall or a nicer bathroom. It is a building that performs better behind the surfaces people see every day.


No Comment! Be the first one.